I accidentally connected a battery Charger.

Tiny
DOA_1970
  • MEMBER
  • 1989 CHRYSLER LE BARON
  • 89,000 MILES
I accidentally connected a battery charger backwards, and now it won't start. What is the most likely thing which was damaged by my mistake? Before the mistake, when the key was on, you could hear the fuel pump getting power, but now you can't hear that.
Wednesday, March 20th, 2013 AT 2:45 AM

22 Replies

Tiny
CARADIODOC
  • MECHANIC
  • 33,742 POSTS
Start by checking for blown fuses inside the car and blown fuse link wires running around the left strut tower. Pull on those wires. If they're good they'll act like a wire. If they're blown they'll act like a rubber band. There's a bunch of them. You'll have to cut the tie straps that bind them into a bundle so you can check each one. To replace them you buy new ones according to the gauge and color. They are special wires with insulation that will not burn or melt. One new fuse link wire will be long enough to be cut into two or three pieces. The length is not important.
Was this
answer
helpful?
Yes
No
+6
Wednesday, March 20th, 2013 AT 2:53 AM
Tiny
DOA_1970
  • MEMBER
  • 12 POSTS
Thank you very much for your detailed response!
Was this
answer
helpful?
Yes
No
+2
Friday, March 22nd, 2013 AT 2:11 AM
Tiny
DOA_1970
  • MEMBER
  • 12 POSTS
A few more details. I tested the fusable links by putting metal pins through the insulation at each end of each wire, then using a volt meter to test for continuity, which seemed to indicate continuity, and that the fuse links are still in tact. Does that sound like a valid test?

Also, before the accident, when you would turn the key on, you could hear the fuel pump power up, but after the accident not.

After the accident, when you turn the key on, something makes a noise in the instrument panel, like a buzzing sound, and it won't turn off when you turn the key off and remove the key. You have to disconnect the battery to stop it.

Do you have any other ideas or suggestions?
Was this
answer
helpful?
Yes
No
Friday, March 22nd, 2013 AT 11:50 PM
Tiny
CARADIODOC
  • MECHANIC
  • 33,742 POSTS
Yup, first of all, continuity tests with an ohm meter are valid but there's a couple of problems. Most of those links are four to six inches long. If you measured on two points between the ends the break could be outside of those points. The wire can burn open in any area. It would be more accurate to put one meter probe on the positive battery cable, then probe the regular wire just beyond where it was spliced to the fuse link.

What you did was severe overkill. Mechanics would never do that because it takes way too long and they have to charge for their time. All you have to do is tug on them. You'll know it as soon as you find a bad one. It will stretch REAL easily. You also should understand that wires were used for fuses because they were expected to never burn open for the life of the car. They feed other fuses that are going to blow when something is shorted, or from reverse polarity. In my entire career in automotive, including ten at a very nice family-owned Chrysler dealership, I only ran into two blown fuse links that other guys were struggling with. One was for a shorted radiator fan motor and one involved a wire harness that was sliding back and forth each time they shifted between drive and reverse, and a wire feeding the backup light fuse rubbed through and grounded out intermittently. Instead of going straight to the fuse links, I should have directed you to start with the dead fuel pump, then work your way back to the fuses, and to check fuse links only when everything else was eliminated.

The last thing was a big source of amusement among my Electrical students. I made a really big deal on the first day of class that they were never to poke a hole in a wire to take a voltage or resistance reading. I had over a dozen school-owned donated cars that I built real-life "bugs" into for them to diagnose. They learned how to locate easily accessible test points to do their troubleshooting. If I ever found a hole poked in a wire they had to stop their learning exercise and replace that entire piece of wire. Patching was not acceptable for two reasons. First, they had to understand how serious I was that we don't damage customers' cars that way, and second, those patches inadvertently provide clues to the next pair of students who have to diagnose that bug. When you get all the problems solved you will want to use a silicone gasket sealer to seal up the holes. I use Chrysler's gray stuff a lot but there's plenty of other good ones out there.

Also, as a point of interest, GM used a bunch of aluminum wire in the '80s and had all kinds of problems. An aluminum wire clamped with a brass rivet in the fuse box is two different metals, and when you add an acid, like road salt from the driver's feet right under that fuse box, you have the same chemical reaction as in a car battery, ... Two different metals and an acid. Sometimes people would cut the insulation on a wire to test for voltage in the dead circuit. Once the problem was fixed, within a few weeks moisture would get in that hole and corrode the wire, and they'd have the same dead circuit but a different cause. The insulation on those wires was translucent and you could where an inch or two of that wire turned to powder.

Your wires are copper and less likely to corrode but they are also sitting right where rain and road salt will spray in. Seal those babies up when you're done to avoid future problems.

Now, to get down to business, there's two LeBaron models; the GTS version and the K-car version. They're totally different. The GTS has the rounded instrument cluster with the signal lever on the dash. I have a '99 service manual with both. Unless you tell me differently I'll use the K-car version with the 2.2L / 2.5L non-turbo engine. Since we know the fuel pump is dead we'll start with an easy circuit. Current comes through the automatic shutdown (ASD) relay and it feeds the ignition coil too. A test light is more accurate for this this test but a digital voltmeter can be used. They often don't respond fast enough. Connect the grounded test light to the positive terminal on the ignition coil. Turn on the ignition switch. The light should light up for one second then go off. That corresponds to you hearing the pump run for one second. If it lights up but the pump doesn't run, there is a break in the wire going to the pump or the pump motor is open. Given the recent history, neither is likely. If you do not find voltage there for one second, go back to the ASD relay and look for it on the red wire.

There's two relays on the front of the left strut tower, and two on the left inner fender. The longer rectangular one toward the front, (closest to the battery), is the ASD relay. Remove that plug and check the red wire for 12 volts. If it's there, plug it in and feel if it's clicking when a helper turns on the ignition switch. If it's not there, check on the 12 gauge black wire on the starter relay. That one is on the strut tower closest to the brake master cylinder. If you have it there but not at the ASD relay there are two fuse links to look for. You can also just crank the engine. If it cranks we know there's 12 volts on that black wire.

Holler back with what you find so I know which way to go next.
Was this
answer
helpful?
Yes
No
+5
Saturday, March 23rd, 2013 AT 2:21 AM
Tiny
DOA_1970
  • MEMBER
  • 12 POSTS
Thank you so much! You've given me alot to understand and lots of steps to try. Thank you.
Was this
answer
helpful?
Yes
No
Saturday, March 23rd, 2013 AT 4:47 AM
Tiny
DOA_1970
  • MEMBER
  • 12 POSTS
Thanks, I'm a poor do-it-yourself parts changers at best.
The car is a 2.5L non-turbo(K-car).
I did get the light on the Tester for about a second and then off. (Tester grounded and probe to + terminal of ignition coil)
On this car the longer rectangular relay is on the strut tower and there are three square relays on the inner fender. I replaced all the three relays from a salvage car. I had checked them as well by applying 12 volts to the coil and checking the relay spades for continuity(saw the relay make & break).
Additionally, at the salvage yard I had gotten the single board computer and replaced it( in case I had smoked the computer and hoping the salvage computer was good).
The car cranks so I didn't think from reading your last paragraph there was any need to further check these relays.
Sounds like your are going to suggest that I need to trace down the wiring to the fuel pump and/or check the fuel pump. Any suggestions on a smart way to do this is greatly appreciated. Dropping the fuel tank and replacing the pump wasn't a great deal of fun.

Thanks!
Was this
answer
helpful?
Yes
No
Saturday, March 30th, 2013 AT 8:54 PM
Tiny
CARADIODOC
  • MECHANIC
  • 33,742 POSTS
First a few comments. There won't be any diagnostic fault codes. Those are erased when the battery or the computer are disconnected. The computer needs 12 volts on one wire to maintain the memory.

Any time the computer's memory is lost it will have to relearn "minimum throttle" before it will know when it must be in control of idle speed. Until that occurs the engine may not start or stay running unless you hold the gas pedal down 1/4", and it will want to stall at stop signs. It also will not give you the nice idle flare-up to 1500 rpm when you start it. To meet the conditions for the relearn to take place, drive at highway speed with the engine warmed up, then coast for at least seven seconds without touching the pedals.

The fact the engine started and ran proves the fuel pump, ignition coil, injector, Engine Computer, and fuse links are all okay. At this point I suspect we're looking for a different cause of the no-start now that the computer has been replaced. If holding the gas pedal down a little doesn't help, first check that you have spark, then listen for that one-second hum of the fuel pump. If you have spark but no fuel pump, it's more likely the pump is giving up. GM pumps characteristically fail while you're driving and they let you sitting on the side of the highway. Chrysler pumps almost never quit once they're running. They fail to start up due to worn brushes in the motor. You will often get them started by banging on the bottom of the gas tank while a helper cranks the engine.

If you have spark, you know you have voltage to the fuel pump because they're both powered through the automatic shutdown relay. Since it was running, you know the wiring is okay too. The only other suspect would be a loose or stretched terminal in the fuel pump connector. That is more likely to occur after it has been recently disconnected.
Was this
answer
helpful?
Yes
No
+1
Sunday, March 31st, 2013 AT 5:15 AM
Tiny
CARADIODOC
  • MECHANIC
  • 33,742 POSTS
Forgot to add that you can verify a pump problem by spraying a little starting fluid into the throttle body.
Was this
answer
helpful?
Yes
No
+1
Sunday, March 31st, 2013 AT 5:17 AM
Tiny
DOA_1970
  • MEMBER
  • 12 POSTS
Thank you again, But I think that you may have misunderstood me. The car has NOT started since I hooked up the battery charger backwards. I am Not hearing the fuel pump come on. I had changed the fuel pump several years ago when I got the car. It is a good suggestion to try starter fluid in the throttle body to see if it wants to start.
Since the test light lite when I checked it on the positive terminal of the ignition coil but I'm not hearing the fuel pump coming on is there anything else you would suggest that I check Before dropping the fuel tank to access the fuel pump?
I don't recall if I can access the fuel pump electrical connector without lowering the tank. If I can I suppose I should check to see if I'm getting 12 vdc at the connector.

I have done a lot of ill advised things on my own and I would hate to jump in to pulling the fuel pump and find out that it was Not the problem.

Thank you very much for all your help this far.
Happy Easter
Was this
answer
helpful?
Yes
No
+1
Sunday, March 31st, 2013 AT 7:40 PM
Tiny
CARADIODOC
  • MECHANIC
  • 33,742 POSTS
Thank you, and Happy Easter to you too.

You're right. I was answering a similar problem with a '96 Caravan when I started having computer trouble. I eventually was able to save my reply to MS Word, then later I pasted it here by mistake. Sorry. Now I know why it didn't show up on that other post.

If I remember correctly there's two electrical connectors on the passenger side of the gas tank so you don't have to lower it. The dark green / black wire is for the pump and it's tied directly to the ignition coil. Since you have the voltage to the coil, that leaves the splice, the dark green / black wire, its connector terminals in the bulkhead connector, the pump and its connector terminals, and the ground wire. Start at the pump connector and see if the 12 volts is there.
Was this
answer
helpful?
Yes
No
Sunday, March 31st, 2013 AT 8:03 PM
Tiny
DOA_1970
  • MEMBER
  • 12 POSTS
I have accessed the fuel pump connector. It is fairly easy once you have the car jacked up; should have done it a long time ago. I got someone to crank the car while I measured the voltage at the fuel pump connector. I have voltage. I should have tried this a long time ago! It was somewhat unusual as the volt meter showed 8.5 to 9 volts and then 11.5. Is there anything you would suggest that I check before ASSUMING that I blew the fuel pump and need to replace it? I have NOT checked fuel pressure as there is not a fuel rail with a schrader valve, but I do not hear the fuel pump come on. I still have the old Bad fuel pump and ohm'ing it out doesn't show that it is open, but replacing it got the car running.
I've done some ill-advised things, so I'm asking if there is something that you would suggest before Assuming that the pump needs replacing?
Thanks
Was this
answer
helpful?
Yes
No
Friday, April 19th, 2013 AT 11:12 PM
Tiny
CARADIODOC
  • MECHANIC
  • 33,742 POSTS
I really don't think the pump got damaged from reverse polarity. The Engine Computer would never have turned on the relays so the pump wouldn't even have tried to run backward.

What I would like you to do next is fashion something that will allow you to remeasure that voltage right at the pump while that connector is still plugged in. OR, ... Instead of a digital voltmeter, use a test light instead. In either case I'm willing to bet you're going to find 0 volts. The clue is that the voltage you found jumped up a little, presumably after something else turned off.

Think of measuring the water pressure at the end of a garden hose that its nozzle is turned off. Suppose you had 50 pounds of pressure. Now suppose you stand on the hose so it's 99 percent blocked. You'd still have 50 pounds of pressure at the nozzle until you opened it, then you'd have no pressure. That's what happens when a fuse link wire burns open and leaves a carbon track behind. That carbon track is a major restriction to current flow but enough will get through for the meter to pick up, unless something in the circuit is trying to run. That's the equivalent to standing on the hose with an open nozzle.
Was this
answer
helpful?
Yes
No
Friday, April 19th, 2013 AT 11:42 PM
Tiny
DOA_1970
  • MEMBER
  • 12 POSTS
I have not had a chance to further check the fuel pump voltage with the connector
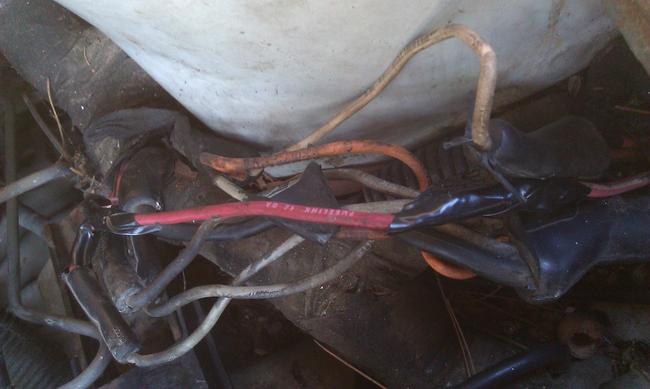
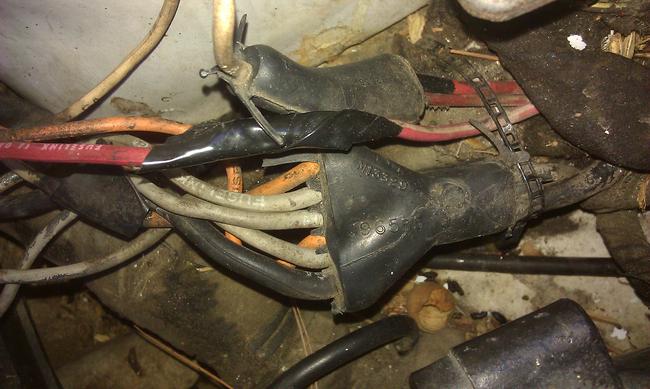
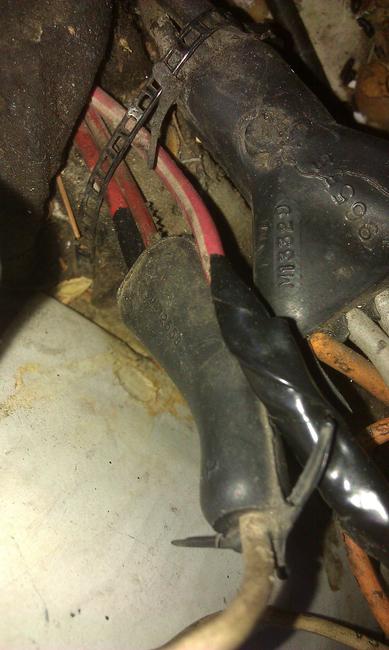
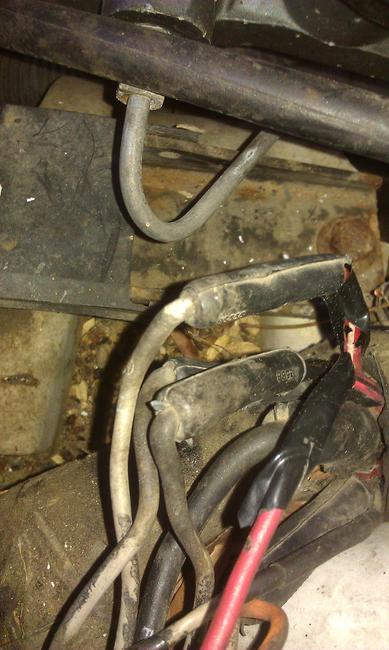
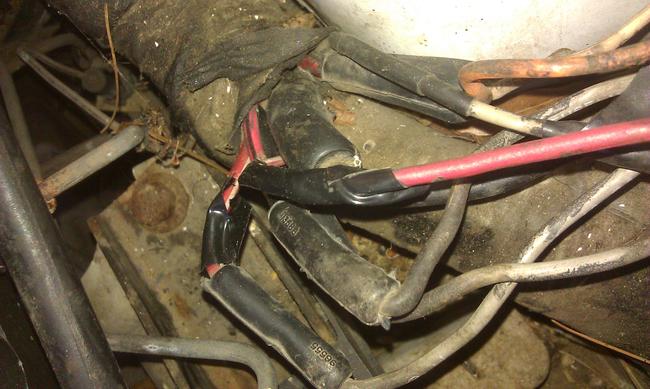
partially connected. I believe that I can use some very small wire to wrap around the pins and still get the connector on. With that said I have looked further at the fusible links and do now wonder if one or more are blown. The small gauge ones do seem 'stretchy". One thing that confuses me is that most of them factory molded to the wire, sometime up to six fusible links are molded to one or two wires. I have attached some pictures. The electrical tape is temporary to seal where I punched a pin through the wire. In the case where there are multiple links molded to a wire/or wires do I need to cut out the entire section and replace all links associated with the molded section?
Before doing anything further would you still suggest that I try to check the voltage at the pump with a test light or volt meter as you earlier suggested?
THanks
Pictures attached.
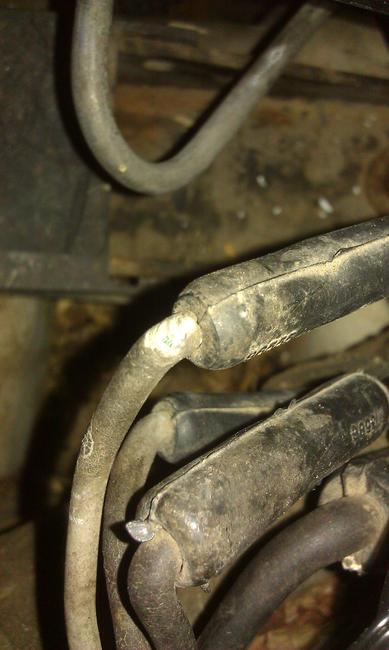
The lighter colored white/gray ones seem to be the ones that I question. There is a larger grayish one with a nick in the insulation that I ignored earlier since I got continuity through(I understand now the continuity test is not a good test).
Was this
answer
helpful?
Yes
No
Sunday, April 28th, 2013 AT 11:25 AM
Tiny
CARADIODOC
  • MECHANIC
  • 33,742 POSTS
First of all, what steps did you go through to post those dandy photos? This site went through some big changes two weeks ago, and since then I can't get my photos to show up.

When we're done and the car is fixed, get rid of the electrical tape because it will unravel into a gooey mess on a hot day. I use Silicone Gasket sealer. The Chrysler dealer's parts department has black and gray stuff that works great. The black stays more rubbery and is easier to remove later. The gray gets a little harder and will seal and bond through a light film of oil or dirt. Other brands will work too but you want one that says "silicone".

There shouldn't be any guess work with those fuse links. If one is burned open you will be able stretch it a lot. There's two ways to repair them. Chrysler has their procedure in every service manual. If you look at your third photo, you're supposed to cut away the insulation to the right of the triangular rubber splice cover right under that nylon tie strap, and attach the replacement wire there. I don't remember how you're supposed to seal it but I would use the silicone sealer again. Next, you go to the other end of the burned-out link and cut the splice off leaving you with the end of the regular wire. Strip that back a little, slide a piece of heat-shrink tubing onto the new link, splice the link to the regular wire, solder it, then seal it with that heat-shrink tubing.

The way I've done it is easier and faster, and you don't have to worry about how to seal that first connection by the tie strap. That fuse link is a good six inches long but it only burned away in one spot. The rest of it is still okay. Cut the insulation apart somewhere in the middle where it's stretching easily, then keep on removing small segments until you come to the wire on both sides. Slide the heat-shrink tubing on, scratch the wires clean, splice and solder them, then slide the tubing over the splice and warm it up. The splice will no longer be part of the weakest link in the chain, so to speak, but the rest of the fuse link wire will be there to protect the circuit.

If you replace the entire link the way Chrysler says to do you can buy new ones at any auto parts store. You typically get about 12" of wire, enough for two repairs. You buy them according to color of the insulation which corresponds to the gauge. You can buy heat-shrink tubing there too. They have some with hot-melt glue inside. Use that for any splice you're sealing under the hood or where water could sneak in. If you look at the fuse links on your car where each one is spliced to the regular wires, you'll see they used the same tubing and there will be a little blob of yellowish glop at each end. That's the glue that oozed out.
Was this
answer
helpful?
Yes
No
Sunday, April 28th, 2013 AT 2:38 PM
Tiny
DOA_1970
  • MEMBER
  • 12 POSTS
Thanks. So your way is to find good spots in the blown original fuse link on both sides and solder in the new fuse link? That would be much easier and I like the use of heat-shrink. I didn't know they made it with a sealer in it. Pictures 5 & 6 is the one that has a nick out of the insulation right at the mold where you can see the wire. I thinking that it is a coincedence and not bad. If I get the car running without messing with this one I'll seal it up as you suggested with the silicon sealer.
On the posted pictures: I posted this one time previously but the entire post never showed up. The second time it worked. There is a "Add Image" button just above the "Reply to Question" button. Pressing the "Add Image" brought up a Browse button that allowed me to go to the folder and select the individual picture file. I had to do that procedure for each picture posted.

Feel much more confortable now messing with these links based on your explanation. Although I'm wondering if the small 22 gauge wire is pretty fragile when stripping back the insulation. I'm thinking that one of the suspect link is a 22AWG link. Do you need to use about 6" of new fuse link, even if you don't need that length to fill the gap?
Was this
answer
helpful?
Yes
No
+1
Sunday, April 28th, 2013 AT 3:45 PM
Tiny
CARADIODOC
  • MECHANIC
  • 33,742 POSTS
You don't have to buy or add in any new fuse link wire. Just connect the two burned ends together, solder them, and seal them. You only have to add wire if the ends aren't long enough to reach to each other, and you can add a piece of regular wire but it has to be larger. All that has to be in there is a 1/4" of the fuse link wire to be the weak link in the chain. They used longer pieces to give you something to tug on to test them.

There's two important characteristics of those fuse link wires. The first one is that they are a smaller gauge than the wires they protect. That way the fuse wire will burn open before the regular wires have a chance to get hot. The second thing is the insulation on the fuse wires will not burn or melt. You can protect the rest of the wiring by splicing in a regular wire of the specified fuse link gauge but that would create a fire hazard. The wire would still burn open quickly if a dead short appeared in that circuit but if there was just an overload, that wire might get red hot long before it melted open. That could cause the insulation to start burning.
Was this
answer
helpful?
Yes
No
Sunday, April 28th, 2013 AT 4:49 PM
Tiny
DOA_1970
  • MEMBER
  • 12 POSTS
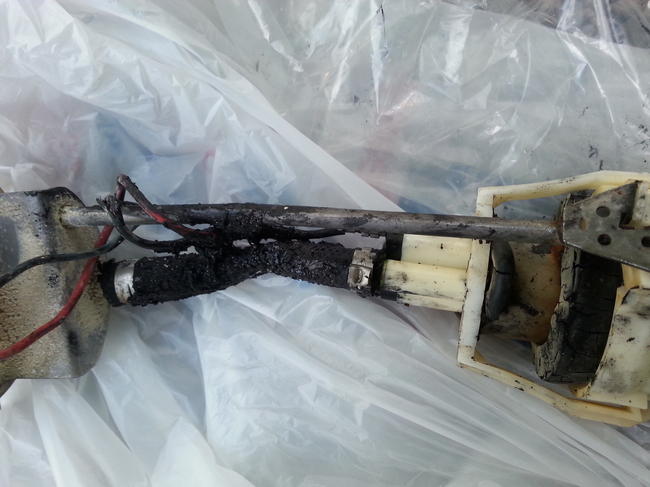
It turns out that I did really smoke the fuel pump, badly. I have attached pictures.
So some how hooking up a battery charger backwards and trying to start the car did do bad electrical damage to the fuel pump. New pump installed and the car started right up. But now my A/C is not coming on and I don't believe the radiator fan is working either. I believe that I've let it warm up enough for the radiator/cooling fan to be signaled to come on. Any suggestions on how to diagnose these two problems. The book that I have does not specifically show a chassis electrical schematic for this AJ type body('89 Lebaron Convertible, 2.5L non-turbo). I can't feel or hear the AC clutch relay click on or off when I have someone turn on and off the AC button.
Just to recap. Early on in playing with this I replaced the single board computer with a salvaged one from a junk yard and also changed the ASD relay and the AC Clutch relay and Radiator Fan relay.
Thanks!
Was this
answer
helpful?
Yes
No
Tuesday, May 28th, 2013 AT 8:21 AM
Tiny
CARADIODOC
  • MECHANIC
  • 33,742 POSTS
The place to start is by disconnecting the two-wire coolant temperature sensor while the ignition switch is on. That will set a diagnostic fault code and turn the Check Engine light on, but it should also turn on the radiator fan. If you hear the radiator fan relay click but the fan doesn't run, the problem is in the high-current circuit that the relay switches on and off. That includes another fuse link and the fan motor itself. If you can identify the relay by feeling it click, check the two larger diameter wires for voltage.

I'm dumbfounded at the sight of those fuel pump wires. That took a lot longer to occur than what would normally happen during short bursts of cranking the engine. I don't have a good answer.
Was this
answer
helpful?
Yes
No
Tuesday, May 28th, 2013 AT 10:23 AM
Tiny
DOA_1970
  • MEMBER
  • 12 POSTS
Yes, I guess that I'm lucky! It is pretty shocking.
I'll see if I can check out the coolant temperature sensor & radiator fan tonight.
I'm probably getting ahead of myself, but you don't happen to know if there is a common feed between the radiator fan and the AC clutch, do you?
THanks!
Was this
answer
helpful?
Yes
No
Wednesday, May 29th, 2013 AT 8:22 AM
Tiny
CARADIODOC
  • MECHANIC
  • 33,742 POSTS
Actually they are both fed from the same fuse link wire. Both relays have a 14 gauge gray wire that will have 12 volts all the time. The fuse link wire is a 20 gauge orange one and is one of seven spliced together.

If I didn't mention this before, if you find 12 volts at the relays with a digital voltmeter, test it again with a test light. In this case the test light is more accurate. If you have voltage with the meter but not with the test light the link is burned open but the carbon track left behind is conducting enough for the meter to pick it up.
Was this
answer
helpful?
Yes
No
-1
Wednesday, May 29th, 2013 AT 9:15 AM

Please login or register to post a reply.

Sponsored links