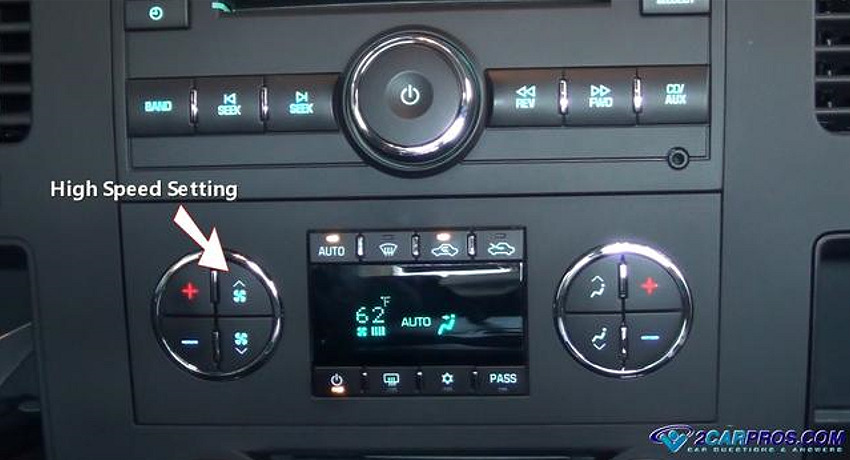
Does your blower fan work on the high speed setting only? This problem is a classic blower motor resistor problem which is common on vehicles that use manual fan speed switch controls. Most people don't know that the high speed blower motor fan speed setting and the medium and low speed settings are two separate electrical circuits. So when the highest fan speed is working it mean the medium and lower speeds are not working, this is because these alternative settings are electrically routed through a blower motor resistor or a blower motor control module. This resistor provides different resistance levels for the various fan speeds, whereas the control module uses electronic controls.
Also see: Replacing a HVAC blower fan motor
The HVAC blower motor circuit typically consists of the following components:
- Blower Motor
- Blower Motor Resistor
- HVAC Control Module
- Relay (if applicable)
- Fuse
When the blower fan is switched onto high speed the circuit is a straight connection from positive to negative battery power, but when the motor is switched onto the lower speeds electrical power is routed through a series of resistors or a solid state speed controller assembly that drops the voltage down to 6 volts, 8 volts and then 10 volts (low, medium low, medium) which in turn makes the blower motor turn slower.
When these parts burn out due to age, or the blower motor, which is pulling excessive amperage due to the blower motors age which will cause the resistor or a solid state speed controller to burn out.
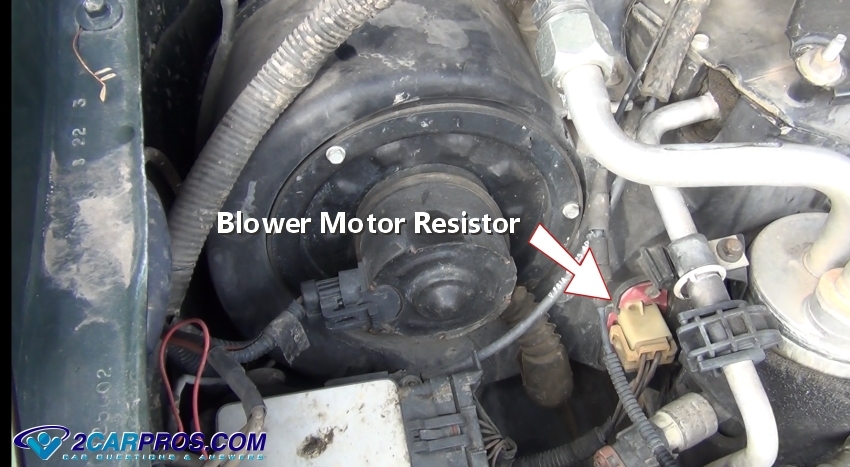
The location of this resistor or speed controller will be inside the air ducting near the blower motor itself which then cools the unit during its operation. Both of these parts are located in the heater plenum box either inside the vehicle on the passenger side, or under the hood mounted near the firewall on the passenger side.
Lets Get Started
1. To start testing turn the ignition key to the on position, (do not start the engine) then test the heater system fuse and replace it if needed. Some vehicles utilize a separate fuse to control lower fan speeds in the fuse box check it as well, use a grounded test light and locate the outgoing wire (usually orange or red) to the blower motor from the resistor. Move the fan speed selector switch to each fan speed and test for power. If there is no power on any of the lower speeds the resistor has failed and needs replacement.
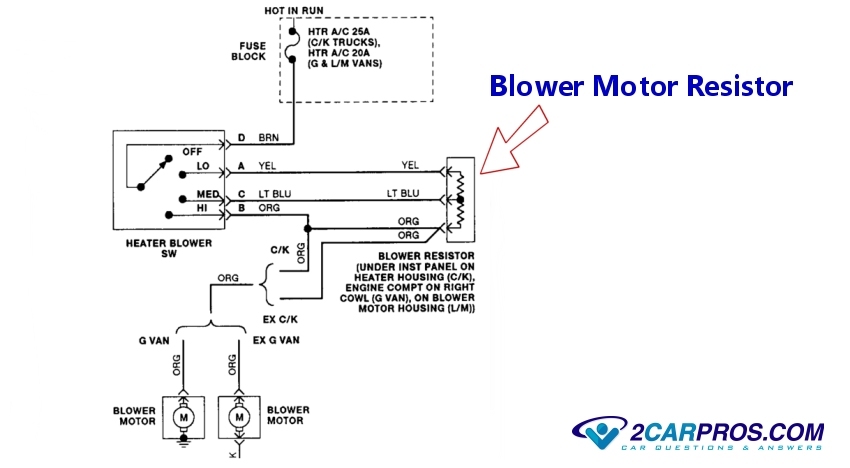
Below is a typical wiring diagram for the blower motor circuit which is basically the same for all vehicles utilizing this system.
2. Remove the fan resistor and inspect it for burn marks which is an indication of failure. If an area shows signs of extreme heat (burned) it needs to be replaced with a the new resistor matches the specifications of your vehicle. Also, inspect the resistor connector for heat damage at the terminals and replace or repair it as needed by splicing in a new connector. Anytime you replace this unit its a good idea to replace the blower motor as well to prevent premature failure due to high amperage draw.
3. A blower fan speed control module can go bad without physical signs of damage such as burn marks like a typical speed resistor, but if all fuses are good and the high speed fan setting works nine times out of 10 the problem will be the blower fan speed control module.
4. Inspect the electrical connections at the resistor or speed control module to make sure they are free from rust and corrosion which can hinder blower fan motor performance.
5. Once repairs have been made, turn the HVAC system on and cycle the fan speed switch throughout all setting to ensure the blower motor is operating correctly.
If you have any questions about what you have just read please visit our mechanics who have supplied hundreds of answers about blower motor resistors.
Credits
This guide knowledge base was created by the 2CarPros Team, and by Ken Lavacot: Automobile repair shop owner and certified master automobile technician of over 30 years. If you have question or need help please ask one of our experts we are happy to help. Please visit our 2CarPros YouTube Channel.