See photo: are the rear drum brake springs in the correct positions?

Tiny
PCMENTOR29
  • MEMBER
  • 1985 TOYOTA PICKUP
  • 75,000 MILES
This is from a 1985 Toyota Motorhome. My rear brake shoes went down to metal after less than 5000 miles. I am wonderning if they were put on incorrectly. I am doing this myself. In the picture I included you can see the lower spring is touching the self adjuster wheel. This doesn't seem right. Can you please send me a diagram or picture of a correctly done job? With the springs and parts in the right place? The Haynes and Chilton only show for half-ton and these are a 1 ton full floating axle which replaced the original axle on this motorhome. These axles were sent by Toyota to National RV who made this motorhome. Thanks
Tuesday, May 7th, 2013 AT 10:49 PM

27 Replies

Tiny
CARADIODOC
  • MECHANIC
  • 33,752 POSTS
This is a common Chrysler brake and I see two things that are noteworthy. First of all, you're right about that lower spring. It is supposed to be in the largest hole on the right side; one hole higher. Chrysler is famous for making parts that interchange and / or have multiple uses. In this case that hole the spring is in now would be used to pound in the pin for the adjuster lever when new linings are bonded on and that frame is used for a rear shoe.

This should be the right rear brake. The lining on the right which should be the front of the vehicle should be the shorter lining, and the left one, what's left of it, should be longer.

The second thing is the parking brake lever hanging down behind and from the left shoe. That lever is supposed to be all the way back. That lever is held forward like it is in your photo when the cable gets rusted tight in the applied position. There's two things to verify that is what caused the linings to wear so quickly. First look at where the two shoes contact the large anchor pin on top. If either one is being held away from that pin the front shoe will grab too easily and commonly cause easy rear wheel lockup under light braking.

The next thing to look at is the parking brake strut bar running right under the wheel cylinder. With your thumb you should be able to push that bar forward a good 1/8" against the pressure of the anti-rattle spring on the right. You'll find your bar is tight between the two shoes because the parking brake lever is being held forward. That lever should be pried rearward to create the 1/8" play in the strut bar.

It's a little hard to see for sure but it looks like the front shoe is being held away from that top anchor pin. Also, look at that Chevy bow tie-looking metal bar on the anchor between the two shoes and the two return springs. It looks like the hole is not centered on the anchor and it's too far away from the shoes. That needs to be lifted up so it snaps closer to the shoes. That will let the return springs seat fully and it will prevent the shoes from moving 1/8" away from the backing plate and chattering when they don't hit the drum squarely.
Was this
answer
helpful?
Yes
No
+2
Tuesday, May 7th, 2013 AT 11:58 PM
Tiny
PCMENTOR29
  • MEMBER
  • 177 POSTS
Thanks for your expert reply. I am going to work on it in a couple days. I will post what I find. I printed out your reply and will check each thing you suggested. You are right, it's the passenger side rear wheel in the picture. Thanks
Was this
answer
helpful?
Yes
No
+1
Wednesday, May 8th, 2013 AT 12:58 AM
Tiny
PCMENTOR29
  • MEMBER
  • 177 POSTS
Hi, I am waiting for the new brake drums to get here. I had more questions though about the springs. Please see the attached photo. Can you tell me what the small, long spring is that anchors to the backing plate and the rear shoe? Should it be in another place? What is it for? Thanks
Was this
answer
helpful?
Yes
No
Wednesday, May 8th, 2013 AT 9:36 AM
Tiny
PCMENTOR29
  • MEMBER
  • 177 POSTS
Here's a closeup crop of the two spring hooks.
Was this
answer
helpful?
Yes
No
Wednesday, May 8th, 2013 AT 9:48 AM
Tiny
PCMENTOR29
  • MEMBER
  • 177 POSTS
What I have learned is this is a duoservo type brake and has a backup adjuster vs the parking brake activated. Am I right here? From the Toyota EPC diagram(Village Toyo site) that extra spring seems to be just an extra secondary shoe tightener attached to the backing plate. It may work with the movement to allow the adjuster to function. Can you input on this? Thanks
Was this
answer
helpful?
Yes
No
Wednesday, May 8th, 2013 AT 9:50 PM
Tiny
CARADIODOC
  • MECHANIC
  • 33,752 POSTS
Sorry for taking so long. Went to a friend's body shop to help with two smashed vehicles. He specializes in rebuilding one and two-year-old Chrysler products.

That spring of which you speak is not standard Chrysler issue and I don't have an answer. That tab is spot welded to the backing plate which suggests it was a Toyota modification with a specific purpose, but my only guess is it was to prevent a moan or chatter. It's going to pull both shoes forward. Logic would say that is going to make the front shoe rub on the drum, but I'm sure the engineers had something in mind.

I'll keep looking for a better answer.
Was this
answer
helpful?
Yes
No
Wednesday, May 8th, 2013 AT 10:11 PM
Tiny
CARADIODOC
  • MECHANIC
  • 33,752 POSTS
Yup, it's a duo servo brake. The front piston pushes the top of the front shoe into the drum which rotates and pushes the bottom of the rear shoe into the drum through the adjuster. The rear piston pushes the top of the rear shoe into the drum. Those two forces acting on the rear shoe makes it a duo servo brake. That's also why the rear lining is longer. It does the stopping.

The shoes do adjust when backing up. Very few designs use the parking brake to adjust drum brakes. When backing up the two shoes switch jobs. The rear shoe gets pushed out on top and the cable guide pulls on the adjuster cable to raise the lever. I can't see any way for that extra spring to affect the adjuster mechanism.
Was this
answer
helpful?
Yes
No
Wednesday, May 8th, 2013 AT 10:37 PM
Tiny
PCMENTOR29
  • MEMBER
  • 177 POSTS
I have looked through my 6 general autoshop texts, 3-4 brake manuals, and an old(90-96) Chilton general truck manual. I have searched hundreds of images on Google, I have the Factory manual(paper and online, also the 1993 edition which should have the 1 ton axle brake in but doesn't) for this truck and 2 haynes and one Chilton specific for this truck. I searched through Autoshop 101 site too. No where have I seen the spot welded spring holder and spring we are wondering is used for. I will put it where it is when I do the job unless I get the needed info. Thanks for your help.
Was this
answer
helpful?
Yes
No
Thursday, May 9th, 2013 AT 3:45 AM
Tiny
PCMENTOR29
  • MEMBER
  • 177 POSTS
Caradiodoc, I have the brakes off and am trying to see if there's a problem with the Emergency brake sticking. I measured the cable that goes into the drum brake housing. When emergency brake handle fully pulled up the cable/spring measures 70 mm. Fully let out it measures 94 mm. Which is about 1 inch travel. Is this enough travel? Or should I adjust the splitter under the truck? I was worried the shoes wore out because the emergency brake was not releasing. Could it have been caused by something else? Do wheel cylinders stick when they go bad? Thanks for your help.
Was this
answer
helpful?
Yes
No
Friday, May 17th, 2013 AT 11:45 AM
Tiny
CARADIODOC
  • MECHANIC
  • 33,752 POSTS
I never measured how far the cables move so I can't tell you what's normal. There's normally two things to look at. First of all those two levers hanging down behind the rear shoes must go all the way back into the shoes. The tops of the shoes must rest against the top anchor pin and there must be free play in the strut bar between the shoes. Apply and release the parking brake, then verify those three things to tell if they both fully released.

Next, with the drums on, the parking brake should get tight when you move the pedal or lever no more than half way. That will allow for some cable stretch to take place.

If those two things are correct the cables are not sticking and they're fully releasing.
Was this
answer
helpful?
Yes
No
Friday, May 17th, 2013 AT 10:35 PM
Tiny
PCMENTOR29
  • MEMBER
  • 177 POSTS
Thanks
Was this
answer
helpful?
Yes
No
Saturday, May 18th, 2013 AT 12:42 PM
Tiny
PCMENTOR29
  • MEMBER
  • 177 POSTS
Hi, I need to run the motor and drive the rear wheels while on jack stands(the motor home is hard to lift) Is this an ok way to let the adjuster work while the wheels are going in reverse? I was wondering if when on stands one wheel will turn one way and the other the other way. I can put in drive for one side and reverse on the other side to step on the brake and let the adjuster function. I want to do this so I can then (with motor off) turn each wheel and see if the brakes are dragging. I would have to lift the MH again otherwise which is hard to do. What is your take on this? Would the adjusters work right when jacked up? Thanks
Was this
answer
helpful?
Yes
No
Monday, May 20th, 2013 AT 1:09 PM
Tiny
PCMENTOR29
  • MEMBER
  • 177 POSTS
If I go forward and back about 1 car length a couple times in my backyard is this enough distance to auto adjust the brakes? When rear drum brakes auto adjust do they only tighten or can the adjuster loosen brakes that are to tight? I am a real novice at adjusting them manually, this is why these questions may seem silly. Thanks
Was this
answer
helpful?
Yes
No
Monday, May 20th, 2013 AT 9:50 PM
Tiny
CARADIODOC
  • MECHANIC
  • 33,752 POSTS
Sorry to ignore you for so long. Been out of town helping a friend rebuild some smashed cars at his body shop.

Both wheels will turn backward when jacked up when you run it in gear. Typically one with more friction won't turn unless you stop the other one from turning. That should be enough to cause the adjusters to work. You don't have to shift between forward and reverse. Each time you apply the brake and the drum is turning backward the spring-loaded adjuster will take one bite on the star wheel adjuster. The adjuster cable and lever won't move at all going forward. If they did the brakes would always "unadjust".

The best luck I had was to adjust the shoes by hand until I could just slip the drum on and turn it. Even when there's a little resistance or drag, new shoes have a different arc than the drum surface so they only make contact right in the middle of the linings. That will wear down very quickly, and then the self-adjusters will take over. If you leave them a little loose, you'll barely feel that in the brake pedal.
Was this
answer
helpful?
Yes
No
Wednesday, May 22nd, 2013 AT 12:12 PM
Tiny
PCMENTOR29
  • MEMBER
  • 177 POSTS
I just received my Brake Resetting Gauge. It's black and has a scale on it to measure the drum inside and then on the opposite side be the right size for the shoes. Also I was planning to press the brake pedal when the drums are off to make sure the shoes go back in resting position after I release the pedal and the brakes are together. Is this a bad idea? Thanks
Was this
answer
helpful?
Yes
No
Wednesday, May 22nd, 2013 AT 5:30 PM
Tiny
CARADIODOC
  • MECHANIC
  • 33,752 POSTS
You're seriously over-thinking this. I never had good luck with those gauges. They got me close but I still ended up just feeling the looseness, then pulling the drum off and turning the adjuster a little, then trying it again until it was snug with just a little drag.

Be careful with the drums off because you can blow the pistons out of the wheel cylinders. In normal operation the shoes and pistons only move about 1/8" or less. Even if you watch them move out, I wouldn't be real concerned if they didn't move back on their own. They will from the normal vibration of driving. If there's evidence of the brakes having been hot numerous times, or for good practice, we like to replace the springs due to them getting weak from heat, rust, and age. The return springs come in a kit with all the other springs and clips and the cost is very low. In a few cases you will get extra springs. Some are a mirror image and you use the two of the three that match what's on the vehicle now. Sometimes there will be two complete sets of return springs or you may get six instead of the four you need. You have to go by length and / or color. The paint color denotes the tension. Chrysler springs of that era were usually yellow but there were some purple ones too.
Was this
answer
helpful?
Yes
No
Thursday, May 23rd, 2013 AT 1:14 AM
Tiny
PCMENTOR29
  • MEMBER
  • 177 POSTS
Thanks, I won't step on the pedal with the drums off. Do you think the spring that was holding the adjuster star from moviving completely was the cause of the shoe to wear out too soon? I see you say just a little drag is correct. Is this with the wheel off? I have been told to turn the tire and let go it's supposed to do 3/4 turn when correct. This is sketchy because everyone has different strength and it would not turn the same each time. Do you have a technique for this test? Thanks for you great replies.
Was this
answer
helpful?
Yes
No
Thursday, May 23rd, 2013 AT 2:22 PM
Tiny
PCMENTOR29
  • MEMBER
  • 177 POSTS
I donated $10 just now. I hope you can buy a pizza for all the help you are giving me. Pete
Was this
answer
helpful?
Yes
No
Thursday, May 23rd, 2013 AT 2:28 PM
Tiny
CARADIODOC
  • MECHANIC
  • 33,752 POSTS
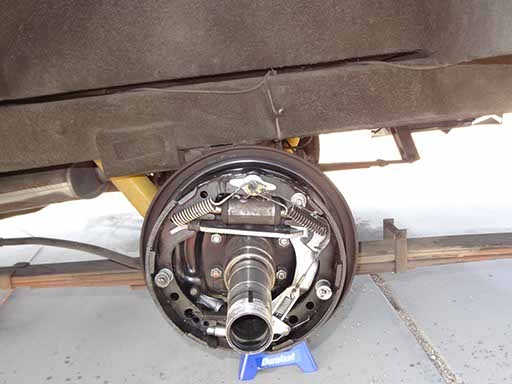
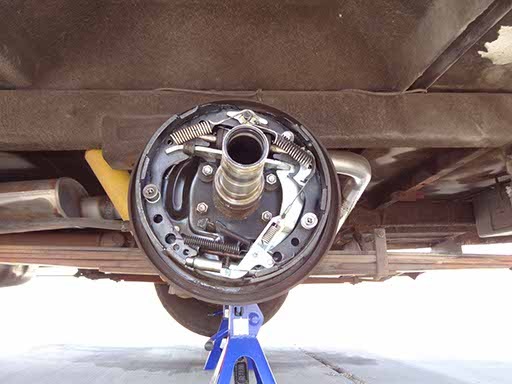
Basically I shove the drum on and turn it by hand. If there's little or no drag I pull it off and turn the star wheel about a half turn then try again. I also push in on the drum to hold it tightly against the axle flange. That holds it straight to the shoes. If you let the drum flop around loose it can sit cocked and it will drag giving the impression the shoes are adjusted up too much. Push in, hold it tight with both hands, turn it left and right a couple of inches, and feel if there's any drag. Keep running the star wheel up until you can't get the drum on or it's really tight. At that point back the star wheel off about a half turn and you'll be good to go.

Installing the wheel will also hold the drum straight. To look at it another way, once you think it's adjusted right and you install the wheel, you may find now it's still too loose, then you can adjust it up a little more with a "brake spoon" through the access hole in the backing plate.

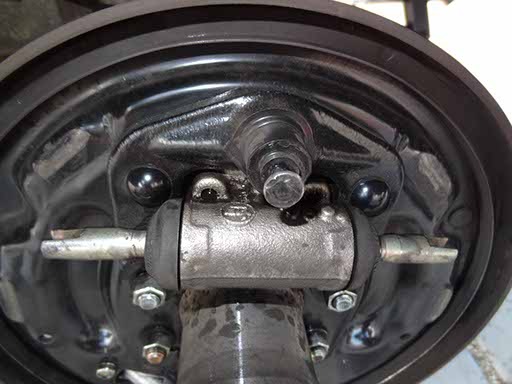
As I recall you found the parking brake cables were rusted or over-adjusted. Anything that removes the free play in the strut bar between the two shoes will lead to accelerated lining wear.

If you don't have the shoes adjusted up enough you will have a low brake pedal. If you have them adjusted up too much but you can still force the drum on the linings will wear down quickly until it's time for them to start self-adjusting. The linings are ground to match the diameter of a new drum. In most applications a drum can be machined as much as.060" and still be legal, but that means it has a larger diameter friction surface. The linings will only make contact in the center, (halfway between the top and bottom). Braking power will be reduced until that section wears down and more of the lining makes contact. That's why we tell you to take it easy on your new brakes for the first 100 miles. By "take it easy" I don't mean to barely use the brakes. I mean use them normally with a few hard applications now and then but to not EXPECT too much from them right away. You probably won't be able to lock those brakes up for 100 miles or so. You may notice you have to push on the brake pedal harder than normal but that will improve as more and more of the linings start to make contact with the drums.

Thank you for the donation. You're truly a wonderful human being!

I should mention too that even if you over-adjust the shoes and manage to force the drum on, you'll only wear down less than 1/16" of lining right in the center. That's why I said you're over-thinking the adjustment issue. Be sure the star wheel adjusters are free and the threads can be lightly lubricated, and be sure the shoes are against the large anchor pin on top and there's free play in the strut bar.

The only other thing that can cause rapid wear is if a rubber flex hose is constricted preventing the brake fluid from releasing back to the reservoir or the brake fluid is contaminated with a petroleum product. That will cause rubber parts to swell; in particular the rubber lip seals in the master cylinder. They will grow past the return ports and trap pressurized brake fluid preventing the brakes from releasing. I doubt you have contaminated brake fluid because you'd have dragging and overheated front brakes first. You can tell if any brake is dragging by observing what happens on a slight incline or what happens at a stop light with an automatic transmission. When you release the brakes the truck should creep ahead on its own. If it doesn't, or if it won't creep downhill on an incline when you are in neutral, a brake is dragging. Even an over-adjusted drum brake won't hold the truck from creeping. A non-releasing brake will get hot too so you'll be able to identify which wheel has the problem.
Was this
answer
helpful?
Yes
No
Thursday, May 23rd, 2013 AT 10:51 PM
Tiny
PCMENTOR29
  • MEMBER
  • 177 POSTS
Hi I had a local mechanic put the passenger side brakes back together today at my house. $60. But it was like a puzzle. I took a picture of the barkes when he was done. Can you see any problems with it? What do you think a fair price for the otherside would be? Thanks
Was this
answer
helpful?
Yes
No
+1
Tuesday, June 4th, 2013 AT 8:37 PM

Please login or register to post a reply.

Sponsored links