Welcome to 2CarPros.
If the engine cranks but doesn't start, the battery seems fine. Chances are either fuel pressure or ignition spark was lost. So, that has to be checked first. The easiest thing to do is see if the engine starts for a couple seconds using starting fluid. If it does, then the problem is fuel related. If it still doesn't start at all, then it is most likely ignition related.
Here are a few links you may find helpful:
https://www.2carpros.com/articles/car-cranks-but-wont-start
https://www.2carpros.com/articles/how-to-check-fuel-system-pressure-and-regulator
https://www.2carpros.com/articles/how-to-test-an-ignition-system
Here are a couple links to help with testing for ignition spark:
https://www.2carpros.com/articles/how-to-use-a-test-light-circuit-tester
https://www.2carpros.com/articles/how-to-use-a-voltmeter
https://www.2carpros.com/articles/how-to-check-wiring
____________________________________
Here are the directions for testing fuel pressure specific to your vehicle, but they do require a scanner. The attached pics correlate with the directions.
ON-VEHICLE INSPECTION
1. CHECK FUEL PUMP OPERATION AND FOR FUEL LEAKS
pic 1
a. Connect the intelligent tester to the DLC3.
1. Turn the engine switch on (IG).
NOTE: Do not start the engine.
2. Push the intelligent tester main switch ON.
3. Select the following menus: DIAGNOSIS / ENHANCED OBD II / ACTIVE TEST / FUEL PUMP/SPD.
b. Check the fuel pump operation.
1. Check for pressure in the fuel inlet tube from the fuel line. Check that the sound of fuel flowing in the fuel tank can be heard.
If there is no sound, check the integration relay, fuel pump, ECM and wiring connector.
c. Check for fuel leaks.
1. Check that there are no fuel leaks after performing maintenance anywhere on the system.
If there is a fuel leak, repair or replace parts as necessary.
2. CHECK FUEL PRESSURE (LOW PRESSURE SIDE)
a. Check that the battery positive voltage is above 12 V.
b. Discharge the fuel system pressure.
c. Disconnect the cable from the negative (-) battery terminal.
CAUTION: Wait at least 90 seconds after disconnecting the cable from the negative (-) battery terminal to prevent airbag and seat belt pretensioner activation.
d. Pinch and pull the fuel pump main tube.
CAUTION:
- Always read the precautions before disconnecting the fuel tube connector (quick type).
- The fuel tube may spray fuel as a result of pressure that remains in the tube. Do not allow fuel to be sprayed in the engine compartment.
pic 2
e. Install SST (pressure gauge) as shown in the illustration.
SST 09268-41048 (90467-13001, 95336-08070, 09268-41500), 09268-45014 (09268-41200, 09268-41220, 09268-41250)
f. Wipe off any gasoline.
g. Reconnect the cable to the negative (-) battery terminal.
h. Operate the fuel pump.
1. Connect the intelligent tester to the DLC3.
2. Turn the engine switch on (IG).
NOTE: Do not start the engine.
3. Push the intelligent tester main switch ON.
4. Select the following menus: DIAGNOSIS / ENHANCED OBD II / ACTIVE TEST / FUEL PUMP/SPD.
i. Measure the fuel pressure.
Fuel pressure:
196 to 588 kPa (2 to 6 kgf/sq.cm, 28 to 85 psi)
HINT:
- If the fuel pressure is higher than the specification, replace the fuel pump (built-in fuel tank).
- If the pressure is lower than the specification, check the fuel hoses and connections, and fuel pump (built-in fuel tank).
j. Start the engine.
k. Measure the fuel pressure at idle.
Fuel pressure:
196 to 588 kPa (2 to 6 kgf/sq.cm, 28 to 85 psi)
If the pressure is not as specified, check the fuel pump and injectors.
l. Stop the engine.
m. Check that the fuel pressure remains as specified for 5 minutes after the engine has stopped.
Fuel pressure:
147 kPa (1.5 kgf/sq.cm, 21 psi) or more
If the pressure is not as specified, check the fuel pump or injectors.
n. After checking the fuel pressure, disconnect the cable from the negative (-) battery terminal and carefully remove SST and the fuel tube connector to prevent fuel from spilling.
o. Reconnect the fuel pump main tube.
p. Check for fuel leaks.
3. CHECK FUEL PRESSURE (HIGH PRESSURE SIDE)
pic 3
a. Connect the intelligent tester to the DLC3.
1. Turn the engine switch on (IG).
2. Push the intelligent tester main switch ON.
b. Start and warm up the engine.
c. Run the engine at idle.
d. Select the following menus: DIAGNOSIS / ENHANCED OBD II / DATA LIST / FUEL PRESS.
e. Check the high pressure side fuel pressure.
Fuel pressure:
3.5 to 4.5 MPa (35.7 to 45.9 kgf/sq.cm, 508 to 653 psi)
If the pressure is not as specified, check the fuel pump, high pressure side fuel pump, fuel pressure sensor and wirings.
f. Stop the engine.
4. PERFORM INITIALIZATION
a. Perform initialization.
NOTE: Certain systems need to be initialized after disconnecting and reconnecting the cable from the negative (-) battery terminal.
____________________________________
If you determine the fuel pump is bad, here are the directions for replacement.
___________________________________
REMOVAL AND REPLACEMENT
REMOVAL
1. DISCHARGE FUEL SYSTEM PRESSURE
2. DISCONNECT CABLE FROM NEGATIVE BATTERY TERMINAL
3. REMOVE REAR SEAT CUSHION ASSEMBLY
4. REMOVE NO. 3 ROOM PARTITION PAD
5. REMOVE REAR NO. 2 FLOOR SERVICE HOLE COVER
6. REMOVE FUEL SUCTION WITH PUMP AND GAUGE ASSEMBLY
DISASSEMBLY
1. REMOVE FUEL SENDER GAUGE ASSEMBLY
pic 4
a. Disconnect the fuel sender gauge connector.
b. Press down on the sender gauge claw labeled A.
Then slide the sender gauge upward.
2. REMOVE SUB TANK SUB-ASSEMBLY
pic 5
a. Using a screwdriver, detach the 4 claws from the claw holes and remove the sub-tank.
HINT: Tape the screwdriver tip before use.
3. REMOVE FUEL PUMP ASSEMBLY
a. Disconnect the fuel pump connector.
pic 6
b. Detach the 2 claws from the claw holes and remove the fuel pump.
c. Remove the fuel pump filter seal from the fuel pump.
d. Remove the fuel pump spacer from the fuel pump.
4. REMOVE FUEL RELIEF VALVE ASSEMBLY
pic 7
a. Disconnect the fuel pump connector from the fuel filter.
pic 8
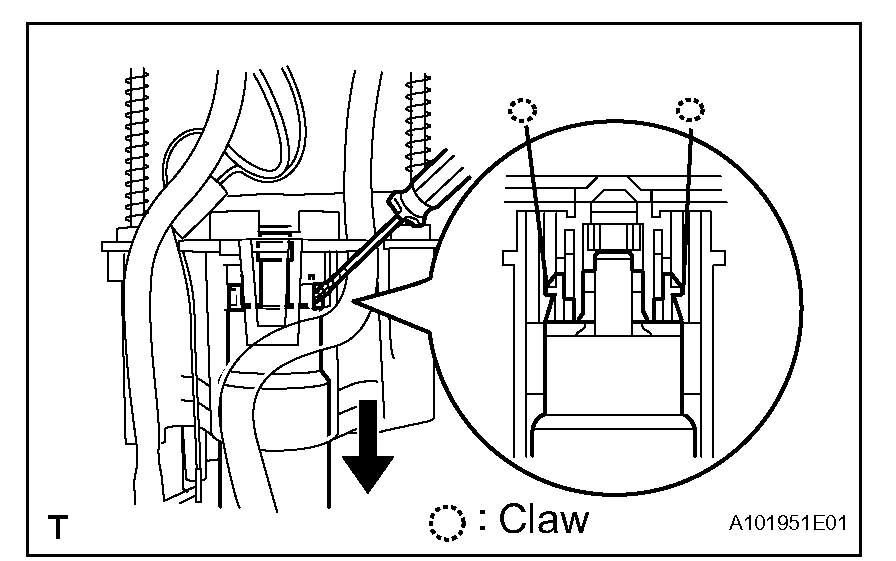
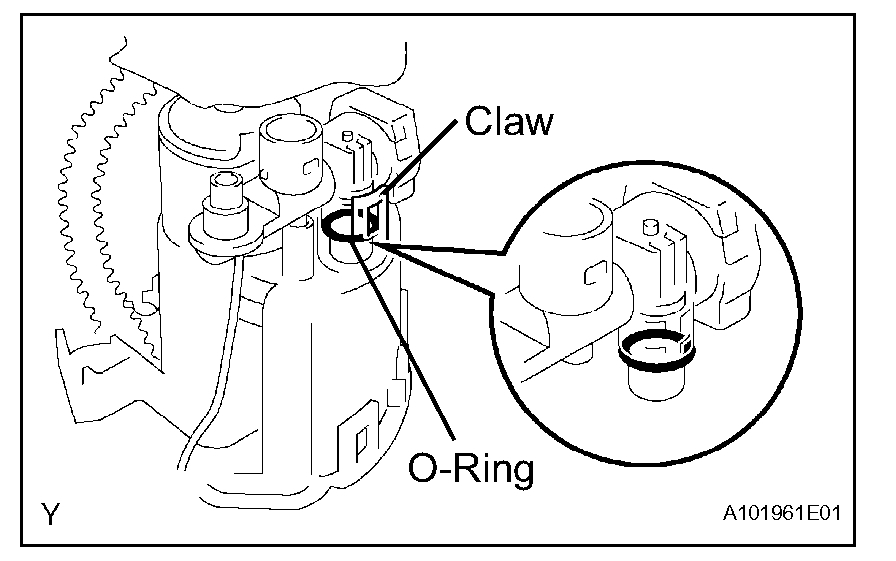
b. Using a screwdriver, detach the claw and remove the relief valve.
5. REMOVE FUEL PRESSURE REGULATOR ASSEMBLY
pic 9
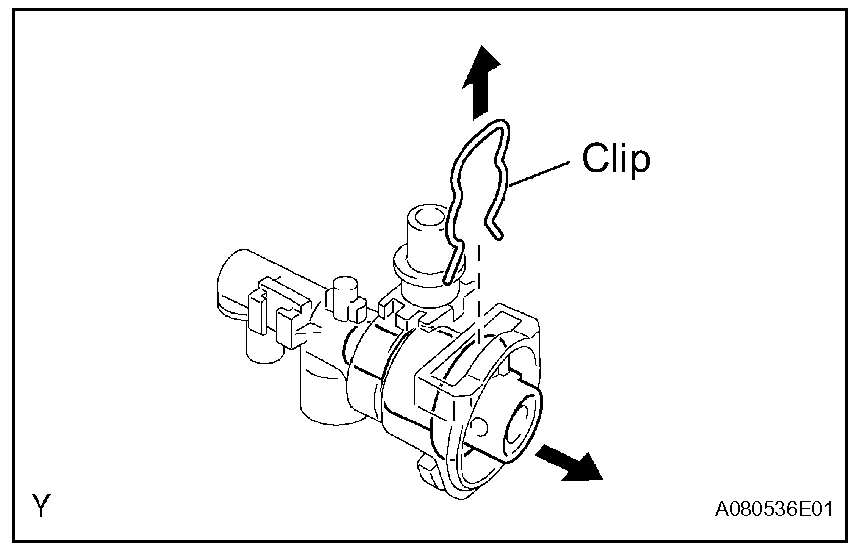
a. Remove the clip and fuel pressure regulator from the relief valve.
pic 10
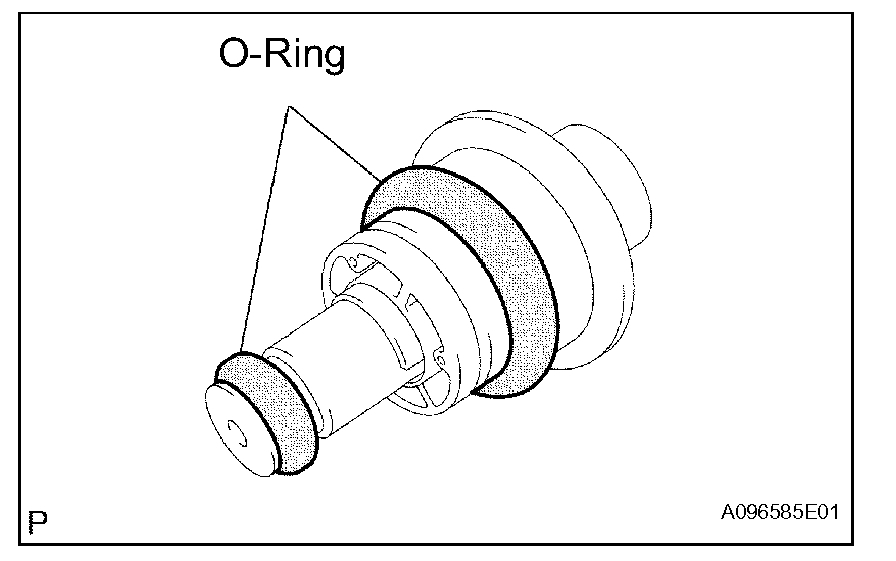
b. Remove the 2 O-rings from the fuel pressure regulator.
REASSEMBLY
1. INSTALL FUEL PRESSURE REGULATOR ASSEMBLY
pic 11
a. Apply a light coat of gasoline to 2 new O-rings, and install it to the fuel pressure regulator.
b. Install the fuel pressure regulator to the fuel relief valve.
pic 12
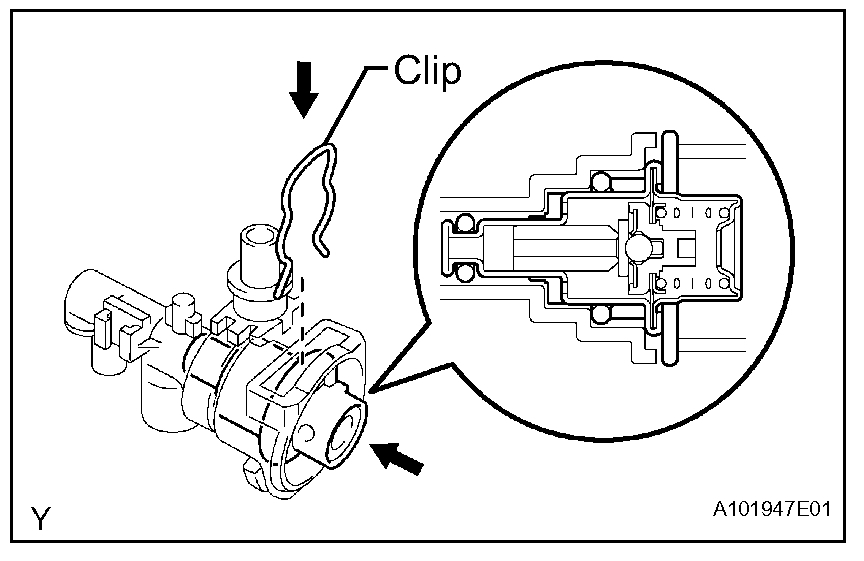
c. Install the clip to the relief valve.
2. INSTALL FUEL RELIEF VALVE ASSEMBLY
pic 13
a. Apply a light coat of gasoline to a new O-ring, and install the fuel relief valve to the fuel filter.
3. INSTALL FUEL PUMP ASSEMBLY
pic 14
a. Install the fuel pump spacer to the fuel pump.
b. Apply a light coat of gasoline to a new seal, and install it to the fuel pump.
c. Install the fuel pump to the fuel filter.
d. Connect the fuel pump connector.
4. INSTALL FUEL SUB-TANK ASSEMBLY
pic 15
a. Apply a light coat of gasoline to a new O-ring, and install the O-ring and fuel sub-tank to the fuel filter.
5. INSTALL FUEL SENDER GAUGE ASSEMBLY
pic 16
a. Set the fuel sender gauge to the fuel sub-tank. Then slide the sender gauge downward to install it.
b. Connect the fuel sender gauge connector.
INSTALLATION
1. INSTALL FUEL SUCTION WITH PUMP AND GAUGE ASSEMBLY
a. Apply a light coat of gasoline to a new gasket, and install it to the fuel tank.
b. Connect the fuel tube connector, and set the fuel suction with pump & gauge.
NOTE:
- Be careful not to bend the arm of the fuel sender gauge.
- When connecting the fuel tube connector, do not forcibly pull the tube.
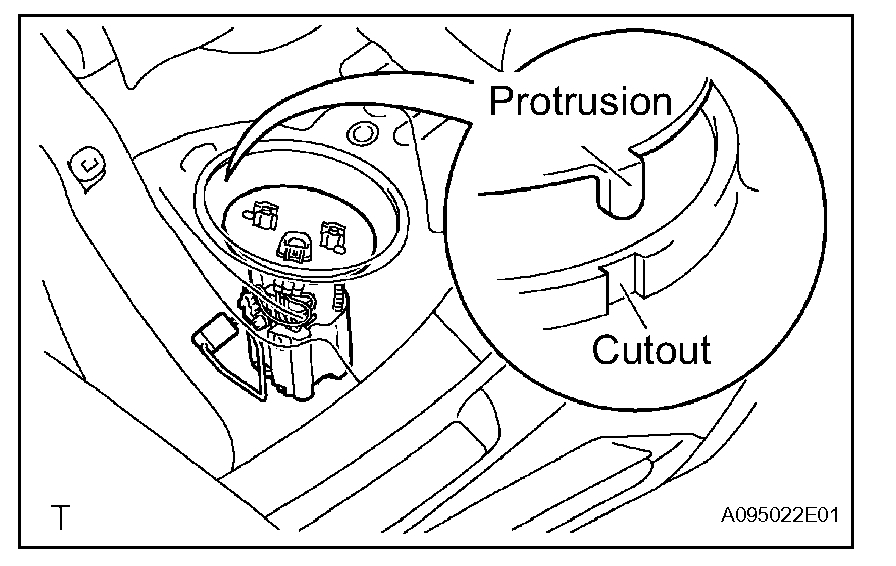
pic 17
c. Align the protrusion of the fuel suction tube and the cutout of the fuel tank.
pic 18
d. While holding the fuel suction tube by hand, align the starting marks of a new fuel pump gauge retainer and the fuel tank. Install the fuel pump retainer to the fuel tank.
pic 19
e. Using a 6 mm socket, set SST to the fuel pump gauge retainer.
SST 09808-14020
HINT: Fit the tips of SST on the ribs of the retainer.
NOTE: Use SST. Do not use any other tools such as a screwdriver.
pic 20
f. Hold SST with one hand and use SST to tighten the fuel pump gauge retainer 2 turns so that the starting mark on the retainer is within the indicated range in the illustration.
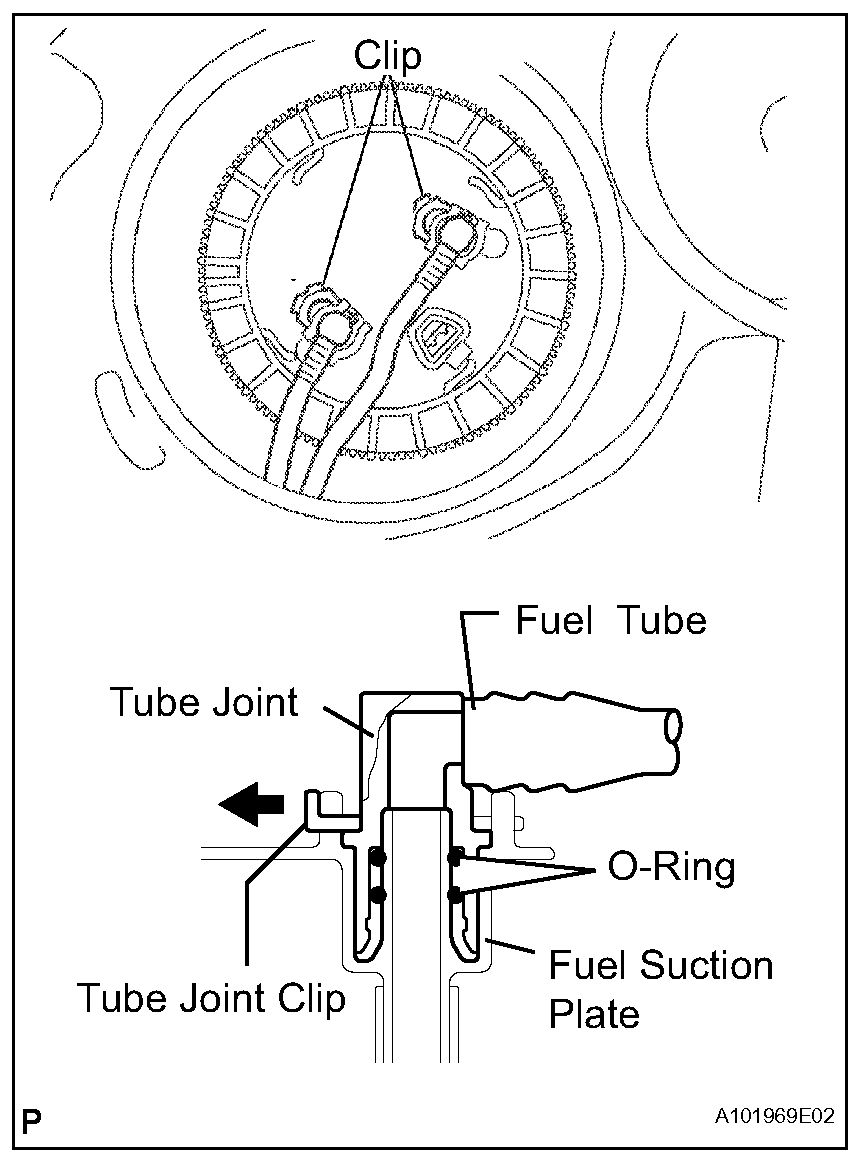
pic 21
g. Connect the fuel main tube and pump tube.
1. Push the fuel tube joint into the plug of the fuel suction plate, then install the 2 tube joint clips.
h. Connect the fuel suction tube connector.
NOTE:
- Check that there are no scratches or foreign matter around the connected part of the fuel tube joint and plug before performing this work.
- Check that the fuel tube joint is securely inserted.
- Check that the tube joint clip is on the collar of the fuel tube joint.
- After installing the tube joint clip, check that the fuel tube cannot be pulled out.
2. CONNECT CABLE TO NEGATIVE BATTERY TERMINAL
3. CHECK FOR FUEL LEAKS
4. INSTALL REAR NO. 2 SERVICE HOLE COVER
5. INSTALL NO. 3 ROOM PARTITION PAD
6. INSTALL REAR SEAT CUSHION ASSEMBLY
7. PERFORM INITIALIZATION
a. Perform initialization
NOTE: Certain systems need to be initialized after disconnecting and reconnecting the cable from the negative (-) battery terminal.
______________________________________________________
If you find fuel pressure isn't the issue and there is no spark present when you check for ignition spark, suspect a bad crankshaft position sensor. Here are a few links that may help you better understand its purpose.
_____________________________________________________
https://www.2carpros.com/articles/how-a-crank-shaft-angle-sensor-works
https://www.2carpros.com/articles/symptoms-of-a-bad-crankshaft-sensor
https://www.2carpros.com/articles/crankshaft-angle-sensor-replacement
_____________________________________________________
Here are the directions for replacement for your vehicle.
_____________________________________________________
REMOVAL AND REPLACEMENT
REMOVAL
1. DISCONNECT CABLE FROM NEGATIVE BATTERY TERMINAL
CAUTION: Wait at least 90 seconds after disconnecting the cable from the negative (-) battery terminal to prevent airbag and seat belt pretensioner activation.
2. REMOVE COOL AIR INTAKE DUCT SEAL
3. REMOVE ENGINE ROOM SIDE COVER RH
4. REMOVE ENGINE ROOM SIDE COVER LH
5. REMOVE NO. 1 AIR CLEANER INLET
a. Remove the bolt and air cleaner inlet.
6. REMOVE V-BANK COVER
a. Remove the 2 nuts and V-bank cover.
pic 22
7. REMOVE FAN AND GENERATOR V-BELT
pic 23
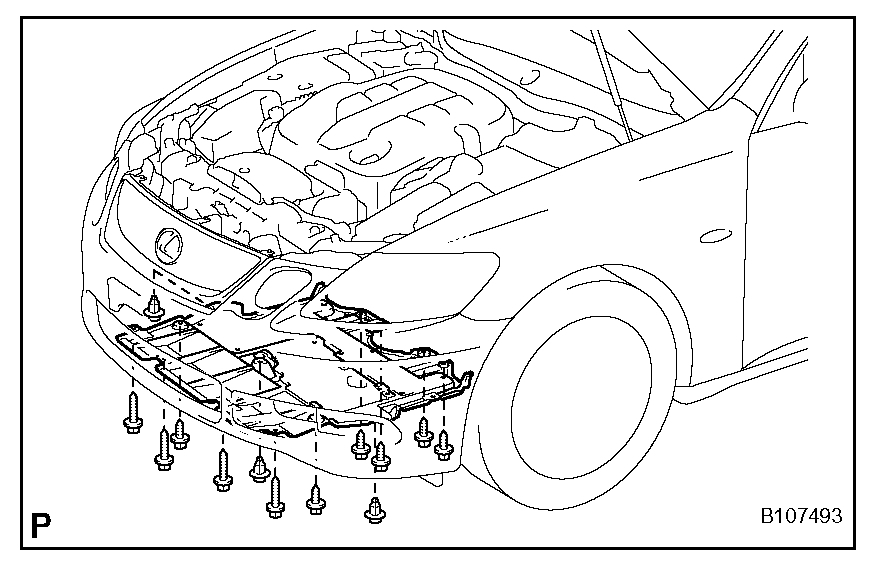
8. REMOVE ENGINE UNDER COVER
a. Using a clip remover, remove the 3 clips.
b. Remove the 10 screws and under cover.
9. DISCONNECT COMPRESSOR WITH PULLEY ASSEMBLY
pic 24
10. REMOVE CRANKSHAFT POSITION SENSOR
a. Disconnect the sensor connector.
b. Remove the bolt and sensor.
INSTALLATION
1. INSTALL CRANKSHAFT POSITION SENSOR
pic 25
a. Apply a coat of engine oil to an O-ring of the sensor.
b. Install the sensor with the bolt.
Torque: 10 N.m (102 kgf.cm, 7 ft.lbf)
c. Connect the sensor connector.
2. INSTALL COMPRESSOR WITH PULLEY ASSEMBLY
3. INSTALL ENGINE UNDER COVER
pic 26
a. Install the under cover with the 10 bolts and 3 clips.
4. INSTALL FAN AND GENERATOR V-BELT
5. INSTALL V-BANK COVER
pic 27
a. Install the V-bank cover with the 2 nuts.
Torque: 5.0 N.m (51 kgf.cm, 44 in.lbf)
6. INSTALL NO. 1 AIR CLEANER INLET
a. Install the air cleaner inlet with the bolt.
Torque: 5.0 N.m (51 kgf.cm, 44 in.lbf)
7. INSTALL ENGINE ROOM SIDE COVER LH
8. INSTALL ENGINE ROOM SIDE COVER RH
9. INSTALL COOL AIR INTAKE DUCT SEAL
10. CONNECT CABLE TO NEGATIVE BATTERY TERMINAL
11. PERFORM INITIALIZATION
a. Perform initialization.
NOTE: Certain systems need to be initialized after disconnecting and reconnecting the cable from the negative (-) battery terminal
___________________________________
I know this is a lot of information, but I am trying to provide options. Let me know if this helps or if you need help.
Take care,
Joe
Images (Click to make bigger)
SPONSORED LINKS
Tuesday, July 2nd, 2019 AT 8:34 PM