Will not start, code P0300

Tiny
NOTYO
  • MEMBER
  • 2001 CHEVROLET ASTRO
  • V6
  • 2WD
  • AUTOMATIC
  • 62,000 MILES
Van runs good except for hesitating/stumbling at freeway speeds occasionally then started at all speeds even at idle still occasionally. Then van wouldn't start it would turn over but not fire. About three weeks later brought mechanic over and van started right up used it everyday for a month. Now van will not start again!
Pulled code: p0300.
Thursday, January 17th, 2019 AT 8:48 PM

5 Replies

Tiny
KENW1
  • MECHANIC
  • 213 POSTS
Thanks for visiting 2CarPros!

There could be a couple of things causing this.

1 Fuel pump failure ( A lean condition from low fuel pressure will result in a po300 and the other conditions you stated. A quick test now would be to spray some starting fluid in the throttle body and see if it cranks. If it does you know the fuel pump is bad or it's not getting voltage.

2. Ignition control module (this can also cause the same symptoms you have. If spraying fuel in the throttle body does not result in it starting this is the next place to look. You can remove it and have most any parts store test it. Below is info on removing it.

Let me know what you find and we can work further if required.

The module is located on the coil bracket on the top passenger side of the engine.

1. Remove the engine cover.
2. Disconnect the electrical connector (3).
3. Remove the screws (4) holding the ignition control module (2) and the heat sink (1) to the bracket.
4. Remove the ignition control module and the heat sink.

INSTALLATION PROCEDURE

NOTE: Refer to Fastener Notice in Service Precautions.

1. Install the ignition control module (2) and the heat sink (1) on the bracket with the screws (4).

Tighten
Tighten the screws to 3.5 N.M (31 lb in).

2. Reconnect the electrical connectors (3).
3. Install the engine cover.
Was this
answer
helpful?
Yes
No
Friday, January 18th, 2019 AT 8:35 PM
Tiny
NOTYO
  • MEMBER
  • 3 POSTS
Thanks Ken, I already replaced the ignition control module, tried the starting fluid test and van won't start. What next?
Was this
answer
helpful?
Yes
No
Friday, January 18th, 2019 AT 10:28 PM
Tiny
KENW1
  • MECHANIC
  • 213 POSTS
Thanks for the additional information. Next step would be to verify voltage at the pink wire going to the ignition coil. it should have around 10-12 volts with key on and while cranking.

if it does the next step is to use an led test light like the one below and see if it flashes while cranking and with the tip on the white and black wire at the coil.

https://www.amazon.com/OTC-3631-Heavy-Duty-Logic-Tester/dp/B001GZH1C8

It's mandatory to use this type of test light not to damage the computer system. it'll flash ground while cranking if the coil is getting signal.

Now if both test fail then the next step it to replace the crankshaft position sensor. it's located on the timing cover. i'll post how to replace it below.

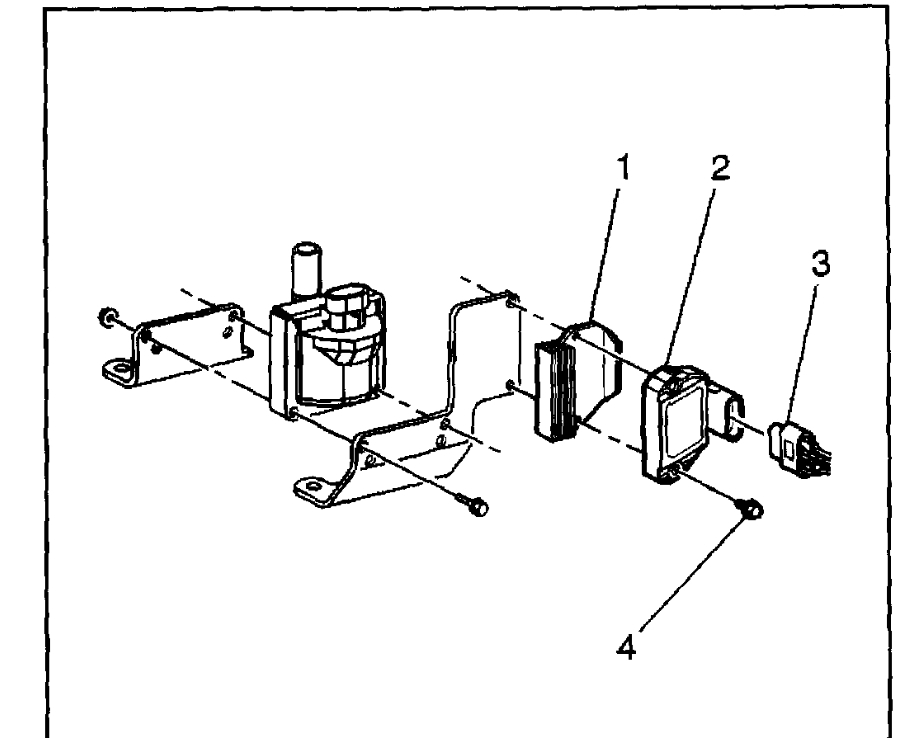
CRANKSHAFT POSITION (CKP) SENSOR REPLACEMENT

REMOVAL PROCEDURE

IMPORTANT: The CKP System Variation Learn Procedure will need to be performed whenever the crankshaft position (CKP) sensor is removed or replaced. Refer to CKP System Variation Learn Procedure.

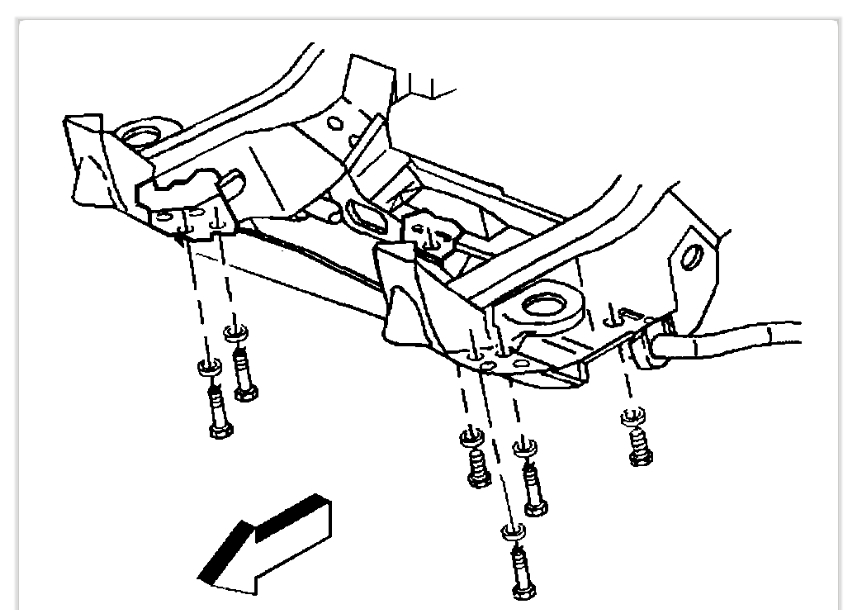
1. Raise the vehicle. Refer to Lifting and Jacking the Vehicle.
2. If the vehicle is equipped with the underbody shield package, then remove the steering linkage shield mounting bolts.

3. Remove the steering linkage shield.

i

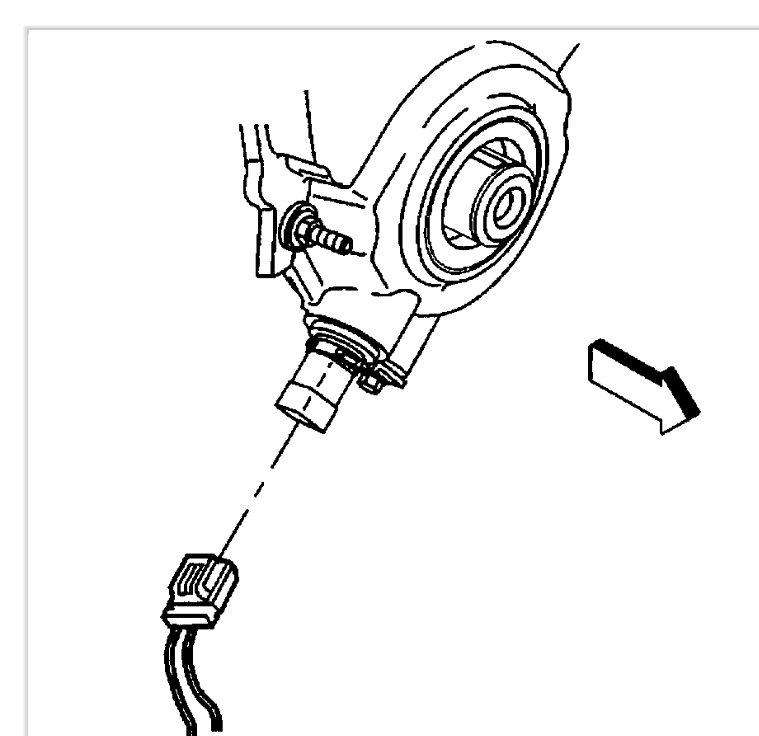
4. Disconnect the CKP sensor harness connector.

5. Remove the CKP sensor mounting bolt.

6. Remove the CKP sensor.

INSTALLATION PROCEDURE

IMPORTANT:
When installing the CKP sensor, make sure the sensor is fully seated before tightening the mounting bolt. A poorly seated CKP sensor may perform erratically and may set false DTCs.
Do not reuse the original O-ring.

1. Replace the CKP sensor O-ring.
2. Lubricate the O-ring with clean engine oil before installing the CKP sensor.

IMPORTANT: Make sure the CKP sensor mounting surface is clean and free of burrs.

3. Install the CKP sensor.

NOTE: Refer to Fastener Notice in Service Precautions.

4. install the CKP sensor mounting bolt.

Tighten
Tighten the CKP sensor mounting bolt to 8 N.m (71 lb in).

5. Connect the CKP sensor harness connector.

6. Install the steering linkage shield.

7. Install the steering linkage shield mounting bolts.

Tighten
Tighten the bolts to 33 N.m (24 lb ft).

8. Lower the Vehicle.
9. Perform the CKP System Variation Learn Procedure. Refer to CKP System Variation Learn Procedure.

The relearn procedure must be done with a high end scan tool most shops will have. The vehicle will set a code if the relearn is not performed.

Was this
answer
helpful?
Yes
No
Friday, January 18th, 2019 AT 10:51 PM
Tiny
NOTYO
  • MEMBER
  • 3 POSTS
Ken, So check this out. I finally got the test light yesterday evening so today I went out to the van to run the tests and thought I'm going to see if it starts and I'll be damned if it didn't fire right up !
Since this seems to happen after a good rain and then starts after a good drying out I'm thinking it's moisture inside the distributor cap. That would give me the P0300 code. What are your thoughts and any kind of remedy?
Was this
answer
helpful?
Yes
No
Friday, January 25th, 2019 AT 11:24 AM
Tiny
KENW1
  • MECHANIC
  • 213 POSTS
Glad to hear it fired up. The rain no starts are real common on the 4.3's. The solution I've found is to use AC Delco cap and rotor and check the vent in the baseplate of the distributor. It has mesh over it. Cleaning with brake cleaner will help moisture come out of the distributor.
Was this
answer
helpful?
Yes
No
Friday, January 25th, 2019 AT 12:53 PM

Please login or register to post a reply.

Sponsored links