Hi and thanks for using 2CarPros.com.
The first things you need to check for are spark and fuel. Here are general directions for both:
https://www.2carpros.com/articles/how-to-check-fuel-system-pressure-and-regulator
https://www.2carpros.com/articles/how-to-test-an-ignition-system
Most likely, one of the aforementioned items is causing it not to start. When checking the fuel pump pressure, it should be around 45psi (3bar).
If you find the fuel pump is not producing, here are the directions for replacement. The first part of these directions are fuel tank removal. All pictures will correlate with both sets of directions.
_____________________
Warning: Working on the fuel system results in fuel and fuel vapor being present in the atmosphere. Fuel vapor is extremely flammable, hence great care must be taken whilst working on the fuel system. Adhere strictly to the following precautions:
Do not smoke in the work area.
Display 'no smoking' signs around the area.
Ensure that a co2 fire extinguisher is close at hand.
Ensure that dry sand is available to soak up any fuel spillage.
Empty fuel using suitable fire proof equipment into an authorized explosion proof container.
Do not empty fuel while working in a workshop a pit.
Ensure that working area is well ventilated.
Ensure that any work on the fuel system is only carried out by experienced and well qualified maintenance personnel.
.
Remove
- Depressurise fuel system. See: Fuel Pressure Release > Procedures
- Ensure that the radio code is available for resetting the radio after the battery is reconnected.
- Remove battery/fuse cover and disconnect the battery.
- Remove trunk floor carpet board and front liner.
- Remove the rear lamp assembly interior trim finisher.
- Remove the trunk seal retainer and left side liner.
- Drain fuel tank using approved equipment and observing appropriate safety precautions.
- Raise vehicle on "4 Post" ramp.
- Disconnect the fuel feed and return pipes from the fuel tank using Jaguar Service Tool JD-203.
- Fit plugs to the tank and to the hoses.
- Release the clip securing the filler aperture drain pipe and release the pipe from the clip.
- Lower the vehicle on the ramp.
- Move the in-car entertainment package from the evaporative flange area.
- Disconnect the vehicle harness from the evaporative loss flange.
- Disconnect fuel gauge tank unit feed wires.
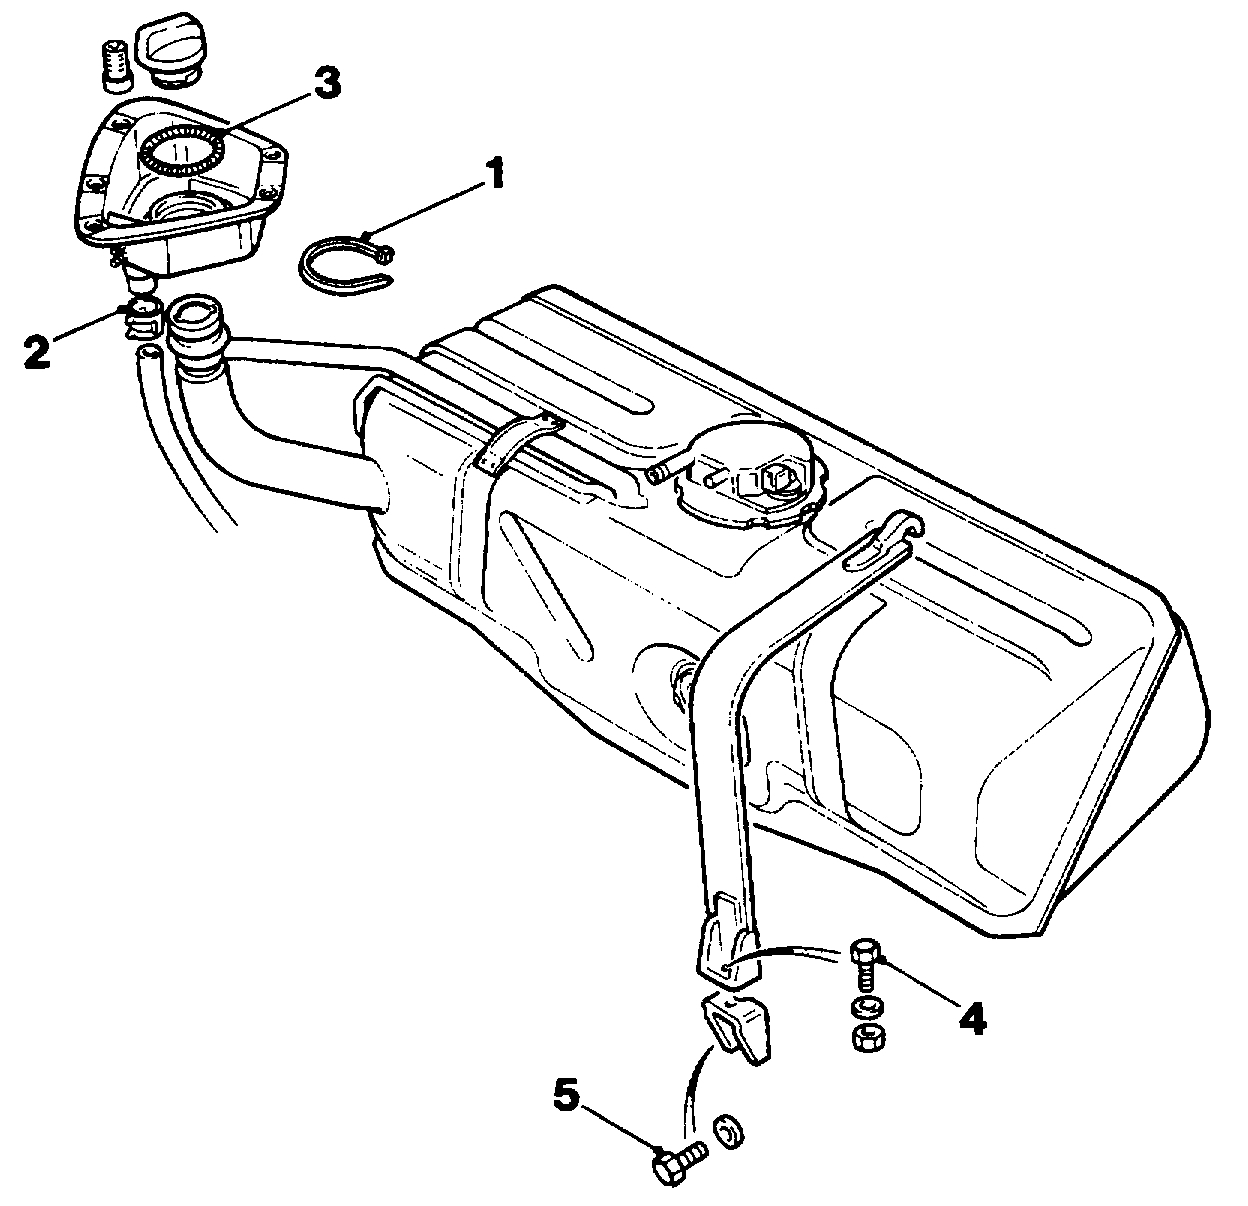
- Remove the ratchet strap (1), and the spring band clip (2), to release the filler aperture drain pipe from the fuel tank filler tube and the aperture.
- Remove drainpipe from the body grommet.
- Using Jaguar Service Tool JD-203 disconnect the under floor vapour pipe from the fuel tank.
- Open the flap and remove the fuel filler cap.
- Carefully remove the garter spring (3) from the filler neck seal.
- Move the seal to the tank filler neck.
- Slacken the two retaining strap tensioning bolts (4) at the lower brackets.
- Remove the bracket retaining bolts (5), leaving the brackets attached to the straps.
- Remove the retaining clip from the left side support strut and detach the the strut from the trunk lid ball pin.
- Remove the fuel tank from the vehicle.
- Drain the remaining fuel and store the tank using the approved equipment and observing the appropriate safety precautions.
Refit in the reverse order of the removal procedure. Refer to tightening specifications. See: Fuel Delivery and Air Induction > Mechanical
NOTE: After reconnecting the battery reset the radio with the radio code and reset the clock. Transfer the fuel, drained from the displaced fuel tank to the new tank in the vehicle.
________________________________________
Fuel Pump
Note: The following procedure is for the supercharged models. The renewal procedure of the single fuel pump fitted inside the fuel tank of a normally aspirated engined vehicle, is similar to the procedure described.
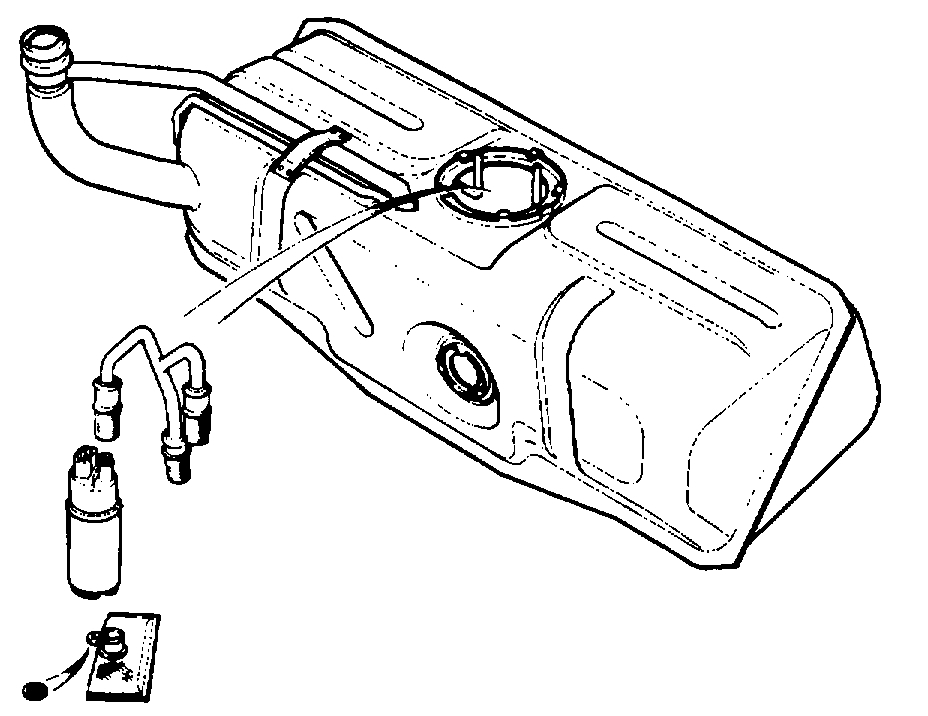
- Remove fuel tank from vehicle. See: Fuel Tank > Procedures
- Remove evaporative loss flange. See: Fuel Tank Unit > Procedures
- Slacken fuel pump feed hose to fuel tank securing clip.
- Disconnect hose from fuel tank stub pipe.
- Undo and remove fuel pump mounting brackets to surge pot securing bolts.
- Displace and remove fuel pumps and feed hose assembly from fuel tank.
- Slacken feed hose assembly to fuel pump securing clips.
- Remove fuel pumps from the feed hose assembly.
- Remove link leads from fuel pumps.
- Cut and remove ratchet straps securing upper clamp rubbers to to the fuel pumps.
- Displace and remove upper clamp rubbers from the fuel pump mounting brackets and discard.
- Remove the mounting brackets from the fuel pumps.
- Remove and discard lower mounting rubbers from the fuel pumps.
- Remove fuel pump and filter assemblies and place aside.
Refit in the reverse order of the removal procedure.
_________________________________
Let me know if this helps and what you find. If you need additional information, let me know.
Take care,
Joe
Images (Click to make bigger)
Friday, September 7th, 2018 AT 7:11 PM