Transmission leaking

Tiny
AHARTLEY
  • MEMBER
  • 1995 OLDSMOBILE 88
  • 3.8L
  • 6 CYL
  • 2WD
  • AUTOMATIC
  • 171,000 MILES
I've just tried to replace the CV axle on the driver side. I went for a drive and it's now leaking transmission fluid. The drive shaft didn't seem to want to go the full way in. I'm not sure. I guess I'll have to climb up under the car to try to make sure.
Any hints or advice?
Monday, March 8th, 2021 AT 4:26 PM

4 Replies

Tiny
CARADIODOC
  • MECHANIC
  • 33,744 POSTS
On most front-wheel-drive models you can't reassemble everything unless the inner CV joint popped all the way back into the transmission. It sounds like you may have one of the exceptions. The shaft has to be wiggled up and down until the inner joint lines up with the splines, then it is spring-loaded and will pop into place. When it does, the highly-polished sealing surface will be under the rubber lip seal.

In some cases that rubber lip seal will be damaged if the inner joint is allowed to drop down and drag across it as it's being removed or installed.

A less-common problem is caused by the spring breaking inside the inner CV joint. That spring is what holds the joint in the transmission. If you installed a used half shaft, it should be checked for that spring. You'll have to work pretty hard to compress the joint by hand, then it will spring back on its own with pretty good force. Since it's already installed, you can do the same test by removing the axle nut, pressing the outer joint's stub shaft in toward the transmission, then observing it pops back out forcefully on its own.

If that inner joint isn't installed all the way, I would expect you to observe a rather severe vibration in the steering wheel and in the seat. The binding joint will push against the transmission with each wheel revolution, and that will push against the spindle and steering linkage.

Be aware if you do remove the axle nut, that nut must never be loose when there's vehicle weight on that tire. Doing so will instantly make that wheel bearing noisy and it will buzz like an airplane engine. Jack the vehicle up and support it on jack stands, then it's okay to loosen that nut. It must be tightened to specs before the car is lowered onto that tire. I was shocked to see the torque spec for your axle nut is only 107 foot / pounds. That is about half of normal, but it still should be set with a click-type torque wrench.
Was this
answer
helpful?
Yes
No
Tuesday, March 9th, 2021 AT 1:25 PM
Tiny
AHARTLEY
  • MEMBER
  • 107 POSTS
Nothing on this job has gone as it is "supposed to" so one more thing wouldn't surprise me at all. Nothing has been as "they" said it would, it has been frustrating. I'm not feeling any vibration at all however I've only had it up to 35 MPH, would that make a difference? Thank you. :-)
Was this
answer
helpful?
Yes
No
Tuesday, March 9th, 2021 AT 2:24 PM
Tiny
CARADIODOC
  • MECHANIC
  • 33,744 POSTS
Half shafts only rotate about one third as fast as rear-wheel-drive driveshafts, so out-of-balance issues are much less common. Yours would be a case of a shaft that is in effect too long and it can't freely collapse and extend as the suspension goes up and down. The shaft pushes on the spindle which is attached to the steering linkage. That's why you'll feel it in the steering wheel.

You should also be able to see the inner CV joint sitting crooked if it isn't popped into the transmission all the way. If it looks okay in that respect, I would have to suggest the seal is simply damaged. I know it would be frustrating to do the job all over again, but at least no bolts will be rusted tight this time. Given the age of the vehicle, it is also possible the seal was hardened which would cause it to crack easily. A new seal will be more flexible and less likely to be damaged during shaft installation.
Was this
answer
helpful?
Yes
No
+1
Tuesday, March 9th, 2021 AT 5:45 PM
Tiny
CARADIODOC
  • MECHANIC
  • 33,744 POSTS
Are you making progress? Here's the procedure for this job. You might read through it to see if you missed something, but it's also for the benefit of others researching this topic:

REMOVAL
1. Raise and support vehicle, then remove tire and wheel assembly.
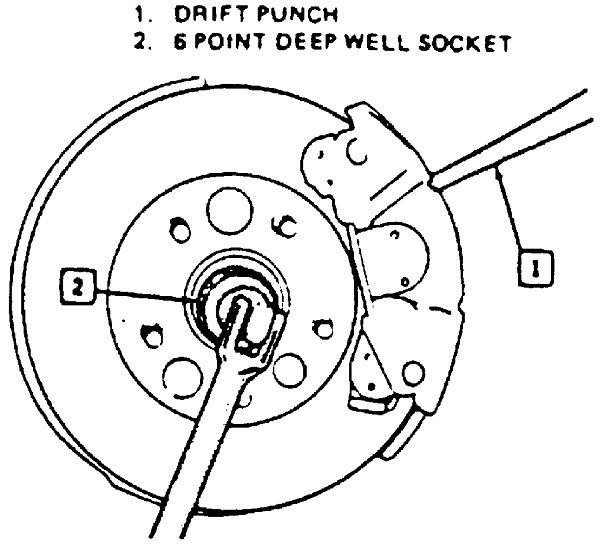
2. Install a brass drift or a screwdriver to prevent the rotor from turning, Fig. 7.
3. Remove axle nut and washer.
4. Remove stabilizer shaft or link from control arm.
5. Remove nut from ball joint, then separate ball joint from steering knuckle using separator tool No. J-36226, or equivalent.
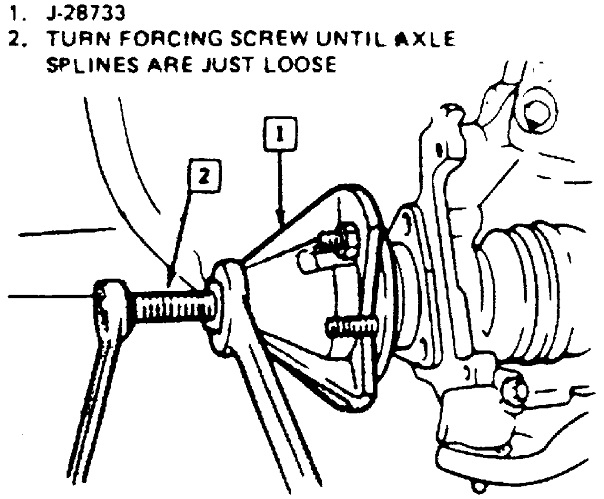
6. Remove drive axle from hub and bearing assembly using front hub spindle remover tool No. J-28733-A, or equivalent, Fig. 8.
7. Remove drive axle from transaxle using axle shaft remover puller tool Nos. J-33008, J-29794 and slide hammer tool No. J-2619-01, or equivalents, if necessary, Fig. 9.

INSTALLATION
1. Install drive axle into the transaxle using seal protector J-37292-B, or equivalent
2. Seat snap ring by placing a screwdriver into the groove on the joint housing and tapping until seated, Fig. 9.
3. Grasp the inner housing and pull outward. If the snap ring is properly seated, the axle will remain in place.
4. Install drive axle into hub and bearing assembly.
5. Install lower ball joint to steering knuckle and tighten to specifications.
6. Install stabilizer shaft or link to control arm, tighten to specifications.
7. Insert a screwdriver or drift into caliper and rotor to prevent rotor from turning, Fig. 7.
8. Install new hub nut and washer, tighten to specification.
9. Install tire and wheel assembly, then lower vehicle.
Was this
answer
helpful?
Yes
No
Wednesday, March 10th, 2021 AT 5:28 PM

Please login or register to post a reply.

Sponsored links