I dont know if there are replaceable bulbs, but here's how to remove and overhaul it.

INSTRUMENT PANEL/METER -2005 Toyota 4Runner Limited
Page 1 of 2
COMBINATION METER ASSY
OVERHAUL
HINT:
COMPONENTS: See INSTRUMENT PANEL/METER
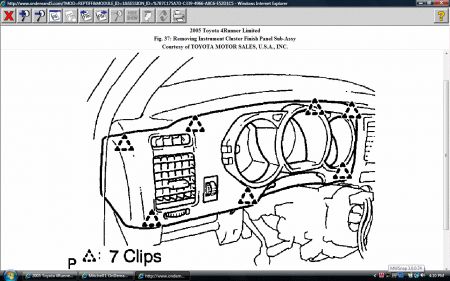
1. REMOVE INSTRUMENT CLUSTER FINISH PANEL SUB-ASSY a.Disengage the 7 clips. b.Disconnect the connectors and remove the instrument cluster finish panel sub-assy.
Fig. 37: Removing Instrument Cluster Finish Panel Sub-Assy Courtesy of TOYOTA MOTOR SALES, U.S.A., INC.
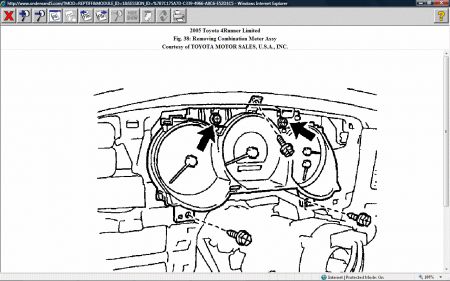
2. REMOVE COMBINATION METER ASSY a.Remove the 3 screws. b.Loosen the 2 bolts and remove the combination meter assy.
Fig. 38: Removing Combination Meter Assy
Courtesy of TOYOTA MOTOR SALES, U.S.A., INC.
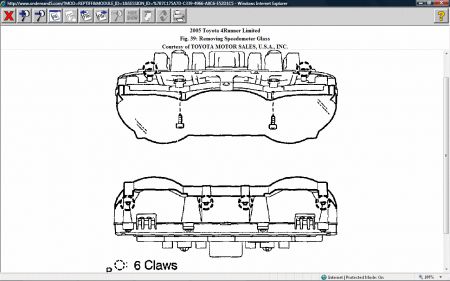
3. REMOVE SPEEDOMETER GLASS a.Remove the 2 screws. b.Disengage the 6 claws and remove the speedometer glass.
Fig. 39: Removing Speedometer Glass
Courtesy of TOYOTA MOTOR SALES, U.S.A., INC.
4. REMOVE COMBINATION METER COVER NO.1 a.Remove the 10 screws and combination meter cover No.1.
Fig. 40: Removing Screws Of Combination Meter Cover No.1
Courtesy of TOYOTA MOTOR SALES, U.S.A., INC.
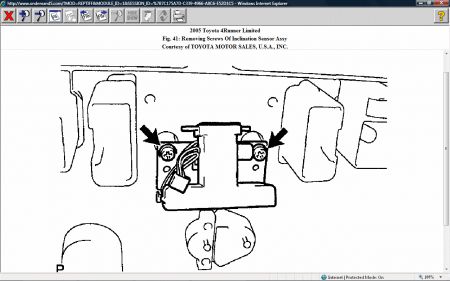
5. REMOVE INCLINATION SENSOR ASSY a.Remove the 2 screws and inclination sensor assy.
Fig. 41: Removing Screws Of Inclination Sensor Assy
Courtesy of TOYOTA MOTOR SALES, U.S.A., INC.
6. INSTALL COMBINATION METER ASSY a.Pull the positions shown in the illustration in the arrow mark direction to make the check pins unseen form the surface.
Fig. 42: Pulling Positions
8/18/2008
INSTRUMENT PANEL/METER -2005 Toyota 4Runner Limited
Page 2 of 2
Courtesy of TOYOTA MOTOR SALES, U.S.A., INC.
b.Check that the connector on the instrument panel side is in place. c.Install the combination meter assy with the 3 screws. d.Tighten the screw shown in the illustration and check that the check pin protrudes.
Fig. 43: Tightening Screw
Courtesy of TOYOTA MOTOR SALES, U.S.A., INC.
7. INCLINATION SENSOR ZERO DEGREE CORRECTION
NOTE:
ï¬ When replacing or removing/installing the combination meter assy and inclination sensor assy, be sure to perform zero degree correction of the inclination sensor.
ï¬ When performing zero degree correction, install the combination meter assy and perform it in level surface.
ï¬ Also perform zero degree correction when the body level setting is inclined because of vehicle height adjustment.
a.Turn the ignition switch off. b.While pressing the RESET switch, turn the ignition switch on. c.Within 5 seconds after the ignition switch is turned on, repeat pressing and releasing the RESET switch 3 times and keep holding the last press for more than 5 seconds. (Buzzer sounds for a second)
NOTE: If the buzzer does not sound, perform this procedure from the beginning.
d.Release the RESET switch when buzzer sounds. e.Press the RESET switch again and keep pressing for more than 5 seconds. (Buzzer sounds for a second again)
HINT:
ï¬ When the buzzer sounds twice, reset operation is completed.
ï¬ The buzzer sound of the first and second time is the same.
NOTE: If the buzzer does not sound or keep sounding for more than 1 second, perform the procedure from the beginning.
Fig. 44: Identifying Inclination Sensor Zero Degree Correction
Courtesy of TOYOTA MOTOR SALES, U.S.A., INC.
8/18/2008
Aug 18, 2008 at 3:28 PM