Welcome to 2CarPros.
The belt tension is measured by resistance. Basically, a scale is used to apply pressure on the belt and it must meet a prescribed tension before the belt move beyond a certain measurement.
Here are the directions for replacing the timing belt. The belt should be inspected every 60,000 miles and the recommended replacement is at 105 regardless of condition. The attached pictures correlate with these directions.
____________________________________________
REMOVAL
1. Disconnect the negative battery cable.
2. Remove the two fresh air duct mounting bolts on the radiator.
3. Loosen the fresh air duct clamp at the intake housing.
4. Remove the hose at the resonance chamber.
Picture 1
5. Remove the fresh air duct.
Picture 2
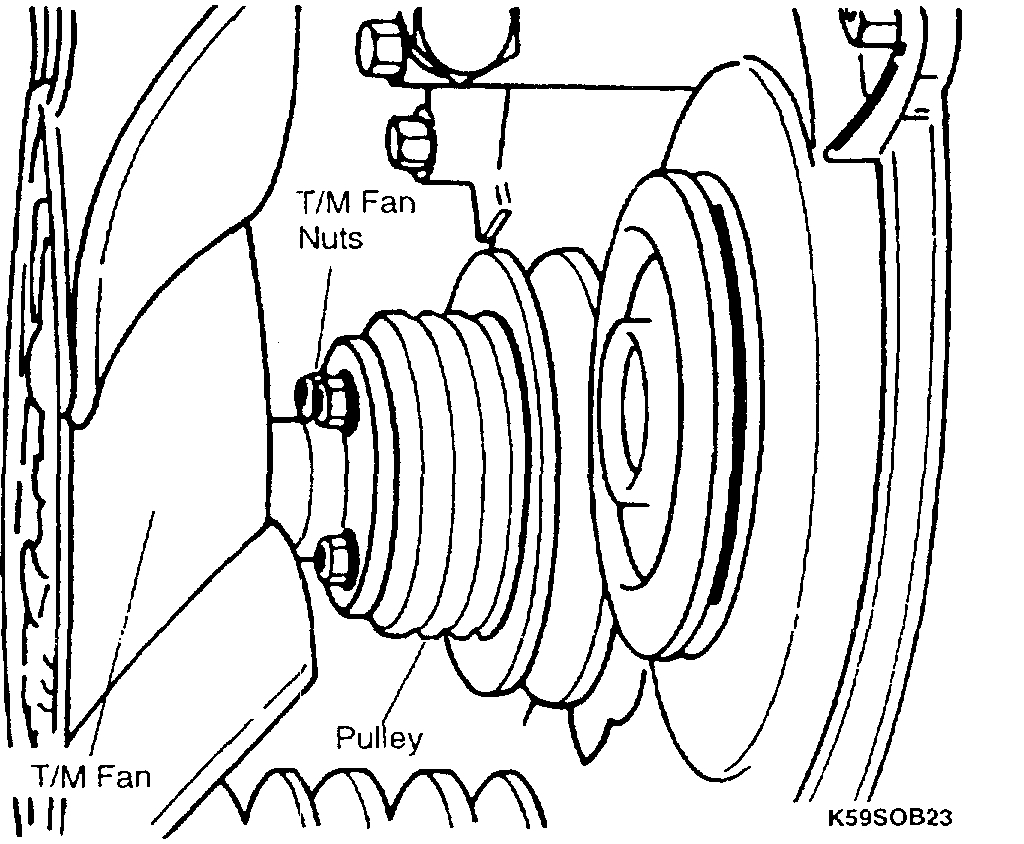
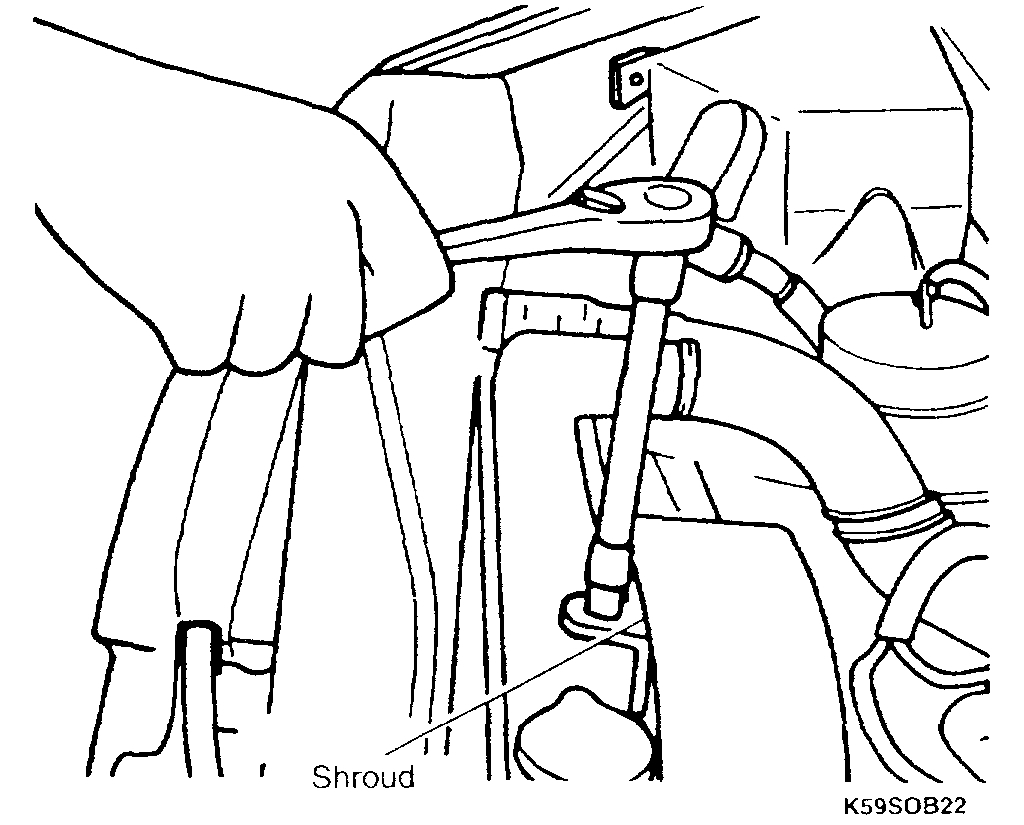
6. Remove the five cooling fan shroud bolts.
7. Remove the four thermo-modulated fan nuts.
Picture 3
8. Remove the thermo-modulated fan and cooling fan shroud at the same time.
Picture 4
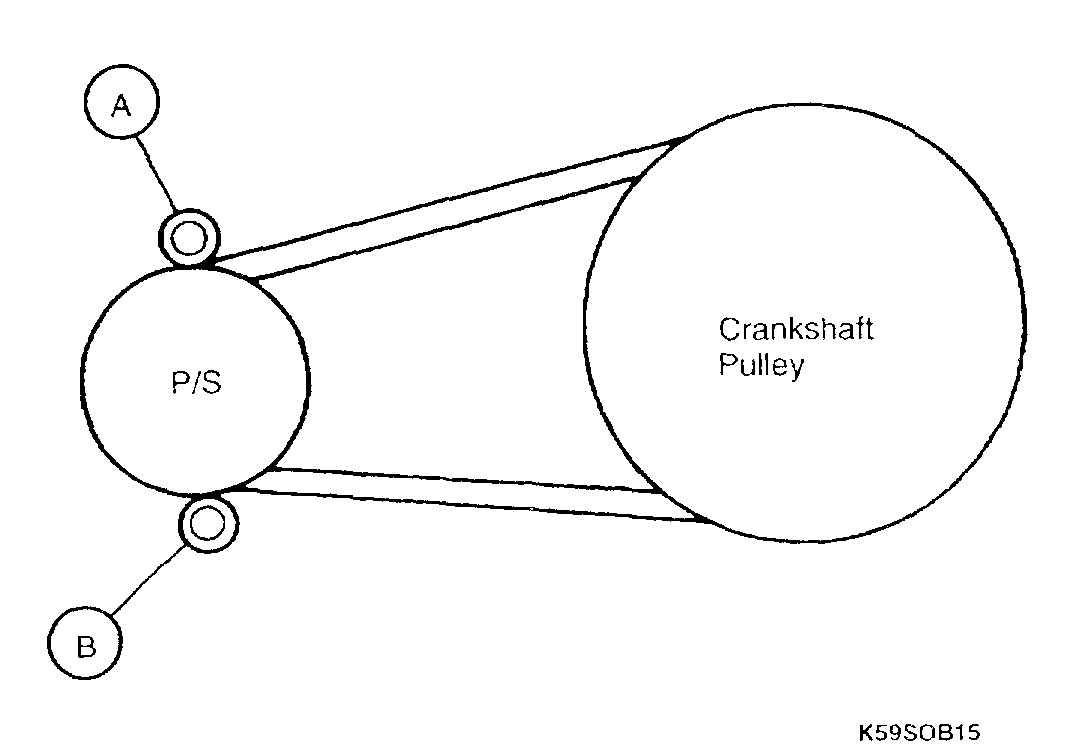
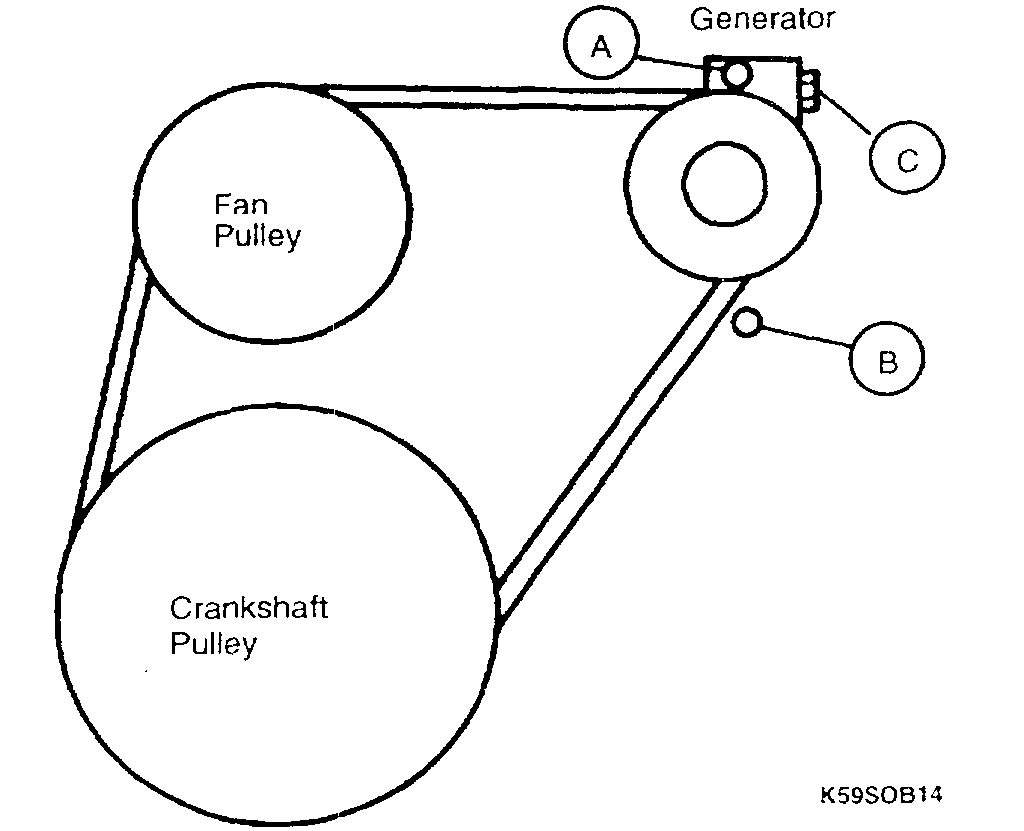
9. Loosen the two generator mounting bolts (A and B).
10. Loosen the generator drive belt from the generator by loosening the adjusting bolt (c).
11. Remove the generator drive belt.
12. Remove the fan pulley.
Picture 5
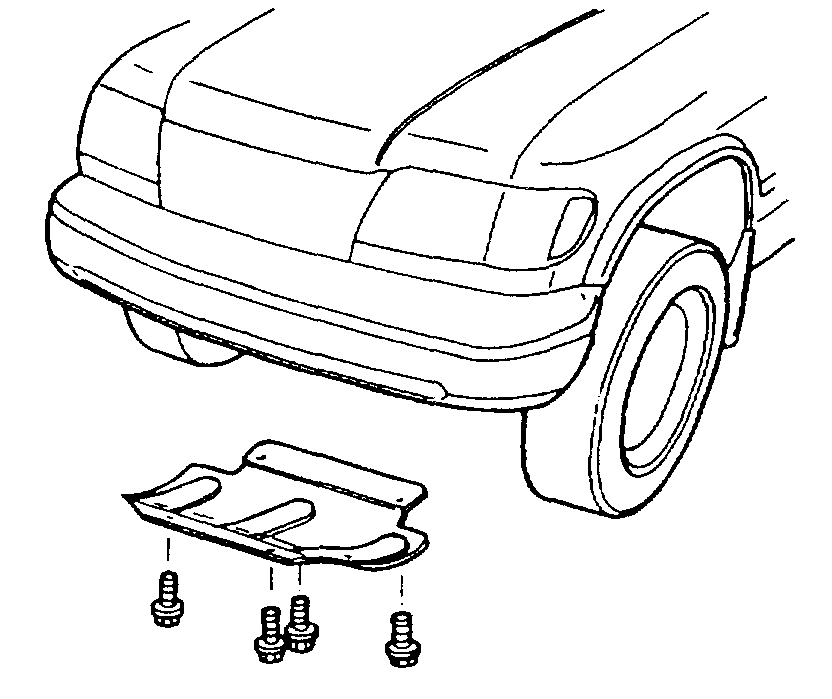
13. Remove the four splash guard mounting bolts and splash Guard.
Picture 6
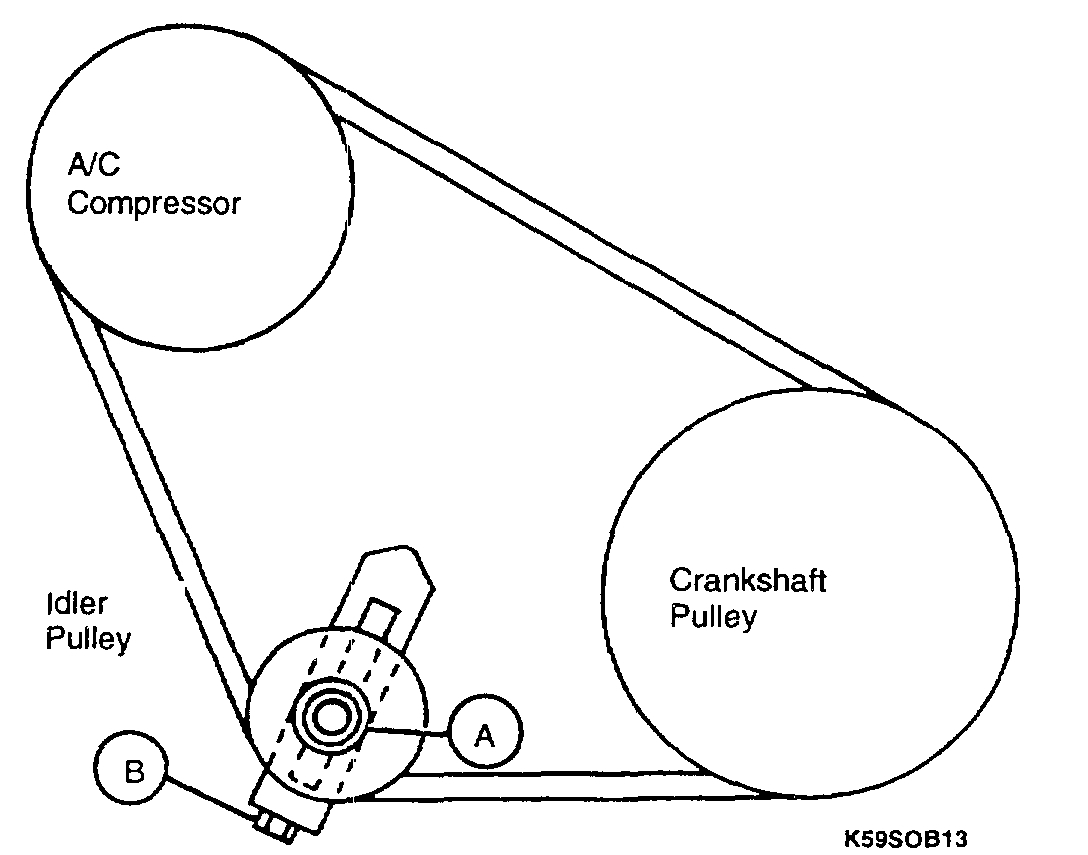
14. Loosen the A/C idler pulley nut (A).
15. Remove the A/C drive belt by loosening the adjusting bolt.
Picture 7
16. Loosen the power steering pump lock bolt and mounting bolt.
17. Remove the power steering belt.
18. Remove five bolts and the upper timing belt cover.
19. Remove two bolts and the lower timing cover.
Picture 8
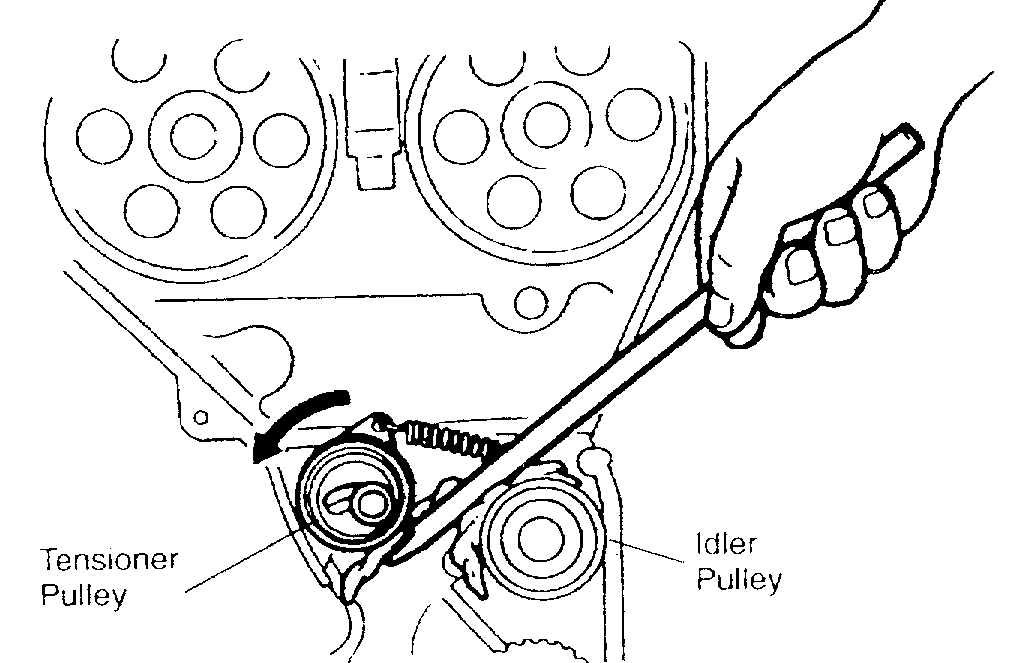
20. Loosen the tensioner lock bolt and pivot the tensioner pulley outward to remove the tension from the timing belt, then re-tighten the tensioner lock bolt.
Tightening Torque: 27 - 38 ft. Lbs. (37 - 52 Nm)
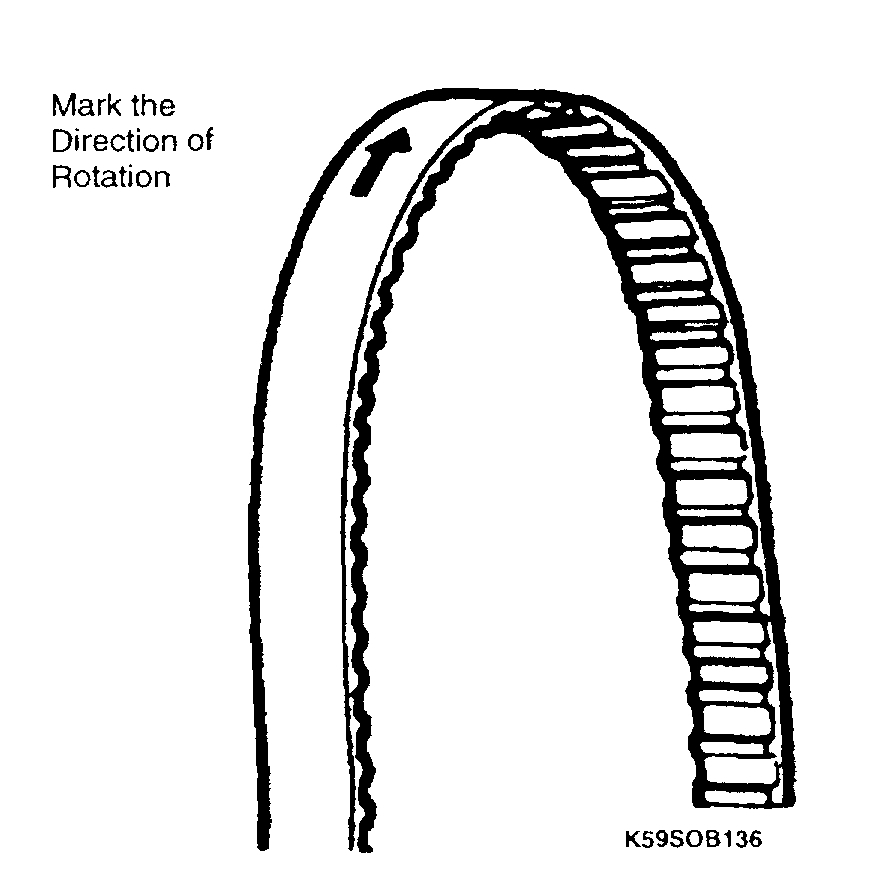
21. Mark the timing belt rotation for proper reinstallation if it is reused.
Picture 9
22. Remove the timing belt.
CAUTION: Be careful not to allow oil or grease on the belt.
INSTALLATION
Picture 10
1. Align the timing belt pulley and the pump body alignment marks.
Picture 11
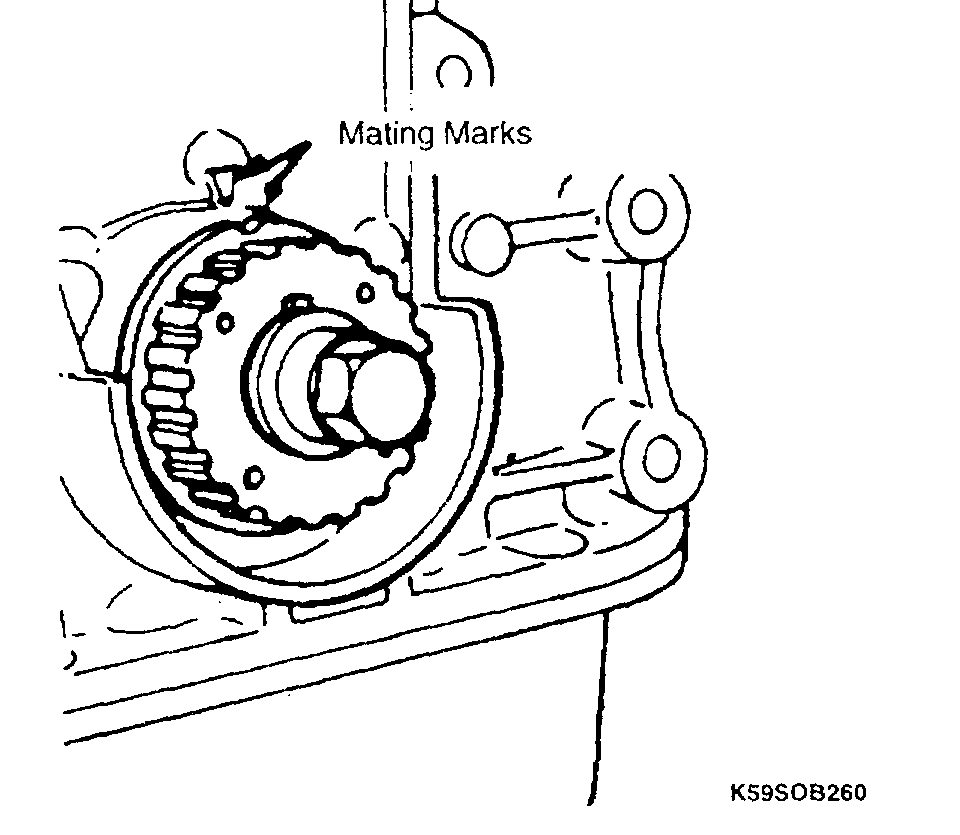
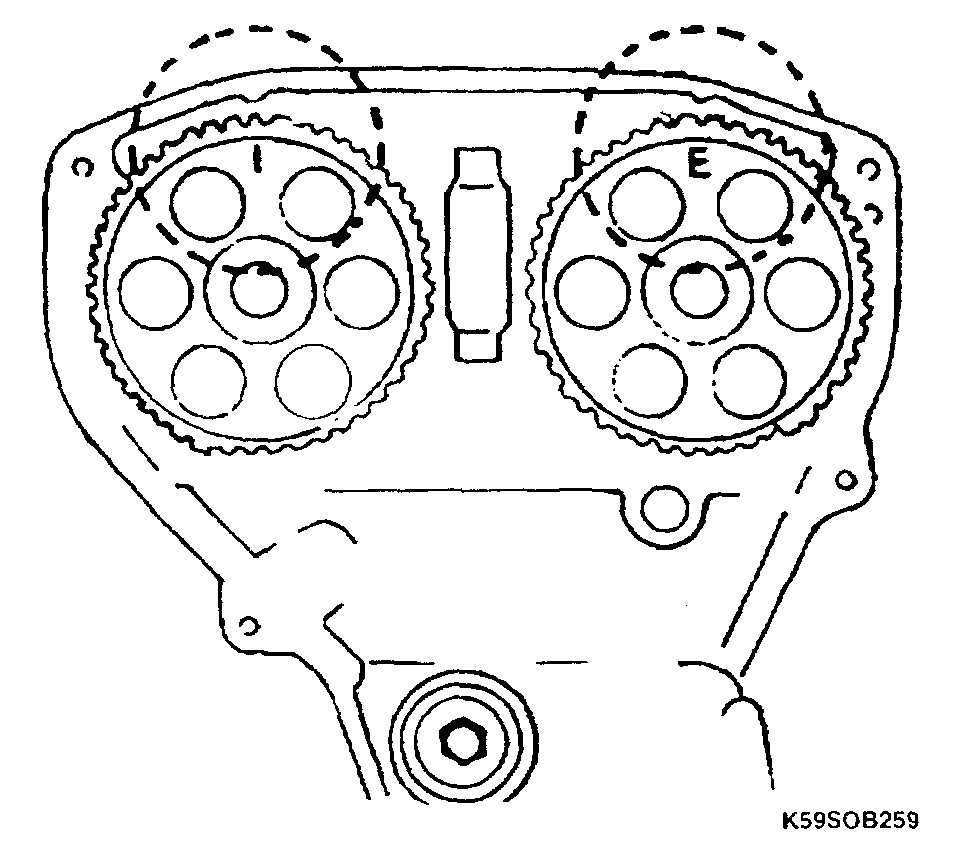
2. Align the mating marks on the camshaft pulleys with the alignment marks on the seal plate.
NOTICE:
- For intake side camshaft pulley, align I mark.
- For exhaust side camshaft pulley, align E mark.
Picture 12
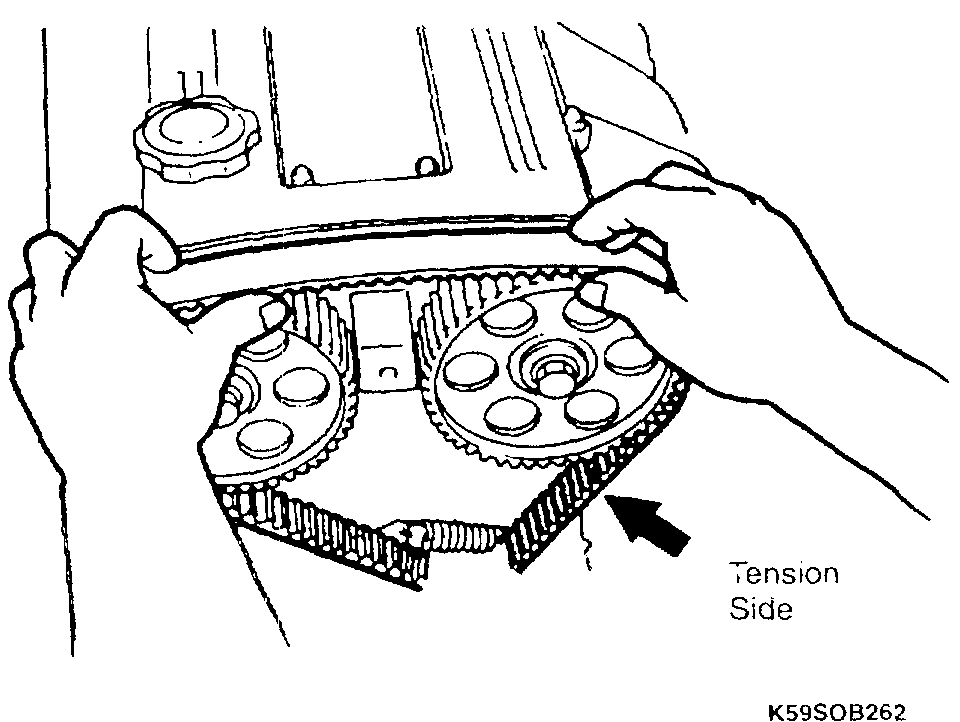
3. Install the timing belt so that there is no looseness at the tension side, and at the two camshaft pulleys.
CAUTION:
- If the timing belt is being reused, it must be reinstalled to rotate in the original direction.
- Check that there is no oil, grease, or dirt on the timing belt
4. Loosen the tensioner lock bolt.
5. Turn the crankshaft two complete revolutions in the direction of rotation.
6. Check that the mating marks are correctly aligned. If not aligned correctly, remove the timing belt and tensioner, and return to step 1.
Picture 13
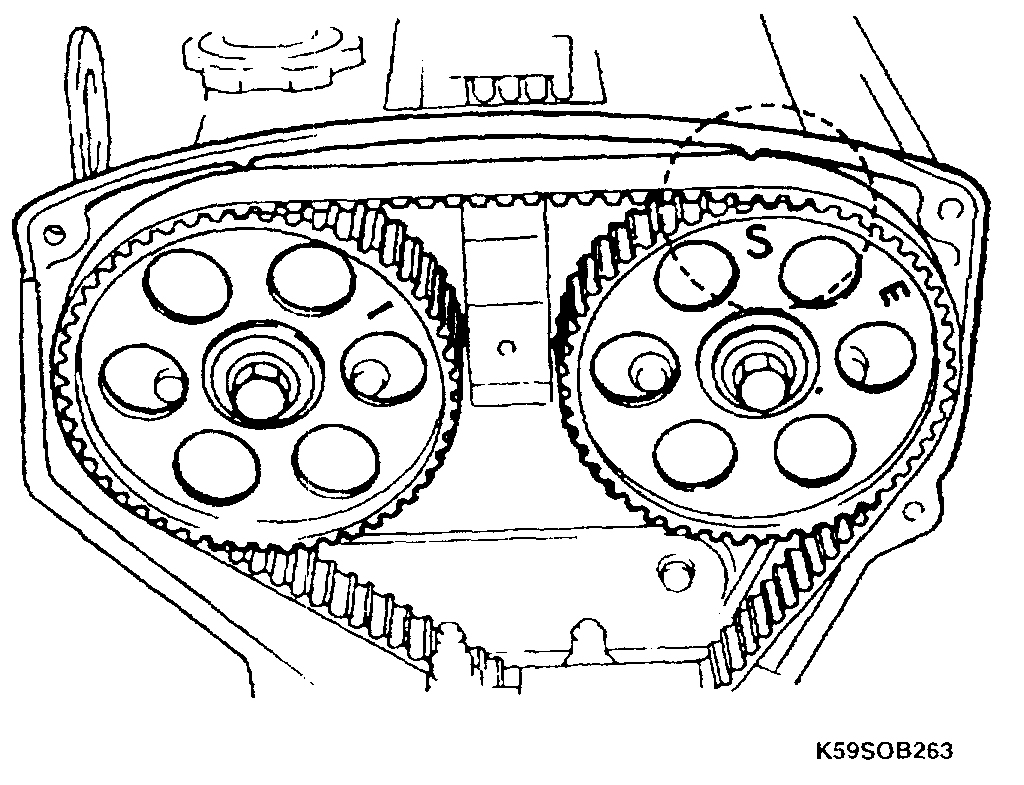
7. Turn the crankshaft to align the S mark of the exhaust camshaft pulley with the seal plate mating mark.
8. Tighten the timing belt tensioner lock bolt.
Tightening torque: 27 - 38 ft. Lbs. (37 - 52 Nm, 3.8 - 5.3 kg-m)
Picture 14
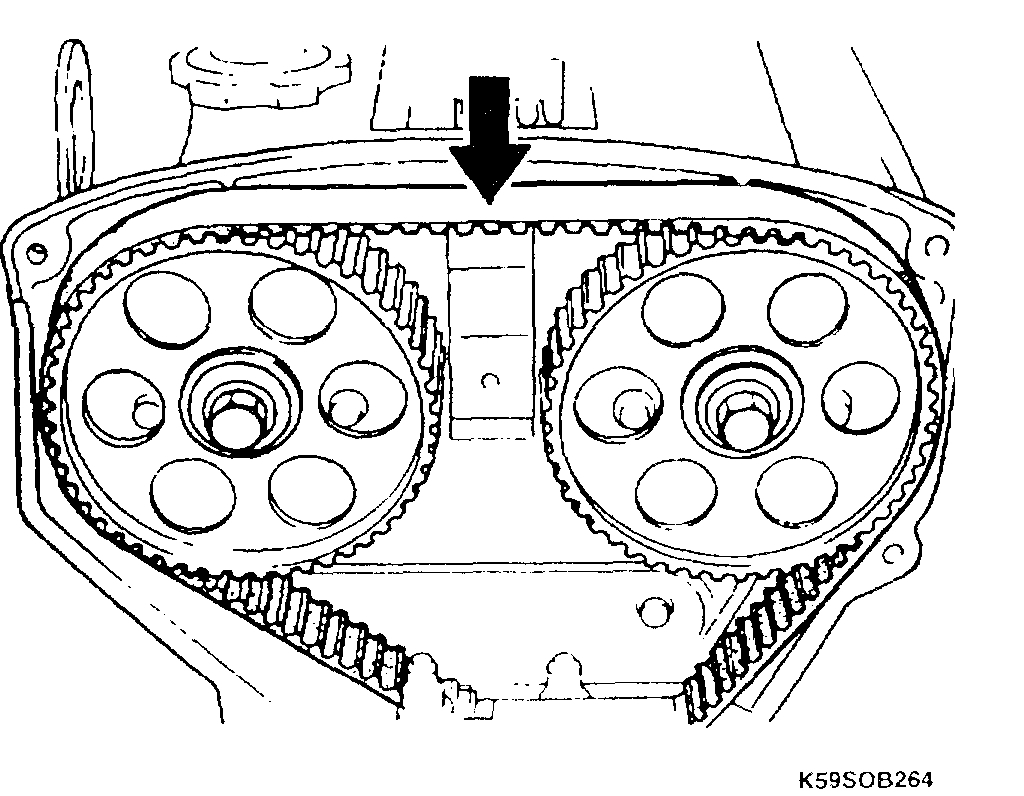
9. Check the timing belt deflection. If the deflection is not correct, loosen the tensioner lock bolt and repeat steps 5-7 above. Replace the tensioner spring if necessary.
Belt deflection: 0.30 - 0.33 inch (7.5 - 8.5 mm)/22 lbs. (98 N, 10 kg)
1O. Install the lower timing belt cover and two bolts.
Tightening torque: 61 - 87 inch lbs. (7 - 10 Nm)
11. Install the upper timing belt cover and five bolts.
Tightening torque: 61 - 87 inch lbs. (7 - 10 Nm)
12. Install the power steering drive belt and set belt deflection.
Power Steering Belt deflection:
New: 0.31 - 0.39 inch (8 - 10 mm)
Used 0.35 - 0.43 inch (9 - 11 mm)
Picture 15
13. Tighten the lock bolt (A) and mounting bolt (B).
Tightening torque: 27 - 34 ft. Lbs. (37 - 46 Nm)
14. Install the fan pulley.
15. Install the generator drive belt and adjust belt deflection by tightening adjusting bolt (c).
Generator Belt deflection:
New: 0.24 - 0.31 inch (6 - 8 mm)
Used: 0.27 - 0.35 inch (7 - 9 mm)
Picture 16
16. Tighten generator mounting bolts (A and B).
Tightening torque:
A: 16 ft. Lbs. (22 Nm)
B: 32 ft. Lbs. (45 Nm)
17. Install A/C drive belt and set belt deflection by tightening adjusting bolt (B).
A/C Belt deflection:
New: 0.27 - 0.35 inch (7 - 9 mm)
Used: 0.31 - 0.39 inch (8 - 10 mm)
Picture 17
18. Tighten the adjusting bolt (B) and idler pulley bolt (A).
Tightening torque: 23 - 25 ft. Lbs. (31 - 34 Nm)
19. Install the splash guard and tighten the four mounting bolts.
20. Install the fan and fan shroud.
Picture 18
21. Install the four fan bolts and tighten.
Tightening Torque: 24 ft. Lbs. (32.6 Nm)
Picture 19
22. Install the five fan shroud mounting bolts.
Tightening torque: 69 - 95 inch lbs. (7.8 - 11 Nm)
23. Install the fresh air duct.
24. Install the hose at the resonance chamber.
25. Install and tighten the clamp at the air intake housing.
Picture 20
26. Install the two fresh air duct mounting bolts and tighten.
Tightening torque: 69 - 95 inch lbs. (7.8 - 11 Nm)
27. Reconnect the negative battery cable.
_____________________________________________________
Here are the directions for the front crank seal. Pics attached correlate with these directions.
REMOVAL
1. Disconnect the negative battery cable.
2. Remove the four undercover bolts.
3. Remove the engine undercover.
4. Remove the timing belt.
5. Remove the timing belt pulley lock bolt.
6. Remove the timing belt pulley.
NOTICE: If necessary, remove the pulley with a steering wheel puller (commercially available).
7. Remove the pulley Woodruff key.
8. Cut the oil seal lip with a razor knife.
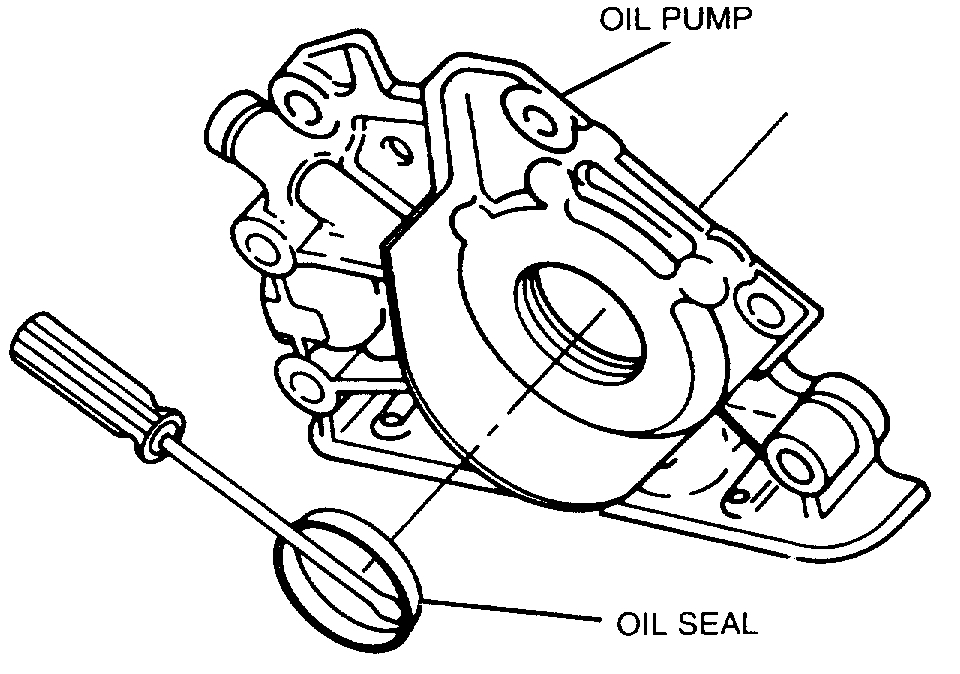
Picture 21
9. Remove the oil seal with a screwdriver protected with a shop rag.
INSTALLATION
1. Apply a small amount of clean engine oil to the lip of a new oil seal.
Picture 22
2. Push the oil seal slightly in by hand.
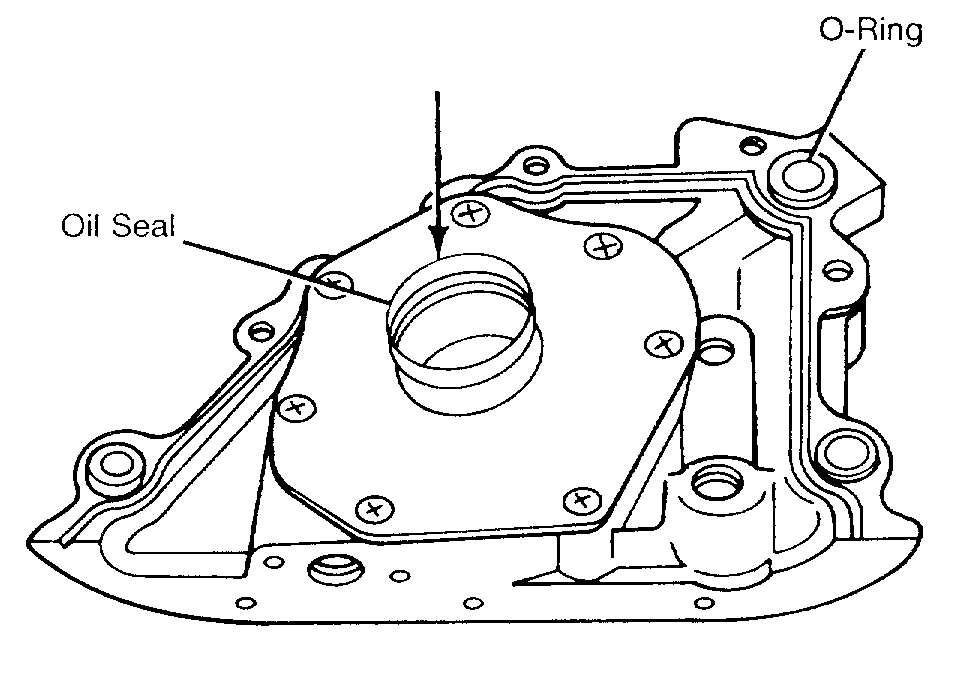
NOTICE: The oil seal must be pressed in until it is flush with the edge of the oil pump body.
Picture 23
3. Install the oil seal into the oil pump body.
4. Install the timing belt pulley.
5. Install the pulley Woodruff key.
6. Install the pulley lock bolt.
Tighten the lock bolt to 116 - 123 ft. Lbs. (157 - 167 Nm)
7. Install the timing belt.
8. Install the undercover.
9. Install the four undercover bolts.
Tighten the four bolts to 18 ft. Lbs. (25 Nm)
10. Connect the negative battery cable.
11. Start the engine and check the ignition timing.
____________________
Let me know if this helps or if you have other questions.
Take care,
Joe
Images (Click to make bigger)
Wednesday, April 7th, 2021 AT 1:45 PM