Tie rods and ball joints

Tiny
RWALLACE33
  • MEMBER
  • 1996 CHEVROLET 1500
  • 5.7L
  • V8
  • 4WD
  • AUTOMATIC
  • 300,000 MILES
Before we get started here, I fairly new to wrenching on my own vehicles. Only done five or six jobs on my truck. So I am very cautious and sometimes not. I tend to overthink things.

1. I feel like I over tightened my inner tie rod ends, so I backed off then realized that was the stupidest thing. So I tightened more to match the cotter pin hole with castle nut. Should I just leave it? Or try to pop back out and re-do with torque wrench. Part is a es2838rl inner tie rod.

2. When I put back together. What should I do to my steering knuckle and hub Assembly? Should I wipe the old grease off and rub new stuff all over it?

3. Also when I put my new upper control arm in, should I tighten the two upper bolts after? Or is there an angle I want to tighten at? Thanks I appreciate the help so much!
Thursday, December 6th, 2018 AT 5:45 PM

10 Replies

Tiny
CARADIODOC
  • MECHANIC
  • 33,825 POSTS
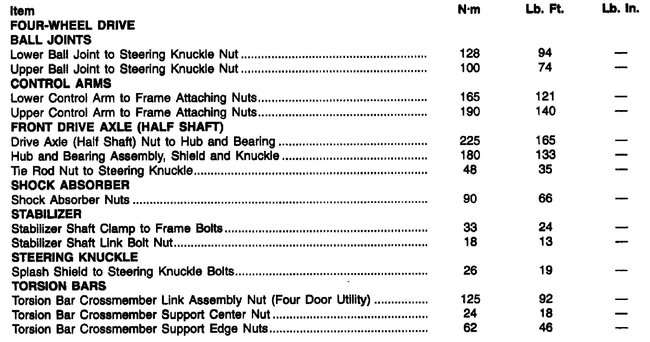
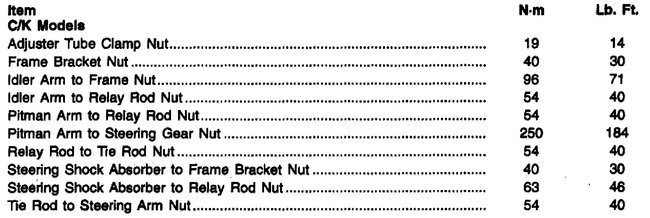
I can help with some of your questions. When you have a castle nut, tighten it to the spec listed on the sheet that comes with it. If none is provided, use the manufacturer's spec. I can look that up for you next time. Once you get it there, always tighten it more, just enough for the hole to line up for the cotter pin. If you already over-tightened the nut, you likely would have felt the threads start to peel, then the nut would quickly turn easier. Invest in a click-type torque wrench for jobs like these. Once tightened, do not back the nut off.

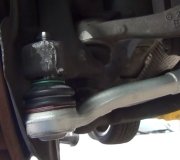
If you ever run into a tapered stud on a tie rod end or ball joint that has come loose, that joint and the spindle must be replaced. The stud is held tight by its friction fit. When it works loose, that taper in the spindle becomes deformed and somewhat rounded. A new tapered stud will not match, and besides working lose again, it will not be fully-supported near the ball/large end, and that can cause the stud to snap from the impacts from normal driving.

Do not put any grease on the tapered stud or in the hole. Some misinformed people do that thinking the parts will come apart easier next time, but that is exactly what you do not want. Wrapping on the side of the knuckle, (spindle), with a hammer, beside the stud, will shock it free next time.

I am not sure what you are asking for number three, but it sounds like you are aware of a common do-it-yourselfer mistake and want to avoid it. Any time you have a rubber bushing with something inside that is supposed to rotate, such as with a control arm, those must always be tightened with the vehicle sitting at normal ride height. That means leaving the bolts loose, then bouncing the vehicle a few times before crawling underneath to tighten and torque those bolts. When I got backed up with suspension work, my coworkers would replace parts then drive the vehicles around in the parking lot before sending them to me for the alignments. Once in the air on my drive-on hoist, it was easy to tighten those bolts. Too many people throw on a new control arm, then tighten the bolts when the car is still jacked up with the wheel off and the suspension hanging down. When they do that, when the car is lowered to the ground, those parts move up, but the bushings are clamped in a permanent twist. As the car bounces up and down, that twists the bushings beyond the range they were designed for and will greatly decrease their life.

Here is some articles that will provide more information:

https://www.2carpros.com/articles/tie-rod-end-replacement

https://www.2carpros.com/articles/lower-control-arm-bushing-replacement

https://www.2carpros.com/articles/upper-control-arm-replacement
Was this
answer
helpful?
Yes
No
Thursday, December 6th, 2018 AT 7:10 PM
Tiny
RWALLACE33
  • MEMBER
  • 24 POSTS
So when I over tighten the tie rod end the tie rod becomes deformed? Or the center link that it is tighten into?
Was this
answer
helpful?
Yes
No
Friday, December 7th, 2018 AT 10:10 AM
Tiny
RWALLACE33
  • MEMBER
  • 24 POSTS
And my upper control arm bolts should not be tightened until it is all put back together and on the ground?
Was this
answer
helpful?
Yes
No
Friday, December 7th, 2018 AT 10:11 AM
Tiny
CARADIODOC
  • MECHANIC
  • 33,825 POSTS
The deformed holes I mentioned occur when a tapered stud works loose after not being tightened fully. That can occur days or years after the part was replaced. Many people do not pay attention to the clunking noise and reduced handling. They keep on driving for days or weeks. That is when the tapered stud and the tapered hole rub against each other and wear, and that is when both parts must be replaced. Simply installing a new tie rod end or ball joint into the old hole will not solve the problem. The nice straight stud will not fully seat on the rounded hole.

Over-tightening the castle nut does not deform the tapered stud or hole. It stretches the threads and if bad enough, will start to peel the threads. At that point you would feel the nut start to turn with much less resistance. If you were still grunting on the wrench, I would leave it alone. Definitely do not back the nut off because it will become too loose to hold the stud in place.

Everything in the steering system can be tightened right away. Those include tie rod ends and ball joints because their rotational movement is designed to occur as the vehicle bounces up and down, and the steering system is turned left and right. It is the balls and sockets that make that possible, and they can sit in any orientation.

It is the parts inside rubber bushings that must be tightened when the vehicle is sitting at normal ride height. This is easiest to see on control arm bushings. Those bushings are clamped in place by the bolts on the inside and the metal sleeve on the outside. You want there to be no twist in that rubber when the vehicle is sitting in its most common position, which is when standing still. The bushings are designed to flex enough to accommodate raising the front end off the ground so the suspension parts are hanging down freely, all the way to the front end bouncing down as low as possible from bumps in the road. If you start out with a twist in a bushing, then you raise or lower the vehicle to one of those two extremes, it will put more twist in the bushing than the rubber can withstand. It might put up with that for a little while, but eventually the rubber will split or it will tear away on one end.

Since you are obviously aware of the right questions to ask, let me add one more tidbit to help you do the job right. This does not apply to any vehicle that has a rack and pinion steering gear. It only applies to vehicles like yours that use inner and outer tie rod ends that look similar, except for the reverse threads on one of them. Once assembled and installed, you will see that if you grab the adjuster sleeve, you can rotate it to rotate both sockets on their mating balls, but there is a limit as to have much you can do that. If you install a new sleeve with two new tie rod ends, that sleeve will turn very easily to make one of the alignment adjustments. The new balls and sockets will be pretty tight and hard to rotate by hand. What can happen is one tie rod end might get installed already rotated fully one way, and the other tie rod end gets installed rotated fully the other way. Once "toe" is set with that adjustment, which is the final alignment adjustment, the clamp straps are tightened to hold it there. Now if you try to twist that sleeve, you will find it cannot move one way because the inner tie rod is at the end of its travel, and it cannot be rotated the other way because the outer tie rod end is at the end of its travel the other way. That entire linkage assembly must be able to rotate freely as the suspension system goes up and down, and as the steering system is turned. If there is binding, the sleeve will try to twist or bend. All you have to do to avoid this is verify the linkage can be rotated back and forth when you have the clamps tight. This is normally checked by the alignment mechanic when the job is finished.
Was this
answer
helpful?
Yes
No
Friday, December 7th, 2018 AT 4:53 PM
Tiny
RWALLACE33
  • MEMBER
  • 24 POSTS
Okay, thank you so much for the help. You are the best! So basically where I am at, I just grabbed my two new tie rods matched them to look identical in length to the old ones. (Assembled still with sleeve) and I just tightened the inner tie rod to the center link. It is just sitting there right now. Tightened the sleeve so it does not move to much.
Now I just line the knuckle up with new lower ball joint and axle?
Install the tie rod to knuckle.
Install the upper control arm and joint. With out fully tightening both.
Install the rest, rotors and tire etc.
Then lower and tighten control arms and sleeve?
Was this
answer
helpful?
Yes
No
+1
Friday, December 7th, 2018 AT 6:08 PM
Tiny
CARADIODOC
  • MECHANIC
  • 33,825 POSTS
The sleeve for the tie rod ends must be tightened right away. There is no twisting force on that as the vehicle is lowered to the ground. The large nuts on the ends of the ball joints' tapered studs also must be tightened right away. There is no twisting force on them either. Only the control arm bushings get tightened after lowering the vehicle to the ground.

As an alternative, the vehicle is going to need an alignment right away, so tell the mechanic which parts you replaced. Most of them will loosen the control arm bushing bolts, then re-tighten them right away after bouncing the vehicle a few times to settle it. That brief period will let them snap back to their at-rest position. They will also take a peek at your other parts to see if something catches their attention, then they will do the alignment. The last step of all alignments is to set "toe" on the two front wheels. That is done by turning those sleeves connecting the inner and outer tie rod ends. You only need to make those clamps tight enough to hold them while you drive to the shop. The mechanic will tighten them when he is done.
Was this
answer
helpful?
Yes
No
Friday, December 7th, 2018 AT 6:58 PM
Tiny
RWALLACE33
  • MEMBER
  • 24 POSTS
Thank you very much you helped me a lot. This is my first time using this website and I am so happy I found it.
Was this
answer
helpful?
Yes
No
Friday, December 7th, 2018 AT 9:16 PM
Tiny
CARADIODOC
  • MECHANIC
  • 33,825 POSTS
I'm only an expert on three things, and you hit on one of them. That's why I appear to be as smart as I are. Keep me updated on your progress, and come back to see us again.
Was this
answer
helpful?
Yes
No
Saturday, December 8th, 2018 AT 3:17 PM
Tiny
RWALLACE33
  • MEMBER
  • 24 POSTS
Perfect. I got the knuckle on now and it’s in the lower ball joint, tie rod, and cv axle right now. Just finger tight.

Like I said before I matched the tie rods. In length and the steering wheel is straight but the hub is way off. Should I just spin the adjuster sleeve to make it a bit straighter? Or is it because it’s not hooked to the upper control arm, and the axle and joints arent fully tightened up?
Was this
answer
helpful?
Yes
No
Saturday, December 8th, 2018 AT 6:26 PM
Tiny
CARADIODOC
  • MECHANIC
  • 33,825 POSTS
Ooh. Watch out for the large axle nut. That has to be tightened to specs before you set the truck down and put its weight on the wheel bearing. Failure to have that nut tight will make the bearing noisy. It will buzz like an airplane engine. The spec. For that nut is 165 foot-pounds which is lower than for most little front-wheel-drive cars. A lot of people mistakenly install the wheel and tire, then set it down so the tire will hold the axle from spinning while they tighten that nut. By that time it's too late. Instead, just stick a punch or screwdriver into a cooling slot of the rotor, then tighten the nut.

When everything else is tight and finished, the last step before buzzing off to the alignment shop is to set "toe" for each front wheel as close as you can get it to reduce tire wear. Lock the steering wheel straight ahead, then twist each tie rod sleeve to bring each wheel straight ahead. Don't obsess over getting these perfect. You won't even be close, as a quarter turn is plenty to go from out-of-specs to in-specs. Your eyeballs aren't calibrated well enough to see that tiny change. When you get close, look through the slot in the sleeve to see how much threads of each tie rod end are engaged. You don't want to end up with one of them only having a few threads engaged. From memory of replacing these on GM cars in the '70s and '80s, those typically ended up with around 26 or 27 threads engaged, but just use that for reference. If you find that one is going to be wound in to the end of its threads, or is going to have just a few threads engaged, rather than popping the tapered studs apart again, just unthread the sleeve from both tie rod ends, then thread them back together while starting both at approximately the same time. You can wind the sleeve onto one tie rod end two or three turns, then work on starting the other tie rod end. Keep running them together to make the linkage shorter and shorter until that wheel is close to straight ahead to match the steering wheel. Tighten the two strap clamp bolts just enough so you can't spin the sleeve any more, then just a little more so they don't tear apart on the drive to the shop. These sleeves are the last thing to be adjusted by the alignment specialist.

If you put any lubricant on the threads for the sleeve, use only axle grease or a spray lithium-based grease. A long time ago I started lubing tie rod threads with Chrysler's Rust Penetrant, thinking these cars were coming in once a year for maintenance alignments, and that would insure the sleeves were easy to adjust. What I learned was penetrating oils open the way for moisture to follow it in, then those parts became rusted together so tightly that I needed a torch to get them loose. Don't use any type of anti-seize compound either on any steering or suspension parts. That stuff will prevent the clamping action from holding parts tightly together, and they will slip.
Was this
answer
helpful?
Yes
No
Sunday, December 9th, 2018 AT 11:25 PM

Please login or register to post a reply.

Related Tie Rod End Content

Tie Rod End Replacement Mercedes Benz
VIDEO

Sponsored links