My truck will not start

Tiny
JORDANR
  • MEMBER
  • 1992 GMC TRUCK
  • 5.7L
  • V8
  • 4WD
  • AUTOMATIC
  • 260,000 MILES
I recently replaced the starter and solenoid, ignition switch on the column, battery. Everything on the dash works fine. When attempting to start I hear an audible click from the starter solenoid but get no cranking at all. Have tried to start in all gears to see if the park/neutral switch is bad. I can only attempt to start in park and neutral, in the other gears the key cannot be turned all the way to start. I'm thinking maybe the neutral switch is not letting power through to the starter or a possible wire somewhere in steering column.
Wednesday, January 1st, 2020 AT 9:31 AM

29 Replies

Tiny
CARADIODOC
  • MECHANIC
  • 33,741 POSTS
Hold on. If that click you're hearing is rather loud and easily heard from some distance from the truck, the neutral safety circuit is working.

Why did you replace the starter? Were you having this problem before, and you assumed it was due to a bad starter, or did this problem first occur after the new starter was installed?

The starter system can be broken into three distinct circuits. The low-current circuit includes the ignition switch, neutral safety switch, and the starter relay in the under-hood fuse box. That circuit draws less than a quarter amp of current which can easily be handled by the little contacts in the two switches. All of that is working.

The medium-current circuit is turned on through the contacts in the starter relay, and includes the solenoid bolted to the top of the starter motor. That circuit draws around 15 - 20 amps. The solenoid has two functions, The first is to physically shove the starter's drive gear into mesh with the ring gear that rotates the engine. That takes a lot of energy to do that. The magnetic field to move the metal core has to be really strong. That's why so much current is needed. The second function is once the drive gear is fully meshed with the ring gear, a large copper disc connects two really beefy contacts together to pass current to the starter motor.

That starter motor circuit is the really high-current circuit. It can draw well over 300 amps for the first instant to get the motor spinning, then current will drop down to around 200 amps. That high current is why the battery cables have to be so fat, and those are where most of the problems occur. The symptoms you described point to this too. Most people spend their time inspecting the positive cable, but problems are just as likely to occur with the negative cable.

For the negative cable, you'll see there is a second smaller negative wire going from the battery to a point on the truck's body. That is the return for the exterior lights, dash, interior lights, computers, and all the electrical items except what's on the engine. That wire has to be okay based on your observations the dash is working normally.

The best suspects are the two large battery cables, but these have to be tested under load, meaning while a helper is holding the ignition switch in the "crank" position. Of the thousands of strands of copper wire that make up each of these cables, all it takes is one to still be intact to get a good voltage reading that would falsely indicate the cables are good. Under load, not nearly enough current can get through. Just like standing on a garden hose and getting almost no water pressure at the nozzle, we need to measure voltage at the starter when it is trying to engage and run. The best way to do that is with a test light. If you don't know how to use one, here's a link to an article that explains it:

https://www.2carpros.com/articles/how-to-use-a-test-light-circuit-tester

You can find a perfectly fine test light at Harbor Freight Tools, any hardware store, Walmart, or any auto parts store. They cost less than ten bucks.

We want to test both battery cables. Each one can be tested separately, but for speed, it's faster to do both together at the same time, then, if that shows they have a problem, we can do each one individually to identify the bad cable. Connect the clip lead for the test light to a rust and paint-free point right on the engine. While that sounds easy enough, my next step is always to touch the probe to the positive cable on the battery. If the test light turns on full brightness, that two-second test verifies the ground clip is making a good connection. Between tvs and cars, I can assure you've I've gone down the wrong path at least a hundred times over the years from this simple mistake.

Now that we have confidence in that ground connection, you'll need to dig down to the starter and touch the probe to the larger copper stud. To encompass all the possible places a problem could develop, be sure the probe is on the stud, not on the terminal bolted to it. You will see the test light is full brightness.

During normal operation when the starter is working properly, the very high current it draws pulls the battery's voltage down to around ten volts, so it is normal to see the test light dim a little. What we don't want to see is the test light goes out completely. That is proof there is a high-resistance break in the circuit, similar to standing on the garden hose. You're going to see one of two things. The light is going to remain bright or it's going to go out. If it remains bright, no current is trying to flow, and that can only be caused by a bad contact disc inside the solenoid. If it goes out, one of the two cables has a bad connection.

Assuming the test light goes out, we have to test each cable individually to see which one is defective. Leave the clip lead where it is on the engine, and move the probe to the negative cable on the battery. Normally we would want to put the probe right on the post, not the cable clamp, but GM made that impossible by their use of side post terminals. For that reason, this test can't include that connection at the battery in the test. Instead, you'll have to do multiple tests to rule out that cable connection at the battery. Place the probe on the negative battery cable bolt head. The light will be off because these are both the same point electrically in the circuit. Now have your helper turn the ignition switch to "crank". If the test light glows or becomes full brightness, the break in the circuit is between the test light's clip and probe, meaning the negative cable. The light is supposed to stay off. If it does, we need to move on to the next test.

Connect the test light's clip lead to the battery's positive cable bolt head, then touch the probe to the large stud on the solenoid where you were before. Here again, these are both the same points in the circuit so the light should be off. Have your helper try to crank the engine again. If the light turns on, dim or bright, that cable has a bad connection, and it likely is not right at the battery. The most common cause is the copper strands of wire are corroded away under the insulation, down by the solenoid, where it's hard to see.

An alternative method of doing this test is to move the test light's clip lead from the positive battery bolt to the negative one. Now the test light will be full brightness when you touch the probe to the terminal on the solenoid. If the positive cable has a bad connection, the test light will go off when your helper tries to crank the engine.

Let me know what you find up to this point or if I need to clarify something. Also, if you're not hearing the solenoid make a single, loud clunk. we have to look in the low-current circuit.
Was this
answer
helpful?
Yes
No
+1
Wednesday, January 1st, 2020 AT 10:51 AM
Tiny
CARADIODOC
  • MECHANIC
  • 33,741 POSTS
I was going to post a drawing pointing out the starter relay location, and I see they didn't use one on your truck. Normally that was only left off on small import cars with tiny starter motors. That eliminates the medium-current circuit, then that heavy job is left to the tiny contacts in the ignition and neutral safety switches. That is a lot to ask of them, so they both become good suspects.

The story is the same if you're hearing the solenoid engage, but if it isn't, we need to diagnose the ignition switch circuit. To see if that low-current circuit is working, place the test light's clip anywhere on ground. That can be the battery's negative bolt, or anywhere on the engine. Place the probe on the smaller terminal on the solenoid, then have your helper turn the ignition switch to "crank". When they do, that is when the test light should turn on full brightness. If it does, that circuit is working. If it doesn't light up, we'll have to narrow the cause down with a few more tests.

While it's not shown in this diagram, GM usually had two smaller terminals on the solenoid, and those wires can't be switched around. At this point, rather than trying to figure out which terminal is which, just check for 12 volts on both of them when the ignition switch is in "crank". We'll figure out the next step once I know what you've found up to this point.

Don't overlook the new ignition switch if it's the type bolted to the top / side of the steering column. Those have slotted bolt holes because those are the adjustment. If it is misadjusted, you may not be able to turn the key far enough to engage the starter circuit.
Was this
answer
helpful?
Yes
No
Wednesday, January 1st, 2020 AT 11:04 AM
Tiny
JORDANR
  • MEMBER
  • 18 POSTS
Hi, wow thanks for all the info. That's amazing. I replaced the starter before because the stud for the control or the smaller one on the starter broke right off with the ringlet attached. When I tried to remove the large wire the stud broke off with a chunk of the starter. Who knows how old the old starter was. Probably quite old. Yes I can hear the audible click of the solenoid. I do not own a test light but I will buy one today and also verify that I have 12 volts going to my starter. I know all these starters for old trucks are re-purposed so on an off chance the starter may be bad too. Thanks a lot I never knew these lights were so handy or would've bought one years ago but the dimming feature certainly tells a lot more than resistance and voltage without having to use an ammeter or build in a circuit to check for amps with a meter. Thanks again. This has been most frustrating.
Was this
answer
helpful?
Yes
No
Wednesday, January 1st, 2020 AT 12:25 PM
Tiny
CARADIODOC
  • MECHANIC
  • 33,741 POSTS
By "re-purposed", do you mean the part is rebuilt? If so, that is common. A brand new starter usually only comes through the dealer, and only when the vehicle is still under warranty. For you or me to buy one would likely cost over $500.00. With rebuilt parts like starters, generators, and rack and pinion steering gears, it is the housing that is cleaned up and reused, along with internal parts that rarely fail, like armatures and field windings. The reputable rebuilding companies replace all the bearings, brushes, seals, any electronics like voltage regulators, along with any other parts that experience has shown to be high-failure items. The less reputable rebuilders clean everything up, then just replace what is defective or badly-worn.

Related to those high-failure items, GM redesigned their generators and starters for the 1987 model year, and went from pretty nice units to horrible designs, especially with their generators. They did have a real common problem with their starter solenoid housings warping. On some older vehicles this happened when they got hot from engine heat, then they'd work okay again after cooling down for a few hours. With the '87 and newer GM solenoids, they warped over time and stayed that way. It caused the movable plunger to stick and not engage the drive gear far enough for the contact disc to turn on, so you'd have the classic loud clunk / no crank problem like you described. A common observation, or clue, was the starter often worked okay with a jump-start from another running vehicle. The slightly higher voltage made the solenoid coil's magnetic field stronger, just enough for the plunger to move far enough.

They did have another problem caused by so many of us in the past getting a starter to work by banging on it. The stationary field windings, (which made all older starter motors become stronger and stronger the more they were loaded down), were replaced with really strong permanent magnets glued to the metal housing. We were warned at training classes to never bang on these as that could break the bond, then the magnet would stick to the armature causing it to drag.

I'm confident the aftermarket industry has come up with a change in the solenoid's design to prevent that warping problem, but GM builds about 80 percent of their own parts, including these starters, and they are well-known for taking a really long time to change or improve design problems. They're still having the multiple generator failures they had since 1987, as an example. If your starter has ever been replaced before, it likely had an improved solenoid on it already. Your current replacement should have a good solenoid too, but just for fun, if all the voltage tests say everything should be working, try increasing system voltage with a jump-start or large battery charger.
Was this
answer
helpful?
Yes
No
+1
Wednesday, January 1st, 2020 AT 2:24 PM
Tiny
JORDANR
  • MEMBER
  • 18 POSTS
Hey thanks again. So I checked the negative cable ground ground to the negative post. When engine in crank a green light on my test light came on. Not sure what that means.

When I went from ground to the brass jump from solenoid to starter the white LED and green one came on.
Was this
answer
helpful?
Yes
No
Thursday, January 2nd, 2020 AT 10:31 AM
Tiny
JORDANR
  • MEMBER
  • 18 POSTS
Okay, so I read up on the test light I got. I guess the green led means a ground is present. So it makes sense that when I went from engine ground to neg battery terminal it came on. Though when I went from the stud connecting the solenoid and starter it's odd how both LED's came on. Thanks again
Was this
answer
helpful?
Yes
No
Thursday, January 2nd, 2020 AT 10:37 AM
Tiny
CARADIODOC
  • MECHANIC
  • 33,741 POSTS
I'd like to see your test light to be sure, but I think what you have is one that has a pair of clips that connect to both battery cables, then it lights up one color when you touch the probe to a good ground, and a different color when you touch it where there's 12 volts. If that sounds right, that test light is too high-class, but we can make it work. I have a friend who buys the best of every tool he has, and he has one like that, but in this case, the best light for this type of problem is a cheap one with just a single incandescent bulb inside.

Let me start out by explaining that digital voltmeters are the more expensive tool but the least accurate in this type of circuit because all they do is measure electrical pressure, meaning voltage. That's like the pressure gauge on a compressed air line. No air actually flows through the gauge. Likewise, with a digital voltmeter, no current actually flows through it. The circuit can have a defect that reduces how much current can flow through it, but as long as a tiny trickle can get through, the voltmeter will detect it and falsely indicate there's 12 volts there. Your two-colored test light is similar to the voltmeter in that it doesn't need much current flow to make it show a reading.

The cheap test light with a light bulb inside requires substantial current flow to make the bulb light up. The good news is we need well over 200 amps to flow to make a starter motor work. The cheap test light only needs less than half an amp to light up, so even here, as with the voltmeter, it can say the circuit is good when in fact, there's a defect big enough to stop the starter from working.

All of this is why we have to force the starter to be in the circuit so the defect will cause a problem, then we can see the results of that with the test light. In this case, your electronic test light should work okay. The place to start is by placing the probe on the larger stud on the starter solenoid and observing what the light does. Now compare that to when your helper tries to crank the engine. Let me know what you find with that test.
Was this
answer
helpful?
Yes
No
+1
Thursday, January 2nd, 2020 AT 12:38 PM
Tiny
JORDANR
  • MEMBER
  • 18 POSTS
It only has one clip and than the light end. Yes, I didn't realize it was LED when I bought it. When I got home I thought it would be trickier than an incandescent bulb. By large stud, do you mean the branch that goes from solenoid into the actual starter or the contact with the large cable? With the location of the stud it's hard to get the light in there. That is why I went to the connection from solenoid to starter. By my guess, since the light came on it seems that the starter itself is getting voltage, possibly just not enough current. I was thinking of dropping the starter and inspecting everything on it since it's only two bolts. Is there a way to test the ampacity of the wire when the starter is dropped? I was also going to bench test the starter to make sure it's functioning properly. At least if I know the starter is functional and getting voltage to the starter lug, that could also mean the cable is to damaged to deliver the proper amount of current. Thanks again for the reply, much appreciated.
Was this
answer
helpful?
Yes
No
Thursday, January 2nd, 2020 AT 12:59 PM
Tiny
CARADIODOC
  • MECHANIC
  • 33,741 POSTS
Your understanding of the issue is a lot better than we usually run into. Bench-testing off the engine is not accurate because with the motor under no load, it only needs to draw around 50 amps. If you want me to, I can explain that in more detail after we have this problem solved.

You're also right about insufficient current flow. We could measure that with a magnetic amp meter placed near the wire, but we already know that is 0 amps because the starter isn't working. The exception would be if current was unusually high, as in over 400 amps, it would indicate the crankshaft is locked up and unable to turn. The better clue here would be to turn on the head lights, and you'd see them get real dim when trying to crank the engine.

The most accurate way to see if there's a high-resistance spot in the battery cable is by observing the test light right down by the starter solenoid. The stud we want is the one the fat battery cable is bolted to. If there's heavy corrosion in that cable, the test light will get dim during attempted cranking. If you go to the other stud with the braided wire that goes into the starter motor, that one is after the internal contacts, and since it's a new starter and should be good, you should find the same voltage there, (only during attempted cranking), as you do on the battery cable stud.

It just occurred to me you may have another problem with your test light. LED's are diodes. Those are one-way valves for electrical current flow, and they either get turned fully-on or fully-off. There is no in between. There will be other circuitry inside the light, or at a minimum, a resistor, to use up part of the 12 volts because all LED's turn on with 1.2 volts. Without a resistor, the LED would melt and short if 12 volts was applied directly. What that means to you is you are unlikely to see a change in brightness from 12 volts down to perhaps as low as five or six volts. The brightness change we need to see is real evident with an incandescent bulb. For that matter, if you have some small clip leads, (jumper wires), you could even connect a common 3057 brake light bulb between ground and the stud on the solenoid. That would be just as accurate as the cheaper test light.
Was this
answer
helpful?
Yes
No
Thursday, January 2nd, 2020 AT 2:07 PM
Tiny
JORDANR
  • MEMBER
  • 18 POSTS
Hi there, thanks again for answering. So I took the starter out and tested it off a battery and it works fine. There is a lot of green corrosion going into the cable on the starter end. I'm picking up the cable today and will change it out. Curious about something. Seeing as how I'm hearing the starter solenoid plunge as it's supposed to. Meaning that obviously there's power there. Now as soon as that solenoid closes it's a direct contact to the starter. So seems as though it has to be the ampacity of the cable. Now unless I'm missing something and there's another signal that is required to be there for the starter to turn, bit I don't see it being that considering there's only two wires to the starter assembly. One being the big one from the battery and the other going to the start post on solenoid from I'm assuming the ignition system. If my thinking is correct the only things it could be are either the battery or the cable. I've had the battery checked at an auto store so by my thinking it should be the old cable that's giving me issues. Guess I'll find out this afternoon. Thanks again.
Was this
answer
helpful?
Yes
No
Sunday, January 5th, 2020 AT 10:56 AM
Tiny
CARADIODOC
  • MECHANIC
  • 33,741 POSTS
This is where the voltage tests would give you confidence in the diagnosis. You'll find 12 volts at the larger stud on the starter solenoid, but to see that, all the battery cable has to do is pass less than half an amp. You're correct about the positive cable needing to be able to handle the very high starter current. This is where it can't do that if it is heavily-corroded under the insulation, and it is where the test light would tell you that by going dim or out when your helper tries to crank the engine.
Was this
answer
helpful?
Yes
No
Sunday, January 5th, 2020 AT 12:04 PM
Tiny
JORDANR
  • MEMBER
  • 18 POSTS
Good day. I fixed the truck finally. So with no where to go and the wrong test light I decided to change out the red battery wire. While changing it I noticed the previous owner tied a wire into the main cable for a questionable trailer brake set up. While seeing where that cable went the guy ran the cable behind the engine between the block and firewall. Than it went through the firewall beside the cruise control module. With no protection and just being hung along other components. Anyhow, on the wire near the back of the block the wire was obviously to close to the engine and started melting through the outer insulation and through the two wires. So anyhow I cut that wire completely out and changed my old cable for the sake of it. Now my truck starts fine just like before. So basically the way I see it is either one could've been the issue. The main wire having to much corrosion and taking away too much current or the other random wire shorting all the starters current to ground. Anyways, thank you very much for the responses I wouldn't have been able to fix it without your insight and suggestions. Because of this experience I will be looking for an incandescent test light in case I have similar issues. Thanks a lot. If I get stumped again this site will be my first stop. Much appreciated.
Was this
answer
helpful?
Yes
No
Tuesday, January 7th, 2020 AT 6:43 PM
Tiny
CARADIODOC
  • MECHANIC
  • 33,741 POSTS
All right! One in a row.

I knew you could do it. Please tell your friends and neighbors about us, if you have any, and come back to see us again.
Was this
answer
helpful?
Yes
No
Tuesday, January 7th, 2020 AT 7:37 PM
Tiny
JORDANR
  • MEMBER
  • 18 POSTS
Hey me again. So my truck ran fine this morning to work and started right up fine. On way home for lunch when I'd push on the gas, the engine would sort of big down and chug. Since it's -20 C here I figured maybe it was cold from sitting for a while. So I let my truck run for a bit on lunch to warm up. Maybe 10 mins Max after driving for 5 mins. I than head out to go back to work. Initially truck turns over but doesn't start, kind of like not getting fuel or spark or air. Than o switch the key off and wait a minute. I attempt to start it again and I get nothing. No solenoid click, no starter engage or attempt. I also don't think my gauges really came on like normal. Anyways, a new day a new issue to figure out I suppose. Thanks again.
Was this
answer
helpful?
Yes
No
Wednesday, January 8th, 2020 AT 12:34 PM
Tiny
CARADIODOC
  • MECHANIC
  • 33,741 POSTS
This is actually a real common problem on all car and light truck brands, but I'm not sure if it applies back to '92 models. Look at the positive battery cable and you'll see a second, smaller wire there. Follow that one to see if it is bolted to the under-hood fuse box. If it is, that connection often works loose. Check that it is clean and tight.

Next, follow the smaller wire from the negative battery cable to where it bolts to the body sheet metal. Be sure that is tight and not rusty.

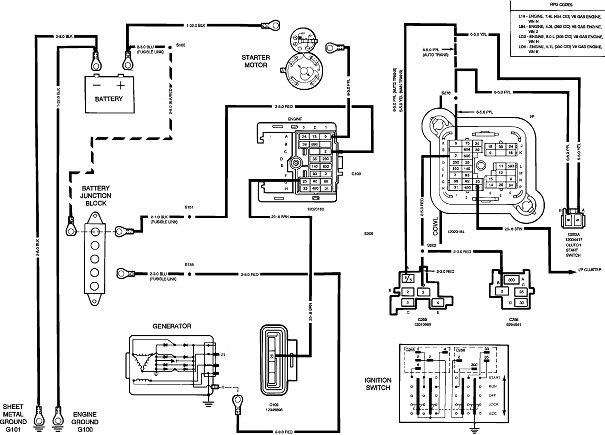
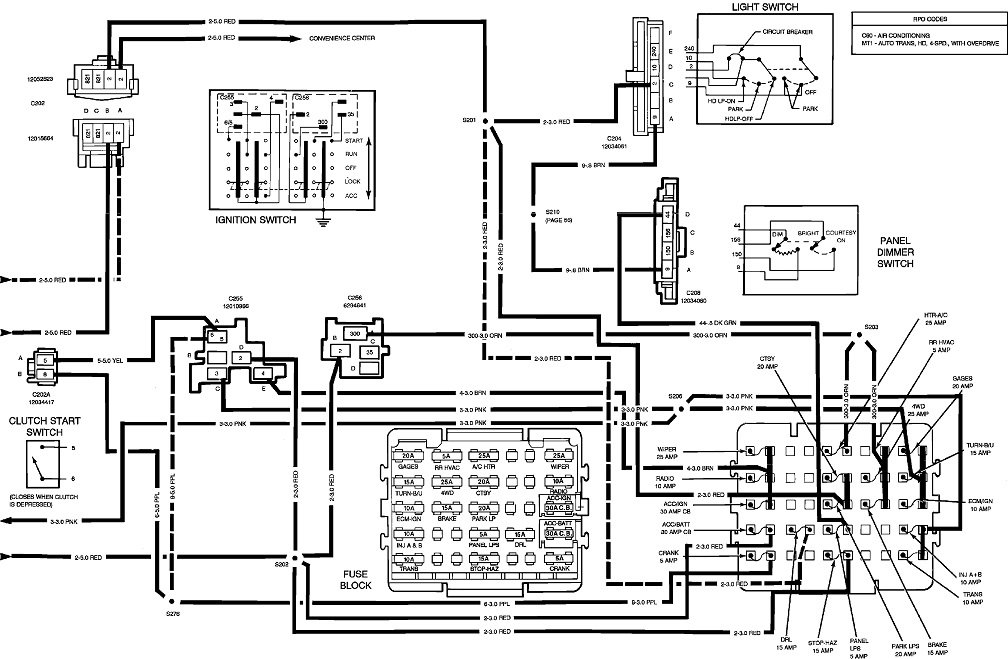
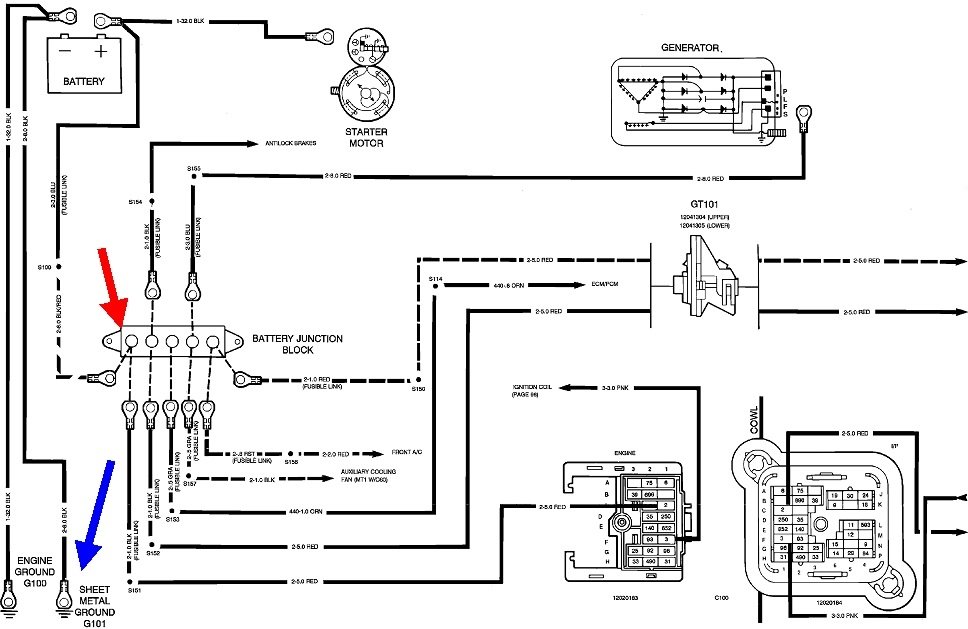
I found these diagrams for Power Distribution. Instead of the fuse box, check the connection on the "Battery Junction Block", by my nifty red arrow, and the ground connection by the blue arrow. Also check all those other connections on the Junction Block.

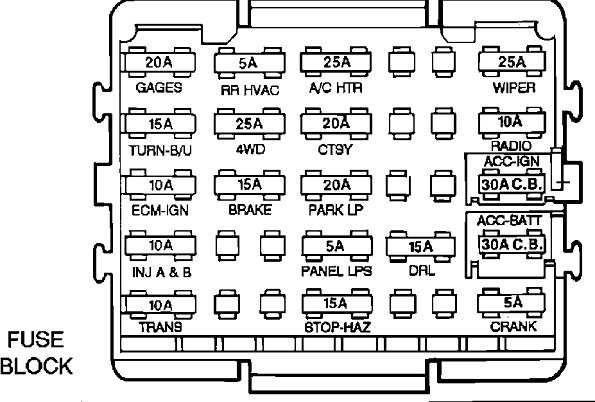
The third diagram is just a cropped and expanded fuse box layout from the second diagram. Use that for future reference, if you need it.
Was this
answer
helpful?
Yes
No
Thursday, January 9th, 2020 AT 12:26 PM
Tiny
JORDANR
  • MEMBER
  • 18 POSTS
Thanks for getting back to me. I actually just put that smaller red wire on that terminal block as I had to crimp it onto the new red battery wire. It's such a weird issue, works for half a day than starts having problems again. Even yesterday it worked after I moved the cover for said junction block because I thought it went on weird after initially replacing power line. So I figured maybe I pinched a wire or something. After I took it off the truck started up fine. I let it run for a bit, went out to check some grounds and it wouldn't start again. Another guy was saying to check all your grounds in the engine compartment, as a bad ground could cause similar issues. I'm going to check my grounds tomorrow with a multi meter and if all good maybe tear apart my dash. Is there anything other than major power wires that could do this? Whatever it is it cuts power to the starter solenoid which is odd considering it's on the main line. I'm wondering if maybe it's something in my dash like a bad connection somewhere. Bit again I'm no expert and don't know if that's completely possible or just me reaching. Thanks
Was this
answer
helpful?
Yes
No
Thursday, January 9th, 2020 AT 8:05 PM
Tiny
CARADIODOC
  • MECHANIC
  • 33,741 POSTS
Don't waste your time checking grounds with an ohm meter. That presents the same type of misguided results as with the large battery cables. A fraction of an ohm can cause a problem, but if you hold the meter's probes together on the meter's lowest range, you'll see there's a good three to five ohms of resistance just in the meter's leads themselves. That eliminates any accuracy in readings this low.

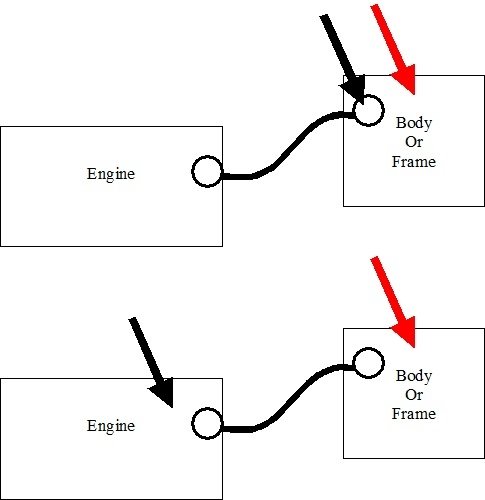
The better test is to perform a voltage drop test across the connection under test. You can also include the entire wire in the test by where you place the meter's probes. I threw together this little drawing to show this. In the top drawing, one meter probe is on a paint-free point on the body, and the other one is on the terminal bolted to it, (not the bolt head). Current has to be trying to flow through that connection, so lights, fan motors, or something in that circuit has to be turned on. While the resistance might be too small to measure directly, this will show how much voltage is dropped across that resistance. Ideally you want to see 0.00 volts, but it's not uncommon to see some. Whatever you find here, subtract that from the battery's 12.6 volts, and that's how much you're left with to run the circuit. When this undesirable resistance is causing the circuit to be dead, expect this voltage to be real high, even as high as 12.6 volts if there is no other alternate path for current to flow.

If you find close to 0.00 volts, the next step is to test every point in that circuit the same way. In this case that means leaving the black probe where it is, and moving the red one to the terminal on the engine. Now it's the resistance of the wire that's being tested. There might be a negative sign on the meter's reading, but that can be ignored. We're only interested in the value, not the polarity.

The next step is to leave the red probe on that terminal and move the black one to a paint and rust-free point on the engine block. That will test that one terminal.

The faster and more efficient way to do this is as shown in the lower drawing, with one probe on the body and one on the engine block. That encompasses the total of the voltage drops across everything in that wire, its terminals, the bolts, and the rust between them. There isn't exactly an industry-standard for what is acceptable because it depends on what the circuit is for. In high-current circuits like for the starter, 0.4 volts is the maximum for the entire cable, and 0.2 volts for any one connection in that cable. For extremely small-current circuits such as for computer sensors, as little as 0.001 volt has meaning and confusion to the computer.

By testing the entire circuit as in the lower drawing, you can test all of it with just one quick voltage test. If it looks okay, you can move on. It's only when this reading is high is when you found the area, and now those individual tests will narrow it down to the exact spot.

For the most part, if the circuit is dead or sluggish due to a high-resistance spot in the wire in the lower drawing, the resulting voltage drop you measure is going to be high and obvious. If that entire wire and its connections are not the cause of a problem, you're going to find the voltage drop is real small. Less is better and none is perfect.
Was this
answer
helpful?
Yes
No
Friday, January 10th, 2020 AT 12:06 PM
Tiny
JORDANR
  • MEMBER
  • 18 POSTS
Okay, so if I understand this properly, were looking for a voltage drop on the negative side of the vehicle circuits? If I'm going from a negative place in the circuit to the engine connector for ground, or the metal on the body or frame being negative. Wouldn't I get no drop because electrically there is no potential in the ground circuit. I get electrical theory, but to see a voltage drop wouldn't you have to be going from a positive potential to a ground potential? If you measure voltage across two grounding points, there wouldn't normally be any potential, or no voltage. Now I'd think you would get a voltage and a drop, bit in order for that to occur wouldn't there have to be hot wire being grounded somewhere to the frame or engine? Since we're testing the negative cable on the battery there shouldn't be any voltage. Or am I just misunderstanding what your telling me to do?
Was this
answer
helpful?
Yes
No
Friday, January 10th, 2020 AT 1:47 PM
Tiny
CARADIODOC
  • MECHANIC
  • 33,741 POSTS
Your understanding is absolutely correct, ... When there's no defect in the circuit. We're looking for a defect, and we see the evidence of that by the undesired voltage drop.

Perhaps, instead of thinking in terms of 12 volts in a positive side and 0 volts in the negative side, consider that every electrical circuit is one giant path from the positive battery post to the negative one. Ignore arguments from experts who insist current leaves the negative post. That's true, the negatively-charged electrons do leave there, but most of us are more comfortable starting at the positive post. Current leaves there, goes through wires, splices, connector terminals, fuses, switches, sheet metal, and more wires, then comes back to the negative battery post. As far as the electron is concerned, he doesn't know or care what the starting or ending point is. All he knows is he's going round and round like a car on the race track.

The important point is if the battery develops 12 volts, all of that has to be used up in the circuit. If, for example, a switch is turned off, all of that 12 volts will be used up, or dropped, across the switch contacts, leaving 0.00 volts to be split up among everything else in the circuit. In Electronics class, we prove that with a series of Ohm's Law formulas, but that's not necessary here.

When the switch is turned on, current will start to flow, but again, all of that 12 volts has to be used up somewhere. Ideally it will all be used up across the fan motor or light bulb, leaving 0.00 volts to be wasted everywhere else, but that isn't reality. All wires have some resistance, and current flow though a resistance results in a corresponding voltage being dropped across it. The smaller the wire's diameter, and the longer its length, the more resistance it's going to have. Any mechanical connection has some resistance that restricts current flow. Those include two mating terminals in a connector, arced switch or relay contacts, and terminals bolted to a fuse box or bolted to body sheet metal. Every one of those connections is supposed to have 0 ohms and therefore, 0.0 volts dropped across them when current is flowing through them. Since in reality there is always some resistance, there is always going to be some voltage drop. When you add up all those voltage drops across all the wires, terminals, switches, etc, they're going to total exactly what you started with at the battery.

All of those voltage drops are unavoidable and normal, but when one develops too much resistance is when the circuit stops working correctly. That undesirable resistance is usually too small to be measured directly with any kind of accuracy, but we can easily measure the results of that resistance with voltage drop readings. As I started to point out, we typically measure the voltage at a point, then at another point nearby, then calculate the difference to determine if the drop is excessive. Current flow can drop over time, especially when running a very high-current starter motor, so in that case, when you take your second voltage reading, battery voltage has dropped a little, making the second reading lower even when it would have been the same as the first one. That's one variable that is avoided when performing voltage drop tests. The second variable is to read a pair of voltages in a 12-volt circuit, most digital voltmeters use ranges of multiples of "2", meaning you have to use the 20-volt scale. On that range, the meter will read any voltage up to 19.9 volts, but with only one or perhaps two places of accuracy after the decimal point. Very often we're going to find the objectionable voltage drop is in the range of hundredths of a volt. There's no way to get that kind of accuracy on the 20-volt scale.

Instead of measuring at two points at two different times, and getting two voltages that are rounded to the point of losing the accuracy, those problems are avoided with the voltage drop test. The meter's probes are at the two points in the circuit, and neither one is placed on what we normally use as the reference point, meaning ground. Instead of calculating the difference in the two readings, this test takes the reading directly, and we're able to switch to the 2-volt range to get another decimal place of accuracy. The ground tests you're asking to do are being done on the ground connections, but not in relation to ground.

Think of the race car going around and around on the circle track. The starting line is right in the middle of the front stretch. From that point on, the car is leaving, just like current is leaving the battery. The positive side of the race track goes all the way to the middle of the back stretch. From there on, it's on the negative, or return side until it comes back to the starting line. You could measure the length of the track, the time it takes to make one lap, then calculate how fast the car went. Suppose that comes out to be 70 mph. That means the car went 70 mph in the front stretch, and 70 mph through the corners. You know that's not right. The driver had to slow down through the corners. If you wanted to know how fast he went through the corner, you would do a spot-check at that point with two timing devices placed a few feet apart. Think of those as your voltmeter probes. Speed isn't being measured in relation to a common reference, the starting line. It's being measure between two points. Your voltage tests have nothing to do with ground as the reference. You're measuring the change, or drop in voltage at a point in the circuit, and that point happens to be the ground terminal. In this case, your timing devices on the race track are at the starting line. That's a coincidence, not a requirement.

Another way to look at this is the race car takes 30 seconds to go around the track, and that 30 seconds is used up over the entire track. If you measure the amount of time it takes to travel 100 feet through the back stretch, ideally you'd love that to be 0.0 seconds, but you know that is unrealistic. There's going to be some time elapsed, and some time elapsed as the car crosses the third turn, and more time for the fourth turn, etc. All of those individual times will add up to 30 seconds. During time trials, the driver is looking for places where the time through some small stretch is too long, then he looks for ways to solve that. It doesn't matter if it's on the "positive side" leaving the starting line, or on the "negative side" approaching the starting line. Wherever it is, his time is too long in that spot. Likewise, it doesn't matter which half of the circuit you're in, you're going to find an excessive voltage drop at the point where there's too much resistance.

If I have you thoroughly confused, let me refer to basic electrical theory. Current flow through a circuit is like the water flow through a garden hose. Resistance reduces current flow just like you create resistance to water flow by standing on the hose. You always use up all of the water pressure you started with at the faucet. That leaves you with 0 psi after the nozzle. You always use up the voltage you started with at the battery.

You want that voltage used up to be across the motor or light bulb, not anywhere else. Voltage, current, and resistance are related through very strict, but simple mathematical formulas, but luckily, our job rarely requires us to do those calculations. Instead, it is sufficient for us to understand if you stand on the garden hose, water flow is going to go down. If you stand on the hose when water is flowing, there is going to be higher pressure on one side of your foot, and less pressure on the other side. You could measure both of those pressures, then calculate how much you're losing across your foot, or you could connect a gauge between both sides of your foot and read the loss directly.

In our world, it is sufficient to know that if resistance goes up, current flow goes down. And, ... When current flows through a resistance, it results in voltage being dropped across it, and that voltage can be measured. You're measuring speed at one spot on the race track, but I haven't made any reference to the starting line. It's not part of the story or the calculations. On your vehicle, you want to measure on the ground connections, which is valid, but where you're confusing the issue is you're measuring speed in turn four, on the "ground" or return side, and you're thinking a problem there is due to a defect in turn two. They're both part of the race track, or entire circuit, not related to each other in that way.
Was this
answer
helpful?
Yes
No
Friday, January 10th, 2020 AT 4:02 PM
Tiny
JORDANR
  • MEMBER
  • 18 POSTS
Hey sorry for not getting back it was -40 here all last week so to cold to work on the truck. So I noticed when I go in my truck that the interior light wouldn't be on sometimes. So I go out and wiggle the negative battery cable and was a bit loose so I tightened it and the truck fired up and ran. I let it run for a bit go back to the cable and make sure it's tight. Go to start it again and nothing. No click on starter solenoid or nothing. Just dash lights up and interior lights. So I buy a new cable from Canadian tire. I got a new bolt from work and install the negative cable. Same thing now. Truck doesn't crank or engage the solenoid again. To me it seems like a loose or bad connection somewhere in the starting circuit. I'm certain the starter connections are good. As well as battery connections, and connections to the terminal board in the engine compartment. That's all I got, any suggestions would be awesome. Thank you again.
Was this
answer
helpful?
Yes
No
Wednesday, January 22nd, 2020 AT 11:18 AM

Please login or register to post a reply.

Sponsored links