Surging and stalling on Idle and chugging at all speeds, codes P2074 and P0108

Tiny
SHARE1001
  • MEMBER
  • 2005 CHRYSLER PACIFICA
  • 3.5L
  • 6 CYL
  • AUTOMATIC
  • 171 MILES
Engine was surging and I smelled fumes inside the vehicle, no codes. Performed a fuel system clean. Got a tune-up with new iridium plugs. Car performed better but I was still getting fumes inside the vehicle. Still no code. Replaced the catalytic converter. Immediately after the install, I noted that engine was idling poorly, stalling on idle, stalling on slow turns, lower gas mileage. That same day I began getting codes, a cascade of them. First time I got codes for 02 sensors, which I replaced. Then got codes for EGR, Throttle Position, MAP and bad MAP connector. Replaced everything with Mopar parts. Car still idling poorly, RPM's surging on idle, stalling intermittently. Car chugging, as if gasping for air at all speeds. Codes P2074 and P0108 now showing. All work done immediately or soon after symptoms started within the space of about six weeks. All work done by a mechanic.
Friday, March 29th, 2019 AT 10:34 PM

7 Replies

Tiny
JACOBANDNICKOLAS
  • MECHANIC
  • 108,179 POSTS
Welcome to 2CarPros.

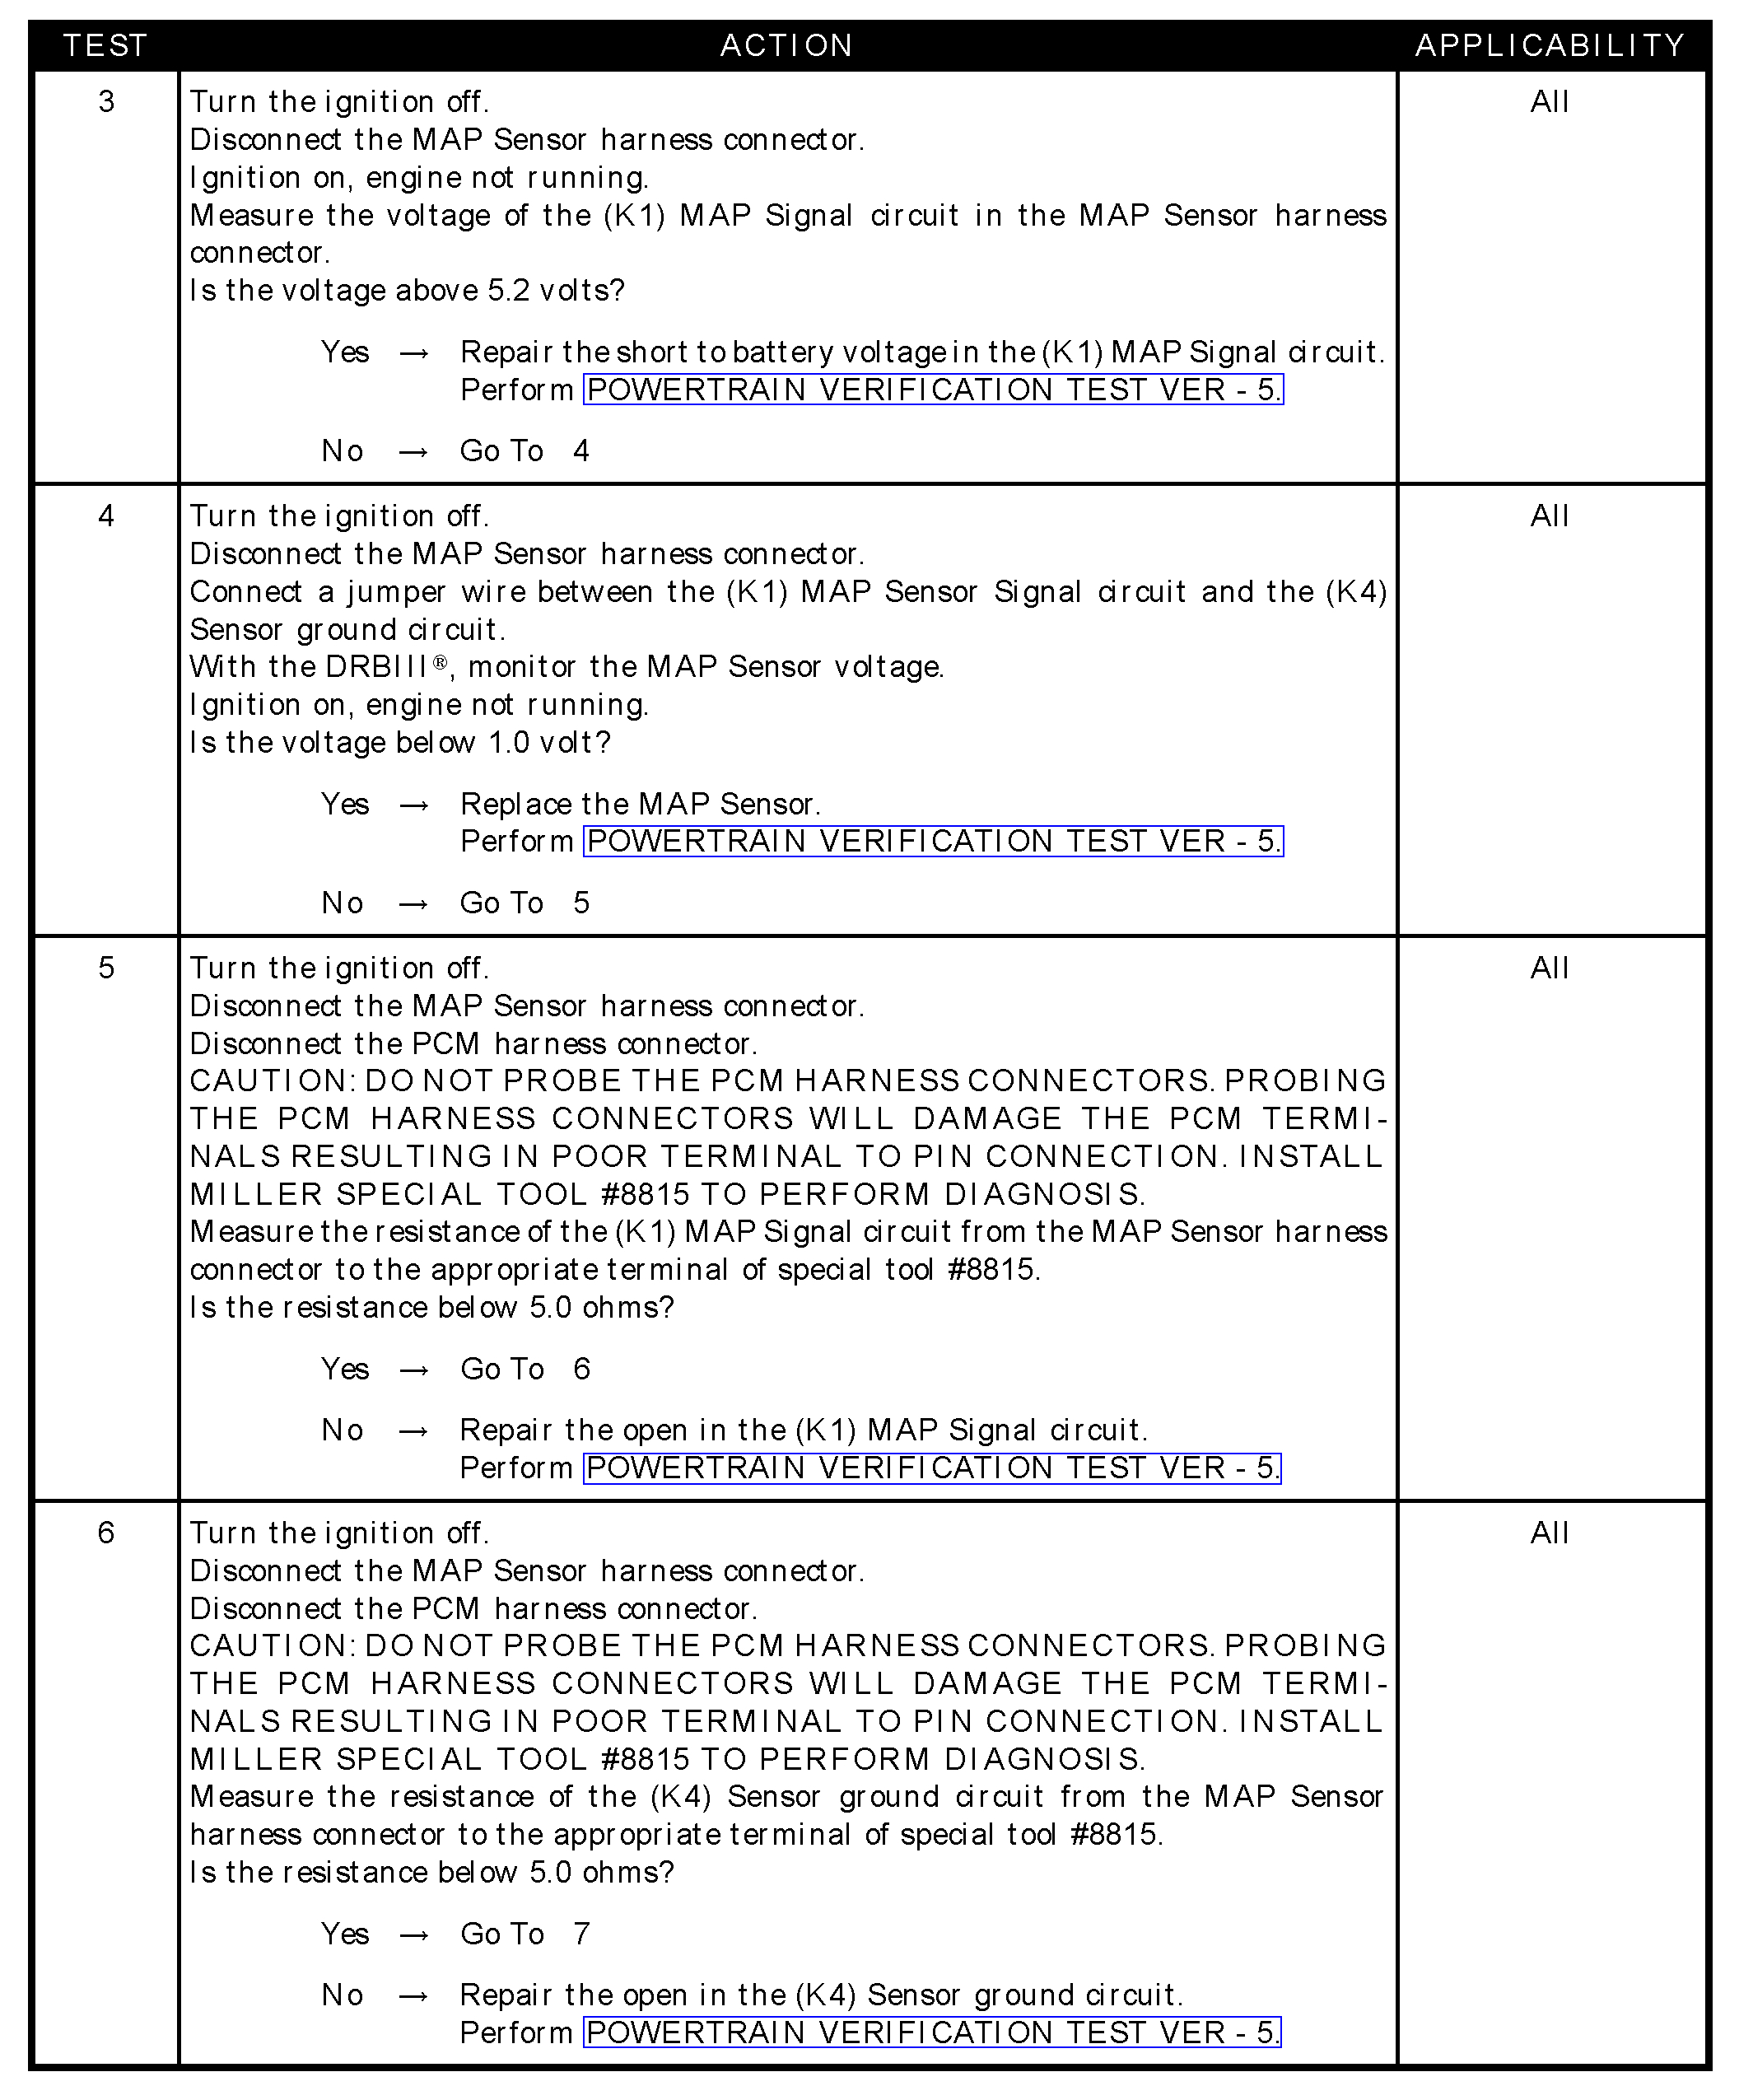
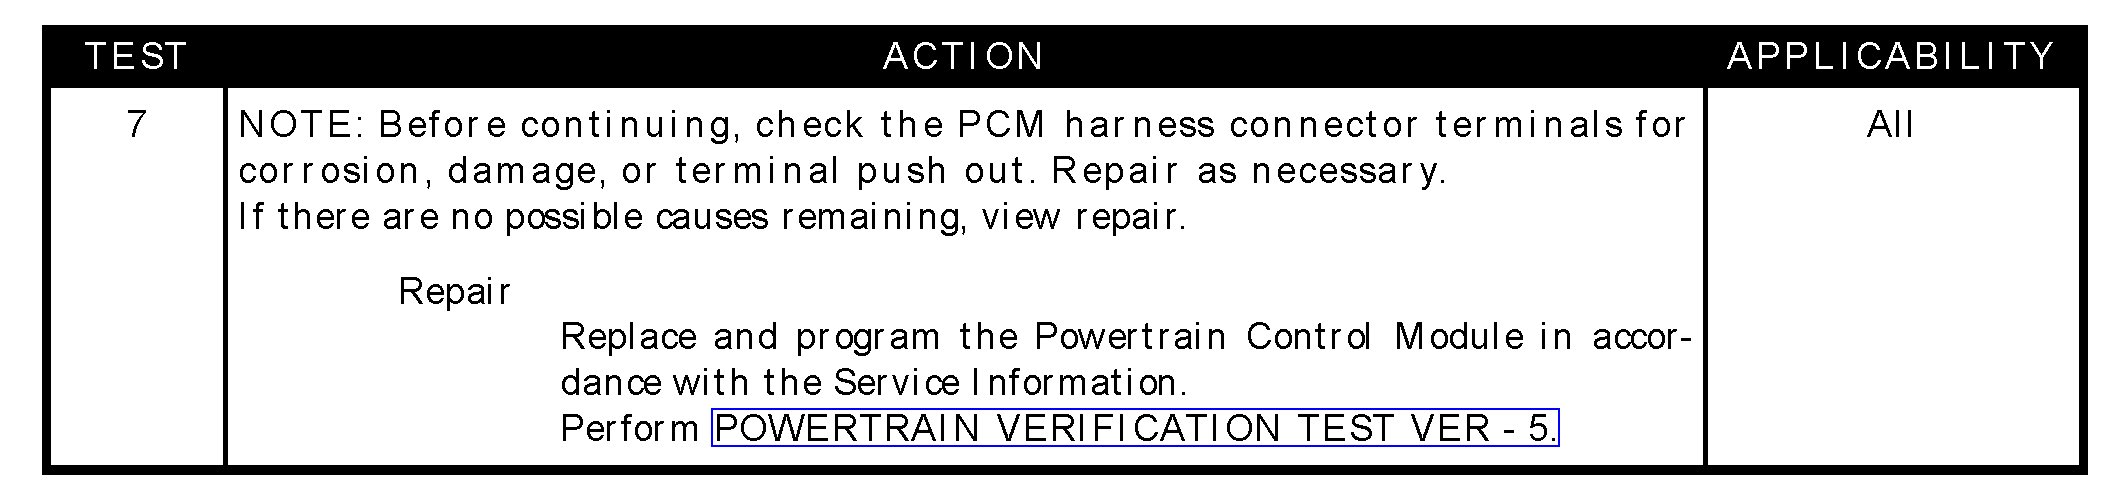
The P0108 is related to high voltage to the map sensor. Since you already replaced the sensor, you will need to follow a flow chart to diagnose the problem. I have attached three pictures. You will need to check voltage to the sensor to determine if everything is within spec.
See pictures 1-3 for the chart. My biggest concern is that you will need a live data scanner to perform these steps. You indicated little knowledge, but it sounds like you have already done a lot of work, so I hope the information is doable for you.

As for the other code, it is tied into the problem. Here are the possible causes. Note that one possible issue can be an engine vacuum leak. Here is a link that shows hot to check for one:

https://www.2carpros.com/articles/how-to-use-an-engine-vacuum-gauge

SYMPTOM
P2074-MANIFOLD PRESSURE/THROTTLE POSITION CORRELATION - HIGH FLOW/VACUUM LEAK

WHEN MONITORED
Engine Running, during all drive modes.

SET CONDITION
The relationship between the MAP and Throttle exceeds a predetermined value for a given engine speed.

POSSIBLE CAUSES
- Good trip equal to zero
- Vacuum leak
- High resistance in MAP (K6) 5 volt supply circuit
- Resistance to ground in MAP (K6) 5 volt supply circuit
- MAP sensor
- High resistance in (K1) MAP signal circuit
- Resistance to ground in (K1) MAP signal circuit
- High resistance in (K4) MAP ground circuit
- PCM
- TP sensor operation
- High resistance in TP sensor (K6) 5 volt supply circuit
- Resistance to ground in TP sensor (K6) 5 volt supply circuit
- TP sensor
- High resistance in (K22) TP signal circuit
- Resistance to ground in (K22) TP sensor signal circuit
- High resistance in TP (K4) sensor ground circuit
- PCM

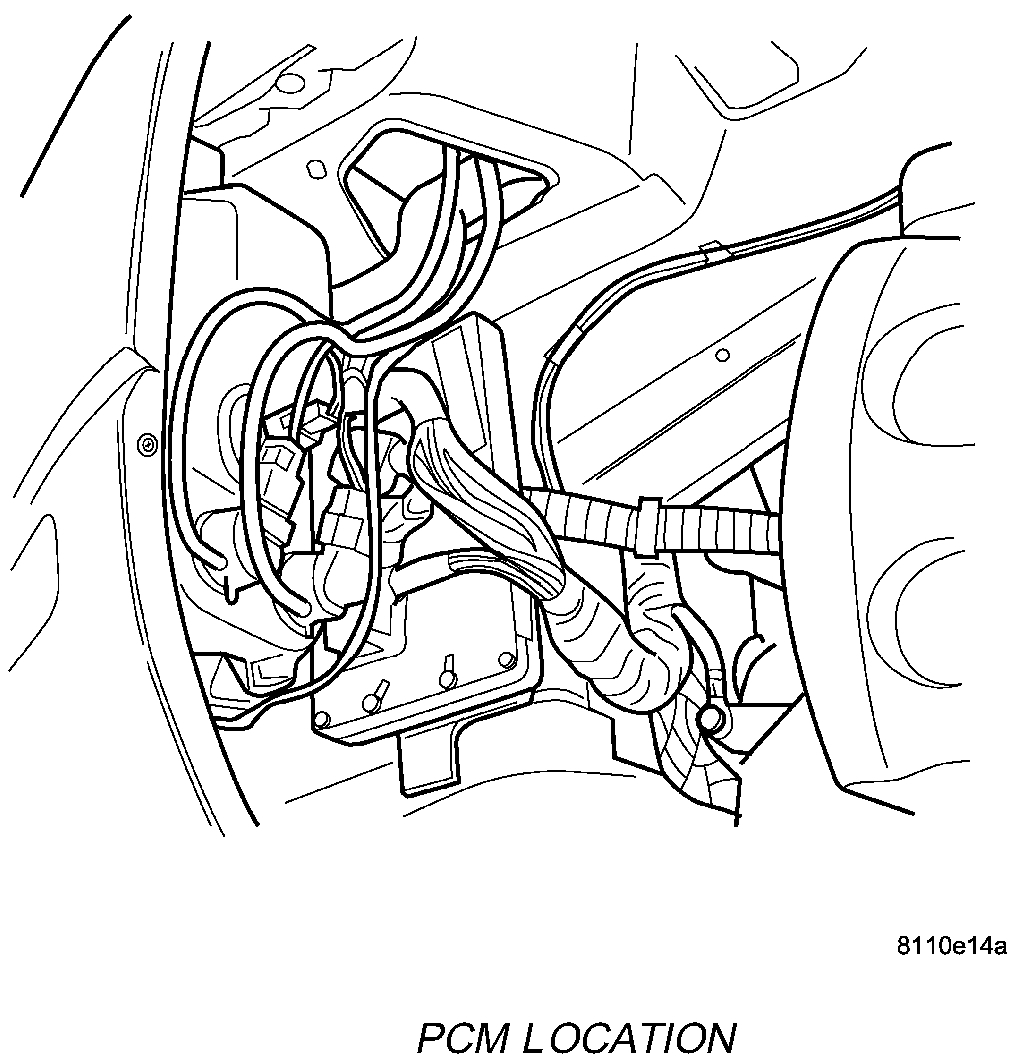
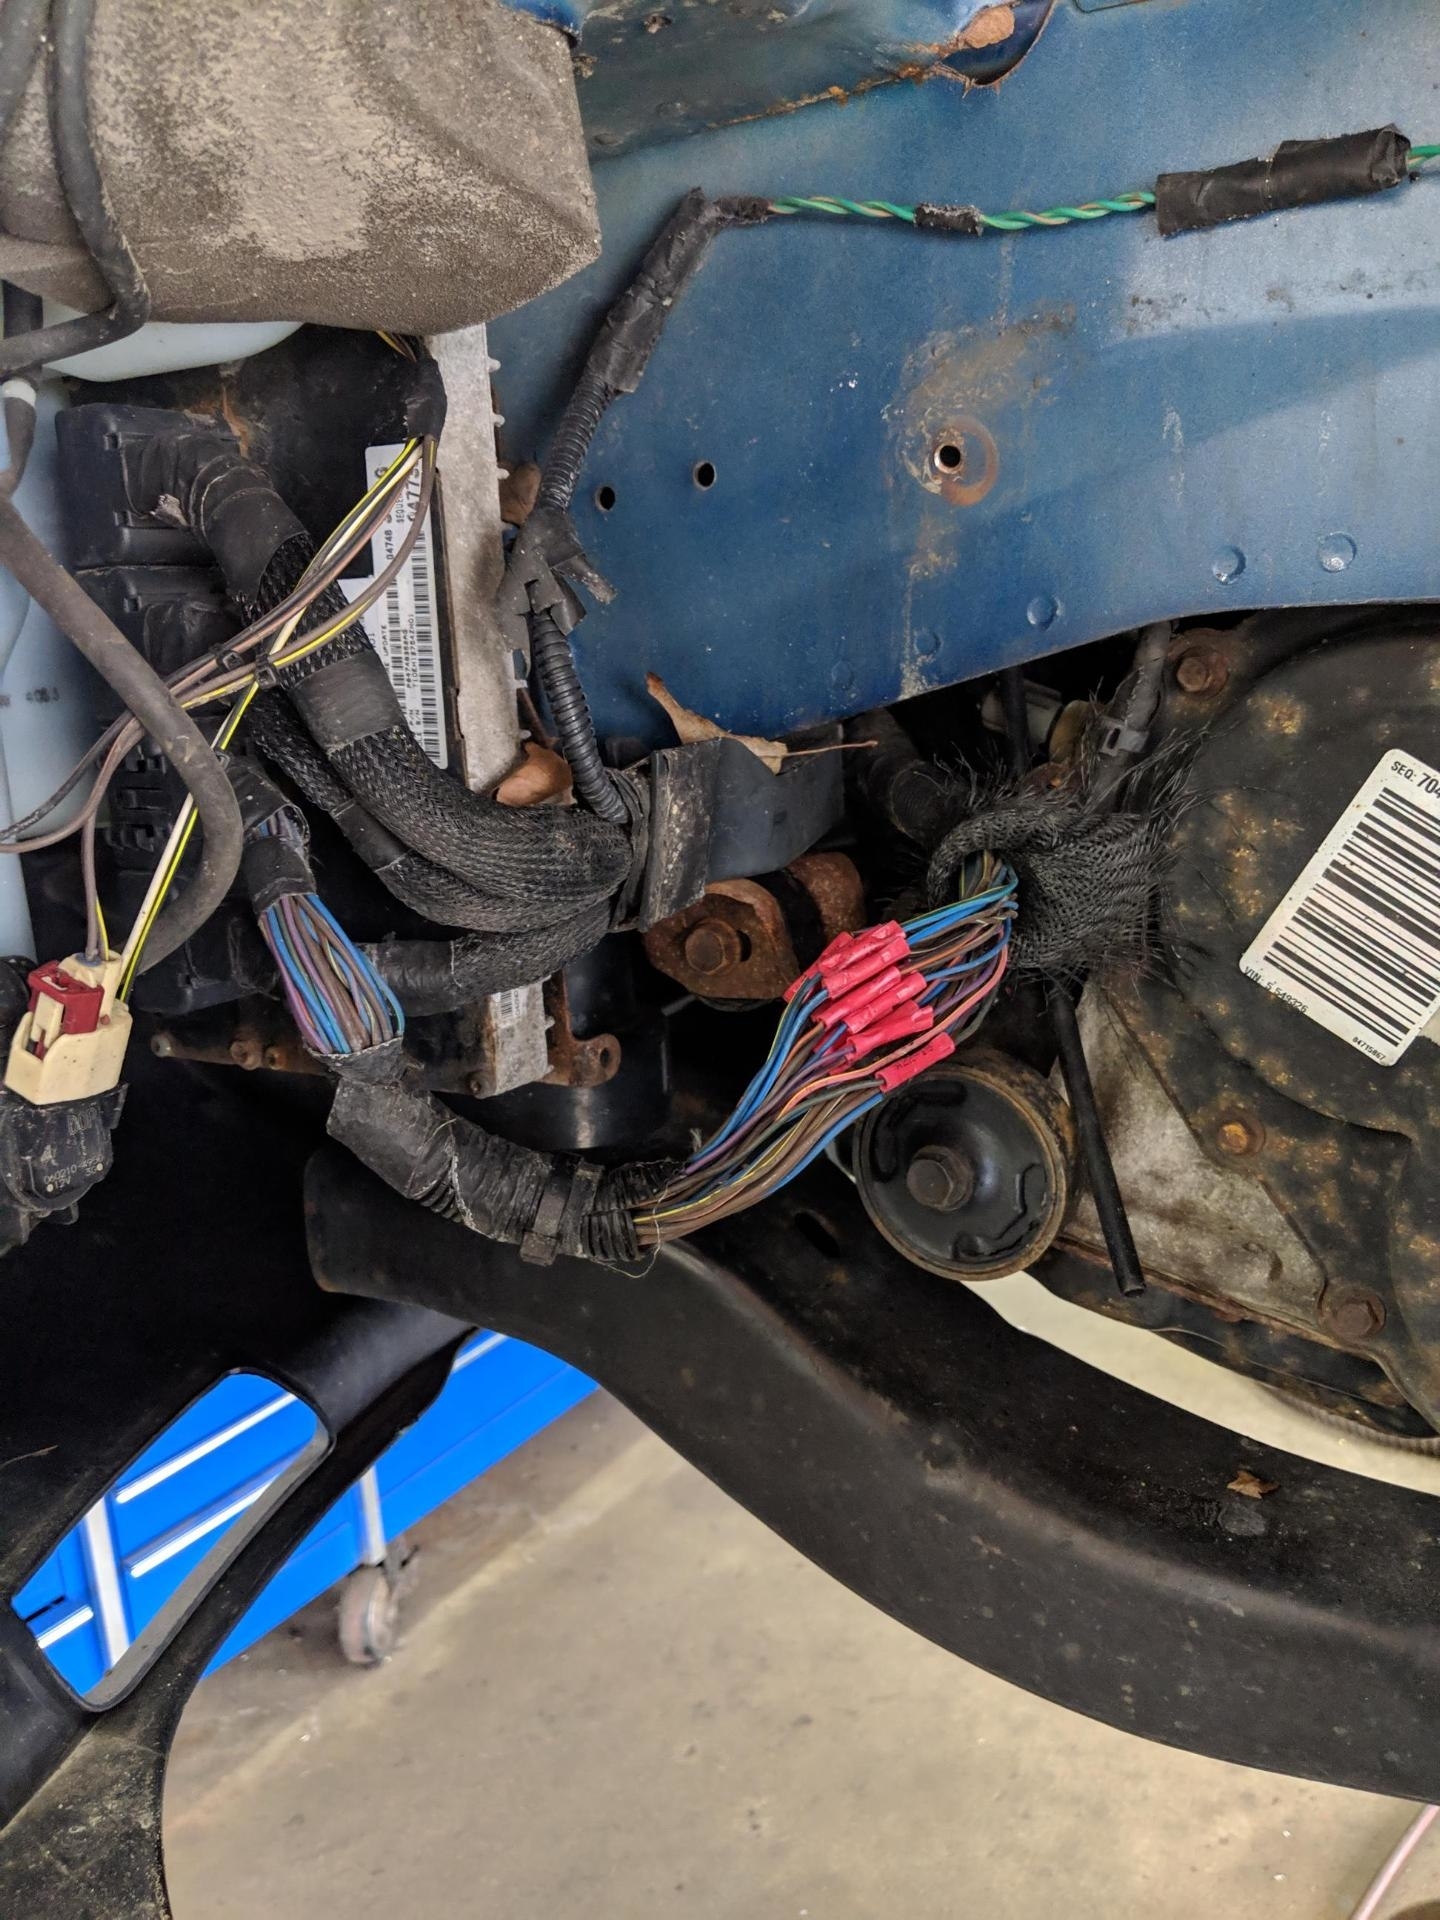
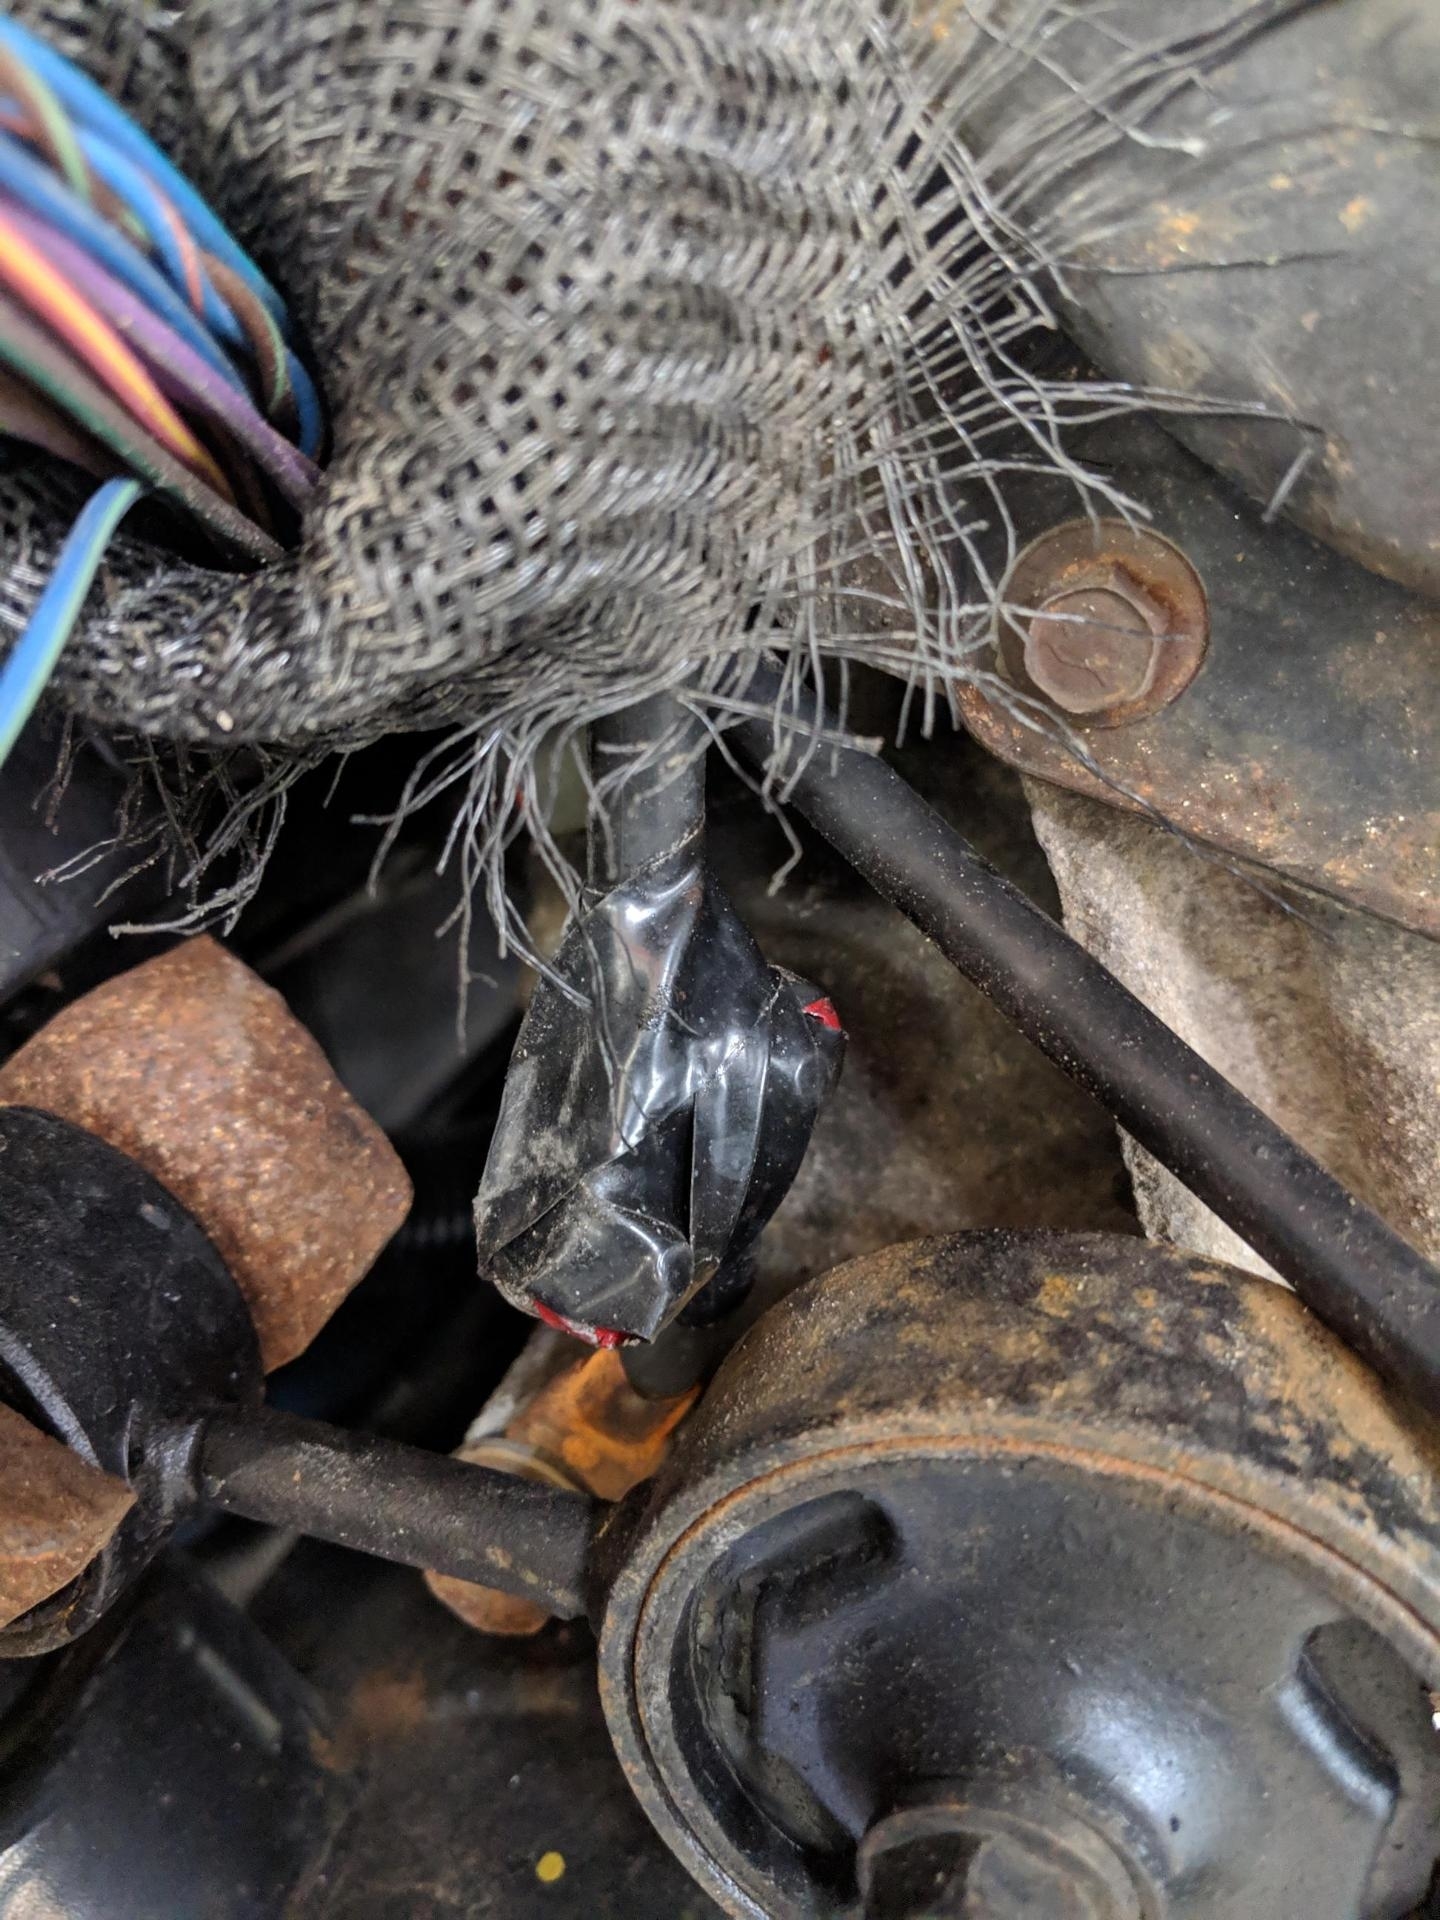
Now, with all of that in mind, this could be something really simple. What I need you to do is disconnect the negative battery terminal. Once that is done, I want you to disconnect the PCM terminals and inspect them for dirt, corrosion, any pins that are pushed in, or anything that can cause a poor connection. I have no idea whose idea it was to locate it behind the driver's side inner fender, but as you can imagine, they collect a lot of dirt. When checking, look for any evidence of wiring being rubbed through which can cause a short.

Here are directions for removing it if you want to go that far. I'm adding them to help you locate and see what is required to at least remove the connections. Do not reconnect the battery until the PCM connectors are securely reattached.

_________________________________________

Starting with picture 4, the remaining pics correlate with these directions.

REMOVAL
1. Disconnect the negative battery cable.
2. Raise vehicle and support.
3. Remove the left front wheel.
4. Remove the left front splash shield.

PCM Location
picture 4
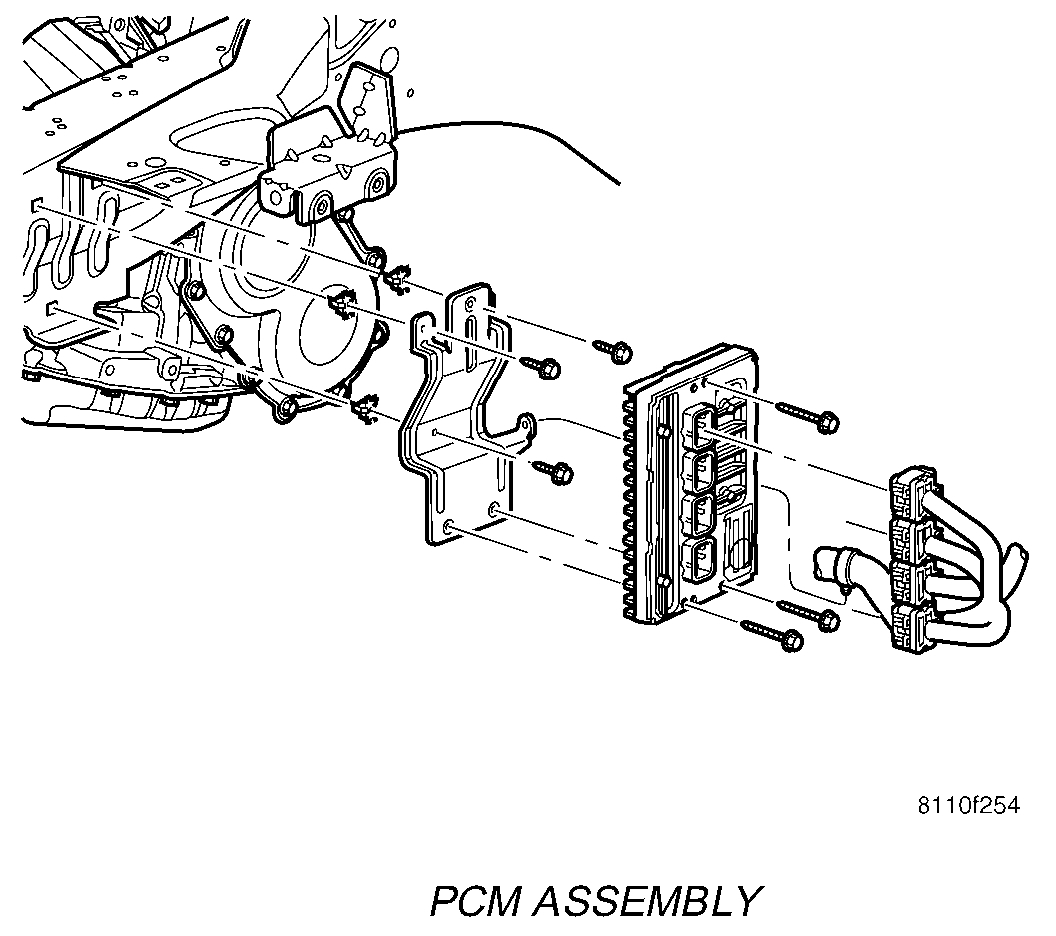
5. Unlock and remove the 4 connectors.
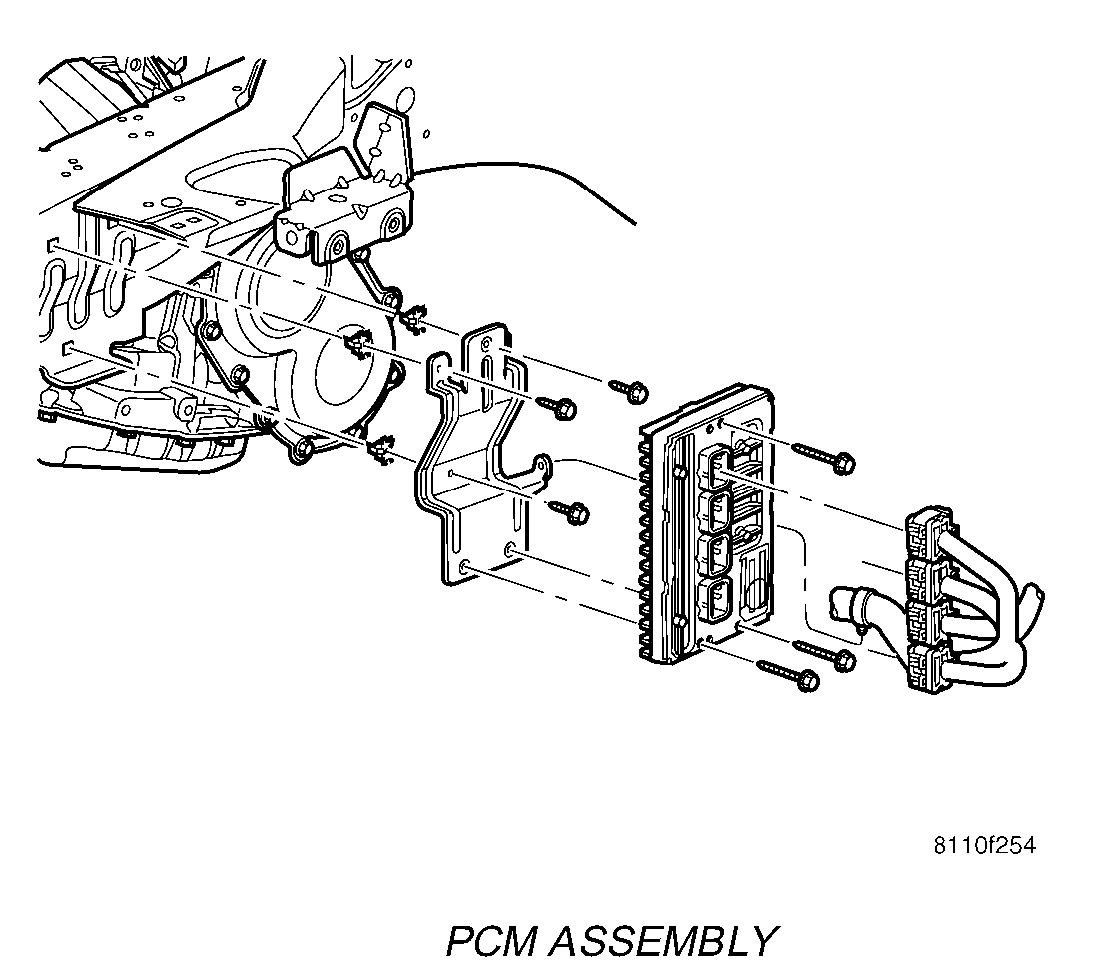
PCM Assembly
picture 5

6. Remove the 3 mounting screws.
7. Remove the PCM.

INSTALLATION

1. Install the PCM.

PCM Assembly
picture 6

2. Install the 3 mounting screws.
3. Tighten screws.

NOTE: The PCM connectors are color coded.

PCM Location
picture 7

4. Install and lock the 4 electrical connectors.
5. Install the left front splash shield.
6. Install the left front wheel.
7. Lower vehicle.
8. Connect the negative battery cable.

Let me know what you find.

Joe
Was this
answer
helpful?
Yes
No
Saturday, March 30th, 2019 AT 8:07 PM
Tiny
SHARE1001
  • MEMBER
  • 4 POSTS
Thank you so much. You're correct. I'm not a mechanic. I'm a 67 year old female. I've done my research though, every step of the way; so I'm able to communicate intelligently about the issues. I will have a mechanic follow the steps you indicated in your reply. I'll get back to you with the results. Again, thank you.
Was this
answer
helpful?
Yes
No
Saturday, March 30th, 2019 AT 8:30 PM
Tiny
JACOBANDNICKOLAS
  • MECHANIC
  • 108,179 POSTS
You are very welcome. Let me know if I can help.

Take care,
Joe
Was this
answer
helpful?
Yes
No
Saturday, March 30th, 2019 AT 10:08 PM
Tiny
SHARE1001
  • MEMBER
  • 4 POSTS
Hi Joe. Just wanted to follow-up with you. The problem turned out to be the PCM wires. They had been cut by a welder I hired to reinforce the engine cradle. He didn't tell me. He tried to repair it but did a very sloppy job (see attached image). He was the only one to have access to that part of my car. The issue started almost immediately after he performed the welding. As I was leaving his shop I actually heard scraping under my front left fender. I assumed it was rocks and sand from the dirt road I had to take to get to his shop. It didn't take long for the heat to break down the connectors and tape he'd used to repair the wiring. The welding job he did cost $750. The wiring repair cost $925 not including all of the "guesswork" repairs, i.E, valve and sensor replacements, that I had done prior to discovering the damaged wires. I don't know how I could have known what he had done. Even if the wires had been visible to me, I wouldn't have known what I was looking at. But perhaps my experience will help someone else. I'm grateful for the time you took with my case. I hope you continue to do this good work.
Was this
answer
helpful?
Yes
No
Sunday, May 19th, 2019 AT 10:16 PM
Tiny
JACOBANDNICKOLAS
  • MECHANIC
  • 108,179 POSTS
Welcome back and thanks for letting me know. All I can say is wow. There is no way you could have known that. However, you and I were on the right track with the PCM connectors. I surely hope you got reimbursed for the repair.

Is everything working properly now?

Joe
Was this
answer
helpful?
Yes
No
Monday, May 20th, 2019 AT 7:19 PM
Tiny
SHARE1001
  • MEMBER
  • 4 POSTS
Yes, it's working properly. The welder didn't own up to his mistake. So no reimbursement. But he was the only one with access. I could sue him - probably win. But I'm retiring in a couple of weeks. I had the Pacifica converted for full-time travel. I leave the day after retirement. I don't want my time tied up in legalities. Again, thank you so much for the time you spent on this problem. Take care!
Was this
answer
helpful?
Yes
No
Friday, May 24th, 2019 AT 9:48 AM
Tiny
JACOBANDNICKOLAS
  • MECHANIC
  • 108,179 POSTS
Welcome back:

I totally understand. Also, congratulations on the retirement! Also, I hope you have a safe and enjoyable trip. If you run into any car trouble, let me know.

Take care and have a good Memorial Day weekend.

Joe
Was this
answer
helpful?
Yes
No
Friday, May 24th, 2019 AT 8:15 PM

Please login or register to post a reply.

Sponsored links