Hi and thanks for using 2CarPros.
Here are the directions for removal and replacement. I will start with removal. The attached pictures correlate with these directions.
______________________________________________________________
Engine Cooling Radiator - Removal
Vehicle Engine, Cooling and Exhaust Cooling System Radiator Service and Repair Removal and Replacement Engine Cooling Radiator - Removal
ENGINE COOLING RADIATOR - REMOVAL
3.6L
1. Remove the engine cover.
2. Remove the belly pan See: Underbody Cover > Removal and Replacement > Belly Pan - Removal.
3. Drain the cooling system See: Cooling System > Procedures.
4. Remove the multipurpose bracket See: Frame > Removal and Replacement > Multipurpose Bracket - Removal.
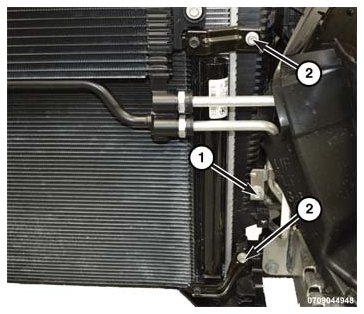
Picture 1
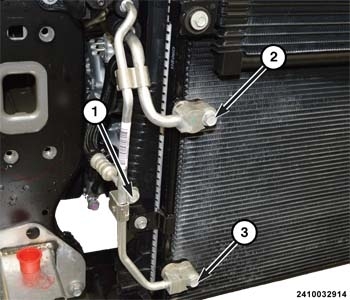
5. Remove the transmission oil cooler bracket bolt (1).
6. Remove the left side condenser mounting bracket bolts (2) from the radiator.
Picture 2
7. Remove the right side condenser mounting bracket bolts (2) from the radiator.
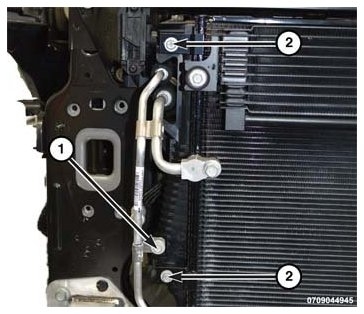
8. Remove the liquid line support bracket fastener (1) from the radiator.
Picture 3
9. Remove the bolt (2) from the A/C service port support bracket (1) and position aside.
10. Disconnect the cooling fan wire harness connector.
11. Disconnect the upper radiator hose from the radiator.
12. Disconnect the lower radiator hose from the radiator.
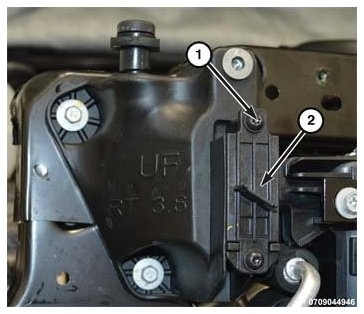
Picture 4
13. Remove the upper radiator mount cover (2) fasteners (1) from both sides of the upper radiator mounts.
Picture 5
14. Separate the condenser from the radiator and position slightly forward.
15. Tilt the radiator forward (1), removing the radiator from the upper mounts.
16. Lift the radiator and cooling fan assembly upward (2) removing it from the vehicle.
17. Remove the two mounting fasteners from the cooling fan assembly.
18. Slide the cooling fan assembly upward from the mounting brackets and separate it from the radiator.
______________________________________________________________
Installation
ENGINE COOLING RADIATOR - INSTALLATION
3.6L
1. Install the cooling fan assembly onto the radiator and tighten the bolts to the proper torque specifications .
Picture 6
2. Position the radiator (2) into the lower mounting isolators on the radiator lower support.
3. Push the radiator rearward, engaging the radiator (1) into the upper mount.
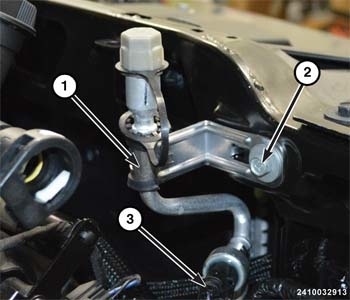
Picture 7
4. Install both upper radiator mount covers (2) and tighten the fasteners (1) to the proper torque specifications .
Picture 8
5. Install the A/C service port bracket (1) and tighten the bolt (2) to the proper torque specifications .
6. Connect the cooling fan wire harness connector.
7. Install the upper radiator hose
8. Install the lower radiator hose.
Picture 9
9. Install the right side condenser mounting bracket bolts (2) and tighten the bolts to the proper torque specifications .
10. Install the liquid line support bracket and tighten the fastener (1) to the proper torque specifications .
Picture 10
11. Install the left side condenser mounting bracket bolts (2) and tighten the bolts to the proper torque specifications .
12. Install the transmission oil cooler mounting bracket and tighten the bolt (1) to the proper torque specifications .
13. Install the multipurpose bracket See: Frame > Removal and Replacement > Multipurpose Bracket - Installation.
14. Install the belly pan See: Underbody Cover > Removal and Replacement > Belly Pan - Installation.
15. Fill the cooling system See: Cooling System > Procedures.
16. Install the engine cover.
_____________________________________________
Let me know if this helps or if you have other questions.
Take care,
Joe
Images (Click to enlarge)
Feb 3, 2019 at 7:45 PM