Vehicle shaking after replacing fuel injectors

Tiny
KINGMICHAEL3
  • MEMBER
  • 1995 CHEVROLET BLAZER
  • 4.3L
  • V6
  • 4WD
  • AUTOMATIC
  • 62,000 MILES
Replaced fuel injectors, then I start the car and it’s got Shaking going. Is it a defective part or something else?
Saturday, March 28th, 2020 AT 7:42 PM

11 Replies

Tiny
JACOBANDNICKOLAS
  • MECHANIC
  • 108,192 POSTS
Hi,

It could be a faulty part, but first check to see if there are any vacuum leaks. Also, is the check engine light staying on when the engine is running?

Here is a link to check for vacuum leaks:

https://www.2carpros.com/articles/how-to-use-an-engine-vacuum-gauge

Also, here are the directions for replacing the fuel injectors. Take a look through them and see if you missed anything. Also, make sure things were properly torqued. The torque specs are included in the directions and the attached pics correlate with the directions.

____________________________________________

1995 Chevy Truck S10/T10 Blazer 4WD V6-262 4.3L VIN W CPI
Fuel Injector(S) Replacement
Vehicle Powertrain Management Fuel Delivery and Air Induction Fuel Injector Service and Repair Procedures Fuel Injector(S) Replacement
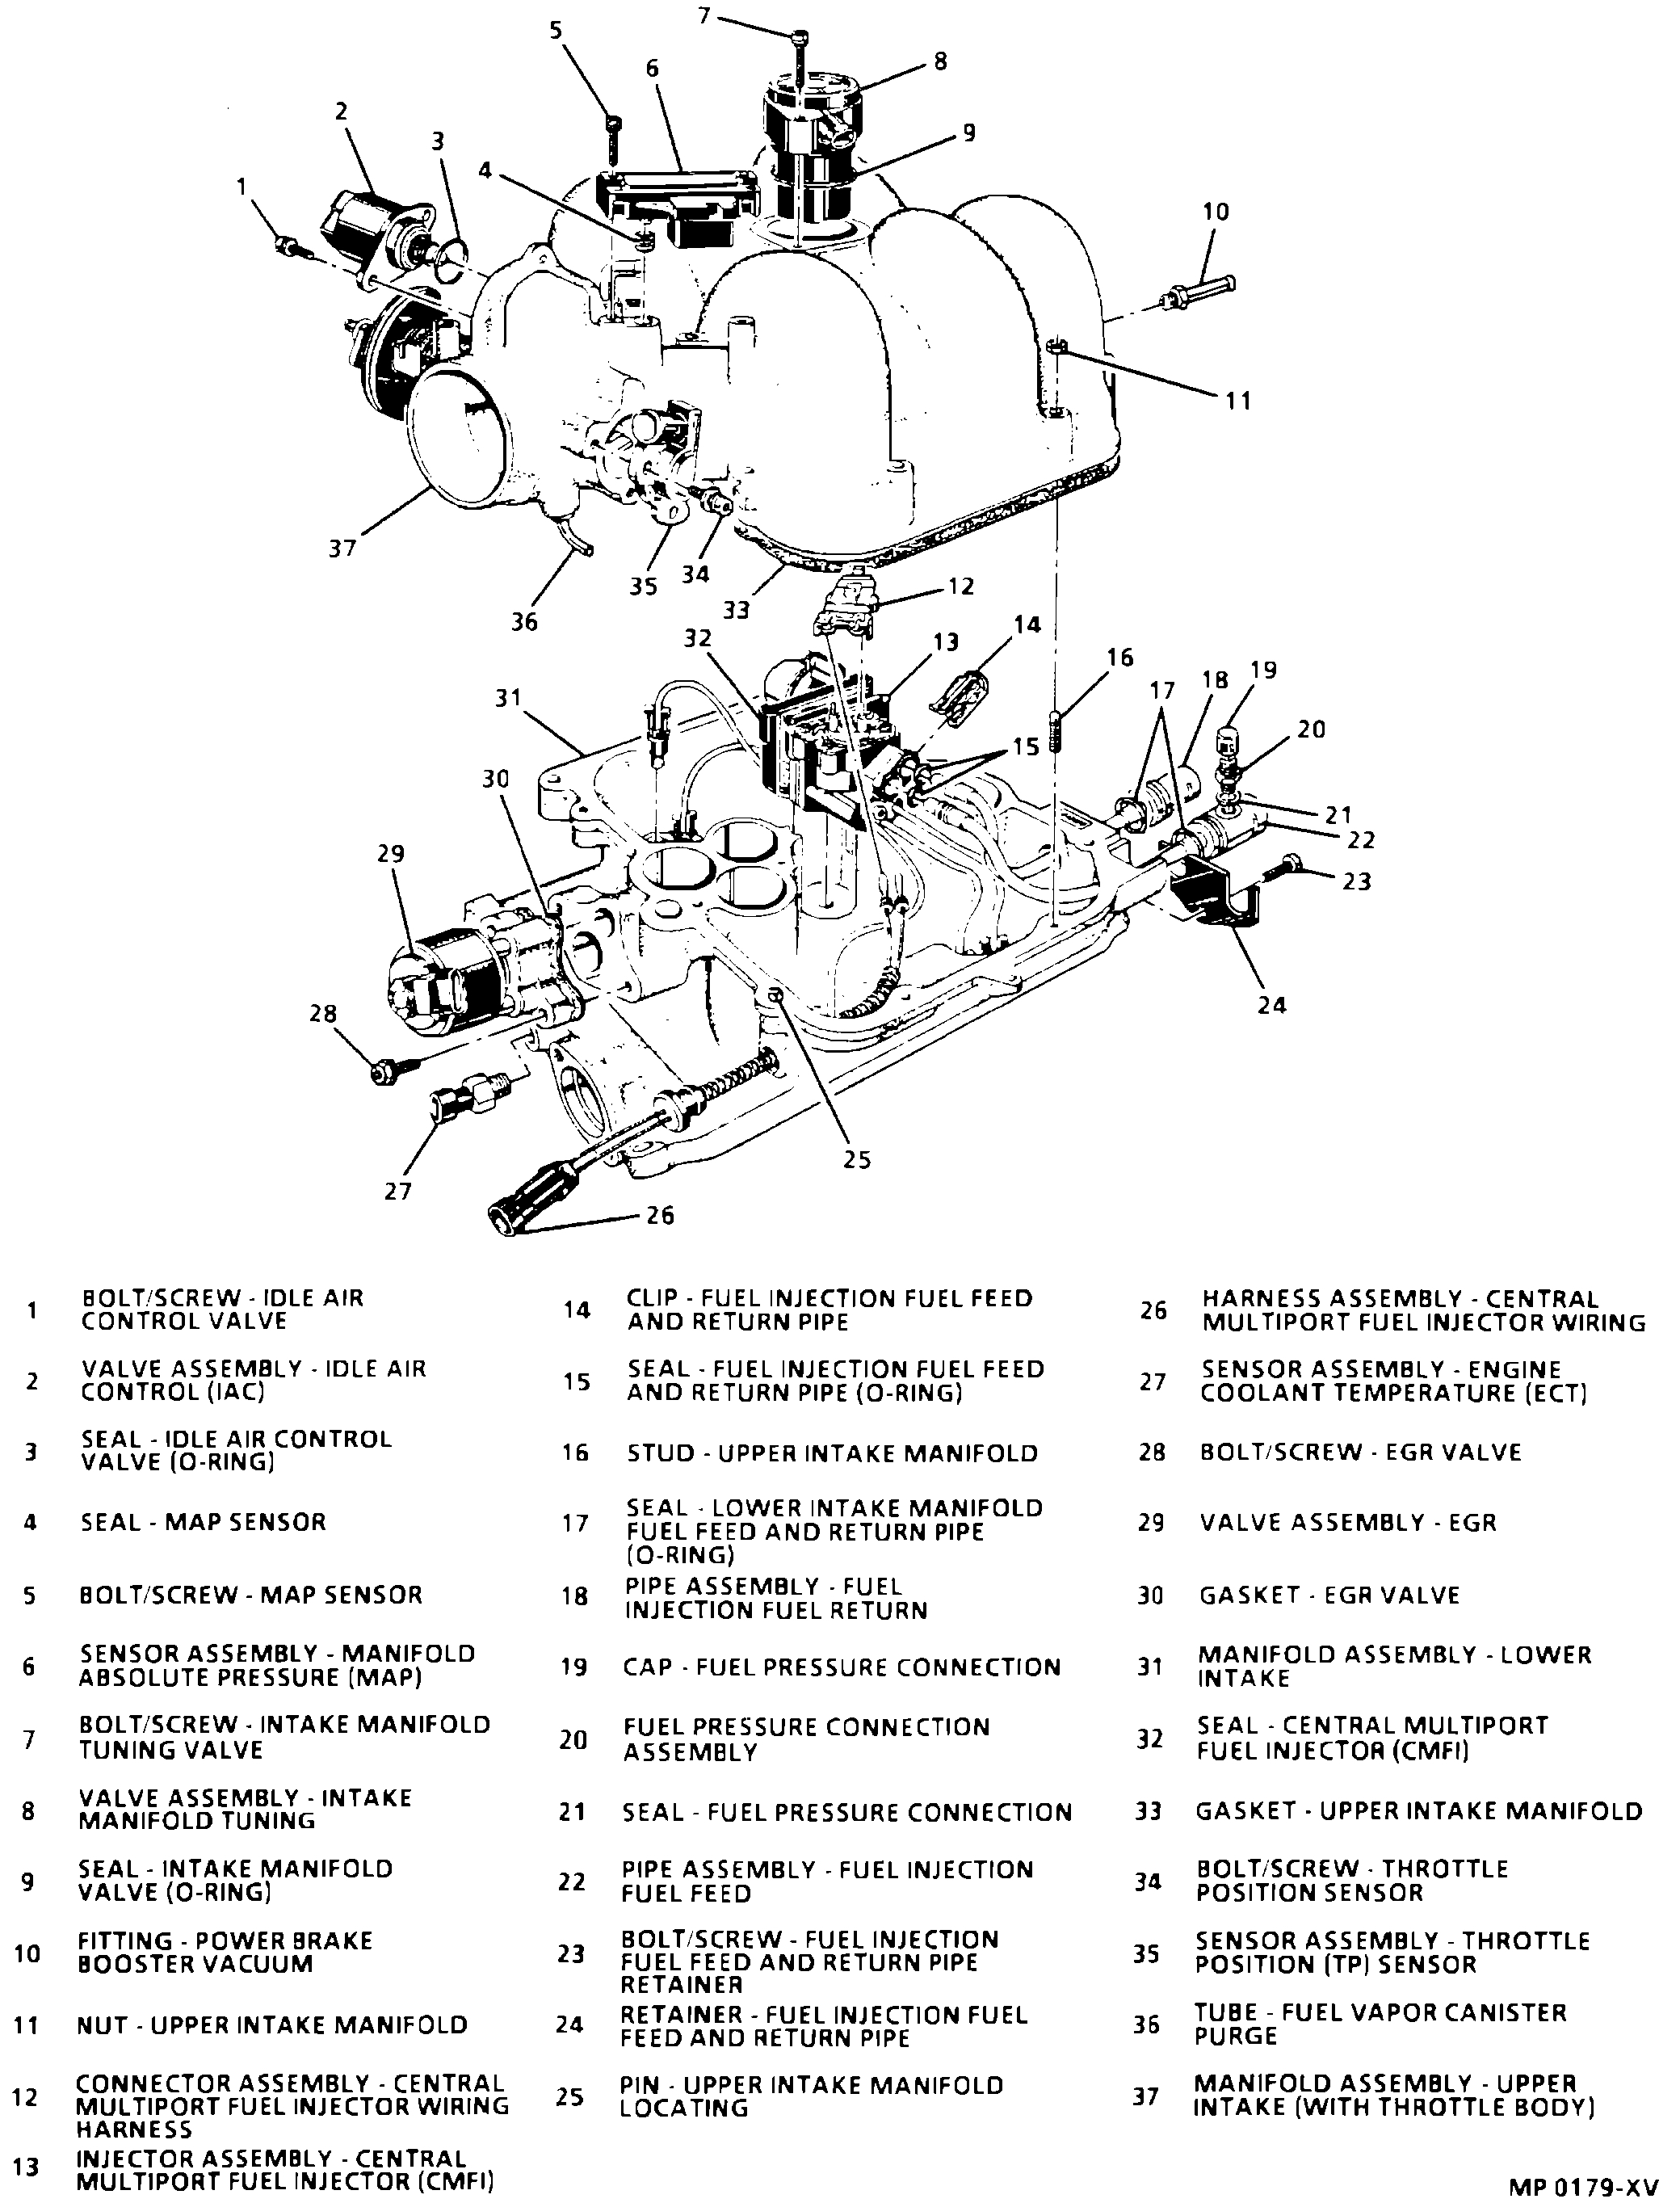
FUEL INJECTOR(S) REPLACEMENT
CMFI Assembly Parts Identification
imageOpen In New TabZoom/Print

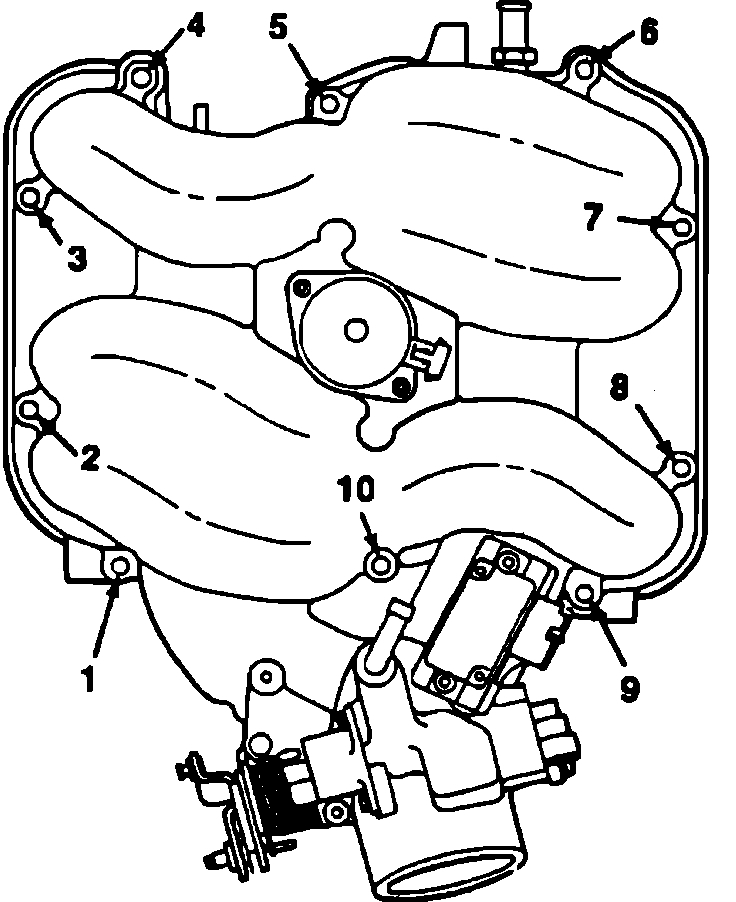
Fig. 9 Upper Intake Manifold Tightening Sequence
imageOpen In New TabZoom/Print

REMOVE
1. Negative battery cable
2. Engine cover.
3. Air cleaner box and intake duct.
4. Wire harnesses, including:
- Throttle Position Sensor (TPS).
- Idle Air Control (IAC) motor
- Manifold Absolute Pressure (MAP) sensor.
- Intake manifold tuning valve assembly.
5. Throttle, Throttle Valve (TV) linkage and cruise cable from upper intake manifold.
6. Ignition coil.
7. PCV hose to upper intake manifold.
8. Vacuum hoses at front and rear of upper intake manifold.
9. A/C line at compressor (if equipped).
10. Upper intake manifold bolts and studs.
- Mark the location of all studs for proper reassembly.
11. Upper intake manifold.

NOTE: Do Not attempt to disassemble the Central Port Injection (CPI) assembly, it is serviceable as an assembly.

WARNING: Refer to "Fuel Pressure Relief Procedure," before disconnecting fuel lines.

12. Remove injector wiring harness connector at CPI assembly.
13. Fuel fitting clip and discard.
14. Fuel inlet and return tube and fitting assembly.
- Discard O-ring seals.
15. CPI assembly.
- Squeeze poppet nozzle locking tabs together while lifting nozzle out of casting socket.
- After removing the six poppet nozzles, lift the CPI assembly out of casting.

WARNING: To reduce the risk of fire and personal injury, verify that the poppet nozzles are firmly seated and locked in their casting sockets. An unlocked poppet nozzle could work loose from its socket thus resulting in a fuel leak.

INSTALL
1. CPI assembly.
- Align CPI assembly grommet with the casting grommet slots and push down until it is seated in bottom guide hole.
- Push poppet nozzles into casting sockets.
- Poppet nozzles must be firmly seated and locked in casting sockets.
2. Fuel inlet and return tube and fitting assembly.
- New O-ring seals coated with clean engine oil.
3. New fuel fitting clip.

NOTE: Test for fuel leakage. Pressurize fuel system, verify no fuel leakage at inlet and return tube to CPI unit.

4. Upper intake manifold gasket with green sealing lines facing up.
5. Upper intake manifold.
- Use care not to pinch the injector wires between the upper and lower intake manifolds.
6. Upper intake manifold bolts. Note the marks made at disassembly for proper stud location.
7. Tighten Bolts to 14 Nm (124 in lb) using the sequence shown in image.
8. A/C line to compressor.
9. PCV hose to upper intake manifold.
10. Vacuum hoses to front and rear of upper intake manifold.
11. Throttle, TV linkage and cruise cable to upper intake manifold.
12. Ignition coil.
13. Wire harnesses, including: TPS, IAC, MAP and Intake manifold tuning valve assembly.
14. Air cleaner box and intake duct.
15. Engine cover.
16. Negative battery cable.

________________________________________

When you check for vacuum leaks, make sure to confirm the PCV is properly attached and that the air induction tube is properly attached.

Let me know.

Joe
Was this
answer
helpful?
Yes
No
Saturday, March 28th, 2020 AT 8:13 PM
Tiny
KINGMICHAEL3
  • MEMBER
  • 7 POSTS
Thanks a lot for taking my question. See everything was working fine until I changed the the injectors. L tested the injectors before I closed it up with no leaks whatsoever and it holds pressure to round 58 psi. I change the distributor cap and rotor and spark plugs because they didn’t look too good, but I will check for vacuum leak and if everything is good it could be the spider injector unit is defected. I will let you know. Thank you very much for helping me out.
Was this
answer
helpful?
Yes
No
+1
Saturday, March 28th, 2020 AT 9:09 PM
Tiny
KINGMICHAEL3
  • MEMBER
  • 7 POSTS
Check engine light flashes for a couple minutes then disappears.
Was this
answer
helpful?
Yes
No
Saturday, March 28th, 2020 AT 9:16 PM
Tiny
JACOBANDNICKOLAS
  • MECHANIC
  • 108,192 POSTS
The flashing usually indicates a misfire. Since you replaced the ignition components, can you scan it to see which cylinder is causing the misfire? You may have a faulty plug wire, not fully pushed on, a bad plug, or something causing it to short for a period.

If you have a scanner or can your hands on one, that is what we need to do.

Let me know.
Joe
Was this
answer
helpful?
Yes
No
Saturday, March 28th, 2020 AT 10:00 PM
Tiny
KINGMICHAEL3
  • MEMBER
  • 7 POSTS
I will buy new wires and I’ll let you know. Thanks again
Was this
answer
helpful?
Yes
No
Sunday, March 29th, 2020 AT 2:32 PM
Tiny
KINGMICHAEL3
  • MEMBER
  • 7 POSTS
In the meantime I’m trying to get the code out of the OBD1. Searching now which pin I have to jump because the scanner does not work on the 1995 Blazer.
Was this
answer
helpful?
Yes
No
Sunday, March 29th, 2020 AT 2:37 PM
Tiny
JACOBANDNICKOLAS
  • MECHANIC
  • 108,192 POSTS
Hi,

Here is a link that shows how it's done. Are you sure it's obd1? 1995 was the introduction of OBD2. That's why I didn't include this the first time.

https://www.2carpros.com/articles/buick-cadillac-chevy-gmc-oldsmobile-pontiac-gm-1983-1995-obd1-code-definitions-and-retrieval-method

Let me know what you find.

Take care,
Joe
Was this
answer
helpful?
Yes
No
Sunday, March 29th, 2020 AT 6:06 PM
Tiny
KINGMICHAEL3
  • MEMBER
  • 7 POSTS
You might be right I think it is OBD 2. But for some reason my cheap scanner it read link Arr because there’s not too many pins in there. I have like three on top and three in the bottom all spread out. When I raise the RPM I hear like a whistle for like two to three seconds and it stops, but I think the misfiring is from cylinder one. I will change the spark plug wires tomorrow. I’ll let you know what happened. Thanks a lot for helping me out.
Was this
answer
helpful?
Yes
No
Sunday, March 29th, 2020 AT 10:40 PM
Tiny
JACOBANDNICKOLAS
  • MECHANIC
  • 108,192 POSTS
The whistle you referred to could be a vacuum leak. Have a helper raise the RPM's while you try to locate the sound.

Let me know.
Joe
Was this
answer
helpful?
Yes
No
Monday, March 30th, 2020 AT 8:18 PM
Tiny
KINGMICHAEL3
  • MEMBER
  • 7 POSTS
I chased my tail for three days. Changed the spark plugs, wires, distributor cap, rotor. I know finally made the decision to take the spider jets unit. The problem was did the unit itself it was it a hair smaller did not seal. And that will cause the hesitation and the shaking. Put the old one in change the fuel pressure regulator with a new one and bingo is running beautifully now. Thank you very much for your time.
Was this
answer
helpful?
Yes
No
Thursday, April 2nd, 2020 AT 3:47 PM
Tiny
JACOBANDNICKOLAS
  • MECHANIC
  • 108,192 POSTS
You are very welcome. Wow, that was a tough one to find, but I'm glad you got it.

Take care and let us know if you have questions in the future.

Joe
Was this
answer
helpful?
Yes
No
Thursday, April 2nd, 2020 AT 6:34 PM

Please login or register to post a reply.

Sponsored links