Welcome to 2CarPros.
First, here is a link that shows in general how one is replaced:
https://www.2carpros.com/articles/how-to-replace-an-electric-fuel-pump
Here are the directions specific to your vehicle for pump replacement. The attached pics correlate with the directions. Note, the fuel tank will need removed. I attached those directions second.
__________________
1992 Buick Regal V6-191 3.1L
Fuel Pump Replacement
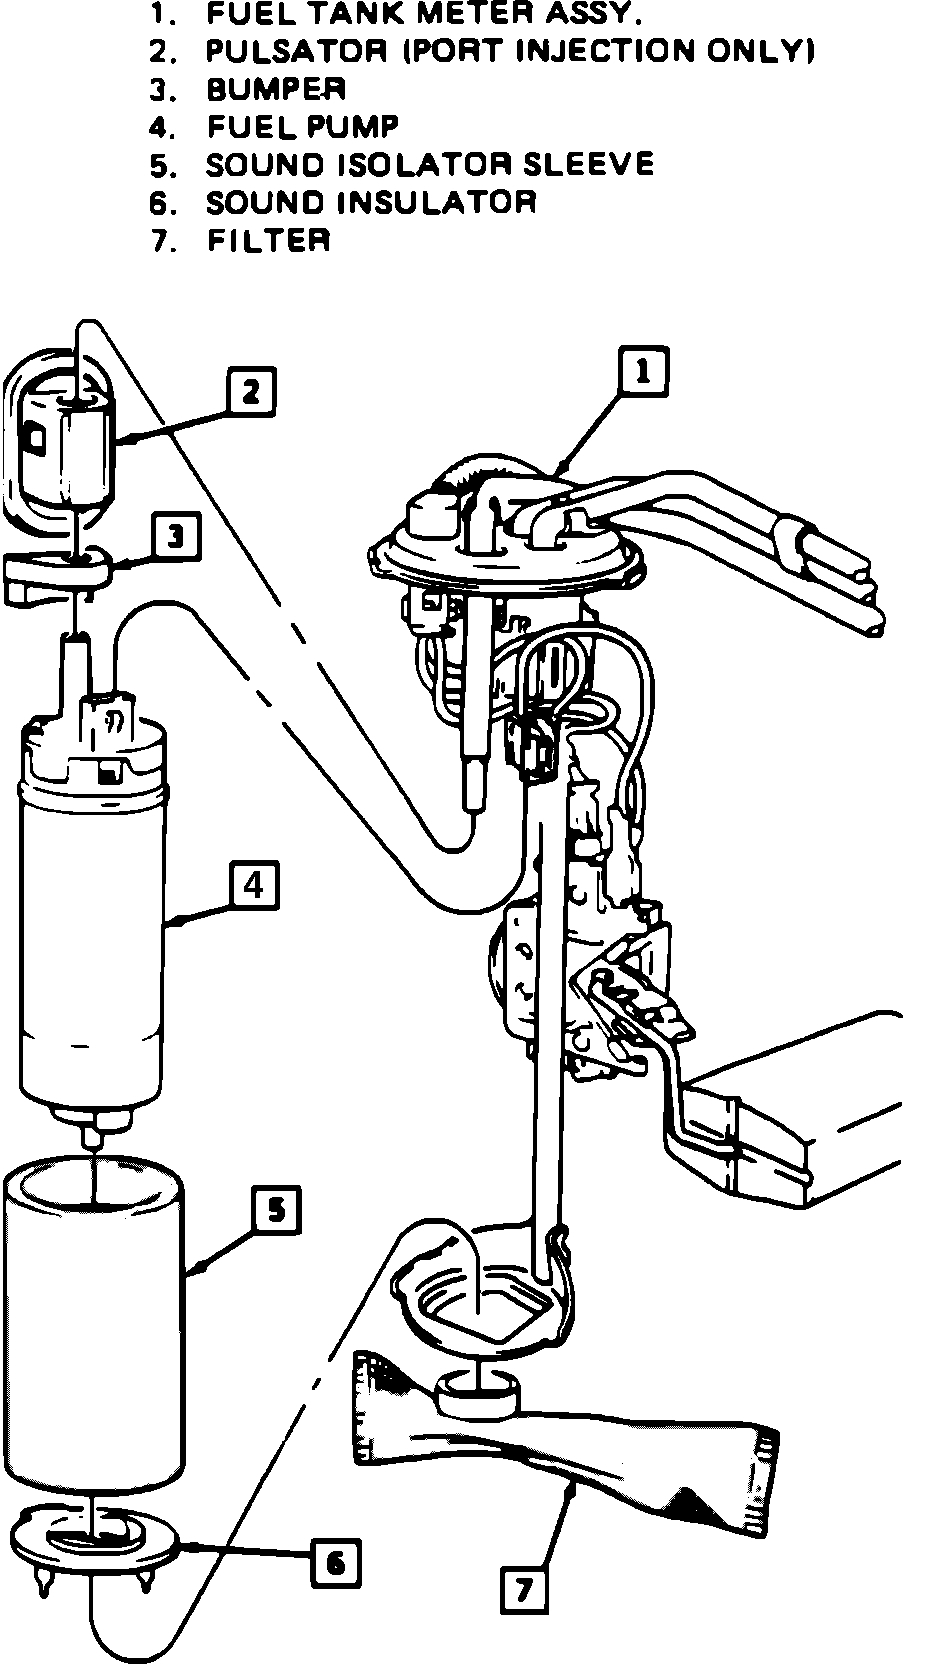
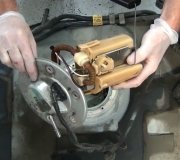
Fuel Pump/Fuel Gauge Sending Unit (typical)
Pic 1
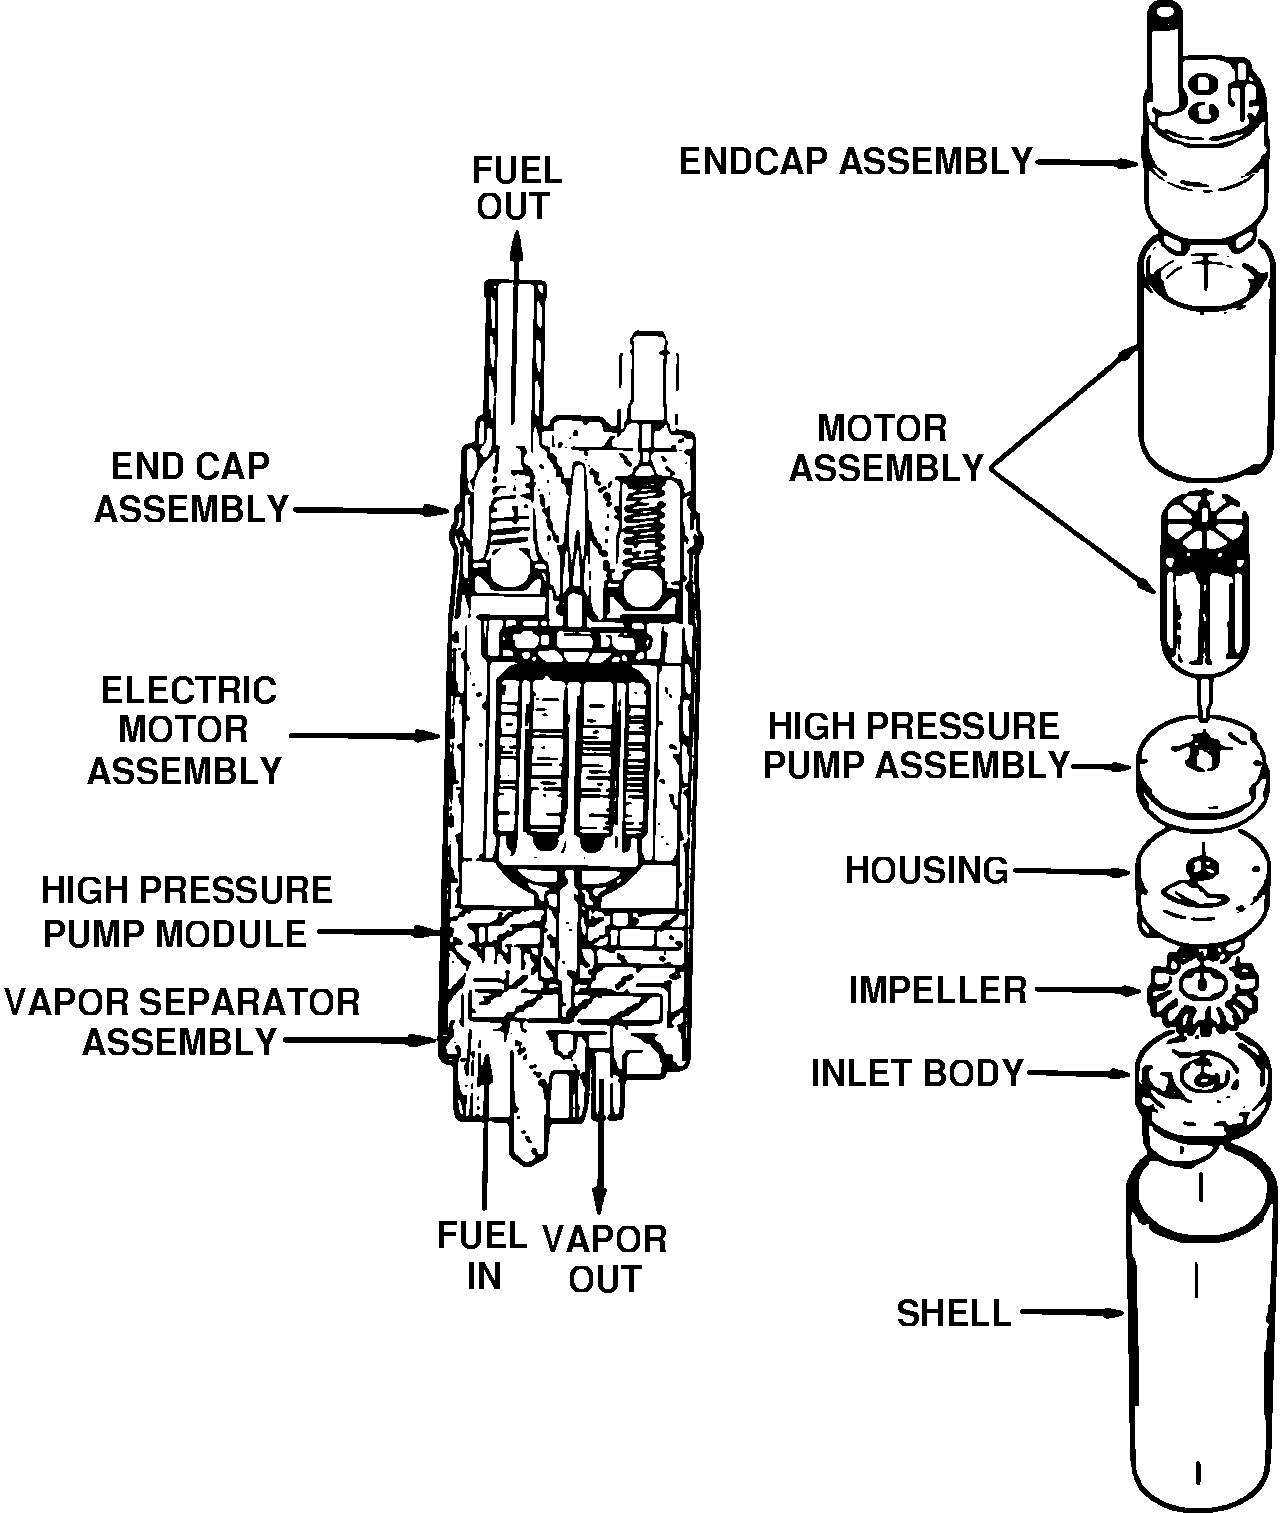
Roller Vane Fuel Pump - Exploded View
Pic 2
NOTE: DO NOT handle the fuel sender by the fuel tubes. Due to the length of the tubes, the amount of leverage generated by handling the tubes could damage the solder joints.
REMOVE OR DISCONNECT:
1. Negative battery cable.
2. Relieve fuel system pressure.
3. Drain fuel tank.
4. Fuel tank.
5. Fuel sender assembly.
DISASSEMBLE:
1. Support pump with one hand and grasp strainer with other hand. Rotate strainer in one direction and pull off of pump. Discard strainer after inspection.
2. Fuel pump electrical connector.
3. Place fuel sender assembly upside down on bench. Pull fuel pump downward to remove from mounting bracket, then tilt pump outward and remove from fuel pulse dampener.
NOTE: DO NOT run fuel pump unless submerged in fuel.
4. Inspect fuel pump strainer. If strainer is contaminated, the fuel tank should be cleaned. Fuel pump inlet for dirt and debris. If found, fuel pump should be replaced.
ASSEMBLE:
1. Rubber bumper and rubber insulator on fuel pump.
2. Position fuel sender assembly upside down. Install fuel pump between fuel pulse dampener and mounting bracket.
3. Fuel pump electrical connector.
IMPORTANT: Always install a new pump strainer when installing fuel pump.
4. Position new pump strainer on fuel pump and push on outer edge of ferrule until fully seated.
INSTALL:
1. Fuel sender assembly.
2. Fuel tank.
3. Add fuel and install fuel filler cap.
4. Negative battery cable.
5. Turn ignition switch to "ON," position for two seconds, then turn to "OFF" for ten seconds. Again turn to "ON" position, and check for fuel leaks.
6. Perform the "Idle Learn Procedure." The ECM will need to relearn the IAC valve pintle position following battery reconnect.
+++++++++++++++++++++++++++++++++++++++
Here are the directions for tank removal.
1992 Buick Regal V6-191 3.1L
FUEL TANK ASSEMBLY
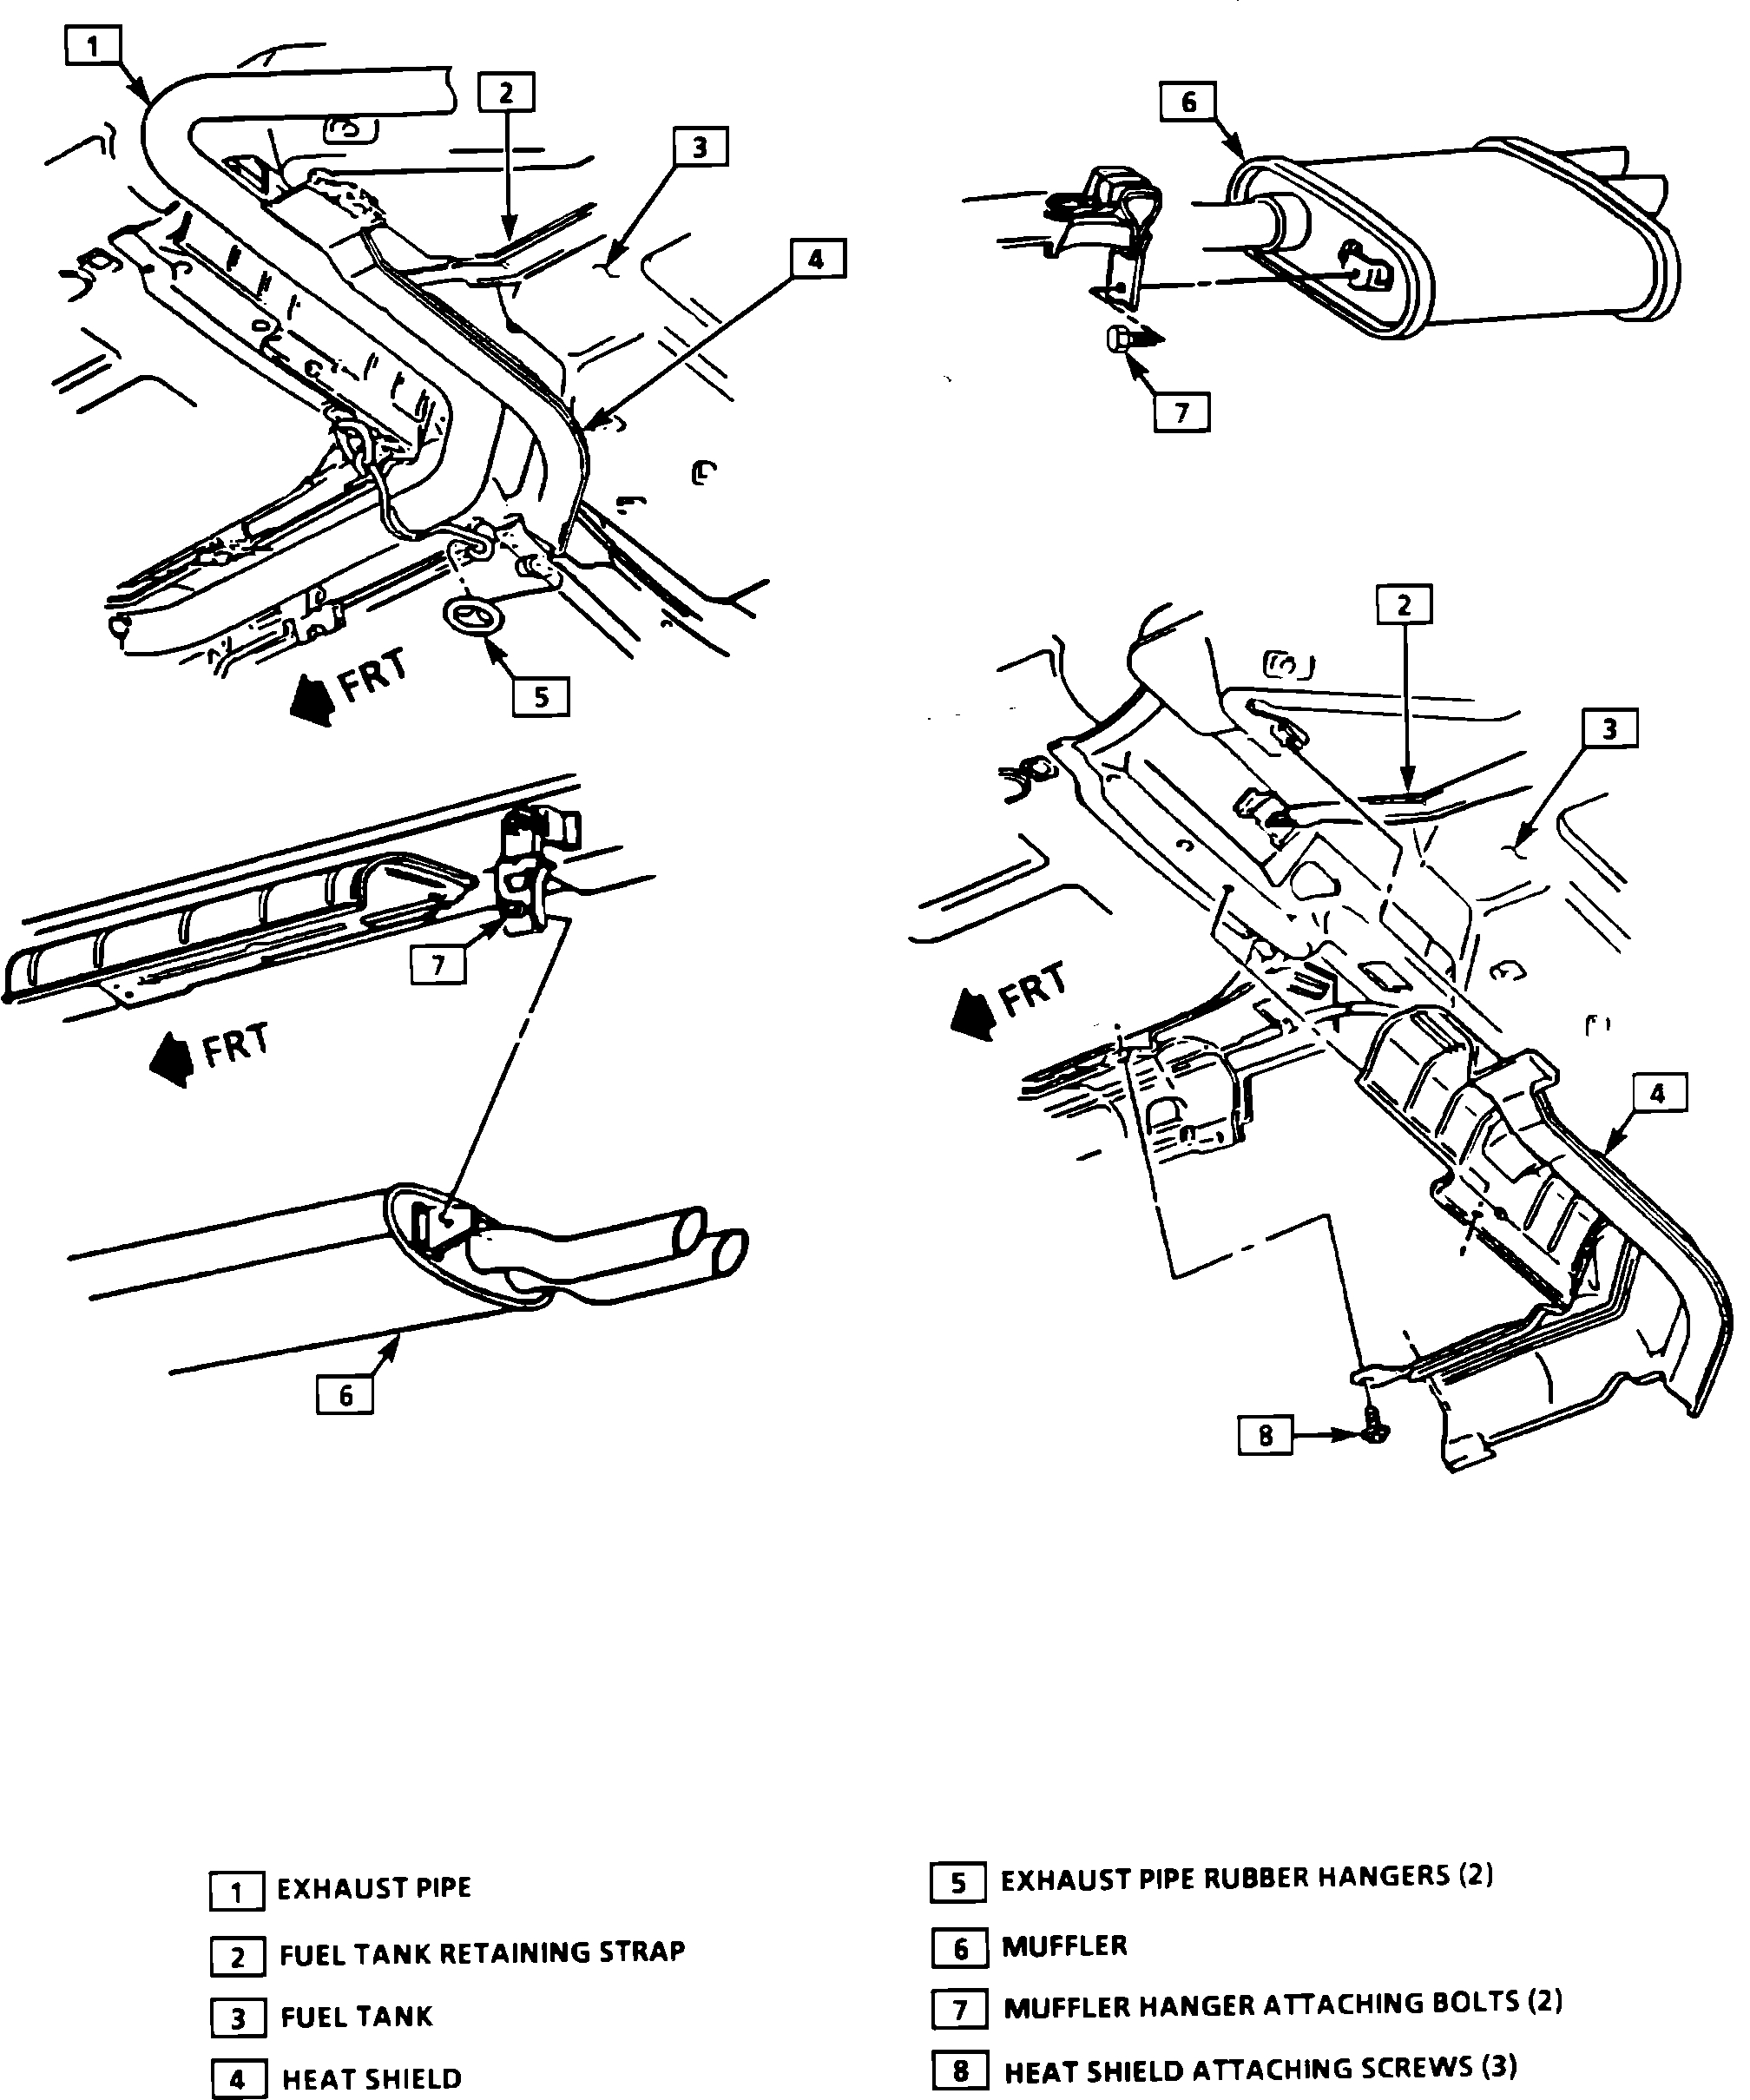
Exhaust/Heat Shield Removal
pic 3
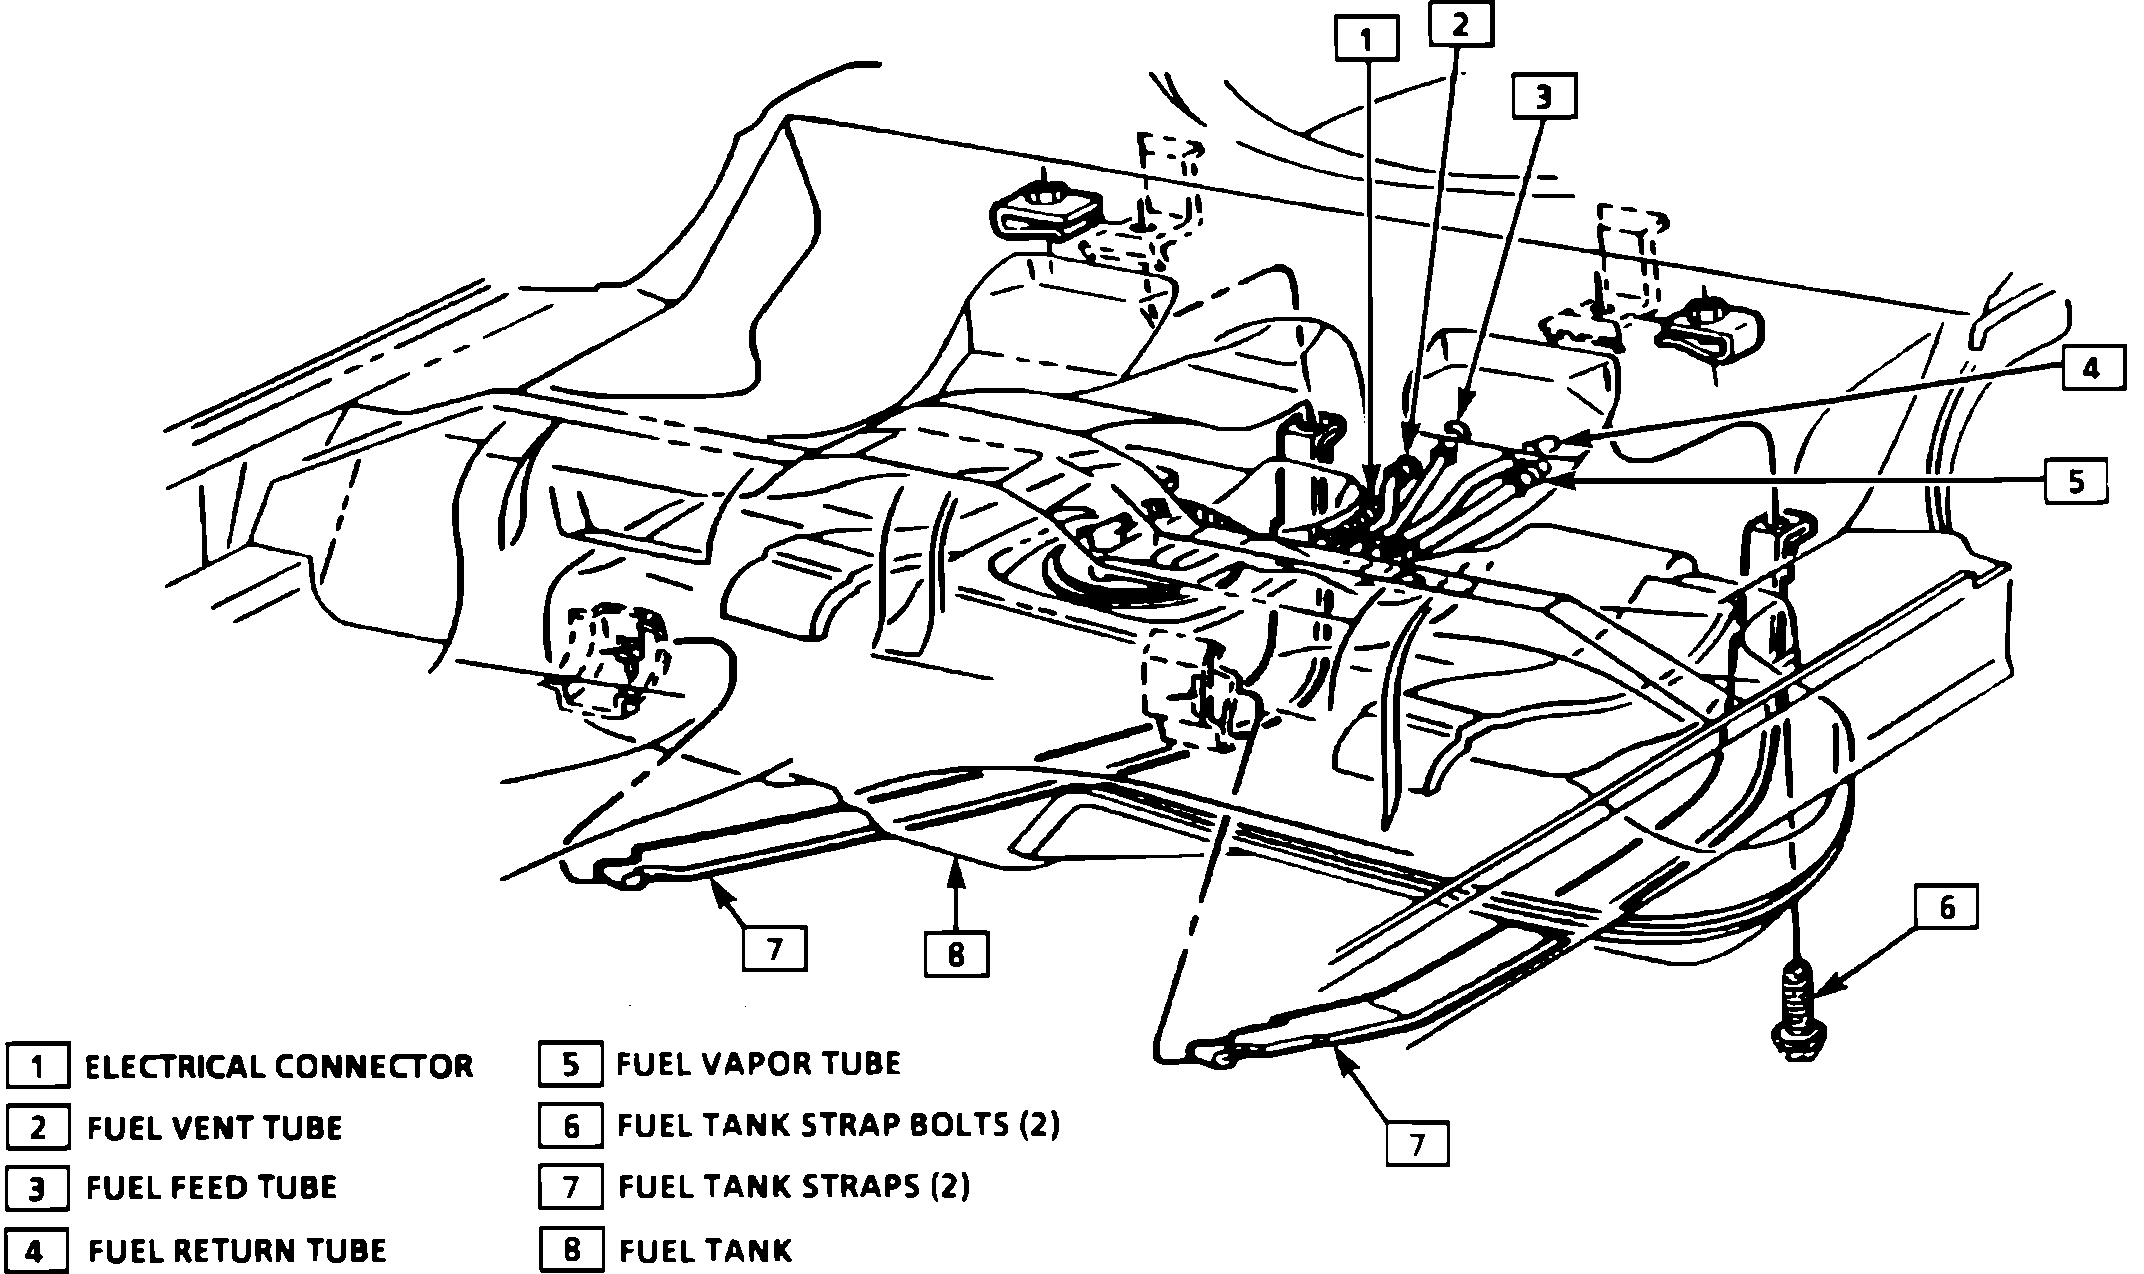
Fuel Tank Replacement
pic 4
WARNING: To help avoid personal injury when a vehicle is on a hoist, provide additional support for the vehicle on the opposite end from which components are being removed. This will reduce the possibility of the vehicle falling off the hoist.
Tools required: J 37088-A tool set, fuel line quick-connect fittings.
REMOVAL:
1. Relieve the fuel system pressure, refer to FUEL SYSTEM PRESSURE RELIEF.
2. Drain the fuel tank, refer to DRAINING FUEL TANK.
3. Raise the vehicle on a hoist.
4. Remove the fuel filler hose from tank.
5. Grasp the fuel sender feed tube and in-line fuel filter quick-connect fitting. Twist the quick-connect fitting 1/4 turn in each direction to loosen any dirt within the quick-connect fitting. Repeat for other fitting.
6. Blow the dirt from the quick-connect fittings with compressed air.
7. Disconnect the quick-connect fittings:
- Squeeze the plastic tabs of the male end connector and pull the connection apart. Repeat for other fitting.
8. Disconnect vapor hose from connection (at front of tank).
9. Remove rubber exhaust pipe hangers to allow exhaust system to drop slightly.
10. Remove exhaust pipe heat shield bolts and heat shield.
11. With aid of an assistant, support tank, and remove front fuel tank strap attaching bolts and 2 retaining fuel tank straps.
CAUTION: DO NOT bend the fuel tank retaining straps, as this may damage the straps.
12. Lower tank enough to disconnect fuel sender electrical connector and remove the retaining clips.
13. Remove vapor hose from fuel sender assembly.
14. Remove Vapor hose from vapor pipe (at rear of fuel tank).
15. Remove fuel tank from vehicle.
NOTE: If it is necessary to remove rust or burrs from the fuel level meter tubes: use emery cloth in a radial motion with the tube end to prevent damage to the O-ring surface.
- Using a clean shop towel, wipe off the male tube ends.
- Inspect all tube ends for dirt and burrs. Clean or replace components/assemblies as required.
- Inspect fuel line O-rings for cuts, nicks, swelling or distortion. Replace if necessary.
INSTALLATION:
1. With the aid of an assistant, position and support the fuel tank. Position the fuel tank retaining straps and front attaching bolts loosely.
2. Connect vapor hose to vapor pipe (at rear of tank).
3. Connect vapor hose to fuel sender assembly.
4. Connect fuel sender electrical connector and install retaining clips.
5. Install rear fuel tank strap attaching bolts and tighten front and rear bolts to 47 N-m (35 lb. ft.).
WARNING: To reduce the risk of fire and personal injury: Before connecting the fuel lines, always apply a few drops of clean engine oil to the male tube ends. This will assure proper reconnection and prevent a possible fuel leak. (During normal operation, the O-rings located in the female connector will swell and may prevent proper reconnection if not lubricated.)
6. To connect fuel sender feed pipe to in-line fuel filter. Quick-connect fittings:
a. Apply a few drops of clean engine oil to the male connector tube ends.
b. Push the connector together to cause the retaining tabs/fingers to snap into place.
c. Once installed, pull on both ends of each connection to make sure the connection is secure.
d. Repeat for the other fitting.
7. Reconnect the vapor hose to vapor pipe (at front of tank).
8. Install fuel filler vent hose to fuel tank.
9. Install the fuel filler hose to fuel tank.
10. Install heat shield and attaching screws.
11. Install rubber exhaust pipe hangers.
12. Lower vehicle.
13. Add fuel and install fuel filler cap.
14. Connect the negative battery cable.
15. Turn the ignition switch to the "ON" position for two seconds, then turn it to the "OFF" position for ten seconds. Again turn the ignition to the "ON" position and check for fuel leaks.
16. Perform the idle learn procedure.
+++++++++++++++++++++++++++++++++++++++++++++++++++++++++++++++
I hope this helps. Let me know if you have other questions.
Take care,
Joe
Images (Click to make bigger)
Saturday, August 24th, 2019 AT 9:46 PM