After replacing brake shoes self adjusters are not working

Tiny
REAPER1992
  • MEMBER
  • 2001 DODGE RAM
  • 5.2L
  • V8
  • 4WD
  • MANUAL
  • 196,000 MILES
The self adjuster do not work on my truck after replacing the brake shoes. I went over them sever times but the self adjuster is not working right. It is new and I used anti lock stuff on it so it would not freeze up. I changed the axle shaft and the dust cover new springs and wheel cylinder and all that stuff on the side it is not working on. Another thing I cannot figure out is the brake drum on same side since changing the axle shaft it locks that side up tight. I checked to see if the brake shoes are touching but they bare not. It calls for the bigger drum but the smaller drum from the 1997's work just fine, but no self adjust so I have to keep adjusting them manually. Any ideas?
Do you
have the same problem?
Yes
No
Sunday, November 18th, 2018 AT 9:18 PM

10 Replies

Tiny
CARADIODOC
  • MECHANIC
  • 33,699 POSTS
There is something else going on that you have not mentioned or have not noticed. You should not see the results of an inoperative self adjuster for a real long time, as in a year or two, or a good 20,000 to 50,000 miles. The only symptom by that time will be a brake pedal that is gradually going closer and closer to the floor.

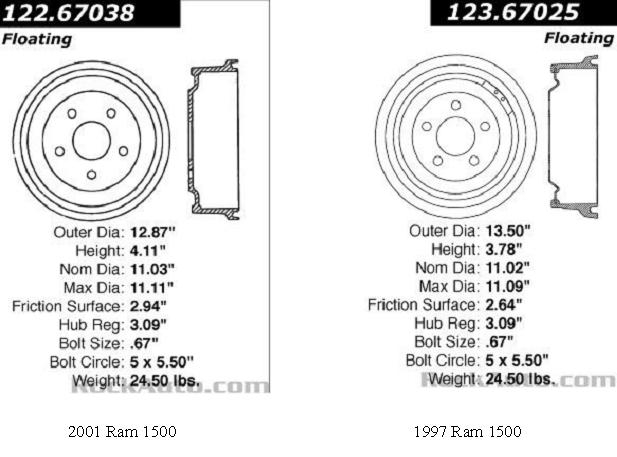
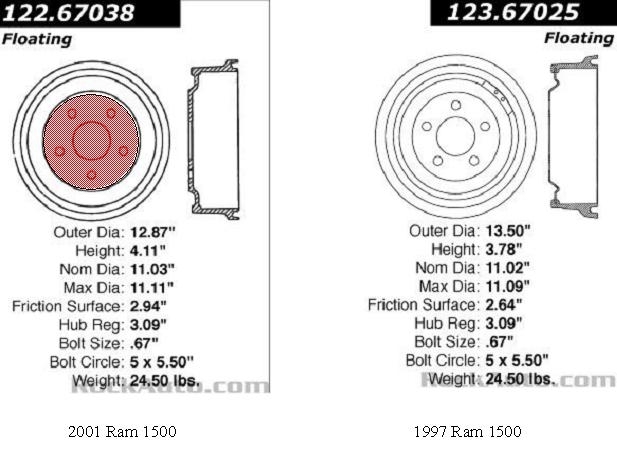
The drum you mentioned is not interchangeable on your truck. Unless specified differently by the manufacturer, the maximum a drum can be machined over-size from original is.060". That is only.030" of material removed all the way around, totaling a.060" larger diameter. Even at that, the diameter of new shoes will not match the diameter of the drum until they wear quite a bit. 1997 drums have a much different diameter, so the first thing is to get the correct drum on there before you go looking for other causes that may not exist.

Any chance you can post a photo of the brake shoes on that wheel? Without seeing it, I can only offer some suggestions of the common things I have run across and that I have caused myself. The first thing is to be sure the "leading shoe", the one toward the front of the truck, has the shorter lining, and the trailing shoe has the longer lining. The smaller front shoe simply grabs the rotating drum and tries to rotate with it. As it does, it pushes on the adjuster assembly, and that pushes the bottom of the rear shoe into the drum, to apply it. The piston in the wheel cylinder pushes the top of the rear shoe into the drum, also to apply it. (That is why it is called a "duo-servo" brake). The rear shoe does most of the stopping. That is why it needs to be a longer and/or thicker lining.

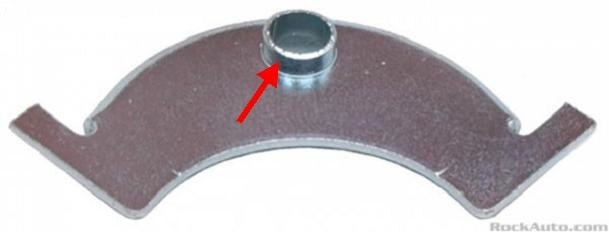
This next problem is a little harder to describe. Look at the quarter-round stamped metal guide the adjuster cable rides on. That is held in place by the hook on the rear shoe's return spring. It is easy to overlook that guide popping out and not sitting flush with the shoe. In the photo below, I added a nifty red arrow pointing to the formed tube that must be seated in the hole in the shoe. I have found it is impossible to slide that into place after the spring has been installed. You have to remove the spring, seat the guide, then reinstall the spring. Hold the guide in place with your thumb as you stretch the spring into place, otherwise it is likely to pop out again. If it does pop out, it will be pulled up and toward the axle shaft, making the distance too short for the cable. You will see the adjuster lever will be down too far, and even if it does move, it won't move far enough to advance the star wheel.

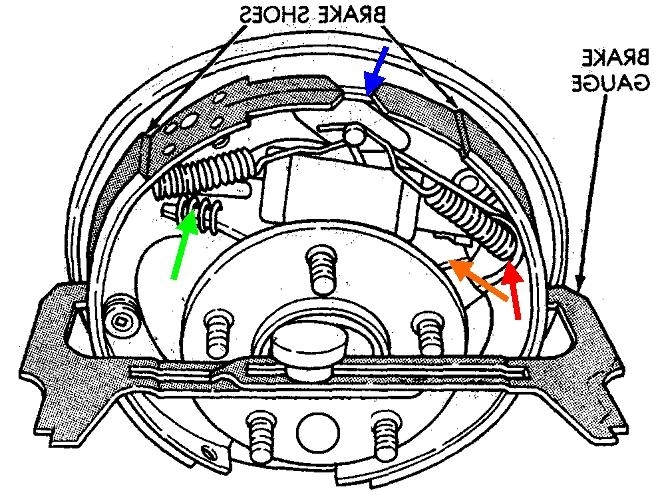
The next often-overlooked problem is a parking brake cable that is rusted in the partially-applied position. That alone will prevent the self adjuster system from doing its job. The first thing to look at is both brake shoe frames must be resting solidly against the anchor bolt on top of the backing plate. That is the blue arrow in the second drawing. I turned this drawing around so it is correct for the left rear brake. Those points are hard to see behind the springs and metal plate. Instead, push forward on the top of the rear shoe. If it moves, you will also see the front shoe move away from that anchor. That is proof the parking brake cable is not fully-released.

Even if both shoes are resting against the anchor bolt, look next at the parking brake strut bar between the two shoes. There needs to be 1/8" gap between that bar and the front shoe, (green arrow). Push forward on that bar with your thumb at the rear shoe, by the orange arrow. The bar should move easily against the pressure of the anti-rattle spring. If that is tight with no free play, it is because the sticking parking brake cable is holding the lever attached to the top of the rear shoe partially-applied, or pulled forward. The self adjuster will be ineffective if there is no free-play in that strut bar.

For drum brakes that seem to apply by themselves, or fail to release properly, there are six "lands" on the backing plate that must be inspected. Those are the raised surfaces the shoes ride on, (three for each shoe). High-temperature brake grease must be applied to those spots during routine brake service. When it is not used, grooves can form on those lands, then the shoe frames can catch on them. A shoe may not apply properly, but more commonly, it will get stuck and won't release. GM has had a real big problem with this since the 1970's. Chrysler uses a version of the same brake, but there are three bent-over tabs on both sides of each shoe to increase the wear surface and reduce this problem. Those tabs are not shown in this drawing. I found a better drawing. The three purple arrows in the third drawing show those lands on the trailing shoe.

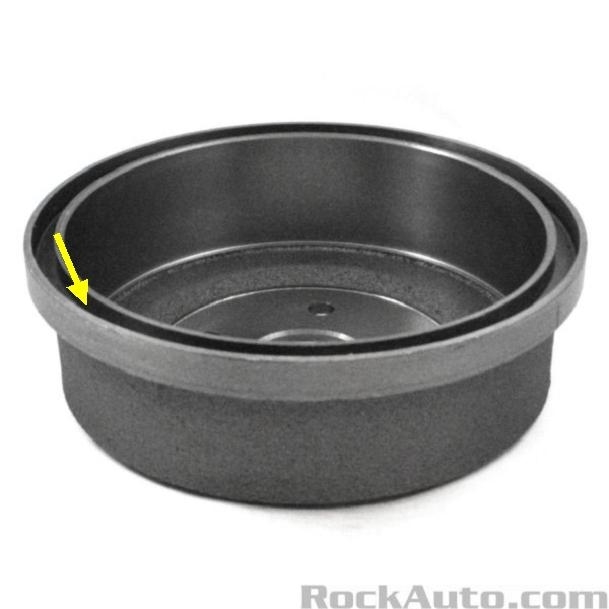
One last thing I should mention is with the wrong drum, one thing we forget to consider is the "labyrinth" seal. The yellow arrow in the fourth photo is pointing to it. There is a lip formed on the outer circumference of the backing plate that fits into this groove around the drum. Its purpose is to reduce entry of dirt and water. With the wrong drum, the backing plate might rub on the drum in that area. I suspect you would have heard that, but it is worth mentioning for others who might be researching this problem. It is also common for rust to build up on the drum and cause a grinding sound, but that typically wears away rather quickly, and is soon forgotten.
Was this
answer
helpful?
Yes
No
+1
Wednesday, March 31st, 2021 AT 10:28 AM
Tiny
REAPER1992
  • MEMBER
  • 39 POSTS
I currently do not have photo of it anymore how ever the only thing I can think of that I forgot to say was the backing plate or dust cover was from a older model truck. I think I was told the truck I took it off of was a 1998 and that would have been same as mine. But some how the people had two passenger side backing plates on one on the driver and one on the passenger. I took and drilled hole in the backing plate holes lined up and looked to be same size so there is a universal backing plate on it now and the drum from mine. When I put it on after changing the axle shaft would lock tight and keep truck from moving same brake shoes and everything it stumped everyone I have talked to about it. I thought the shoes was pressing against the drum but no it was not I must have taken those shoes and drum off and looked for issues like twenty times. I even had someone get in and slowly push the e-brake down to make sure it was working. And press the brake it pushed the pads out I accidentally found that the other brake drum allowed the tire to move freely. I was sticking it on the other drum backward and tightening it down with out the shoes on to see if it was something in the shoes, but it still got tight and would not let the axle shaft turn. Then I switched it just to see and it turned just fine tightened down.
Was this
answer
helpful?
Yes
No
Wednesday, March 31st, 2021 AT 10:28 AM
Tiny
CARADIODOC
  • MECHANIC
  • 33,699 POSTS
Sorry, but I got confused. Boil it down for me. Are you saying you switched the drums side-to-side, and that solved the problem?

Does your right parking brake cable come into the backing plate in the front of it, like normal, or does it run all the way to the rear bumper, around the spare tire, then into the backing plate from the rear?
Was this
answer
helpful?
Yes
No
Wednesday, March 31st, 2021 AT 10:28 AM
Tiny
REAPER1992
  • MEMBER
  • 39 POSTS
Okay, so I have drums from another rear end from a older model the drums from that works on my axle on the truck but not the drum that is for my truck the one for it locks the axle shaft from spinning. I do not know why and cable comes from the front like it is suppose to cause I made a hole in the front of the backing plate. I checked to see if the drum for my truck was hitting the new backing plate it was not. And the shoes I took off to see if it was them and they were not stopping the drum. So I checked to see if there was a difference in the backing plate they was same size and markings as the one I broke the original one the cable that goes to the self adjuster seems like it could be tighter but it is not loose enough that it sags and I made sure the track for the cable is in correctly and it is. I have had a couple mechanics look at it that are certified but they also said they did not know what it is the only difference is the drums are a different size in thickness but they are both same size around. I did end up bending the new backing plate and did not catch that I put a dent in it at first and pressed the original drum on to the backing plate and cause it to dent in a little but then I caught that and fixed it. But for some reason I still had same issue. Also, I wanted to take the time to thank you guys. I know figuring out automotive issues with out seeing the vehicle and being able to work on it is hard.
Was this
answer
helpful?
Yes
No
Wednesday, March 31st, 2021 AT 10:28 AM
Tiny
CARADIODOC
  • MECHANIC
  • 33,699 POSTS
I do understand the drum will not spin even with the shoes removed. I actually did run into that years ago at the dealership, with a new mechanic, but it was on a minivan. Those use a different style drum, and the hub was rubbing on the parking brake strut bar that he had installed upside down.

The only thing you can have is the drum is rubbing on the lip on the backing plate. To prove that, I have a spray can of leak detector powder that would work perfectly. You spray a light coating on one part, assemble them, take them apart, then look for where that powder transferred to the other part. You might be able to do that with a spray can of white lithium grease, or even spray paint. You might also try using our special tool for this, ... A dollar bill. Hold it across the lip on the backing plate, then slide the drum on. If the two parts are rubbing, you won't be able to pull the dollar bill out.

I cannot help but feel if you put the right parts for the model year on the truck, you will solve the problem. Here is the list of specs for the two years. The fact the original drum diameters are different tells me these are not the same truck in many ways. The diameter of pistons in the front calipers, rear wheel cylinders, and master cylinder, and the size of the friction surfaces are all factors in designing a brake system that is perfectly balanced front-to-rear.

Besides the legal ramifications of modifying the brake system, and having two brakes that do not stop as hard as the other two, also consider that a brand new drum with no wear to the friction surface is going to be very hard to install over brand new brake linings that are starting out at the maximum diameter of their life. There is very little room to spare, but you're trying to install a drum that is smaller in diameter by.010". Even when the shoes are adjusted down as far as possible, getting that drum shoved on is going to take some effort. To see if this is what is happening, assemble the shoes and star wheel as a unit, and try to stuff it inside the drum. You should be able to separate the tops of the shoe frames where they hit the large anchor bolt on top, by a good 1/4". If you cannot do that, the drum is too small.

There is one more thing to look at that is not real common for this problem, but it is worth checking. Look at the inside of the drum that is red on the second drawing, and the mating surface on the end of the axle shaft. Look for any impacted rust, scale, or other debris. When that gets caught in there, it will tilt the drum and change the relationship to the backing plate. I have also seen that happen to two-piece drum/hub assemblies like those used on older Escorts. The pieces are held together by the studs, and there is shoulders on them that cannot get lined up right to the holes in the drum. That can cause a horrendous wobble in the drums and the wheels/tires.
Was this
answer
helpful?
Yes
No
Wednesday, March 31st, 2021 AT 10:28 AM
Tiny
REAPER1992
  • MEMBER
  • 39 POSTS
I am having the issue with the right parts on it the wrong drum is the one I am not having issues with. I will check that with the dollar and the axle shaft thou and let you know. Thank you
Was this
answer
helpful?
Yes
No
Wednesday, March 31st, 2021 AT 10:28 AM
Tiny
CARADIODOC
  • MECHANIC
  • 33,699 POSTS
Any chance someone previously replaced the rear axle assembly with one from a different year?
Was this
answer
helpful?
Yes
No
Wednesday, March 31st, 2021 AT 10:28 AM
Tiny
REAPER1992
  • MEMBER
  • 39 POSTS
No, the truck was original when I got it and the only thing I did was change the axle shaft. Other then that and backing plate the axle is all original. Is it possible that it could be the axle shaft its self?
I got it from AutoZone and the computer said it was for my truck and normally the computer there are right, but they have been known to be wrong. I noticed the wheel studs was fatter then the normal ones and lug nuts but it was still five studs. So I just figured it was because it was not the original ones.
Was this
answer
helpful?
Yes
No
Wednesday, March 31st, 2021 AT 10:28 AM
Tiny
CARADIODOC
  • MECHANIC
  • 33,699 POSTS
The light bulb over my head is starting to light up. Measure the distance between the backing plate and the inside of the flange the drum sits on, then compare the two sides to each other. I suspect you're going to find the new shaft is shorter, so the drum is too close to the backing plate and is rubbing on it. When you look up the part in their parts book or computer, see if they specify the same part number for a truck one year older and one year newer than yours. If they show different numbers, your truck could be an early or late production near the beginning or end of that model year.

The other glaring clue is the different diameter studs. That is not correct. You need the correct studs to fit through the holes in the wheel, and the matching lug nuts have a curved friction surface that must match that on the wheel. It's that friction surface that holds the nuts tight. Be careful to not get any type of grease or other lubricant on those surfaces.
Was this
answer
helpful?
Yes
No
Wednesday, March 31st, 2021 AT 10:28 AM
Tiny
REAPER1992
  • MEMBER
  • 39 POSTS
Okay, thank you.
Will try that next day off thanks.
Was this
answer
helpful?
Yes
No
Wednesday, March 31st, 2021 AT 10:28 AM

Please login or register to post a reply.

Sponsored links