Welcome back:
Okay, the one side has 30 psi. Now you made a good point. If a valve is bent and stuck open, you would have no compression. So, I suspect it is off time but not enough to bend anything. The 30 psi may be an indicator that the valves are not closing early enough or opening too soon. Thus, it can't build compression.
To check timing before you remove the chains, you will have to see if all the marks align, which may require several crankshaft rotations to happen. I am going to provide the directions for replacing the primary and secondary chains. Just fyi, this isn't going to be the easiest thing you have ever done. In fact, it can be frustrating.
_____________________________
Here are the directions. I will break them down this way: Primary, Secondary Left, and Secondary Right. All attached pictures will correlate with the directions. Note: The secondary left must be installed before the right side.
____________________________
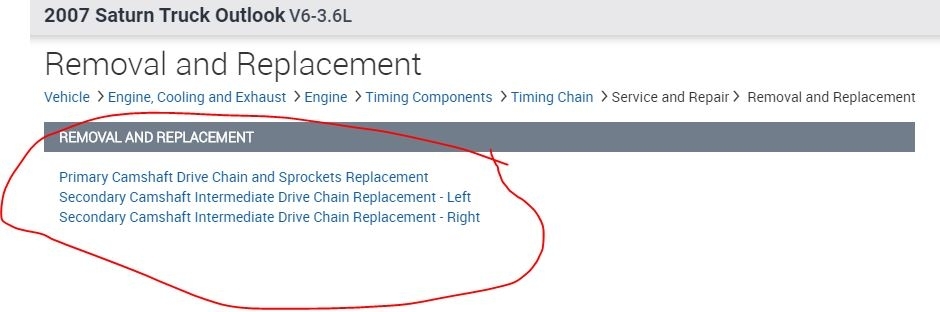
2007 Saturn Truck Outlook V6-3.6L
Primary Camshaft Drive Chain and Sprockets Replacement
Vehicle Engine, Cooling and Exhaust Engine Timing Components Timing Chain Service and Repair Removal and Replacement Primary Camshaft Drive Chain and Sprockets Replacement
PRIMARY CAMSHAFT DRIVE CHAIN AND SPROCKETS REPLACEMENT
PRIMARY CAMSHAFT DRIVE CHAIN AND SPROCKETS REPLACEMENT
Tools Required: EN 46111 Crankshaft Rotation Socket
Removal Procedure
1. Remove the engine front cover. See: Timing Cover > Removal and Replacement > Engine Front Cover Replacement
2. Remove the spark plugs in order to ease crankshaft/engine rotation. See: Spark Plug > Removal and Replacement
3. Remove the right bank secondary camshaft drive chain tensioner. See: Engine > Overhaul > 16. Secondary Camshaft Drive Chain Tensioner Removal - Right Side
4. Remove the right bank secondary camshaft drive chain shoe. See: Engine > Overhaul > 17. Secondary Camshaft Drive Chain Shoe Removal - Right Side
5. Remove the right bank secondary camshaft drive chain guide. See: Engine > Overhaul > 18. Secondary Camshaft Drive Chain Guide Removal - Right Side
6. Remove the right bank secondary camshaft drive chain. See: Engine > Overhaul > 19. Secondary Camshaft Drive Chain Removal - Right Side
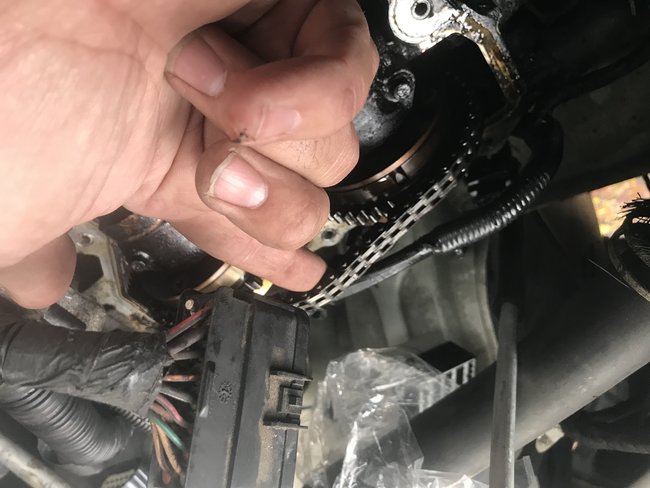
7. Remove the primary camshaft drive chain tensioner. See: Engine > Overhaul > 20. Primary Camshaft Drive Chain Tensioner Removal
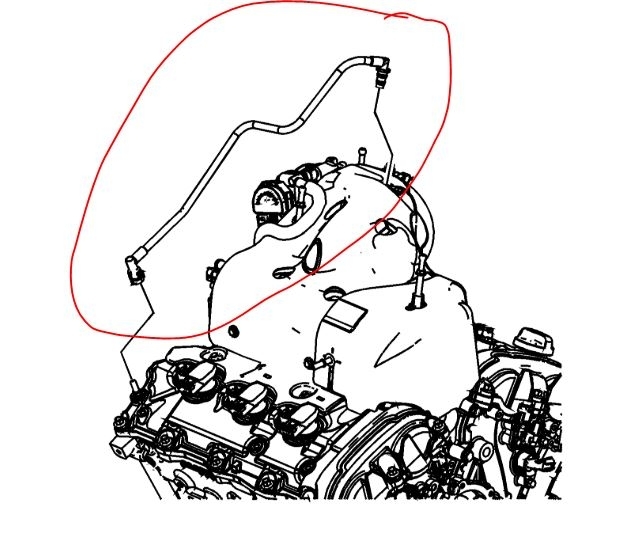
8. Remove the primary camshaft drive chain upper guide. See: Engine > Overhaul > 21. Primary Camshaft Drive Chain Guide Removal - Upper
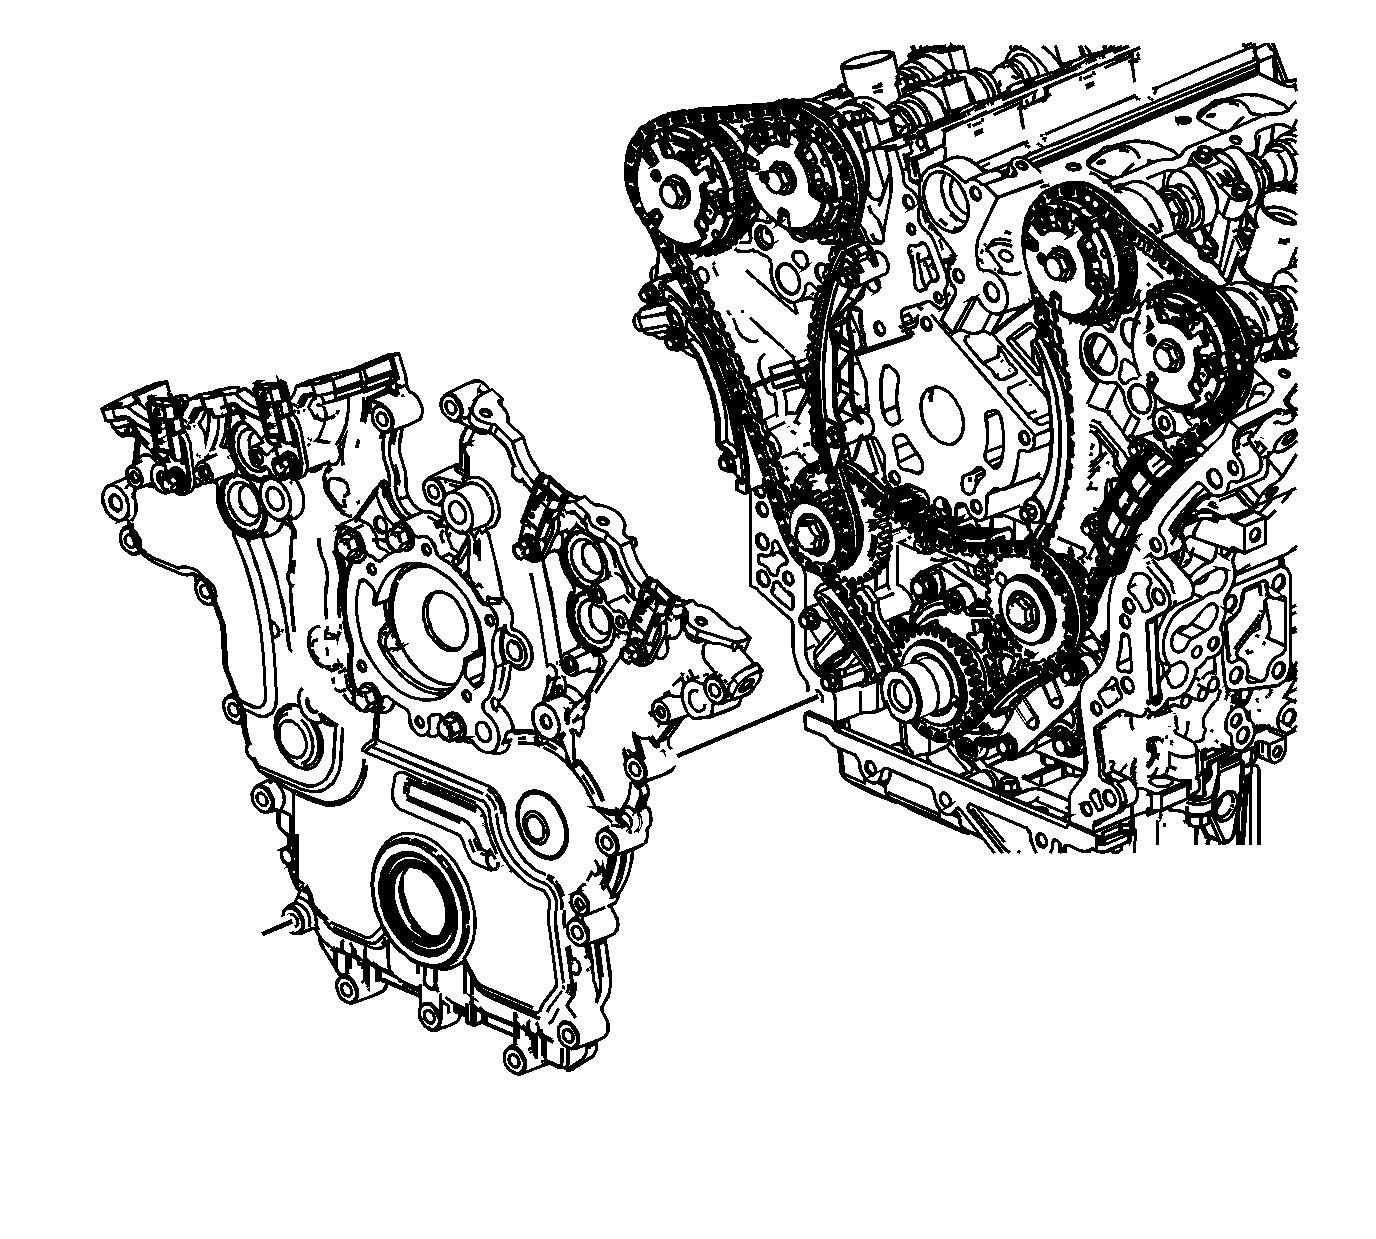
pic 1
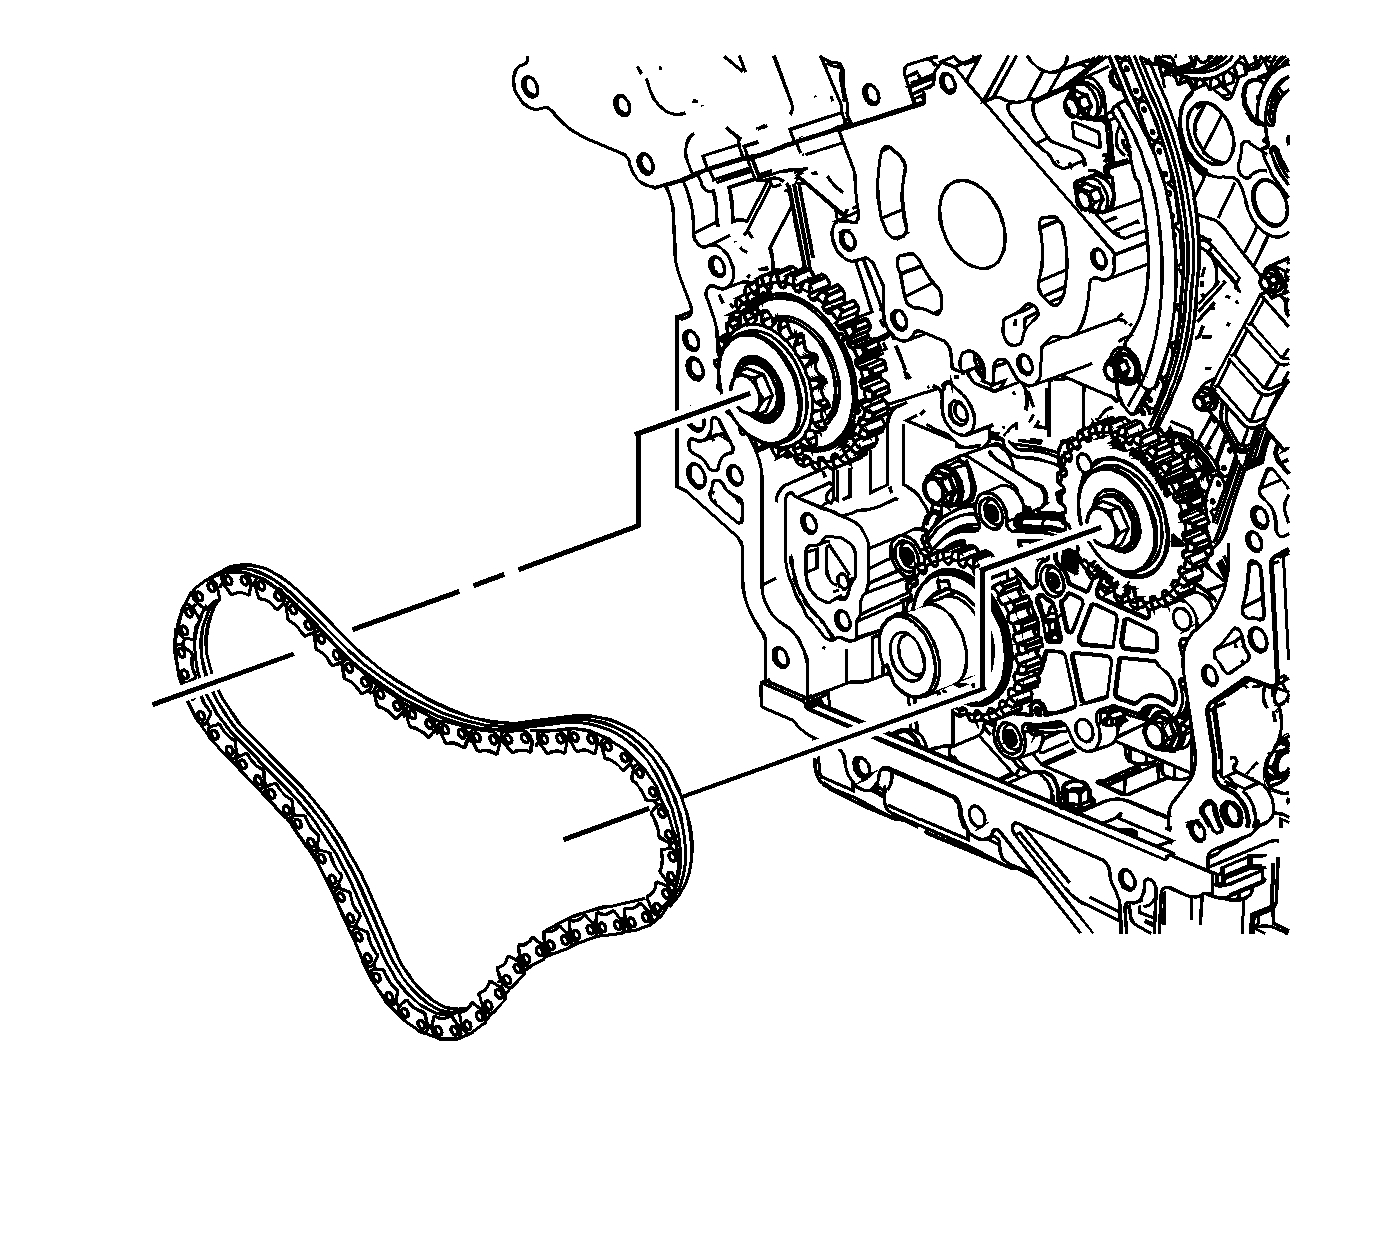
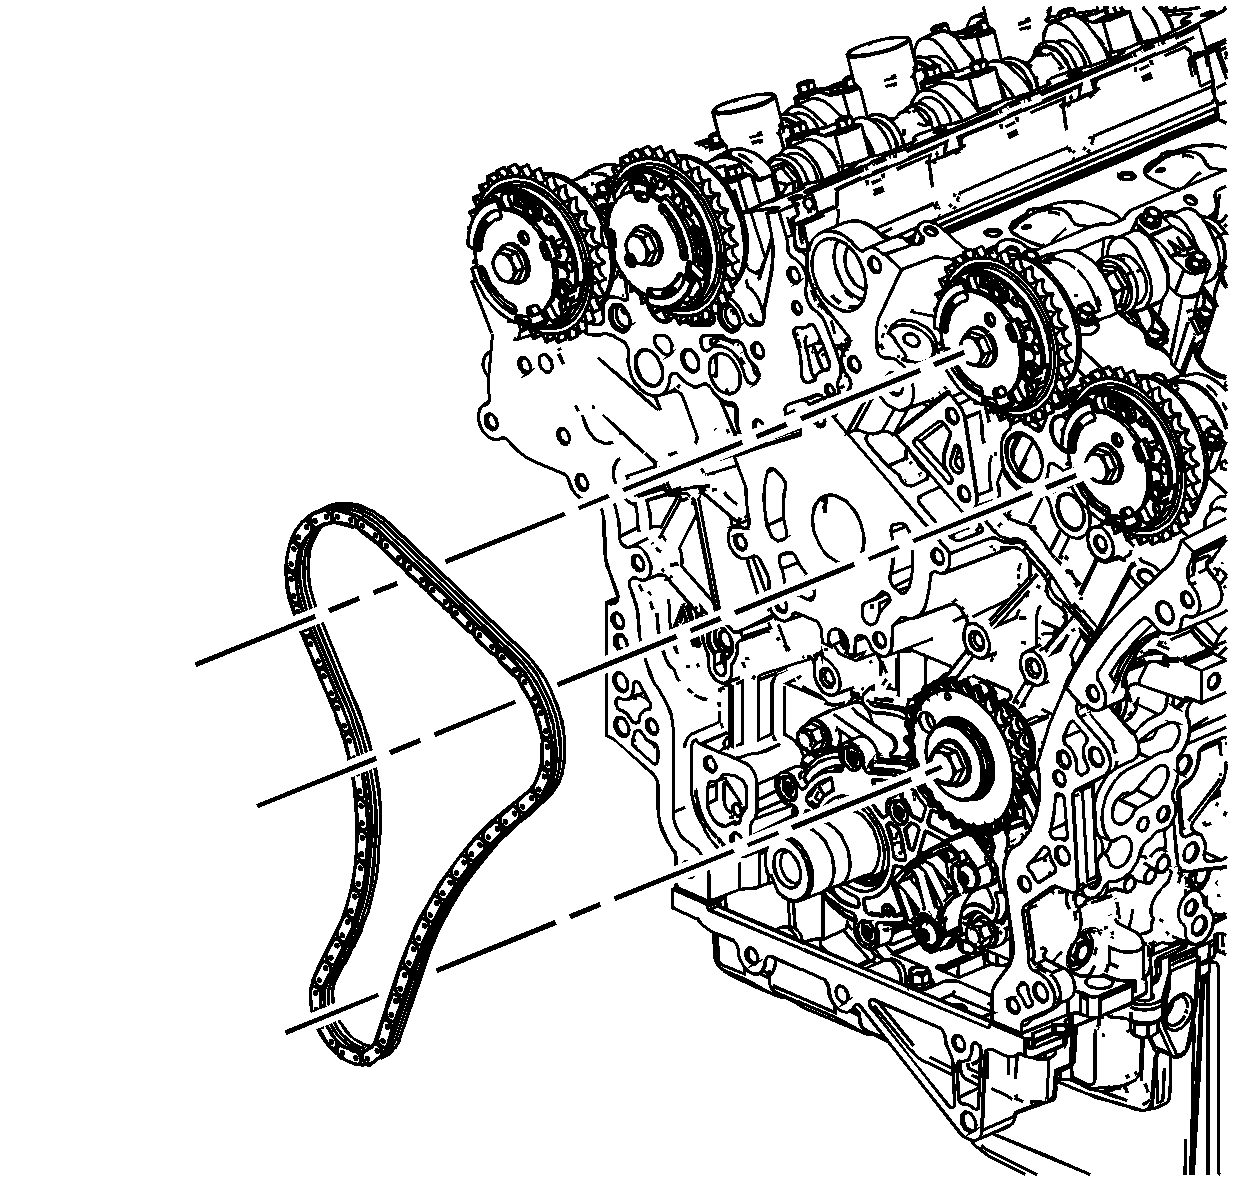
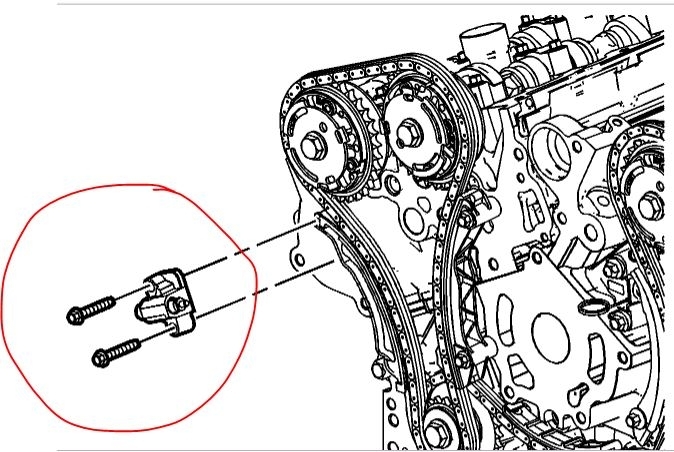
9. Remove the primary camshaft timing chain. See: Engine > Overhaul > 23. Primary Camshaft Drive Chain Removal
pic 2
10. Remove the crankshaft sprocket from the nose of the crankshaft.
Installation Procedure
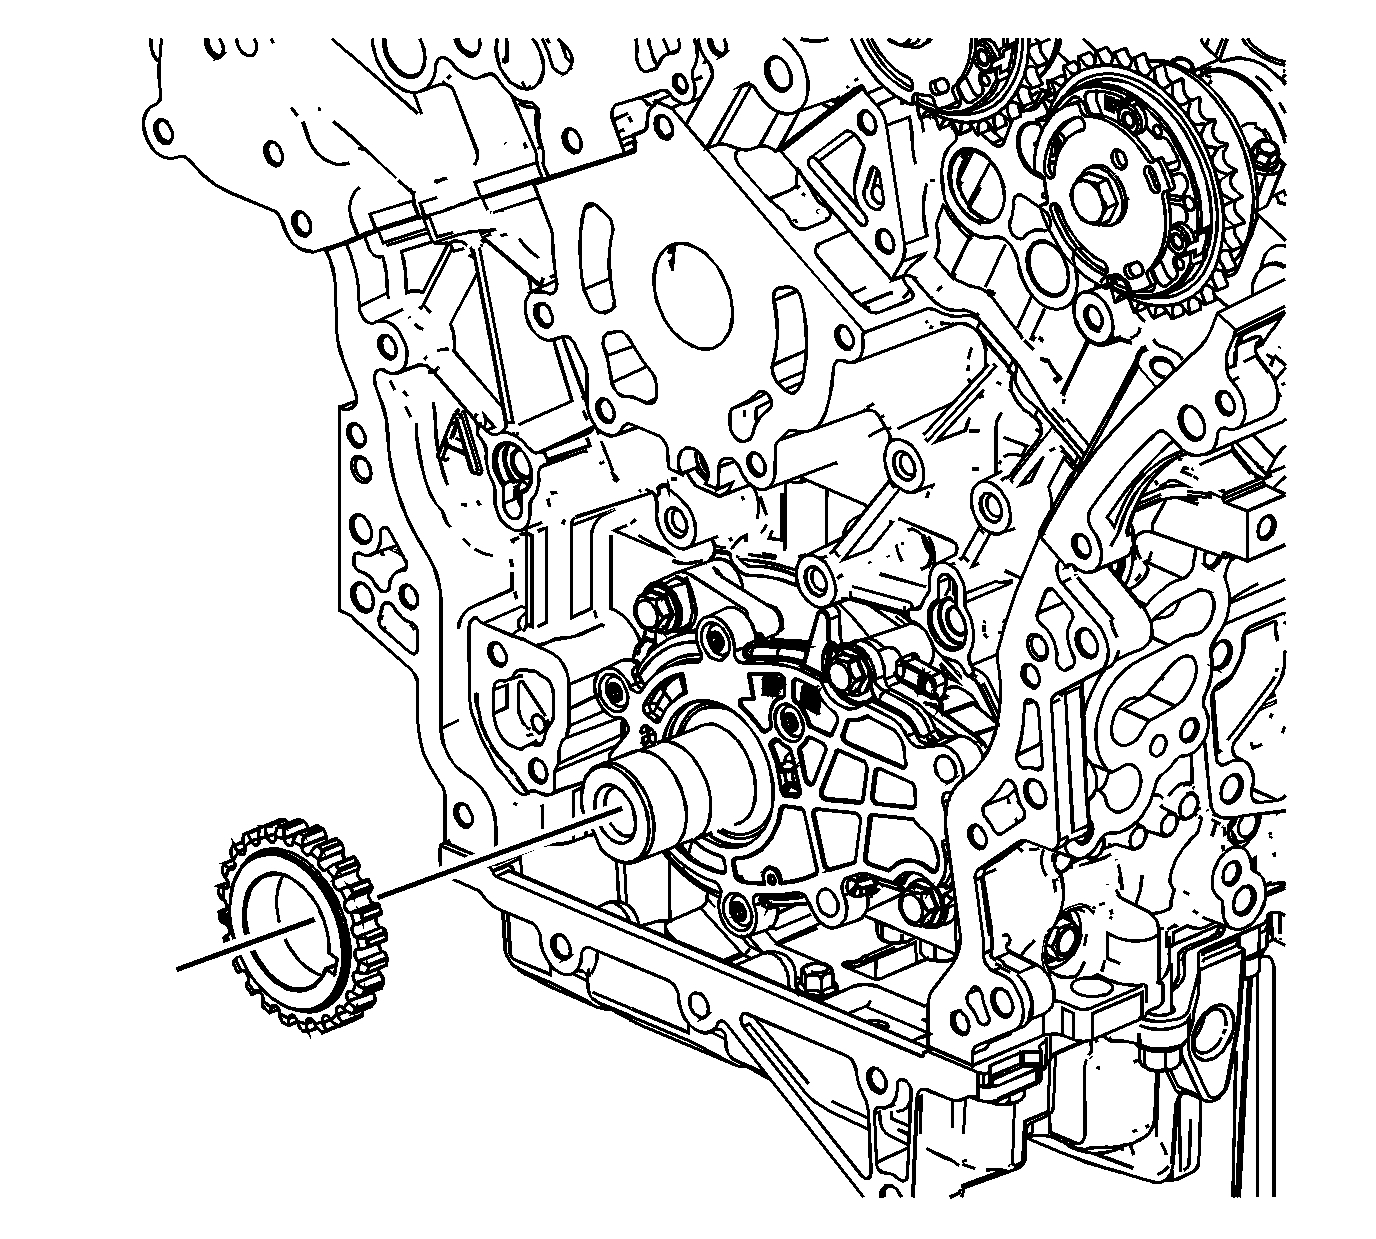
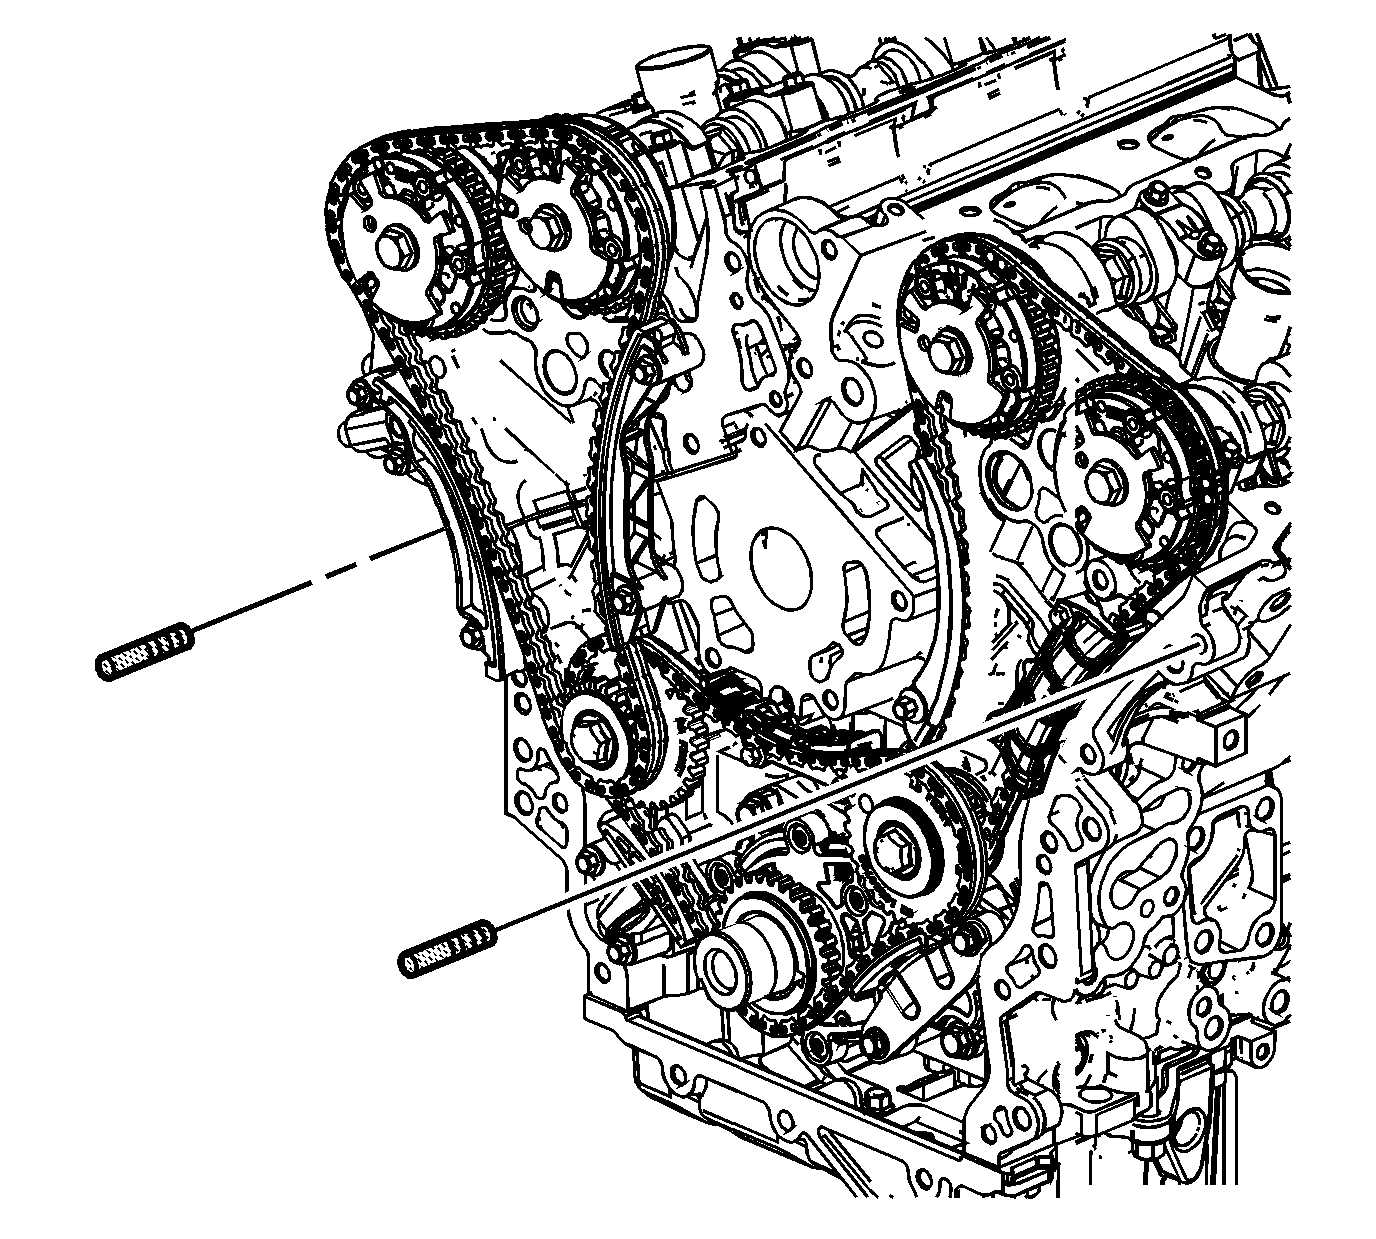
1. Ensure the secondary timing chain is in the stage 1 timing position. See: Timing Component Alignment Marks > Components
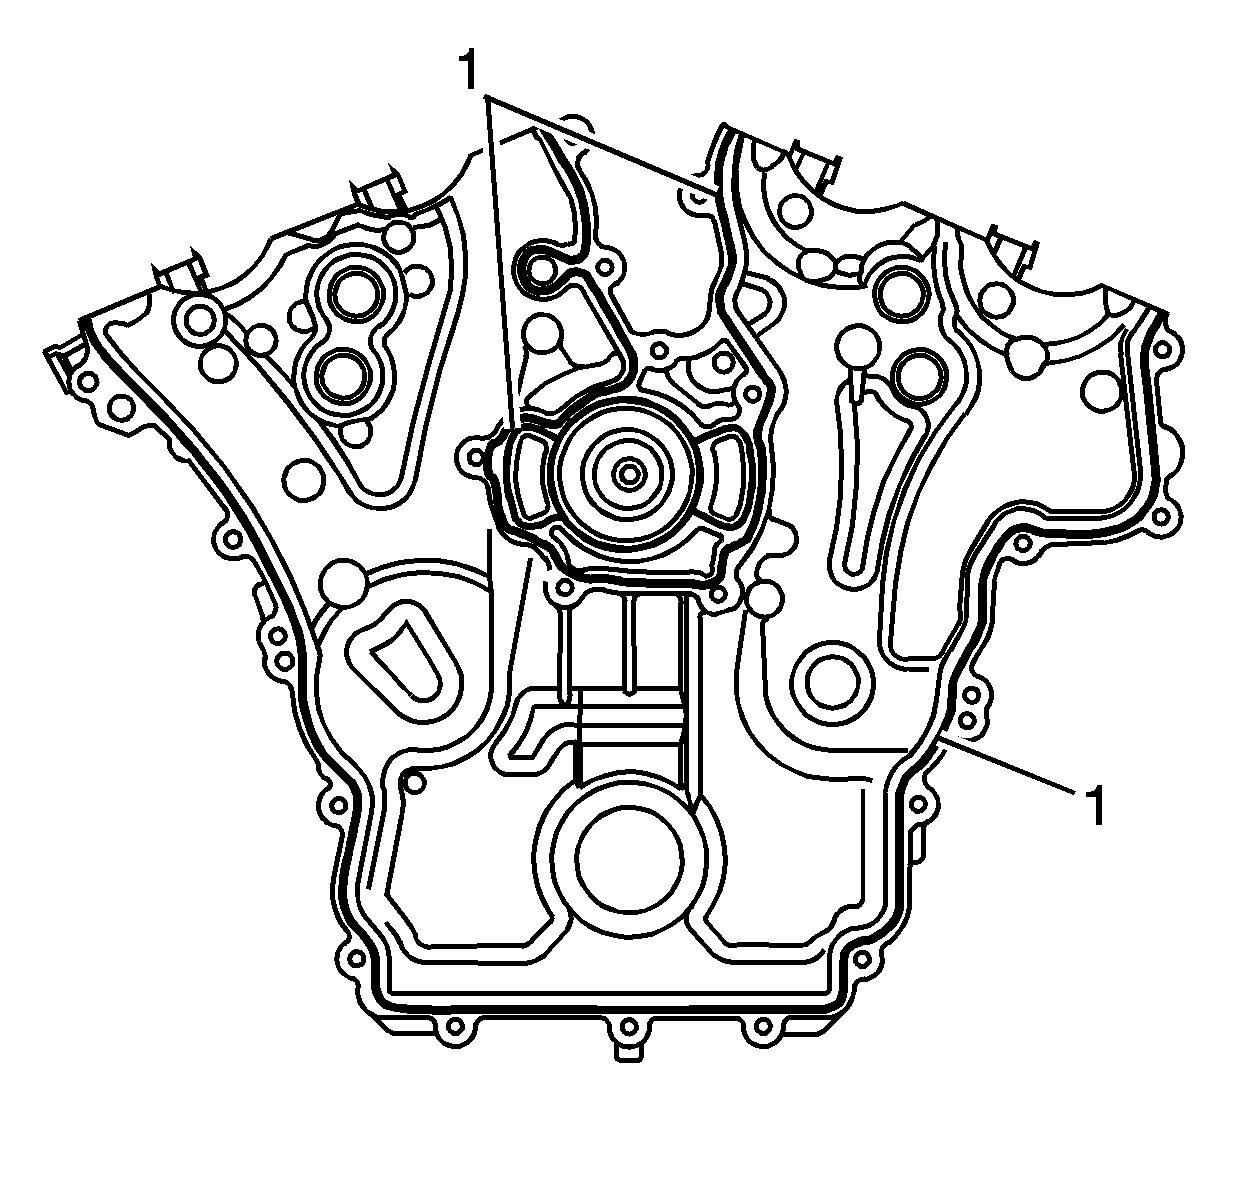
pic 3
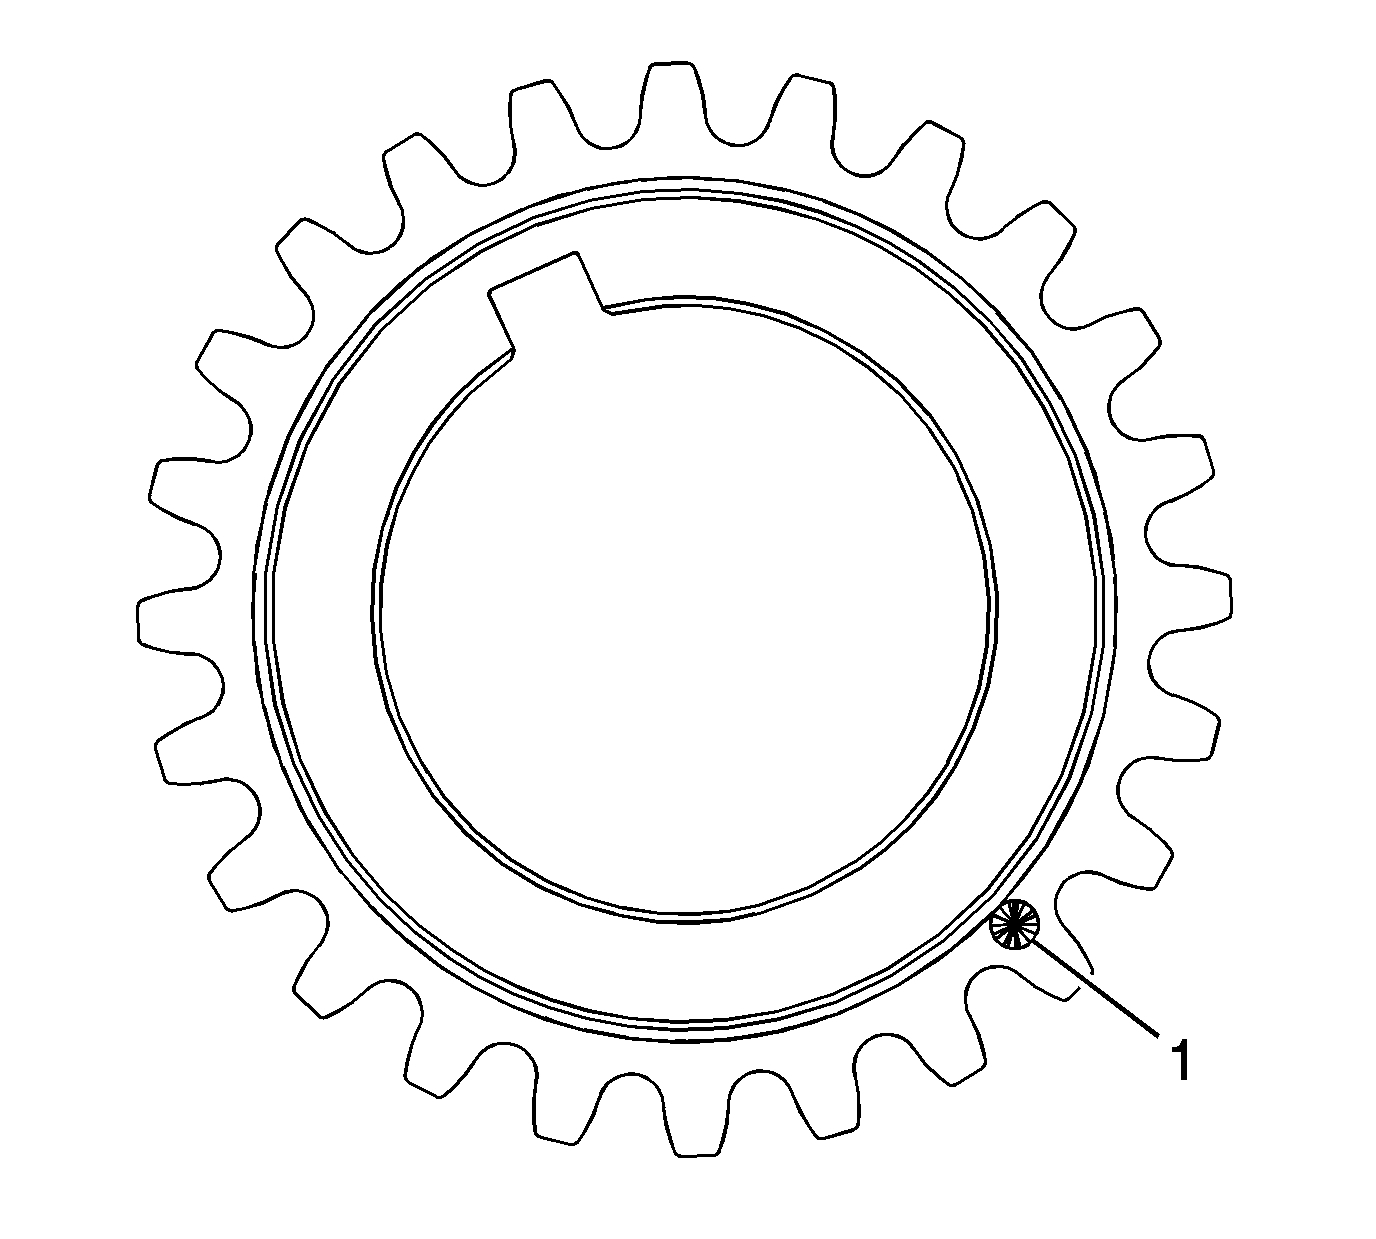
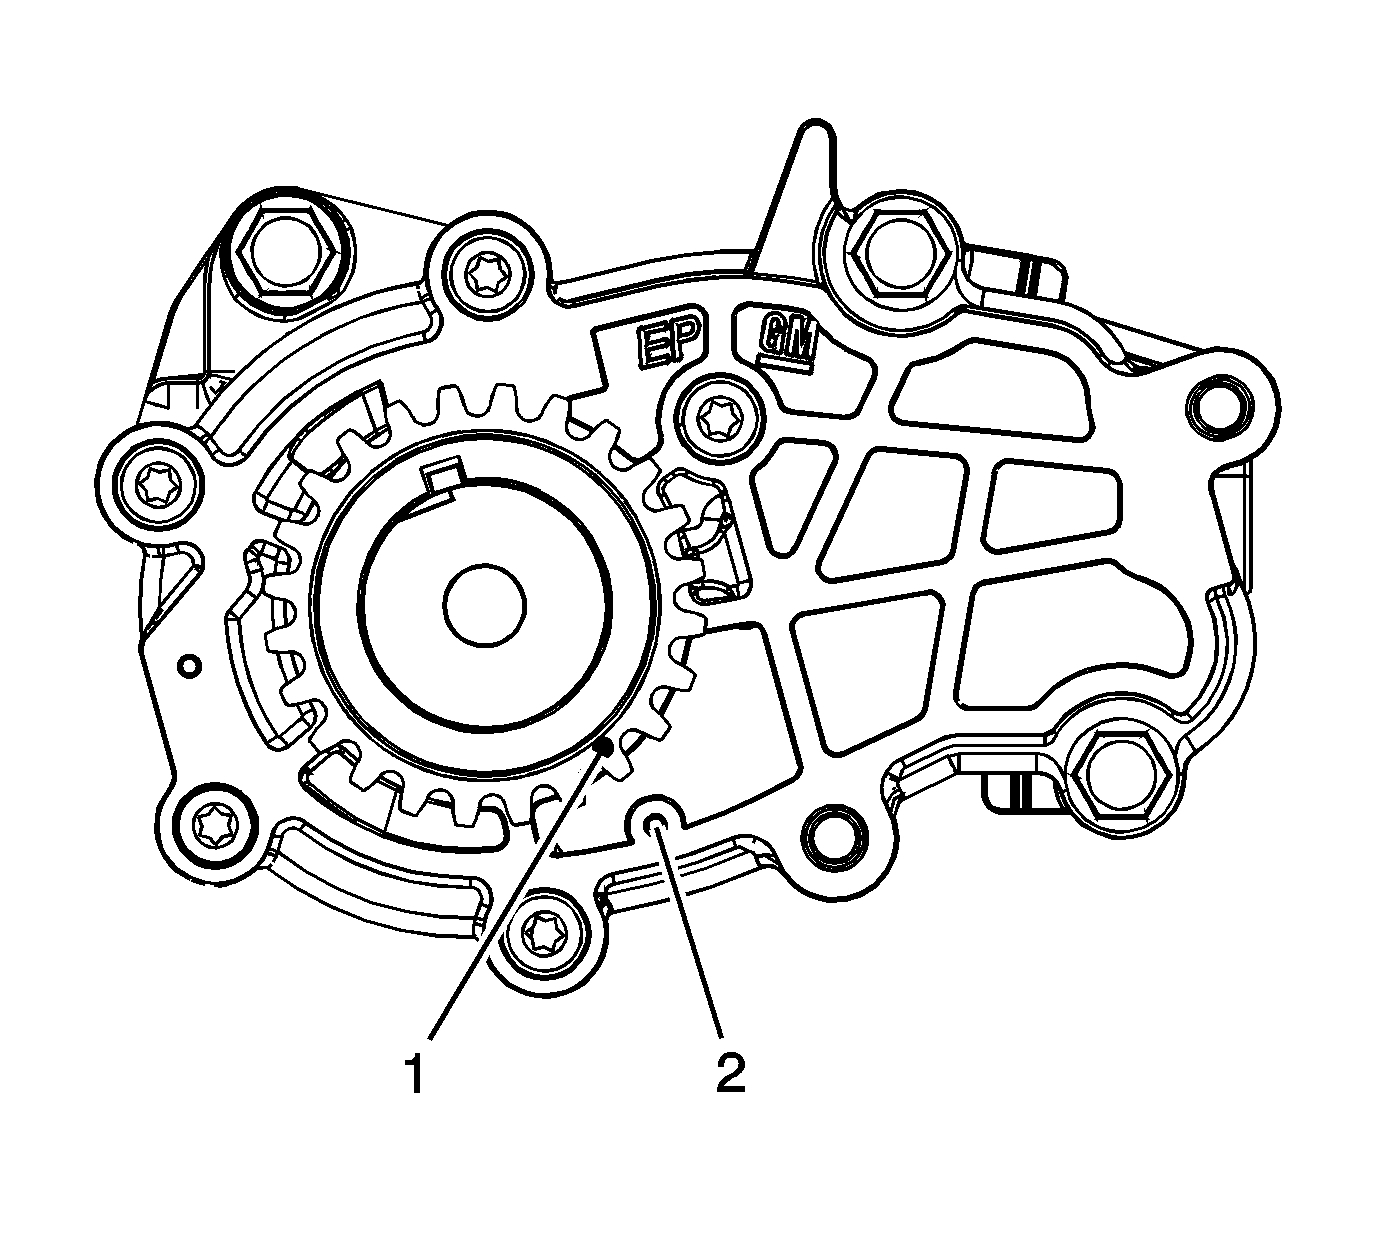
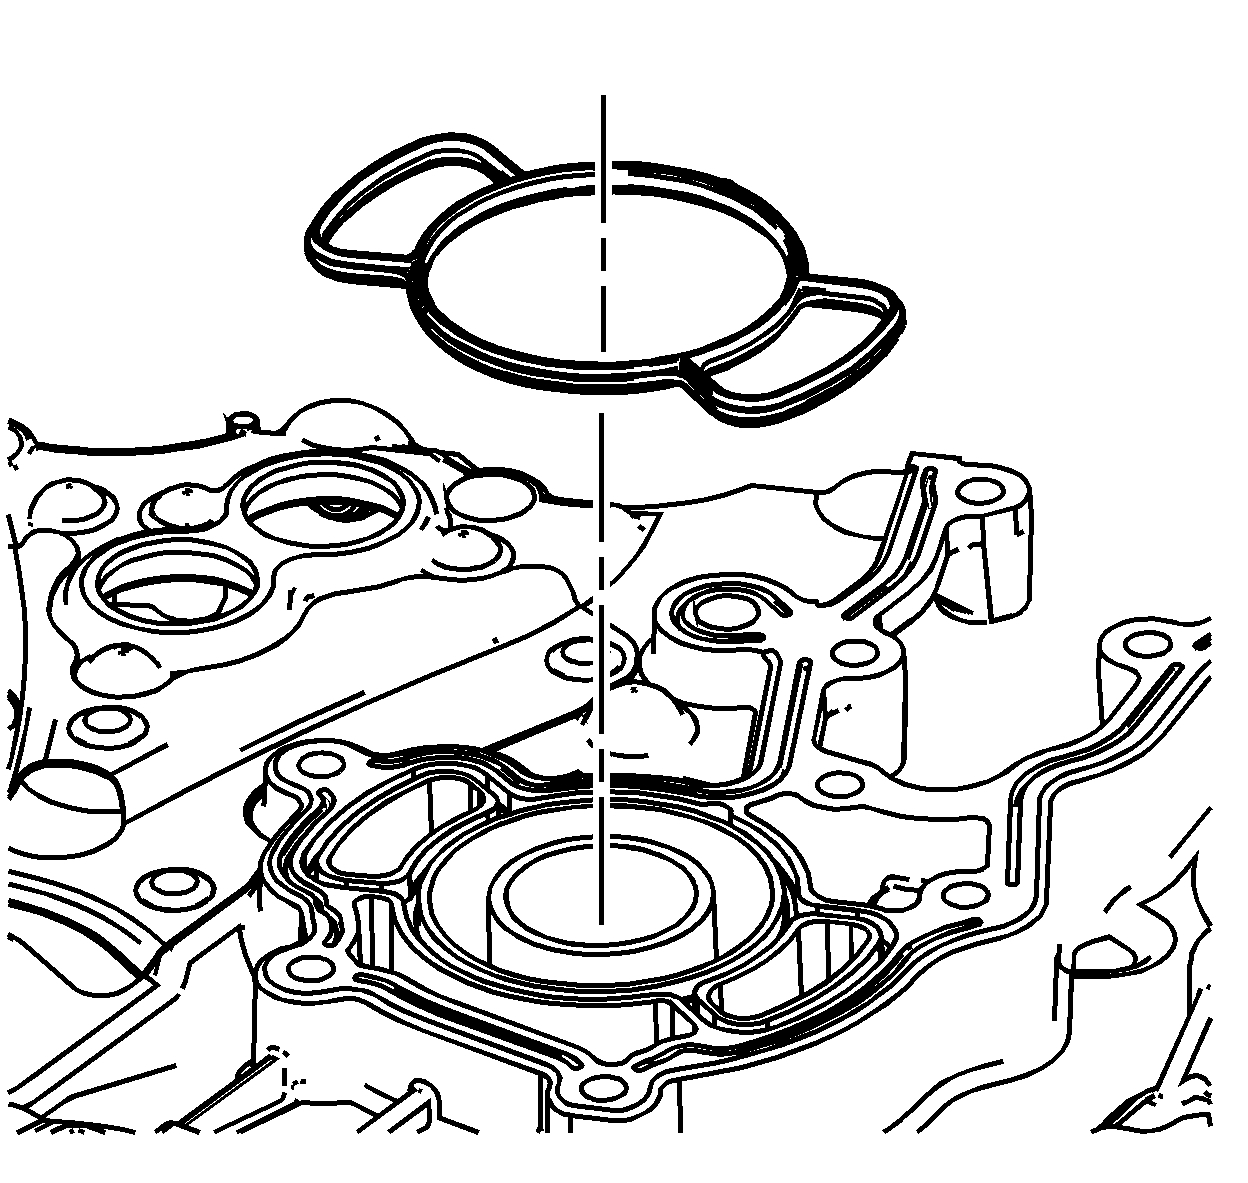
2. Ensure the crankshaft sprocket is installed with the timing mark (1) visible.
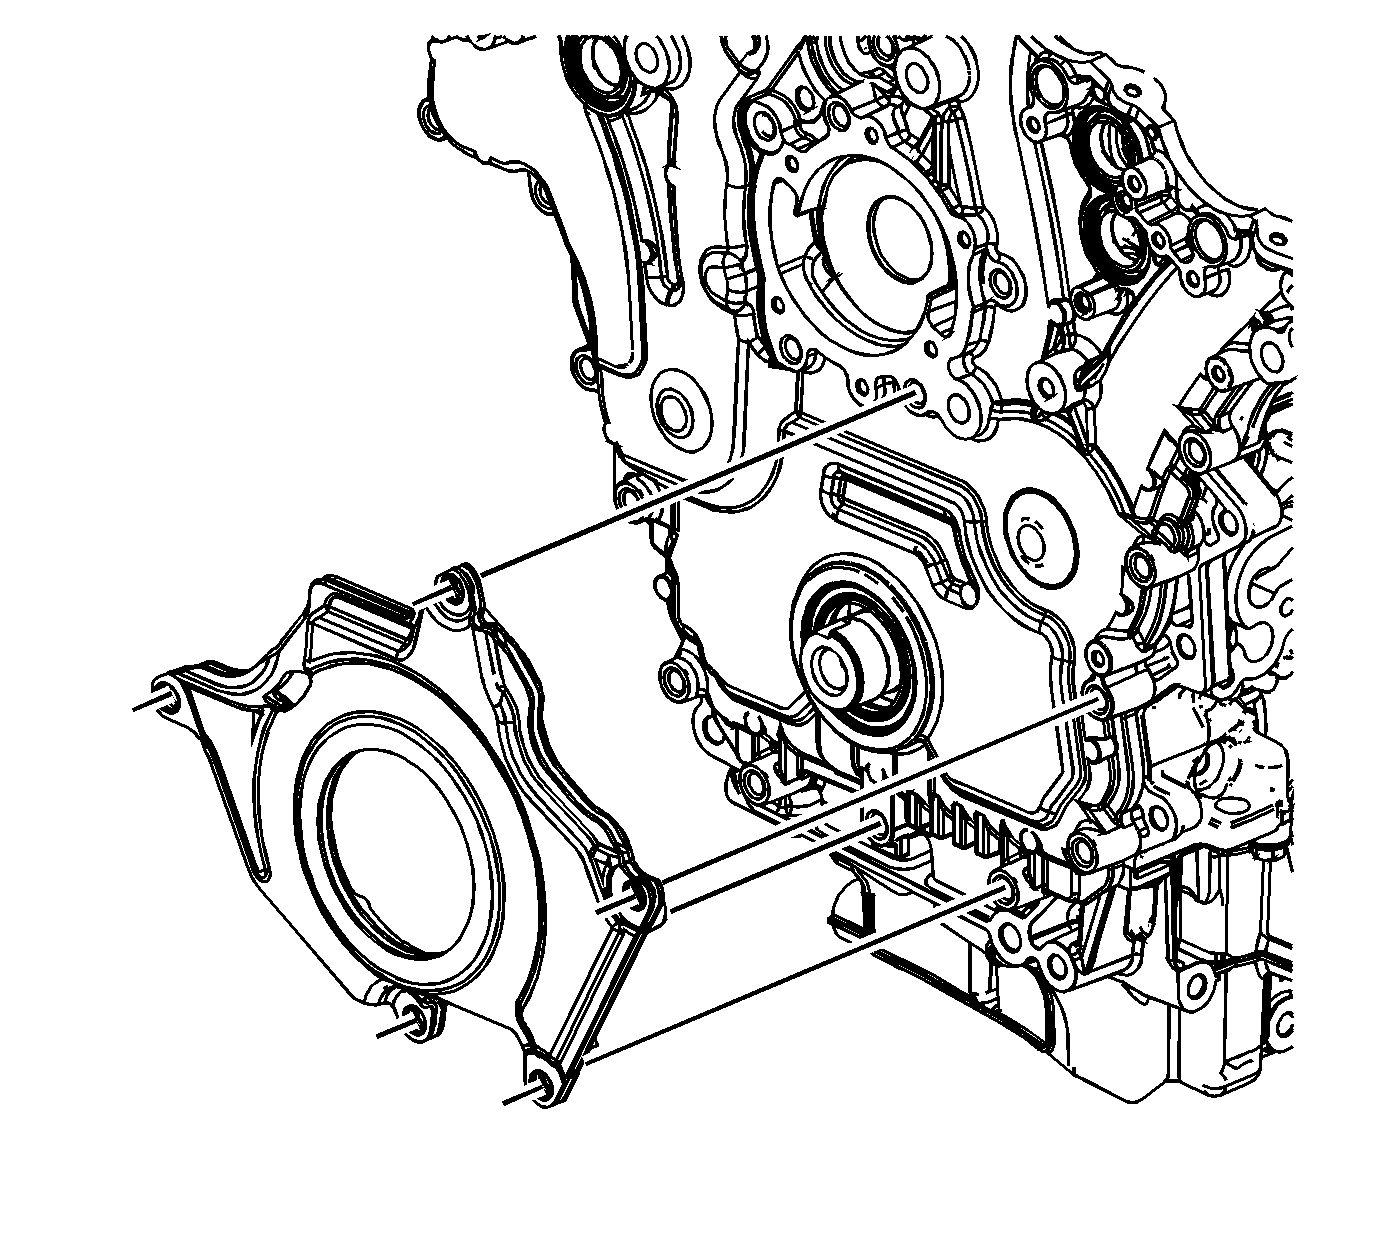
pic 4
3. Install the crankshaft sprocket on to the nose of the crankshaft.
4. Align the notch in the crankshaft sprocket with the pin in the crankshaft.
5. Slide the crankshaft sprocket on the crankshaft nose until the crankshaft sprocket contacts the step in the crankshaft.
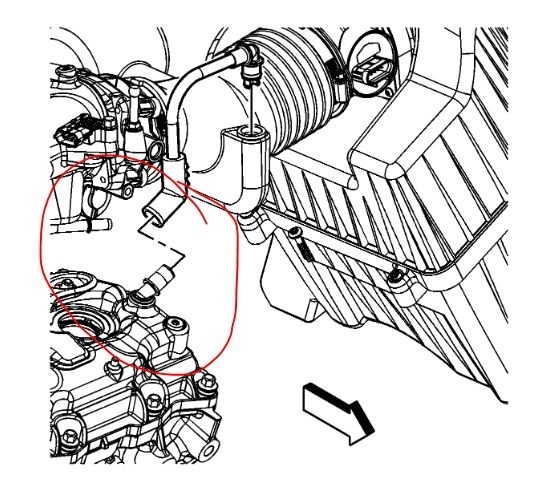
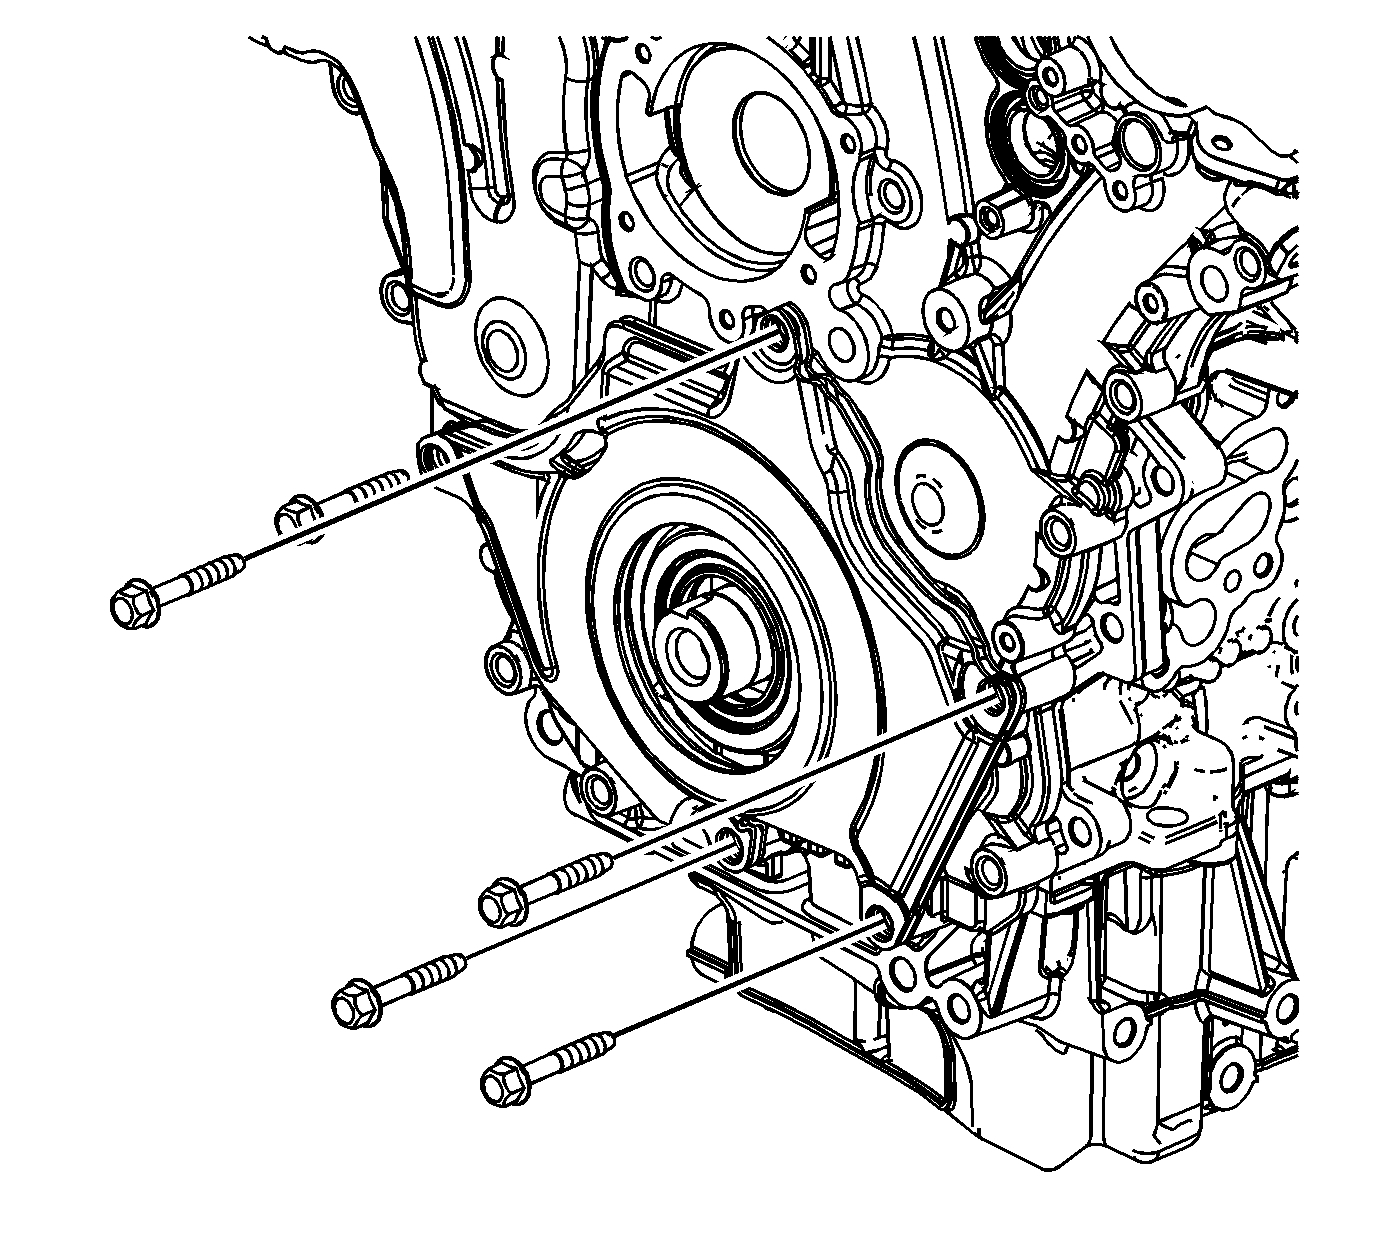
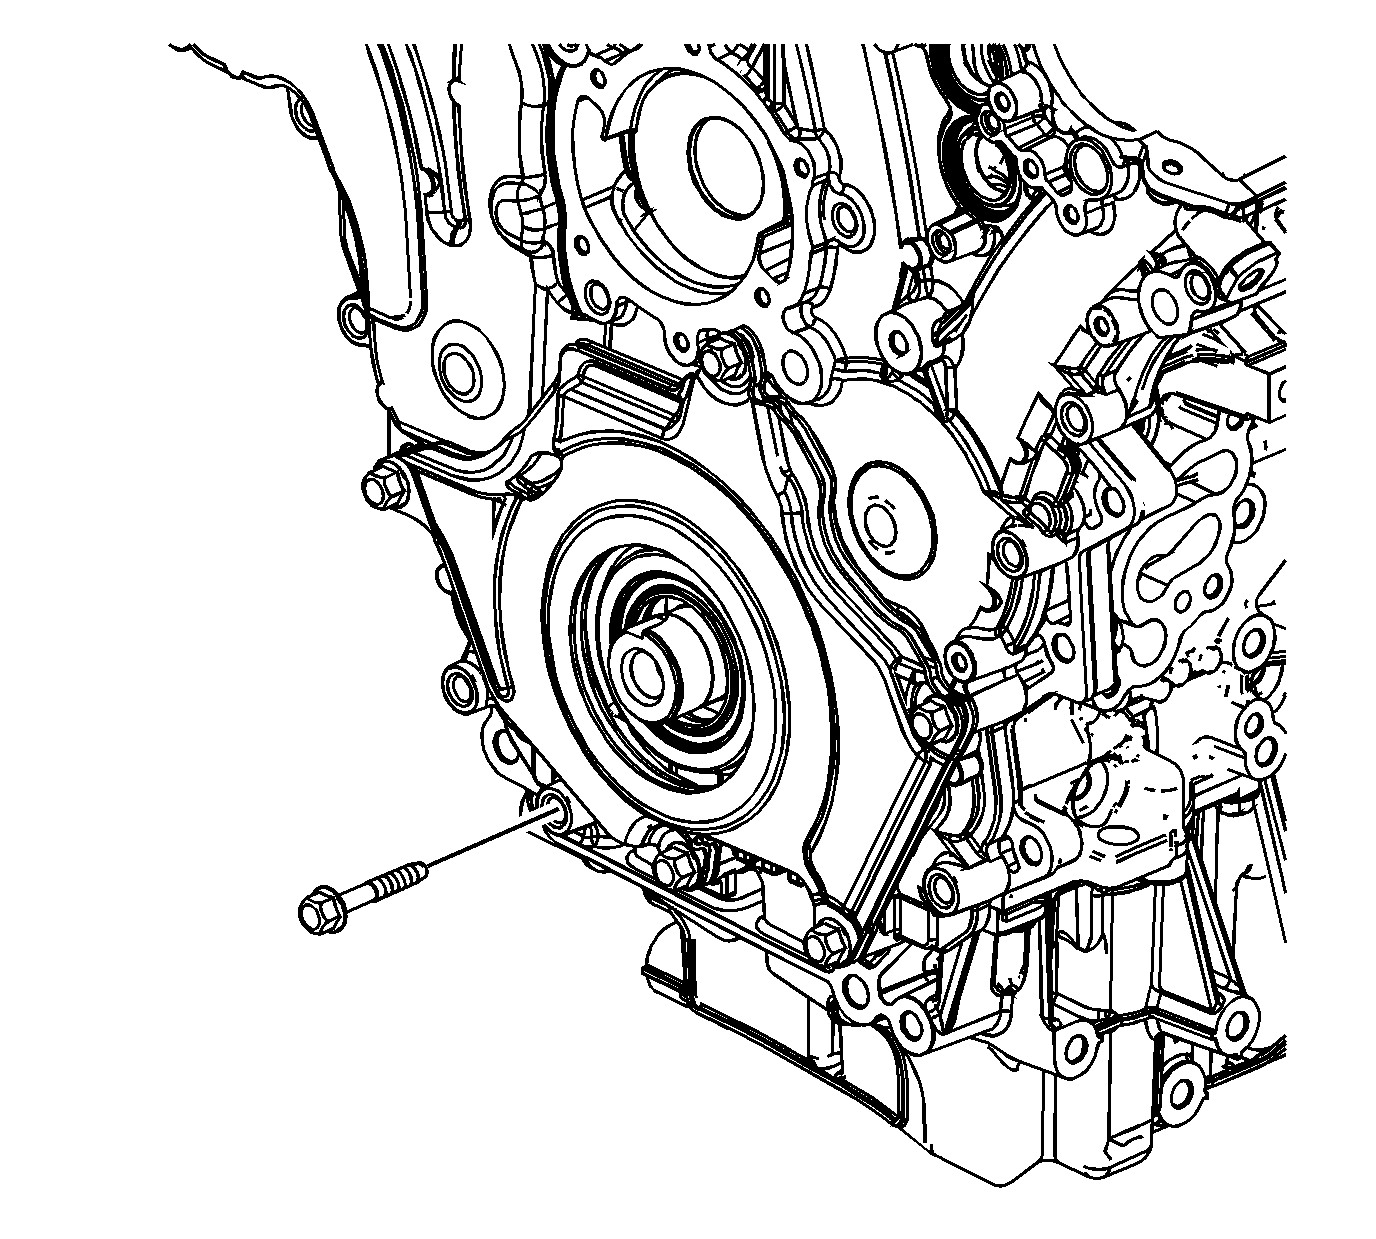
pic 5
6. Ensure the crankshaft is in the stage one timing position with the crankshaft sprocket timing mark (1) aligned to the stage one timing mark on the oil pump cover (2) using the EN 46111. See: Timing Component Alignment Marks > Components
pic 6
7. Install the primary camshaft timing chain. See: Engine > Overhaul > 114. Primary Camshaft Drive Chain Installation
8. Install the primary upper camshaft drive chain guide. See: Engine > Overhaul > 116. Primary Camshaft Drive Chain Guide Installation - Upper
9. Install the primary camshaft drive chain tensioner. See: Engine > Overhaul > 117. Primary Camshaft Drive Chain Tensioner Installation
10. Install the right bank secondary camshaft drive chain. See: Engine > Overhaul > 118. Secondary Camshaft Drive Chain Installation - Right Side
11. Install the right bank secondary camshaft drive chain guide. See: Engine > Overhaul > 119. Secondary Camshaft Drive Chain Guide Installation - Right Side
12. Install the right bank secondary camshaft drive chain shoe. See: Engine > Overhaul > 120. Secondary Camshaft Drive Chain Shoe Installation - Right Side
13. Install the right bank secondary camshaft drive chain tensioner. See: Engine > Overhaul > 121. Secondary Camshaft Drive Chain Tensioner Installation - Right Side
14. Install the spark plugs. See: Spark Plug > Removal and Replacement
15. Install the engine front cover. See: Timing Cover > Removal and Replacement > Engine Front Cover Replacement
_____________________________________________________________________
Secondary Left
Secondary Camshaft Intermediate Drive Chain Replacement - Left
Vehicle Engine, Cooling and Exhaust Engine Timing Components Timing Chain Service and Repair Removal and Replacement Secondary Camshaft Intermediate Drive Chain Replacement - Left
SECONDARY CAMSHAFT INTERMEDIATE DRIVE CHAIN REPLACEMENT - LEFT
SECONDARY CAMSHAFT INTERMEDIATE DRIVE CHAIN REPLACEMENT - LEFT
Removal Procedure
1. Remove the engine front cover. See: Timing Cover > Removal and Replacement > Engine Front Cover Replacement
2. Remove the right bank secondary camshaft drive chain tensioner. See: Engine > Overhaul > 16. Secondary Camshaft Drive Chain Tensioner Removal - Right Side
3. Remove the right bank secondary camshaft drive chain shoe. See: Engine > Overhaul > 17. Secondary Camshaft Drive Chain Shoe Removal - Right Side
4. Remove the right bank secondary camshaft drive chain guide. See: Engine > Overhaul > 18. Secondary Camshaft Drive Chain Guide Removal - Right Side
5. Remove the right bank secondary camshaft drive chain. See: Engine > Overhaul > 19. Secondary Camshaft Drive Chain Removal - Right Side
6. Remove the primary camshaft drive chain tensioner. See: Engine > Overhaul > 20. Primary Camshaft Drive Chain Tensioner Removal
7. Remove the primary upper camshaft drive chain guide. See: Engine > Overhaul > 21. Primary Camshaft Drive Chain Guide Removal - Upper
8. Remove the primary camshaft drive chain. See: Engine > Overhaul > 23. Primary Camshaft Drive Chain Removal
9. Remove the right bank camshaft intermediate drive chain idler. See: Engine > Overhaul > 24. Camshaft Intermediate Drive Chain Idler Removal - Right Side
10. Remove the left bank secondary camshaft drive chain tensioner. See: Engine > Overhaul > 25. Secondary Camshaft Drive Chain Tensioner Removal - Left Side
11. Remove the left bank secondary camshaft drive chain shoe. See: Engine > Overhaul > 26. Secondary Camshaft Drive Chain Shoe Removal - Left Side
12. Remove the left bank secondary camshaft drive chain guide. See: Engine > Overhaul > 27. Secondary Camshaft Drive Chain Guide Removal - Left Side
13. Remove the left bank camshaft intermediate drive chain idler. See: Engine > Overhaul > 29. Camshaft Intermediate Drive Chain Idler Removal - Left Side
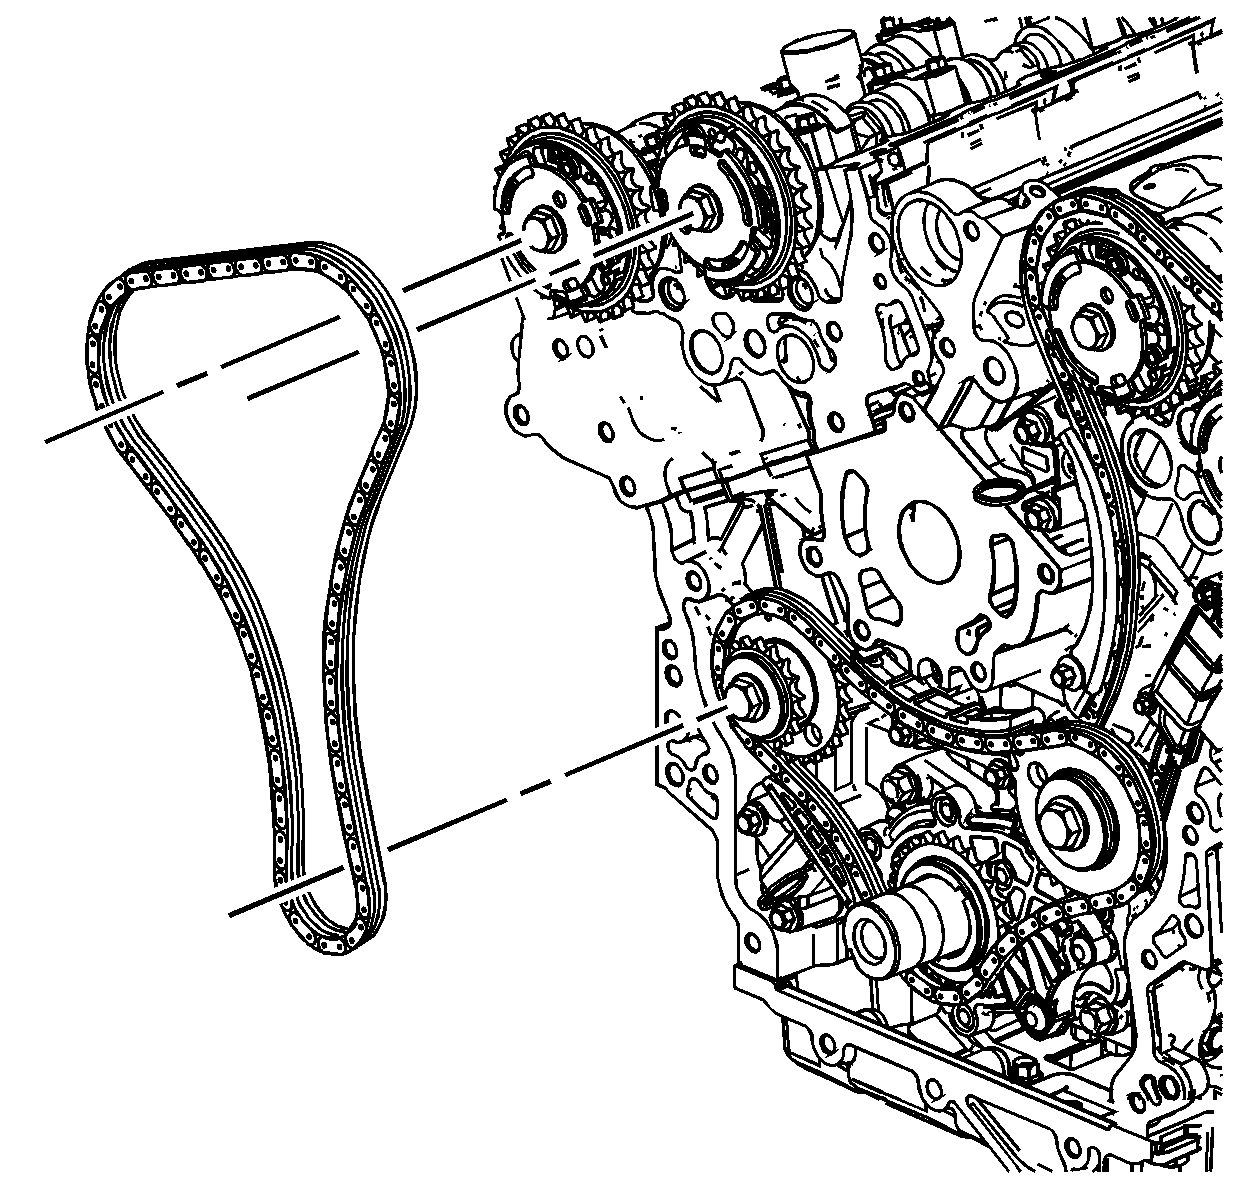
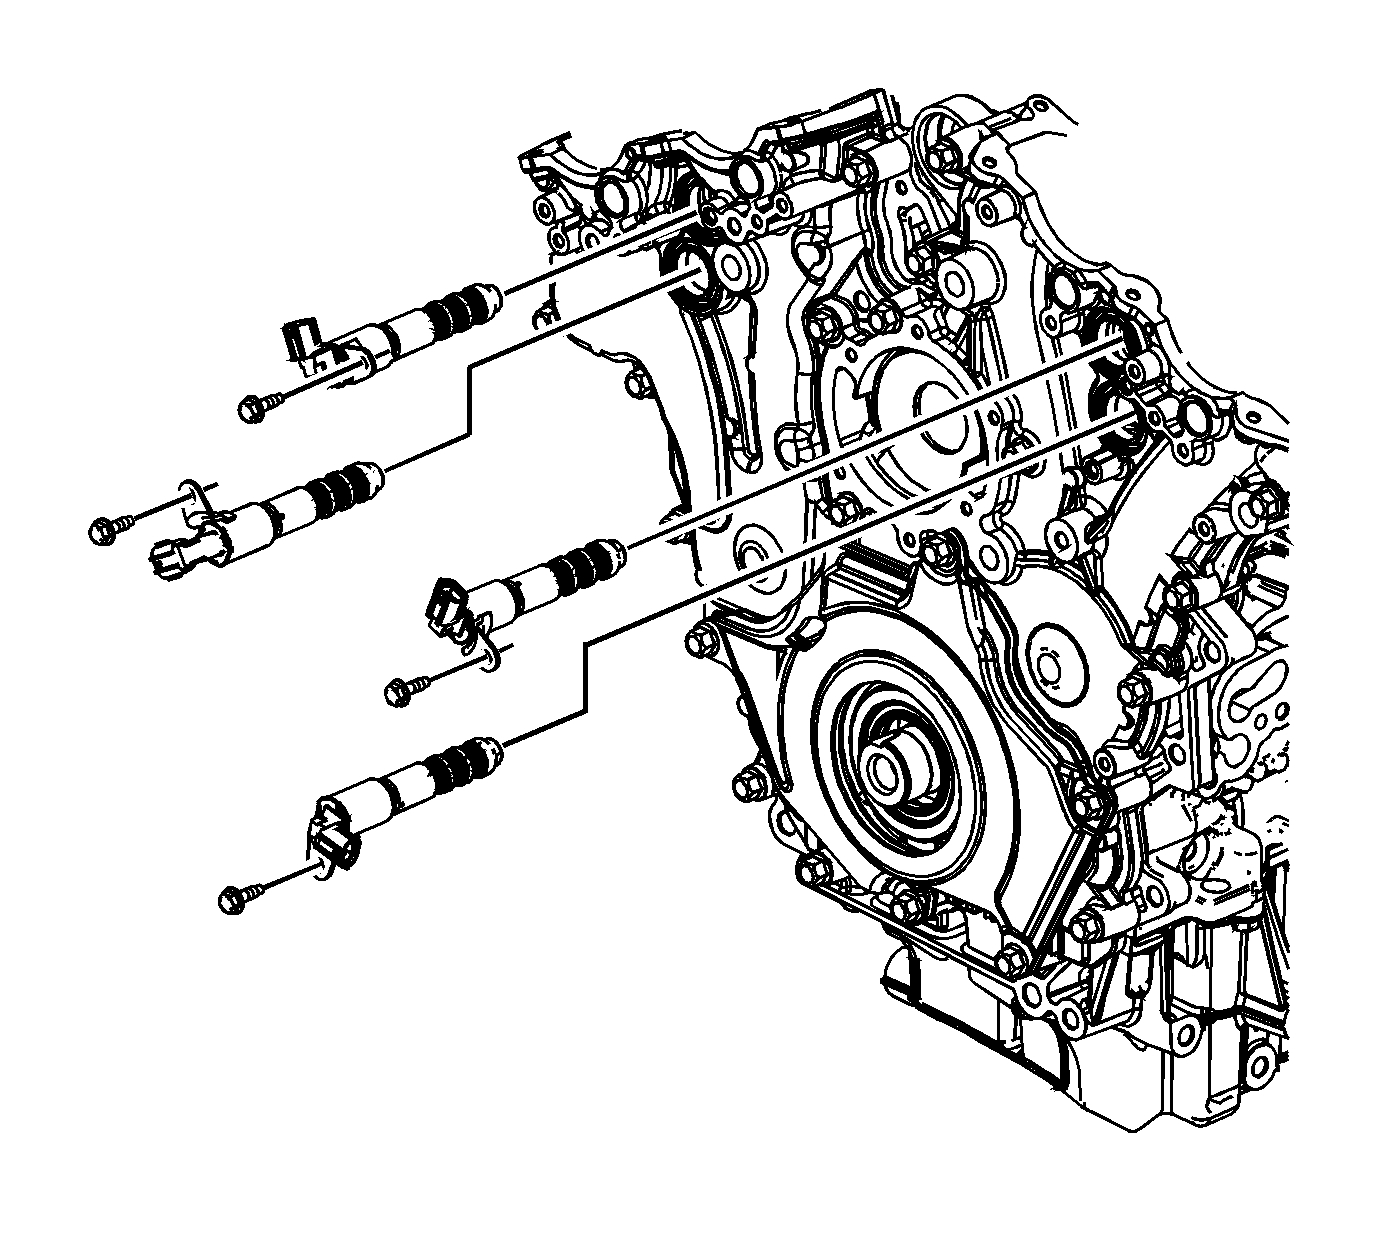
pic 7
14. Remove the left bank secondary camshaft drive chain. See: Engine > Overhaul > 28. Secondary Camshaft Drive Chain Removal - Left Side
15. Clean and inspect all of the camshaft timing drive components. Replace components as necessary. See: Engine > Overhaul > 64. Camshaft Timing Drive Components Cleaning and Inspection
Installation Procedure
pic 8
1. Install the left bank secondary camshaft drive chain. See: Engine > Overhaul > 109. Secondary Camshaft Drive Chain Installation - Left Side
2. Install the left bank camshaft intermediate drive chain idler. See: Engine > Overhaul > 108. Camshaft Intermediate Drive Chain Idler Installation - Left Side
3. Install the left bank secondary camshaft drive chain guide. See: Engine > Overhaul > 110. Secondary Camshaft Drive Chain Guide Installation - Left Side
4. Install the left bank secondary camshaft drive chain shoe. See: Engine > Overhaul > 111. Secondary Camshaft Drive Chain Shoe Installation - Left Side
5. Install the left bank secondary camshaft drive chain tensioner. See: Engine > Overhaul > 112. Secondary Camshaft Drive Chain Tensioner Installation - Left Side
6. Install the right bank camshaft intermediate drive chain idler. See: Engine > Overhaul > 113. Camshaft Intermediate Drive Chain Idler Installation - Right Side
7. Install the primary camshaft drive chain. See: Engine > Overhaul > 114. Primary Camshaft Drive Chain Installation
8. Install the primary upper camshaft drive chain guide. See: Engine > Overhaul > 116. Primary Camshaft Drive Chain Guide Installation - Upper
9. Install the primary camshaft drive chain tensioner. See: Engine > Overhaul > 117. Primary Camshaft Drive Chain Tensioner Installation
10. Install the right bank secondary camshaft drive chain. See: Engine > Overhaul > 118. Secondary Camshaft Drive Chain Installation - Right Side
11. Install the right bank secondary camshaft drive chain guide. See: Engine > Overhaul > 119. Secondary Camshaft Drive Chain Guide Installation - Right Side
12. Install the right bank secondary camshaft drive chain shoe. See: Engine > Overhaul > 120. Secondary Camshaft Drive Chain Shoe Installation - Right Side
13. Install the right bank secondary camshaft drive chain tensioner. See: Engine > Overhaul > 121. Secondary Camshaft Drive Chain Tensioner Installation - Right Side
14. Install the engine front cover. See: Timing Cover > Removal and Replacement > Engine Front Cover Replacement
____________________________________________
Secondary Right
2007 Saturn Truck Outlook V6-3.6L
Secondary Camshaft Intermediate Drive Chain Replacement - Right
Vehicle Engine, Cooling and Exhaust Engine Timing Components Timing Chain Service and Repair Removal and Replacement Secondary Camshaft Intermediate Drive Chain Replacement - Right
SECONDARY CAMSHAFT INTERMEDIATE DRIVE CHAIN REPLACEMENT - RIGHT
SECONDARY CAMSHAFT INTERMEDIATE DRIVE CHAIN REPLACEMENT - RIGHT SIDE
Removal Procedure
1. Remove the engine front cover. See: Timing Cover > Removal and Replacement > Engine Front Cover Replacement
2. Remove the spark plugs in order to ease crankshaft/engine rotation. See: Spark Plug > Removal and Replacement
3. Remove the right bank secondary camshaft drive chain tensioner. See: Engine > Overhaul > 16. Secondary Camshaft Drive Chain Tensioner Removal - Right Side
4. Remove the right bank secondary camshaft drive chain shoe. See: Engine > Overhaul > 17. Secondary Camshaft Drive Chain Shoe Removal - Right Side
5. Remove the right bank secondary camshaft drive chain guide. See: Engine > Overhaul > 18. Secondary Camshaft Drive Chain Guide Removal - Right Side
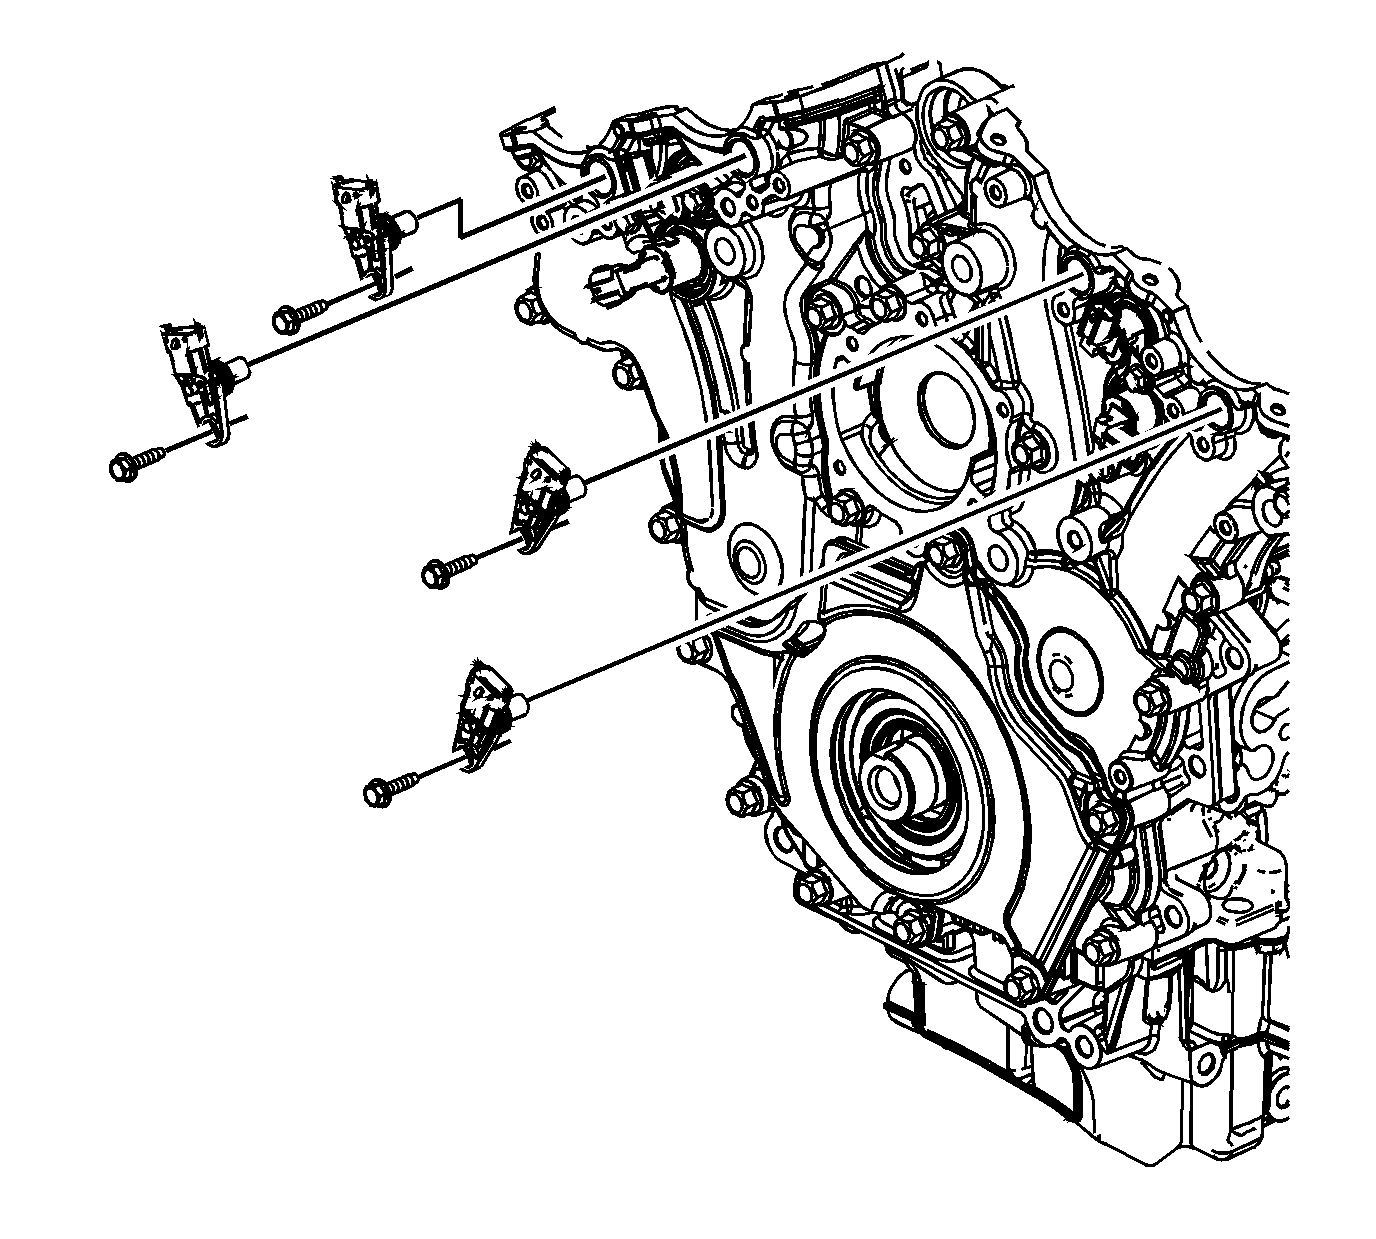
pic 9
6. Remove the right bank secondary camshaft drive chain. See: Engine > Overhaul > 19. Secondary Camshaft Drive Chain Removal - Right Side
Installation Procedure
1. Ensure the stage 1 camshaft timing is correct. See: Timing Component Alignment Marks > Components
pic 10
2. Install the right bank secondary camshaft drive chain. See: Engine > Overhaul > 118. Secondary Camshaft Drive Chain Installation - Right Side
3. Install the right bank secondary camshaft drive chain guide. See: Engine > Overhaul > 119. Secondary Camshaft Drive Chain Guide Installation - Right Side
4. Install the right bank secondary camshaft drive chain shoe. See: Engine > Overhaul > 120. Secondary Camshaft Drive Chain Shoe Installation - Right Side
5. Install the right bank secondary camshaft drive chain tensioner. See: Engine > Overhaul > 121. Secondary Camshaft Drive Chain Tensioner Installation - Right Side
6. Install the spark plugs. See: Spark Plug > Removal and Replacement
7. Install the engine front cover. See: Timing Cover > Removal and Replacement > Engine Front Cover Replacement
_____________________________________________________________________________
Here is timing mark information.
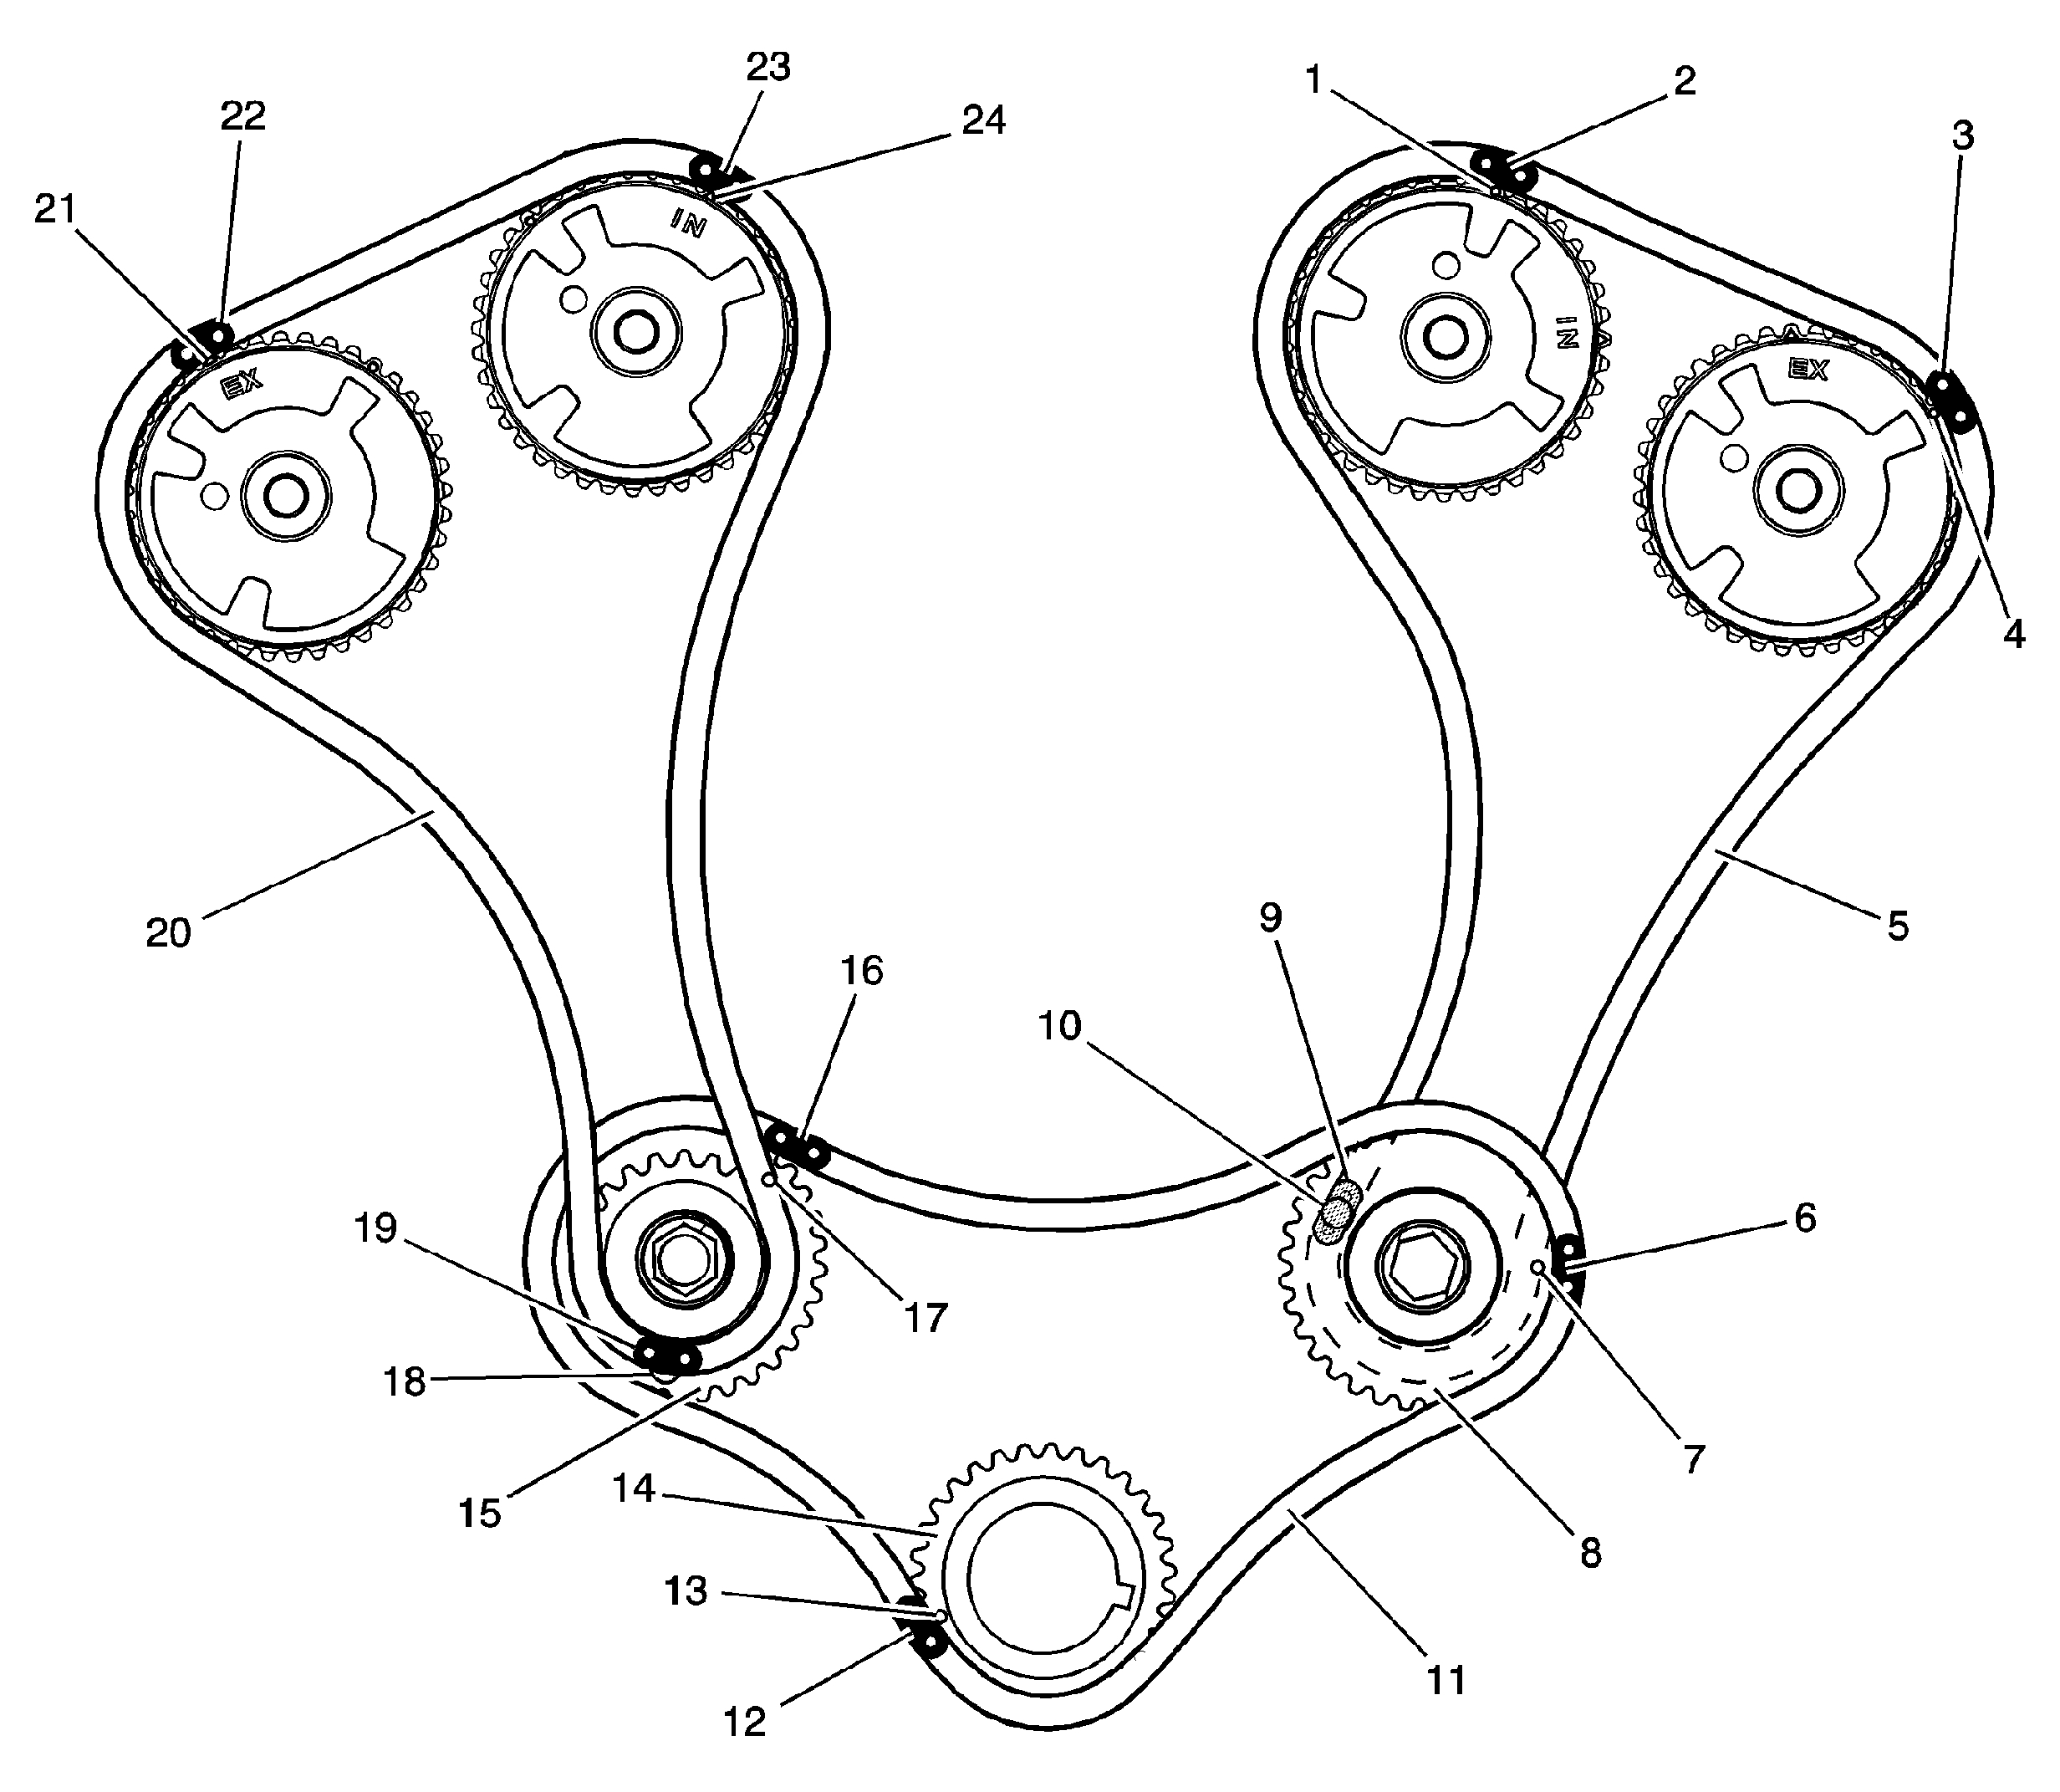
STAGE ONE
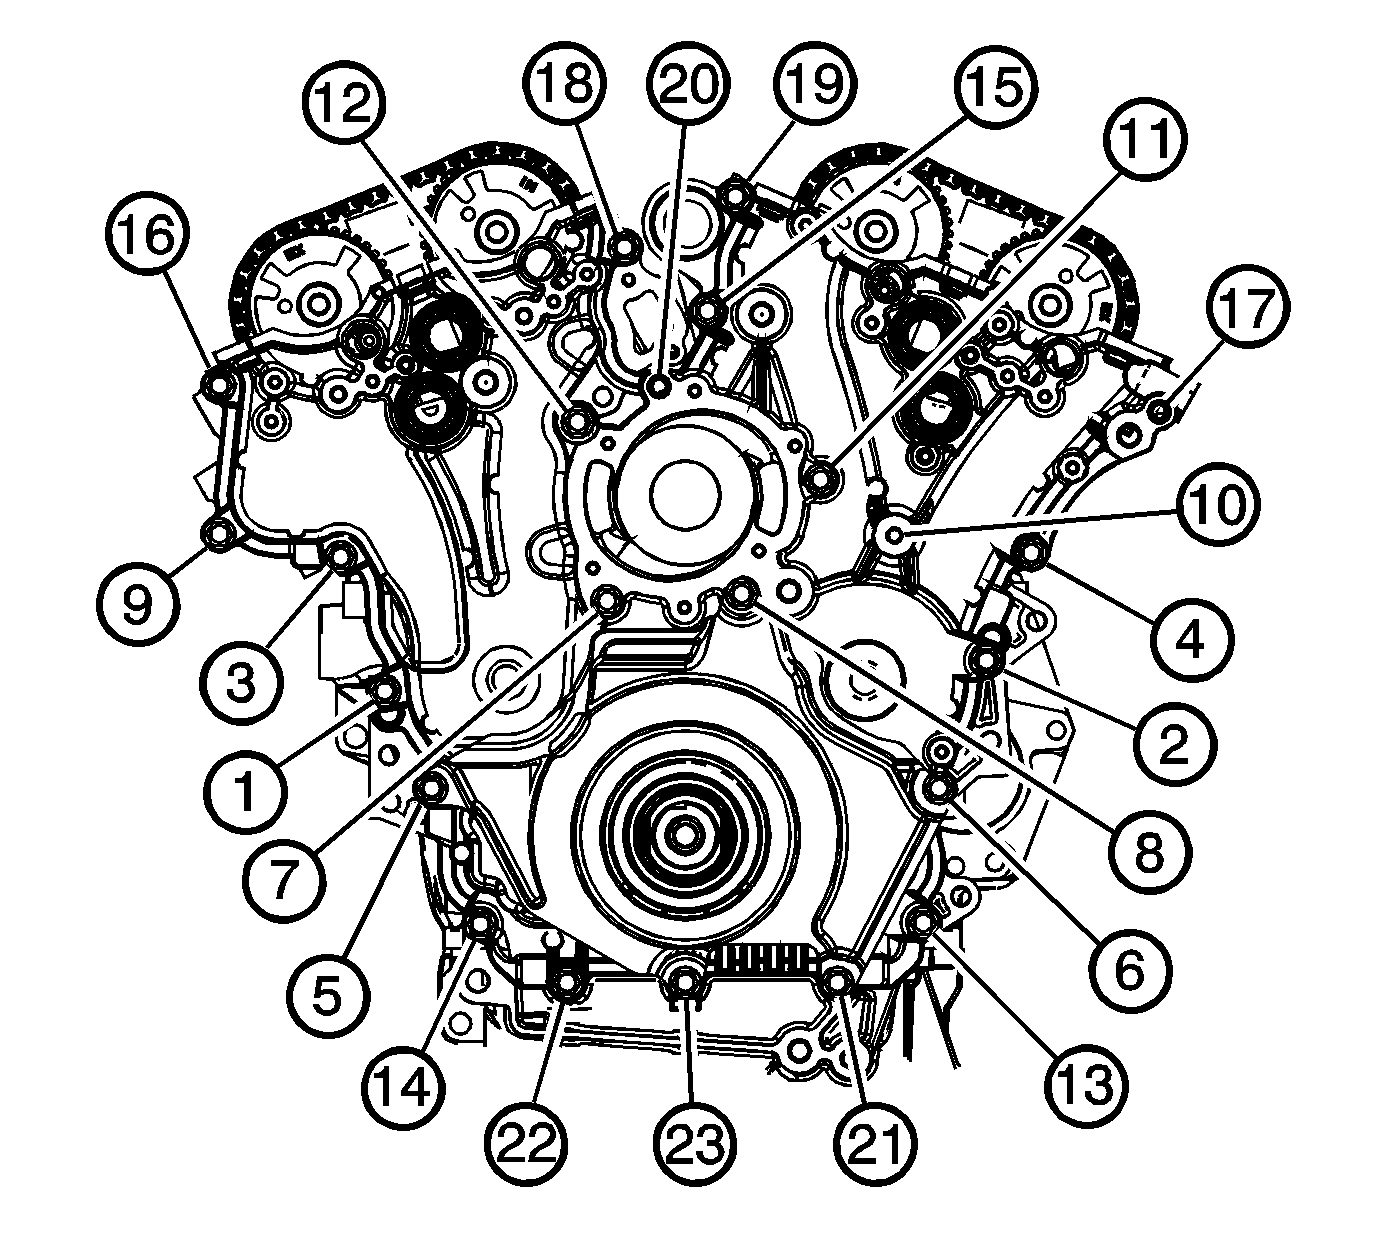
pic 11
1. Left Intake Camshaft Position Actuator Timing Mark - Circle
2. Left Intake Secondary Camshaft Timing Drive Chain Timing Link
3. Left Exhaust Secondary Camshaft Timing Drive Chain Timing Link
4. Left Exhaust Camshaft Position Actuator Timing Mark - Circle
5. Left Secondary Camshaft Timing Drive Chain
6. Primary Camshaft Drive Chain Timing Link for the Left Primary Camshaft Intermediate Drive Chain Sprocket
7. Left Primary Camshaft Intermediate Drive Chain Sprocket Timing Mark for the Primary Camshaft Drive Chain
8. Left Primary Camshaft Intermediate Drive Chain Sprocket
9. Left Secondary Camshaft Timing Drive Chain Timing Link for the Left Primary Camshaft Intermediate Drive Chain Sprocket, behind hole in sprocket
10. Left Primary Camshaft Intermediate Drive Chain Sprocket Timing Window for the Left Secondary Camshaft Timing Drive Chain Timing Link
11. Primary Camshaft Drive Chain
12. Primary Camshaft Drive Chain Timing Link for the Crankshaft Sprocket
13. Crankshaft Sprocket Timing Mark
14. Crankshaft Sprocket
15. Right Primary Camshaft Intermediate Drive Chain Sprocket
16. Primary Camshaft Drive Chain Timing Link for the Right Primary Camshaft Intermediate Drive Chain Sprocket
17. Right Primary Camshaft Intermediate Drive Chain Sprocket Timing Mark
_______________________________________________
Pic 12
1. Left Intake Camshaft Position Actuator Timing Mark - Circle
2. Left Intake Secondary Camshaft Timing Drive Chain Timing Link
3. Left Exhaust Secondary Camshaft Timing Drive Chain Timing Link
4. Left Exhaust Camshaft Position Actuator Timing Mark - Circle
5. Left Secondary Camshaft Timing Drive Chain
6. Primary Camshaft Drive Chain Timing Link for the Left Primary Camshaft Intermediate Drive Chain Sprocket
7. Left Primary Camshaft Intermediate Drive Chain Sprocket Timing Mark for the Primary Camshaft Drive Chain
8. Left Primary Camshaft Intermediate Drive Chain Sprocket
9. Left Secondary Camshaft Timing Drive Chain Timing Link for the Left Primary Camshaft Intermediate Drive Chain Sprocket, behind hole in sprocket
10. Left Primary Camshaft Intermediate Drive Chain Sprocket Timing Window
11. Primary Camshaft Drive Chain
12. Primary Camshaft Drive Chain Timing Link for the Crankshaft Sprocket
13. Crankshaft Sprocket Timing Mark
14. Crankshaft Sprocket
15. Right Primary Camshaft Intermediate Drive Chain Sprocket
16. Primary Camshaft Drive Chain Timing Link for the Right Primary Camshaft Intermediate Drive Chain Sprocket
17. Right Primary Camshaft Intermediate Drive Chain Sprocket Timing Mark for the Primary Camshaft Drive Chain
18. Right Primary Camshaft Intermediate Drive Chain Sprocket Timing Mark/Window for the Right Secondary Camshaft Timing Drive Chain
19. Right Secondary Camshaft Timing Drive Chain Timing Link for the Right Primary Camshaft Intermediate Drive Chain Sprocket
20. Right Secondary Camshaft Timing Drive Chain
21. Right Exhaust Camshaft Position Actuator Timing Mark - Triangle
22. Right Exhaust Secondary Camshaft Timing Drive Chain Timing Link
23. Right Intake Secondary Camshaft Timing Drive Chain Timing Link
24. Right Intake Camshaft Position Actuator Timing Mark - Triangle
__________________________________________________________________
Camshaft Position Actuator Timing Marks
CAMSHAFT POSITION ACTUATOR TIMING MARKS
pic 13
1. Right Intake Camshaft Position Actuator Identifier
2. Right Intake Camshaft Position Actuator Right Side Timing Mark - Triangle
3. Left Intake Camshaft Position Actuator Left Side Timing Mark - Circle
4. Left Intake Camshaft Position Actuator Identifier
5. Exhaust Camshaft Position Actuator Identifier
6. Exhaust Camshaft Position Actuator Right Side Timing Mark - Triangle
7. Exhaust Camshaft Position Actuator Left Side Timing Mark - Circle
________________________________________
Let me know if this helps.
Joe
Images (Click to enlarge)
Nov 3, 2019 at 12:12 AM