Orifice tube and expansion valve location

Tiny
CORY2427
  • MEMBER
  • 2012 VOLKSWAGEN BEETLE
  • 2.5L
  • 5 CYL
  • 2WD
  • 94,400 MILES
So I need to know where and how to change expansion valve and orifice tube on car. My A/C at times takes forever to get cold and sometimes it be blowing cold then turn warm for a bit then goes back to cold and blows really good. Then it’s like it turns the blowing down then picks back up.
Friday, July 19th, 2019 AT 7:12 PM

28 Replies

Tiny
JACOBANDNICKOLAS
  • MECHANIC
  • 108,179 POSTS
Welcome to 2CarPros.

This vehicle has an expansion valve. It is located on the firewall under the hood. Here are the directions for replacement. The attached pictures correlate with the directions.

________________________

2012 Volkswagen Beetle (5C1) L5-2.5L (CBTA)
Expansion Valve, Removing and Installing
Vehicle Heating and Air Conditioning Expansion Valve Service and Repair Removal and Replacement Expansion Valve, Removing and Installing
EXPANSION VALVE, REMOVING AND INSTALLING
Expansion Valve, Removing and Installing

Special tools, testers and auxiliary items required

Torque Wrench 1331 5-50Nm (VAG1331)

A/C Service Station (VAS6007A) (or succeeding model)

Engine Bung Set (VAS6122)

ATTENTION!
Danger due to refrigerant coming out under pressure.

Danger of frost bite to skin and other parts of the body.

Extract the refrigerant and immediately open the refrigerant circuit after that.

If the refrigerant was extracted more than 10 minutes in the past and the refrigerant circuit was not opened, extract the refrigerant again. Pressure in the refrigerant circuit is caused by evaporation.

The expansion valve atomizes the streaming refrigerant and controls the flow rate so that the vapor is gaseous only at the evaporator outlet, depending on the heat transmission.

Refrigerant must be extracted beforehand using the A/C Service Station (VAS6007A) or succeeding model.

Environmentally hazardous draining of refrigerant is an offense punishable by law.

See notes.

Note the safety precautions in vehicles with a start-stop system. Refer to [Vehicles with Start/Stop System General Information ] See: Heating and Air Conditioning > Components > Vehicles with Start/Stop System General Information.

Depending on engine and vehicle version, it may be necessary to loosen or to remove the following components (upper engine cover, compressed air pipe to throttle valve part and, depending on engine, the intake manifold, etc.).

Removing

Perform the Following Work

- Extract the refrigerant with the A/C Service Station (VAS6007A) (or succeeding model) from the refrigerant circuit.

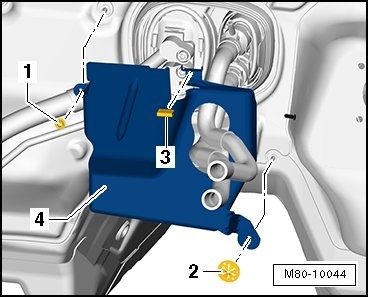
The heat shield is installed in front of the expansion valve, depending on engine.

Loosen, but do not remove, the heat shield and pull it off slightly. The coolant system does not need to be opened.

If Equipped, Loosen the Heat Shield

- Remove nut - 1 - (10 Nm).

- Remove the lock washer - 2 - and the clip - 3 -.

- Loosen the heat shield for the expansion valve - 4 - from the bulkhead.

Pic 1

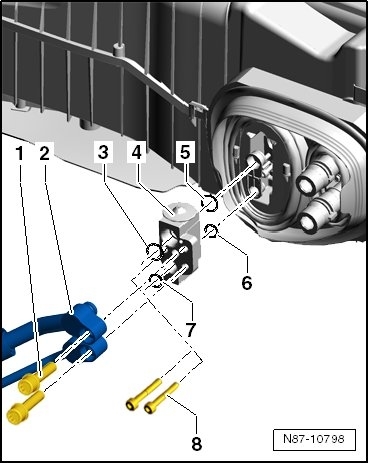
- Remove the bolts - 1 - from the refrigerant line - 2 - (10 Nm).

- Carefully remove the refrigerant lines - 2 - from the expansion valve - 4 -.

- Remove the bolts - 8 - from the expansion valve - 4 - to (5 Nm).

- Carefully remove the expansion valve - 4 - from the heater and A/C unit.

Pic 2

Installing

Install the expansion valve in reverse order. Note the following when doing this:

Always replace the O-ring for the high pressure refrigerant line - 3 and 5 -.

Always replace the O-ring for the low pressure refrigerant line - 6 and 7 -.

Lubricate O-ring seal lightly with refrigerant oil before installing.

____________________________________

Let me know if this helps or if you have other questions.

Take care,
Joe
Was this
answer
helpful?
Yes
No
-1
Friday, July 19th, 2019 AT 7:29 PM
Tiny
STEVE W.
  • MECHANIC
  • 12,963 POSTS
Welcome back. The expansion vale is mounted right at the evaporator core at the firewall. No orifice tube on it. Your issue sounds more like a moisture problem so I would be sure to pull a good vacuum for 45-60 minutes before recharging the system.
Was this
answer
helpful?
Yes
No
Friday, July 19th, 2019 AT 7:35 PM
Tiny
CORY2427
  • MEMBER
  • 270 POSTS
So should I even replace valve? Should I just recover Freon and pull a vacuum so it does not have a accumulator drier or anything? How could I recover system myself would it be better to put fresh Freon in it?
Was this
answer
helpful?
Yes
No
Friday, July 19th, 2019 AT 8:19 PM
Tiny
CORY2427
  • MEMBER
  • 270 POSTS
I thought that is what the dryer accumulator dryer was for us to remove moisture and stuff.
Was this
answer
helpful?
Yes
No
Friday, July 19th, 2019 AT 8:20 PM
Tiny
STEVE W.
  • MECHANIC
  • 12,963 POSTS
It can remove some, but it is very limited. I would actually start by checking your pressures. Then recover the charge replace the valve (it's cheap and easy to do) and pull a vacuum and be sure it holds, then recharge. Should take 525 grams (18.5 oz) to fill it.
Was this
answer
helpful?
Yes
No
Friday, July 19th, 2019 AT 9:54 PM
Tiny
CORY2427
  • MEMBER
  • 270 POSTS
Certain way that has to go on? What about o-rings and how can I evacuate Freon if I don’t have a pump to do that?
Was this
answer
helpful?
Yes
No
Saturday, July 20th, 2019 AT 10:33 AM
Tiny
CORY2427
  • MEMBER
  • 270 POSTS
So how is the car not have a accumulator dryer?
Was this
answer
helpful?
Yes
No
Saturday, July 20th, 2019 AT 10:49 AM
Tiny
STEVE W.
  • MECHANIC
  • 12,963 POSTS
The easiest way would be to find a shop that can evacuate the system, then you do the mechanical work and then return to have it recharged. It can be hard to find a shop that will do that but they are out there. Your car has an accumulator drier that's unique. The image is what it looks like. It is attached to the condenser core behind the bumper.
Was this
answer
helpful?
Yes
No
Saturday, July 20th, 2019 AT 12:28 PM
Tiny
CORY2427
  • MEMBER
  • 270 POSTS
How could I just let it out myself and would this be possible cause to?
Was this
answer
helpful?
Yes
No
Saturday, July 20th, 2019 AT 2:00 PM
Tiny
CORY2427
  • MEMBER
  • 270 POSTS
The A/C was engaged and on high, check Freon again it was in the red. Let it out until it was in the blue. But went a little cold not much. Last time I checked it was perfect not overcharged.
Was this
answer
helpful?
Yes
No
Saturday, July 20th, 2019 AT 2:02 PM
Tiny
STEVE W.
  • MECHANIC
  • 12,963 POSTS
You need to use a proper gauge set to see what the low and high side pressures are. Especially if some R134a has been added without checking the pressures.
Was this
answer
helpful?
Yes
No
Saturday, July 20th, 2019 AT 7:47 PM
Tiny
CORY2427
  • MEMBER
  • 270 POSTS
How do I get to and remove the drier tube?
Was this
answer
helpful?
Yes
No
Sunday, July 21st, 2019 AT 5:07 PM
Tiny
CORY2427
  • MEMBER
  • 270 POSTS
I got part just don’t know how to get to it and do it never had to before.
Was this
answer
helpful?
Yes
No
Sunday, July 21st, 2019 AT 5:08 PM
Tiny
STEVE W.
  • MECHANIC
  • 12,963 POSTS
The drier is not a fun thing, basically you need to remove the entire nose of the car. However you shouldn't need to replace it, you use a vacuum pump and use it to pull a good vacuum and that will remove the moisture from the system. But you really need to use a good gauge set to check the high and low pressures first.
Was this
answer
helpful?
Yes
No
Monday, July 22nd, 2019 AT 7:49 AM
Tiny
CORY2427
  • MEMBER
  • 270 POSTS
So I need to take bumper off and headlights or just pull radiator out how do you know the drier doesn’t need replaced
Was this
answer
helpful?
Yes
No
Monday, July 22nd, 2019 AT 5:26 PM
Tiny
CORY2427
  • MEMBER
  • 270 POSTS
Don’t it go bad to how come some cars ac drip really good and leave puddles and mine doesn’t
Was this
answer
helpful?
Yes
No
Monday, July 22nd, 2019 AT 5:27 PM
Tiny
STEVE W.
  • MECHANIC
  • 12,963 POSTS
Drier has nothing to do with condensate dripping on the ground. It is installed in the system to catch any moisture that could get into the system if there is a leak or someone tries to top off the refrigerant charge without the proper equipment. It is nothing but a tube with desiccant in it. If you recover the charge and then apply a vacuum it will actually boil any moisture out of the system and the drier as well. So far you have decided to replace parts but haven't actually tested the system to see what the issue is. It could simply be low on charge or contaminated if someone tried sealer or similar on it. You really need to use an actual gauge set first.
Was this
answer
helpful?
Yes
No
Monday, July 22nd, 2019 AT 8:14 PM
Tiny
CORY2427
  • MEMBER
  • 270 POSTS
Changed expansion valve did a vacuum and it was perfect recharge ac was cold but still goes to warm and back to cold at times
Was this
answer
helpful?
Yes
No
Wednesday, July 24th, 2019 AT 10:16 AM
Tiny
CORY2427
  • MEMBER
  • 270 POSTS
Also still doing the thing where it's like you switched from recirculating to ac back what could these situations be could it be the ac recirculate actuator
Was this
answer
helpful?
Yes
No
Wednesday, July 24th, 2019 AT 4:36 PM
Tiny
STEVE W.
  • MECHANIC
  • 12,963 POSTS
It could be the actuator(s). I assumed you had checked those already before going under the hood. The recirculating actuator can be removed and replaced through the glove box. The control has to be in the fresh air position to be removed and installed. Testing the doors and controller requires a VW bi-directional scan tool both to read any possible codes in the HVAC control head and to test the individual actuators.
Was this
answer
helpful?
Yes
No
Wednesday, July 24th, 2019 AT 9:09 PM

Please login or register to post a reply.

Sponsored links