There is a Technical bulliten on your transmission, it is as follows:
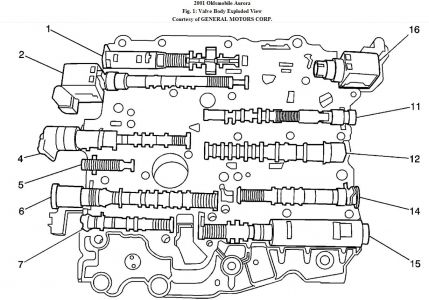
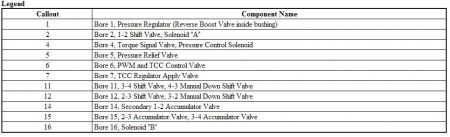
Incorrect Transmission Shifts, Poor Engine Performance, Harsh 1-2 Upshifts, Slips 1ST and Reverse, Torque Converter Clutch (TCC) Stuck Off/On, DTCs P0730, P0756, P0757, P0741, P0742 (Clean Transaxle Valve Body and Case Oil Passages of Debris) TECHNICAL SERVICE BULLETIN Reference Number(s): 02-07-30-013E, Date of Issue: May 20, 2005 Related Ref Number(s): 02-07-30-013, 02-07-30-013A, 02-07-30-013B, 02-07-30-013C, 02-07-30- 013D, 02-07-30-013E ARTICLE BEGINNING CONDITION Some owners may comment on any one or more of the following conditions: ï¬ The SES lamp is illuminated. ï¬ The transmission slips. ï¬ The transmission does not shift correctly, is very difficult to get the vehicle to start moving or the engine lacks the power to move the vehicle. ï¬ Poor engine performance. CAUSE The most likely cause of the various conditions may be chips or debris: ï¬ All years-Pressure Reg. Valve (Bore 1) or Torque Signal Valve (Bore 4) stuck. ï¬ On 2001-2002 vehicles, a plugged orifice on the case side of the spacer plate. ï¬ ON 2003-2005 vehicles, restricted movement of the 2-3 shift valves in the valve body. ï¬ On 2003-2005 vehicles, restricted movement of the 3-4 shift valves in the valve body. TECHNICIAN DIAGNOSIS AND CORRECTION ï¬ The technician's road test reveals the vehicle launches in third or fourth gear (high RPM with slow vehicle acceleration). ï¬ On 2001-2002 vehicles, a DTC P0756 or P0757 may be stored. ï¬ On 2003-2005 vehicles, a DTC P0730, P0741, P0748 or P0757 may be stored. ï¬ Refer to the appropriate Service Information (SI) for additional Diagnostic Assistance. Affected Model(s): 2001-2005 GM Passenger Cars with 4T65-E Automatic Transmission; 2001-2005 Buick Rendezvous; 2005 Buick Terraza; 2001-2004 Chevrolet Venture; 2005 Chevrolet Uplander; 2001-2004 Oldsmobile Silhouette; 2001-2005 Pontiac Aztek, Montana; 2005 Saturn Relay; with 4T65-E Transmission (RPOs M15, MN3, MN7, M76) Supercedes: This bulletin is being revised to include additional diagnostic information and clarify model usage. Please discard Corporate Bulletin Number 02-07-30-013D (Section 07 - Transmission/Transaxle). ï¬ With a Tech 2(R) connected to the vehicle, road test the vehicle and perform the following steps: If the above symptoms are present proceed with the following steps. 1. With the valve body removed and on a workbench, carefully push the valve against spring pressure to check if the valve will snap back to the original position. Or for the valves seated in home position, use a small flat-bladed screwdriver and carefully pry the valve off its seat, quickly remove the screwdriver allowing the valve to return to its seat. If the valve does not snap back unencumbered, then the valve will need to be removed from the valve body. 2. Once the valve is removed, inspect for any scratching or scoring. 3. If any scratching or scoring is found, then the fingernail test will need to be performed. 4. Using your fingernail, move over any scratches to see if your nail will catch on the scratch or score. ï¬ If your nail catches in the scratches, the valve will need to be replaced. ï¬ If your nail does not catch in the scratches, continue with the next step. 5. Clean the valve and bore using brake cleaner. 6. Blow off with shop air. 7. To verify free movement of the valve, dip the valve into clean ATF and install the valve back into the appropriate bore. The valve should move freely. If the valve moves freely, in most cases the valve body will function properly when reinstalled. 8. Reassemble and retest . IMPORTANT: It has been found that in most cases that the scratches are not severe enough to catch your fingernail. IMPORTANT: Clean the valve body with the machined side down so debris may escape.
Aug 31, 2010 at 3:09 PM