Hi and thanks for using 2CarPros.com. If there is no brake fluid in the master cylinder, you have a leak. The ABS light will come on under these conditions. Now, you need to locate the leak. Primarily, the brake lines are made of steel. There are rubber hoses at the front brake calipers, too. Most times, the steel brake lines will rust and burst. Thus, you lose the brake fluid and braking ability. It is also possible for the rubber brake lines to rupture and leak. So, you will need to check all of them. If you find no leaks, there is a chance the master cylinder is leaking from the rear and filling the brake booster with the fluid.
Here is general information related to the brake going to the floor:
https://www.2carpros.com/articles/brake-pedal-goes-to-the-floor
Here are directions specific to your vehicle for checking for leaks:
INITIAL INSPECTION AND DIAGNOSTIC OVERVIEW
INSPECTION
Inspect for Leakage
NOTE: The master cylinder should be cleaned thoroughly prior to inspection (several days preferably). Spilled brake fluid can be easily confused with leakage.
Piston Seals
- Leakage around the piston seals will seep out from the end of the cylinder and leak down the outside of the brake booster.
- Inspect for signs of seepage or bubbled paint on the brake booster.
- If any leakage is detected the master cylinder should be replaced or overhauled
Brake Line Fittings
- While someone is applying pressure to the brake pedal, inspect the brake line fittings on the master cylinder for leakage.
- If the fittings are leaking they should be disassembled and inspected.
Reservoir to Cylinder Gasket
- Inspect the gasket for signs of leakage or hardening and cracking.
- Overhaul or replace the master cylinder if any leakage is indicated.
Inspect for Oil Contamination.
- Inspect the rubber gasket on the inside of the master cylinder lid. If the gasket is swollen or bloated, the brake fluid is contaminated with oil.
- Siphon or scoop a small amount of brake fluid out of the master cylinder and place into a styrofoam cup filled 2/3 of the way with water. Brake fluid will mix with the water while oil contaminants will float on the surface and dissolve the styrofoam.
NOTE: If any oil contamination is present ALL brake components containing rubber seals will need to be replaced or overhauled. This includes the master cylinder, both front brake calipers, both rear wheel-cylinders, and all flexible brake hoses.
Verify Hold-Down Bolts Are Tight
- While someone is applying and releasing pressure to the brake pedal, verify the the master cylinder is tightly secured to the brake booster.
- Retighten hold-down bolts if necessary.
Functional Checks
WARNING: Always bleed the entire brake system and verify the rear brakes are properly adjusted prior to diagnosing a master cylinder as defective. For additional information see Master-Cylinder / Brake Pedal Relationship.
Check Related Systems
- Check for proper brake booster operation
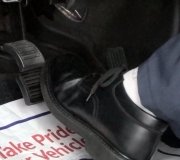
With the engine "OFF", depress and release the brake pedal 4-5 times (this bleeds off the vacuum reserve in the booster).
Depress the brake pedal firmly and start the engine. If the pedal goes down slightly the brake booster is assisting in brake operation.
If the pedal does not go down slightly the brake booster is not assisting in brake operation and should be diagnosed for problems.
- Check and adjust rear brakes.
- Check all brake lines and brake assemblies for leakage.
Repair all deficiencies with related systems prior to diagnosing the master cylinder as defective.
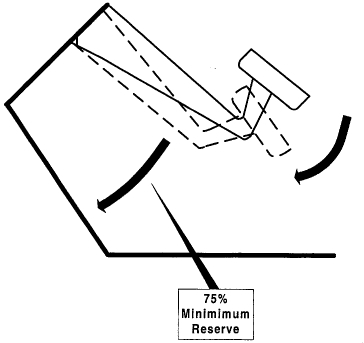
Check Brake Pedal Travel (Non-Antilock Brake Systems Only)
- Fully depress the brake pedal and check for the following:
- The pedal should have a 75% reserve.
Pedal Reserve Checks
- The pedal should be firm and not leak down.
Replace the master cylinder if all of the following conditions exist:
- The brake pedal is not firm with a 75% reserve and -
- There were no problems with any of the related systems and -
- The entire brake system has been bled and -
- The rear brakes are properly adjusted.
'
The easiest way to find the leak is by simply refilling the master cylinder and then pumping the brakes. If there is a leak, it will push the fluid out at that point.
Let me know if you have other questions.
Take care,
Joe
Image (Click to make bigger)
Wednesday, March 17th, 2021 AT 12:26 PM