The first thing is to straighten out the melted/shorted wires, then expect to find blown fuses. Tell me which wire colors are affected.
The only proper repair involves replacing the switch and the two or more overheated terminals. If you only replace the switch, or you only replace the terminals, the problem is going to keep on occurring over and over.
This is caused by a less-than-perfect connection between a mating pair of terminals, or between a pair of contacts inside the head light switch. When just a little resistance develops between them, that causes heat to be generated when current flows through it. That heat leads to more resistance which leads to more heat. That heat migrates from the bad connection to the switch's contacts, or the other way around. When you only replace the switch, the bad connections between the terminals is still there. That is what causes the repeat failures. The same occurs when you only replace the terminals. The arced switch contacts will cause the heat problem to occur again.
First replace the switch. Cut out the two burned terminals from the connector body, and cut away the melted part of the connector. Replace the two terminals with universal crimp-type terminals of the same size. You can also snip that connector from a truck in the salvage yard and remove two clean and shiny terminals from it. Be sure to get at least four inches of wire with those terminals. Gently squeeze the new terminals to insure they make a nice tight connection to the switch's terminals.
Cut off four inches of the wire with the burned terminals. That wire will be hardened from overheating and solder won't adhere to it. With the universal terminals, crimp them to four inches of new wire of the same diameter, but solder them too to insure a good connection. Plug in the connector with the melted areas cut away, then plug in the two new terminals individually. Splice the wires to the truck's wires. Solder those connections, then seal them with heat-shrink tubing. Never use electrical tape in a car as it will unravel into a gooey mess on a hot day.
This same problem occurs to other switches in high-current circuits, to include heater fan speed switches, dimmer switches, and ignition switches. Repairs can be handled the same way. Heater fan and ignition switches commonly develop these overheated terminals when people use the fan on the highest speeds often, and when switching the ignition switch on and off while the fan switch is set to a high speed. That causes a lot of internal arcing inside the ignition switch, and those arced or burned spots lead to the high-resistance contacts that generate a lot of heat.
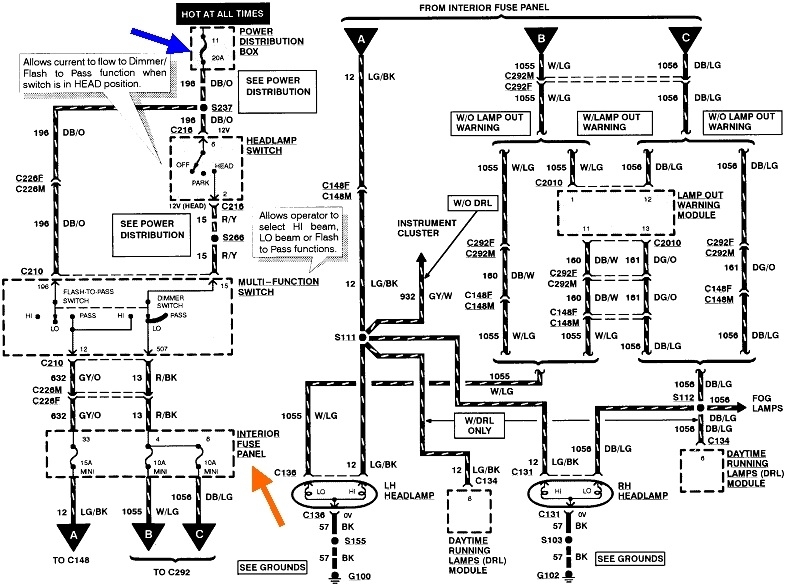
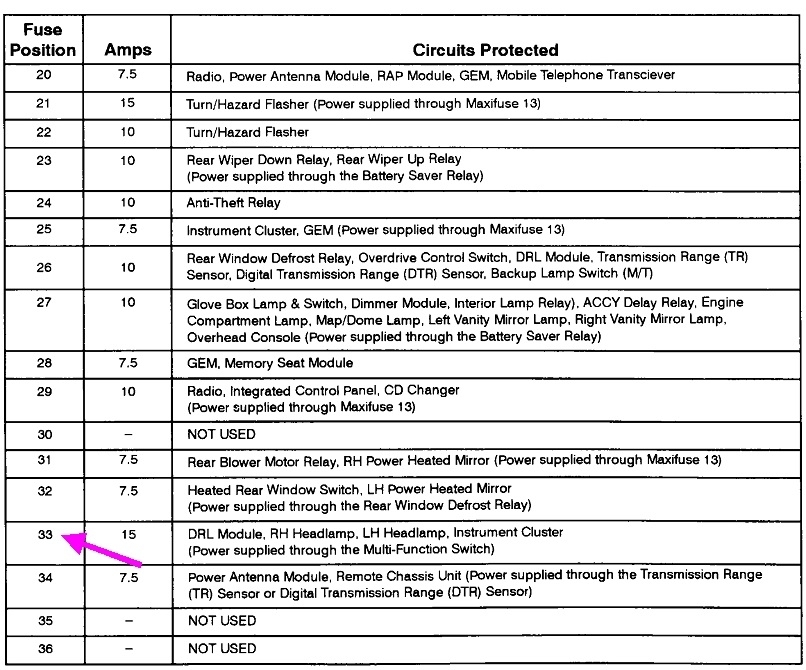
Here's the entire head lamp diagram without automatic lights. The 20-amp fuse is shown as number 11, but on the chart, head lamps isn't listed for that fuse, so there is already some confusion.
Images (Click to make bigger)
Monday, May 10th, 2021 AT 1:24 PM