Here is the removal and install for your engine the figures at bottom are the timing diagrams to set the timing
REMOVAL & INSTALLATION
See Figure 1
CAUTION
When draining the coolant, keep in mind that cats and dogs are attracted by the ethylene glycol antifreeze, and are quite likely to drink any that is left in an uncovered container or in puddles on the ground. This will prove fatal in sufficient quantity. Always drain the coolant into a sealable container. Coolant should be reused unless it is contaminated or several years old.
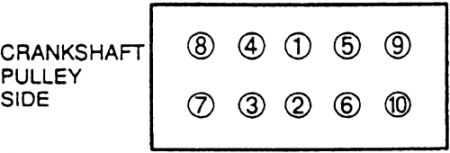
Fig. 1: Cylinder head bolt tightening sequence for all 4-cylinder engines
Before installing the cylinder head, thoroughly clean and inspect it, especially if the head needed to be removed to replace a blown gasket. Refer to the Engine Reconditioning procedures, later in this section.
1990-94 1.6L and 1.8L (except K8) Engines
See Figure 4
Disconnect the negative battery cable and remove the engine undercover.
Remove the air ducts from the air cleaner and throttle body.
Tag and disconnect the spark plug wires from the spark plugs. Remove the spark plugs and the distributor cap and wires assembly. Remove the distributor.
Drain the cooling system and disconnect the radiator and heater hoses.
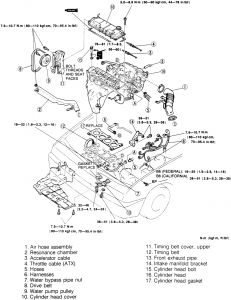
Fig. 4: Exploded view of the cylinder head assembly for the 1990-94 1.6L and 1.8L (except K8) SOHC engines
Disconnect the exhaust pipe and remove the exhaust manifold.
On DOHC engines, remove the coolant bypass pipe.
Disconnect the accelerator cable.
Label and disconnect all necessary electrical connections and vacuum hoses. Disconnect the fuel lines.
Remove the intake manifold bracket and the intake manifold.
Remove the cylinder head cover bolts and the cylinder head cover.
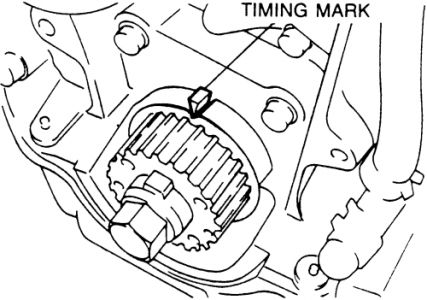
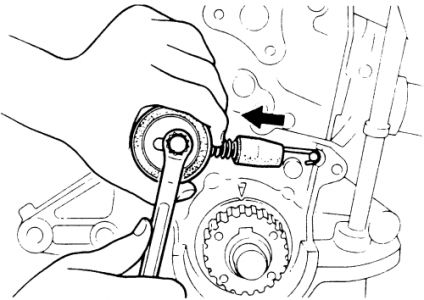
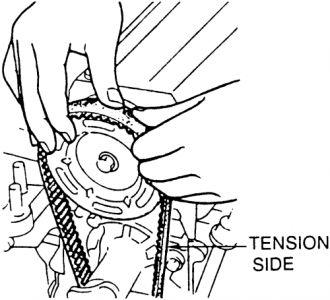
Remove the timing belt cover(s). Rotate the crankshaft, in the normal direction of rotation, until the No. 1 cylinder piston is at TDC on the compression stroke. Make sure the timing marks on the crankshaft and camshaft sprocket(s) are properly aligned and mark the direction of rotation of the belt.
Loosen the timing belt tensioner and remove the belt. Do not rotate the crankshaft until the timing belt is reinstalled.
When everything is disconnected, loosen the cylinder head bolts in the reverse of the tightening sequence. Remove the bolts and lift the head off the engine.
To install:
Thoroughly, clean the cylinder head and the block contact surfaces. Examine the head gasket and check the cylinder head for cracks. Check the cylinder head for warpage using a feeler gauge and straightedge. The maximum allowable distortion is 0.004 in. (0.10mm) on 1.8L engine.
Clean the cylinder head bolts and the threads in the block. Make sure the bolts turn freely in the block.
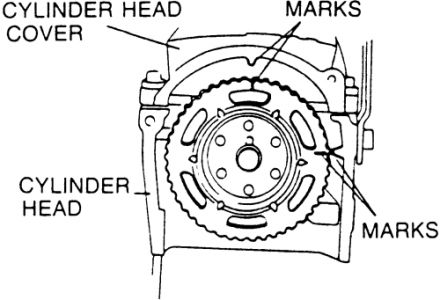
Install a new head gasket on the engine block. Make sure the camshaft sprocket timing marks are still aligned, as set during the removal procedure. Install the cylinder head.
Lubricate the bolt threads and seat surfaces with clean engine oil and install them. Torque the bolts in 2-3 steps to 56-60 ft. lbs. (75-81 Nm) in the proper sequence.
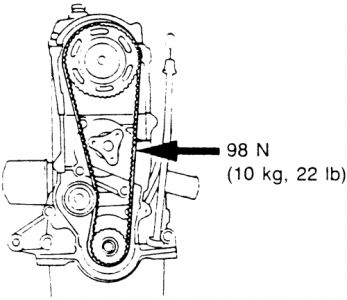
Make sure the crankshaft and camshaft sprocket timing marks are aligned, install the timing belt and set the tension. Carefully rotate the crankshaft 2 turns to make sure the timing marks still line up.
Apply a thin bead of sealant to the cylinder head cover and install the new gasket. Install the cover and torque the cover bolts to 78 inch lbs. (9 Nm).
Install the timing belt cover(s) and tighten the bolts to 95 inch lbs. (11 Nm).
Use new gaskets and install the manifolds. Torque the intake manifold bolts/nuts to 19 ft. lbs. (25 Nm) and install the intake manifold bracket. Torque the exhaust manifold nuts to 34 ft. lbs. (46 Nm).
Use a new gasket to connect the exhaust pipe and torque the nuts to 34 ft. lbs. (46 Nm).
If removed, install the radiator and connect all cooling system hoses. On DOHC engines, install the coolant bypass pipe.
Install the distributor, spark plugs, distributor cap and wires.
Connect all vacuum and fuel system hoses and connect all wiring.
Connect the accelerator cable and install the air ducts and engine undercover.
Connect the negative battery cable. Fill and bleed the cooling system. Change the engine oil.
Start the engine and bring to normal operating temperature. Check for leaks. Check the ignition timing and idle speed.
Thursday, October 30th, 2008 AT 8:38 PM