Lowering the steering column

Tiny
BOB%
  • MEMBER
  • 1994 CHEVROLET ASTRO
  • 4.3L
  • 4WD
  • AUTOMATIC
  • 149,000 MILES
I have a 1994 GMC safari. I have to lower the steering column in order to replace the ignition switch.I unbolted the two main bolts holding the column up, but it doesn't lower to the seat.I can't figure out why it won't lower. Please help me out. Thank you, Bob
Monday, May 13th, 2019 AT 2:31 PM

7 Replies

Tiny
JACOBANDNICKOLAS
  • MECHANIC
  • 108,192 POSTS
Welcome to 2CarPros.

I have attached a picture of the column. Take a look at it and let me know what you have removed. If it is the lock cylinder you are removing, here are the directions for that. Pictures 2 and 3 correlate with these directions.

_____________________________________

IGNITION LOCK CYLINDER
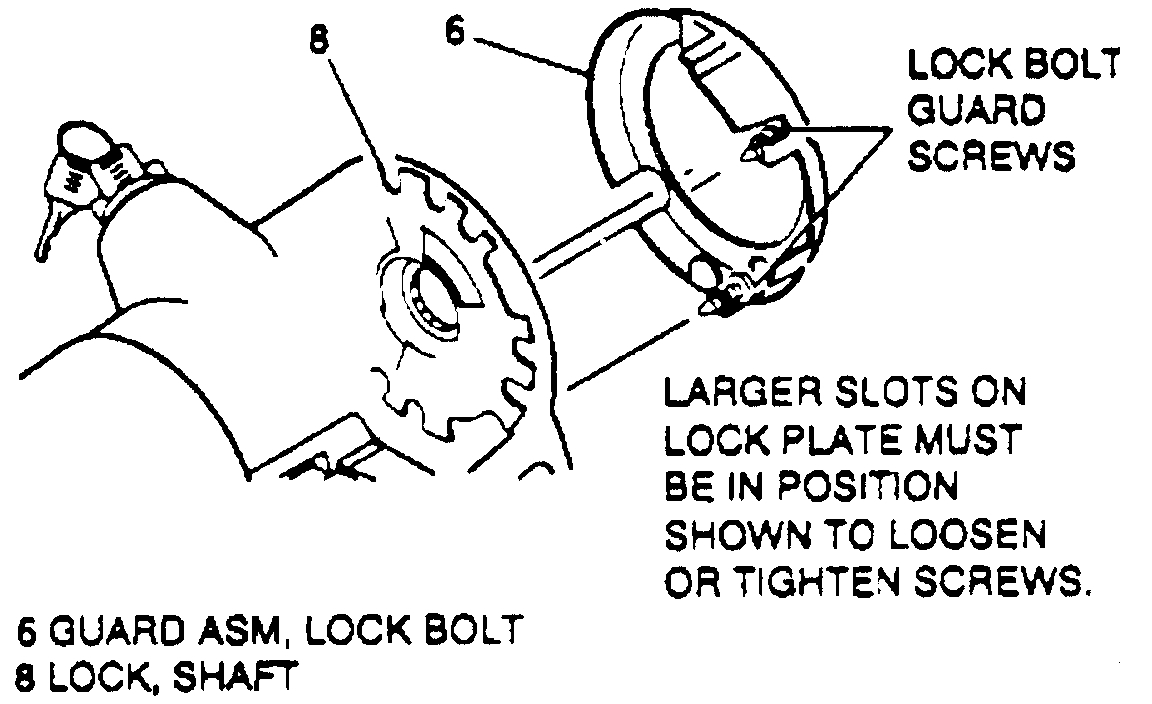
Fig. 8 Lock Bolt Guard Removal.
Pic 1

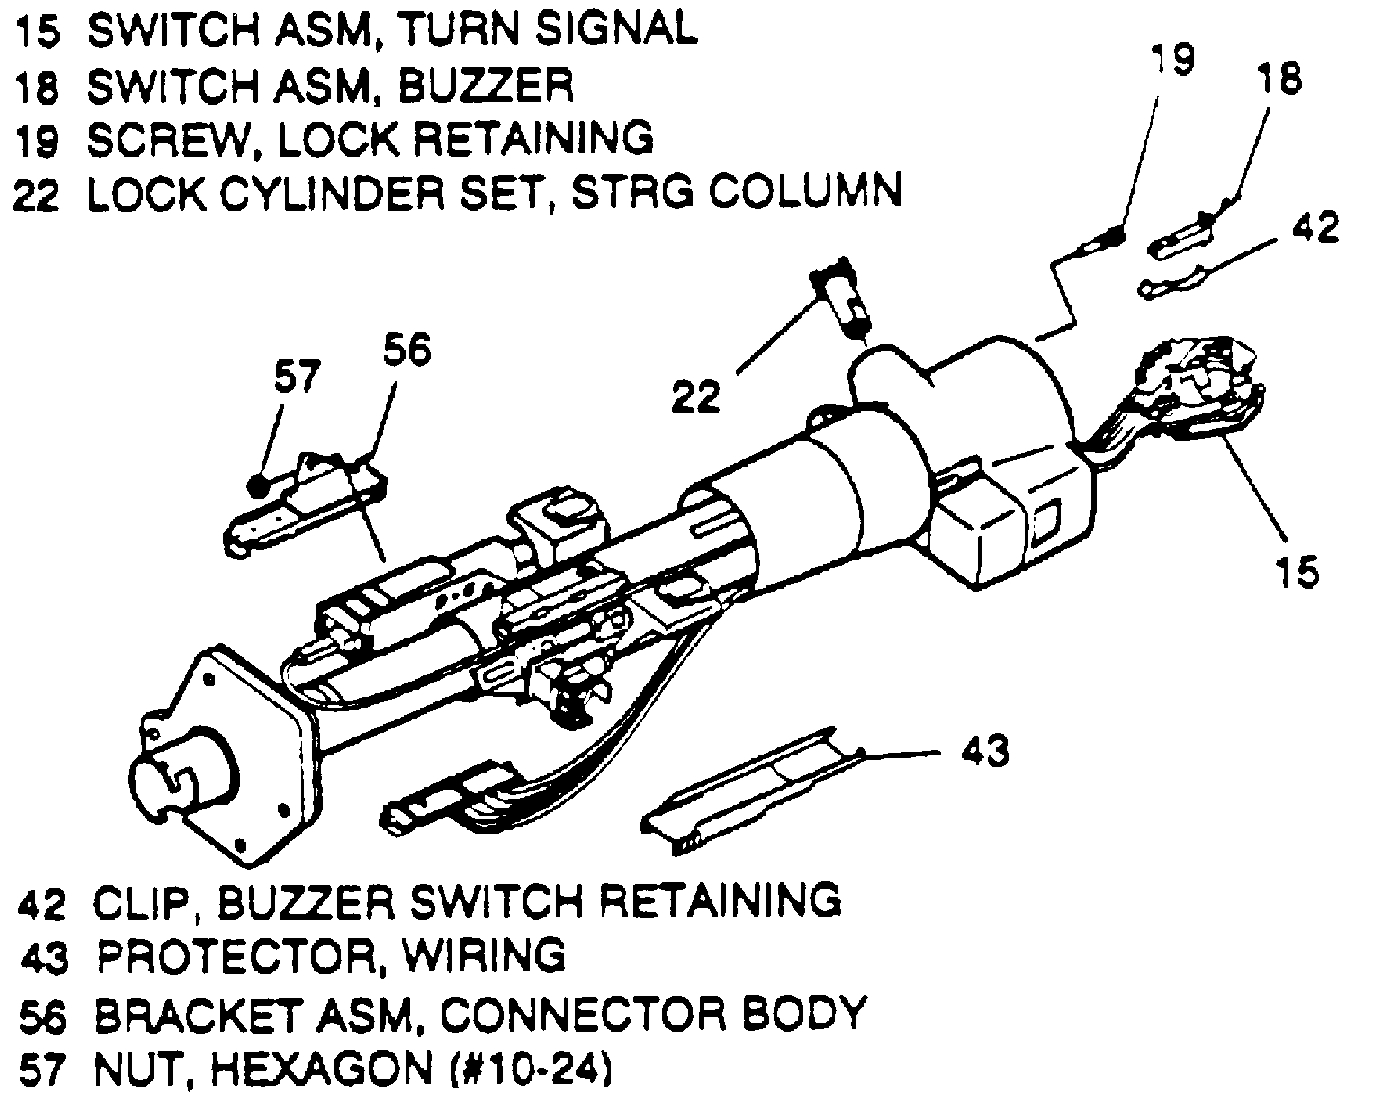
Fig. 9 Buzzer Switch, Lock Cylinder & Turn Signal Switch Removal.
Pic 2

1. Place ignition to Lock position to prevent coil assembly from moving off center.
2. Disconnect battery ground cable.
3. Remove steering wheel.
4. Remove coil assembly retaining ring from upper steering column.
5. Remove SIR coil assembly. Let coil assembly hang freely.
6. Remove wave washer.
7. On models with tilt steering column, remove lock bolt guard assembly, Fig. 8, as follows:
a. Place ignition switch to Run position.
B. Rotate steering shaft assembly until block tooth is at 7 o'clock position and bolt guard screws are accessible through wide slots in shaft lock.
C. Loosen screws on lock bolt guard until guard can be removed.
D. Place ignition switch to Lock position.
8. Remove shaft lock retaining ring using tool No. J-23653-SIR, or equivalent, to push down shaft lock. Discard ring.
9. Remove shaft lock, Fig. 8.
10. Remove turn signal canceling cam assembly.
11. Remove upper bearing spring.
12. Remove upper bearing inner race and inner race seat.
13. Position turn signal to right turn position.
14. Remove multi-function lever and hazard knob assembly.
15. Remove turn signal switch arm.
16. Remove turn signal switch from steering column and let it hang freely, Fig. 9.
17. Remove inflatable restraint coil assembly with wire harness from column assembly. Gently pull wire through column.
18. Remove buzzer switch assembly and buzzer switch retaining clip, Fig. 9.
19. Remove ignition lock retaining screw.
20. Remove ignition lock cylinder set, Fig. 9.
21. Reverse procedure to install. Torque lock retaining screw to 40.0 lb in

___________________________________________

Let me know if this helps or if you have other questions.

Joe
Was this
answer
helpful?
Yes
No
-1
Monday, May 13th, 2019 AT 5:38 PM
Tiny
BOB%
  • MEMBER
  • 67 POSTS
I am trying to replace the switch that's on top of the column, not the one where the key is inserted. This is located by dimmer switch and there is a rod connected to it.I cannot get the steering column to lower.I took out the two big bolts, but it won't lower. Bob
Was this
answer
helpful?
Yes
No
Tuesday, May 14th, 2019 AT 12:38 AM
Tiny
JACOBANDNICKOLAS
  • MECHANIC
  • 108,192 POSTS
Welcome back:

Bob, both of my manuals indicate the column needs removed to access the switch. I have to be honest, I never remember it being that involved. However, here are the directions for removal of the column. I think once you get so far with the removal, you will be able to access it. It's been awhile since I did a 94. The attached pics correlate with the directions.

_____________________________________________________

WARNING: Servicing the vehicle's SIR-associated systems without first disabling the airbag may result in accidental deployment and personal injury.

Fig. 3 Steering Column Removal
imageOpen In New TabZoom/Print

Removal
1. Disconnect battery ground cable.
2. Disconnect transmission control linkage from column shift tube levers.
3. Remove upper universal joint pinch bolt, from intermediate shaft. Mark relationship of universal yoke to steering shaft.
4. Remove bracket, then screws from cover and seal.
5. Remove steering wheel as follows:
a. Remove horn button cap, retainer and steering wheel nut.
B. Remove horn wire lead assembly if equipped, then mark position of steering wheel to steering shaft.
C. Remove wheel with a suitable steering wheel puller.
6. Disconnect column electrical connectors.
7. Rotate column so shift lever clears dash opening and remove.

Installation
1. Insert column through dash opening guide shaft into universal yoke, lining "UP" marks made at removal.
2. Finger tighten screws and nuts on bracket.
3. Attach upper intermediate shaft pinch bolt and tighten to specifications.
4. Angle of Carden joint must be 34-39 deg.
5. Tighten bracket screws and nuts to specifications.
6. Install screws through cover and seal to dash panel.
7. Connect electrical connectors and install steering wheel.
8. Connect transmission control linkage and battery ground cable.
Was this
answer
helpful?
Yes
No
+1
Tuesday, May 14th, 2019 AT 6:11 PM
Tiny
BOB%
  • MEMBER
  • 67 POSTS
Thank you. Your expert advice is really appreciated. Bob
Was this
answer
helpful?
Yes
No
Tuesday, May 14th, 2019 AT 11:54 PM
Tiny
JACOBANDNICKOLAS
  • MECHANIC
  • 108,192 POSTS
Happy to help. I just hope I did.

Take care,

Joe
Was this
answer
helpful?
Yes
No
+1
Wednesday, May 15th, 2019 AT 7:02 PM
Tiny
BOB%
  • MEMBER
  • 67 POSTS
Joe, I really appreciate all the expert advice given on your site. You guys are the best. Take care, BOB.
Was this
answer
helpful?
Yes
No
Thursday, May 16th, 2019 AT 3:36 PM
Tiny
JACOBANDNICKOLAS
  • MECHANIC
  • 108,192 POSTS
You're welcome. Please feel free to come back anytime.

Joe
Was this
answer
helpful?
Yes
No
+1
Thursday, May 16th, 2019 AT 6:17 PM

Please login or register to post a reply.

Sponsored links