Hello,
Here are diagrams that show you how to remove the transfer case for your car start by disconnecting the battery and raising the car uop safety on jackstands. Check out the diagrams (Below). Please let us know if you need anything else to get the problem fixed.
TRANSFER CASE -2002 Jaguar X-Type
Page 1 of 4
REMOVAL
1.
Loosen the shock absorber and spring assembly securing nuts.
Fig. 31: Loosening Shock Absorber & Spring Assembly Nuts Courtesy of JAGUAR CARS, INC.
Remove the front subframe. For additional information, refer to FRONT SUBFRAME Remove the fender splash shield access panel.
2. 3.
.
Fig. 32: Removing Fender Splash Shield Access Panel Courtesy of JAGUAR CARS, INC.
4.
Remove the steering gear heat shield bracket.
Fig. 33: Removing Steering Gear Heat Shield Bracket Courtesy of JAGUAR CARS, INC.
5.
Remove the steering gear heat shield.
Fig. 34: Removing Steering Gear Heat Shield Courtesy of JAGUAR CARS, INC.
6.
Remove the front pipe.
Fig. 35: Removing Front Pipe Courtesy of JAGUAR CARS, INC.
7.
Remove and discard the halfshaft seal.
Fig. 36: Removing Halfshaft Seal Courtesy of JAGUAR CARS, INC.
CAUTION: To prevent damage to the transfer box internal seal, make sure
that the link shaft is not retracted further than 200 mm (7.87
inches) from the transfer case.
CAUTION: Make sure the halfshaft constant velocity (CV) joints do not
over articulate. Failure to follow this instruction may result in damage to the CV joints.
8.
Using the special tools, detach the halfshaft.
? Align the special tools to the halfshaft. ? Detach the halfshaft.
Fig. 37: Detaching Half Shaft Courtesy of JAGUAR CARS, INC.
1/26/2012
TRANSFER CASE -2002 Jaguar X-Type
Page 2 of 4
CAUTION: Make sure the halfshaft constant velocity (CV) joints do not over articulate. Failure to follow this instruction may result in
damage to the CV joints.
9.
Support the halfshaft.
Fig. 38: Supporting Half Shaft Courtesy of JAGUAR CARS, INC.
10.
Remove and discard the halfshaft snap ring.
Fig. 39: Removing Half Shaft Ring Courtesy of JAGUAR CARS, INC.
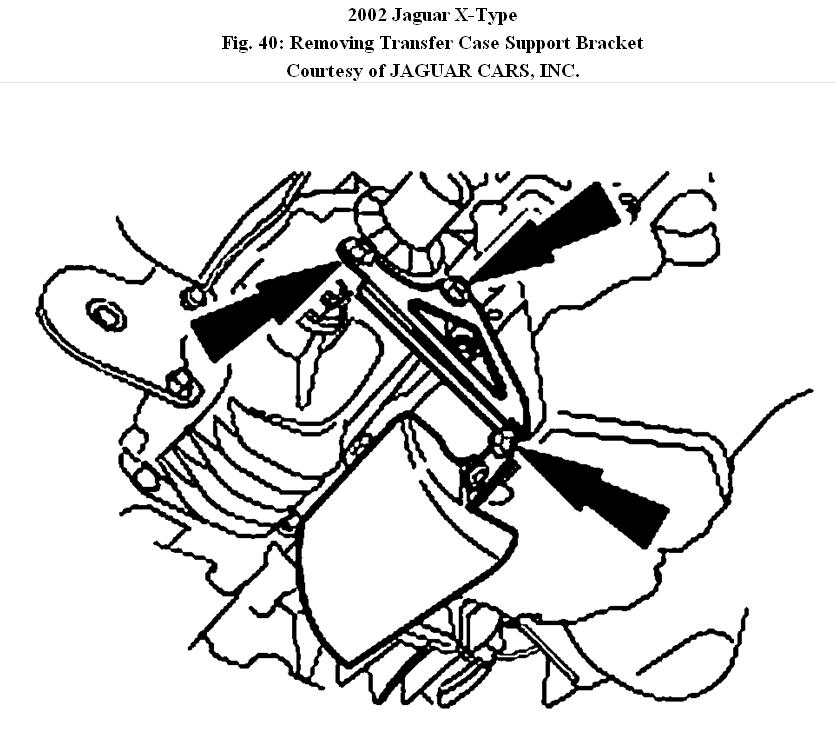
11.
Remove the transfer case support bracket.
Fig. 40: Removing Transfer Case Support Bracket Courtesy of JAGUAR CARS, INC.
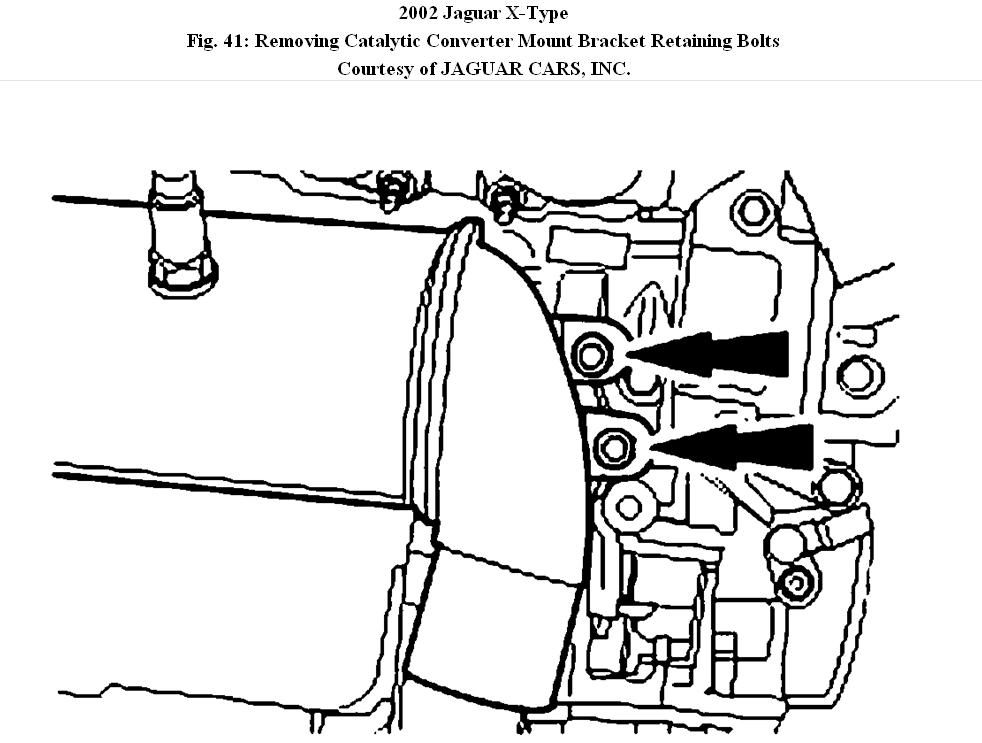
12.
Remove the catalytic converter to catalytic converter mount bracket retaining bolts.
Fig. 41: Removing Catalytic Converter Mount Bracket Retaining Bolts Courtesy of JAGUAR CARS, INC.
13.
Using the special tool, loosen the catalytic converter mount bracket, top left-hand retaining bolt
Fig. 42: Loosening Catalytic Converter Mount Bracket (Top Left Retaining Bolt) Courtesy of JAGUAR CARS, INC.
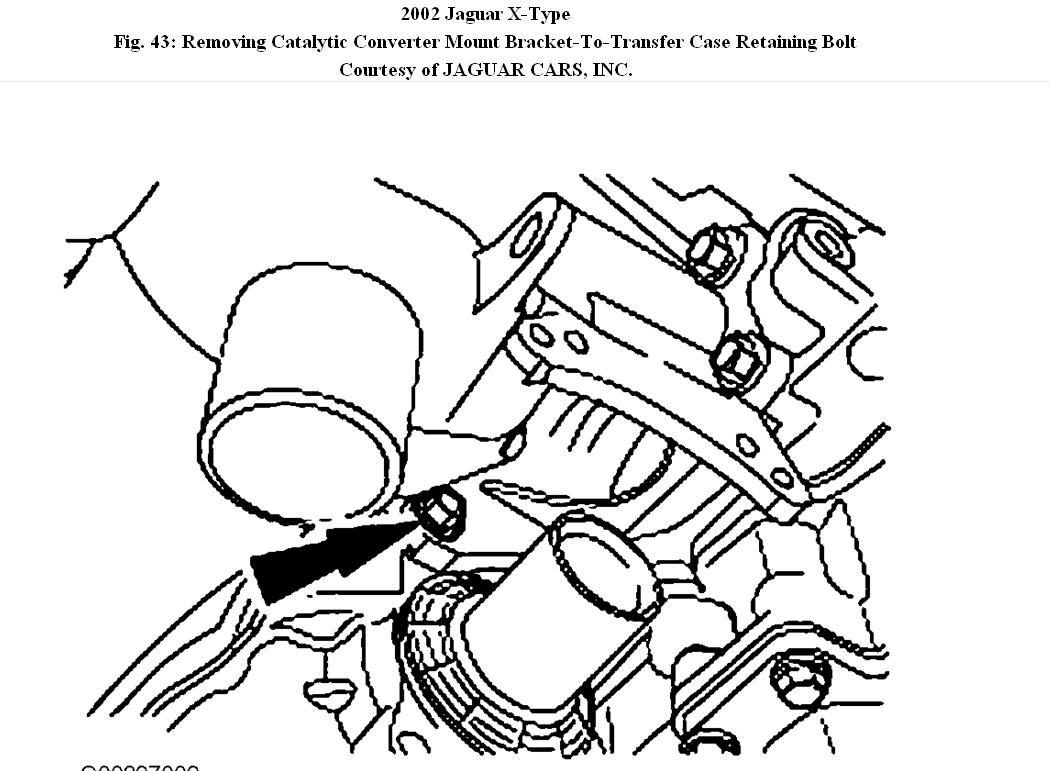
14.
Remove the catalytic converter mount bracket to transfer case retaining bolt.
Fig. 43: Removing Catalytic Converter Mount Bracket-To-Transfer Case Retaining Bolt Courtesy of JAGUAR CARS, INC.
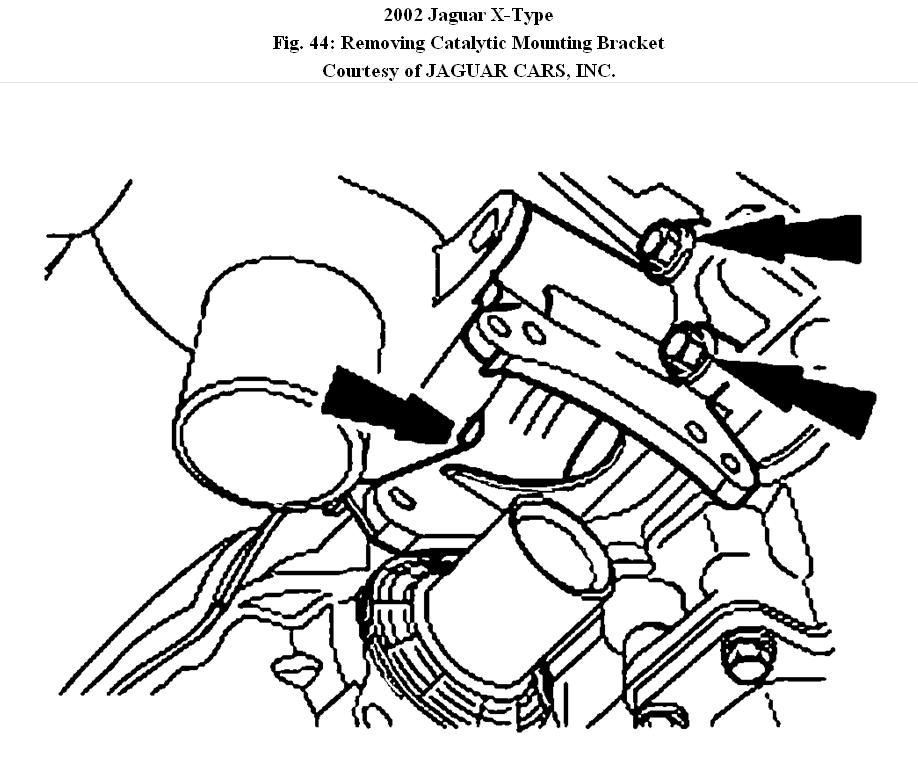
15.
Remove the catalytic converter mount bracket.
Fig. 44: Removing Catalytic Mounting Bracket Courtesy of JAGUAR CARS, INC.
16.
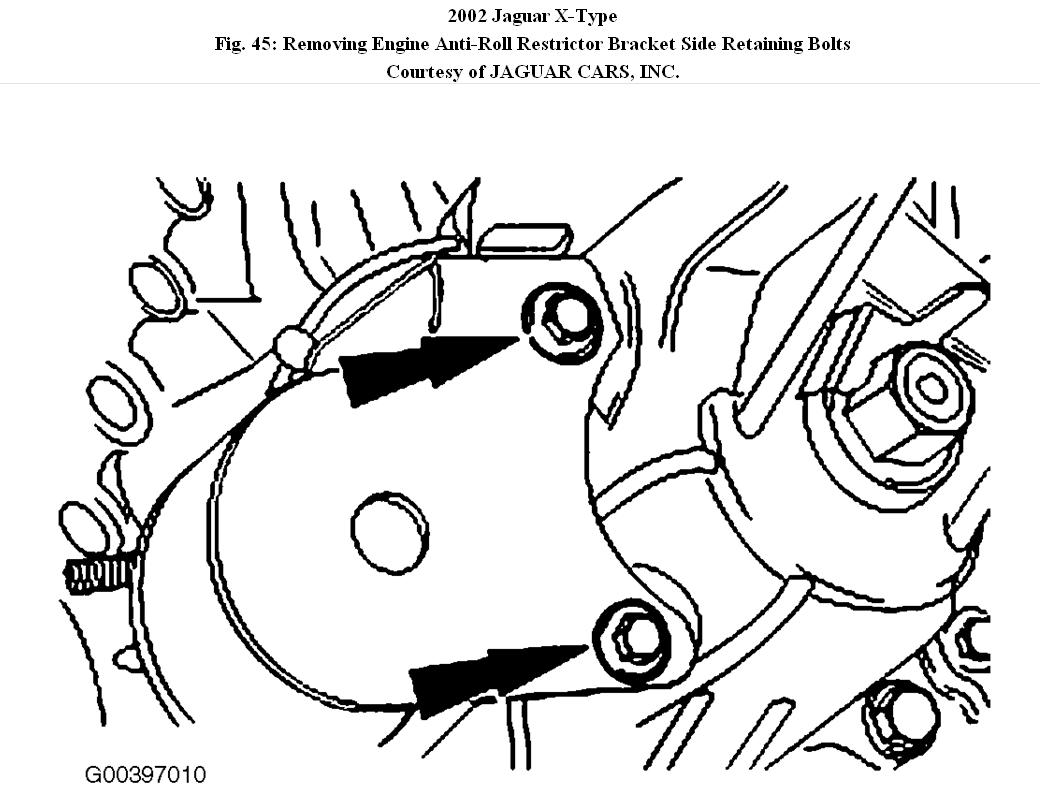
Remove the engine anti-roll restrictor bracket side retaining bolts.
Fig. 45: Removing Engine Anti-Roll Restrictor Bracket Side Retaining Bolts Courtesy of JAGUAR CARS, INC.
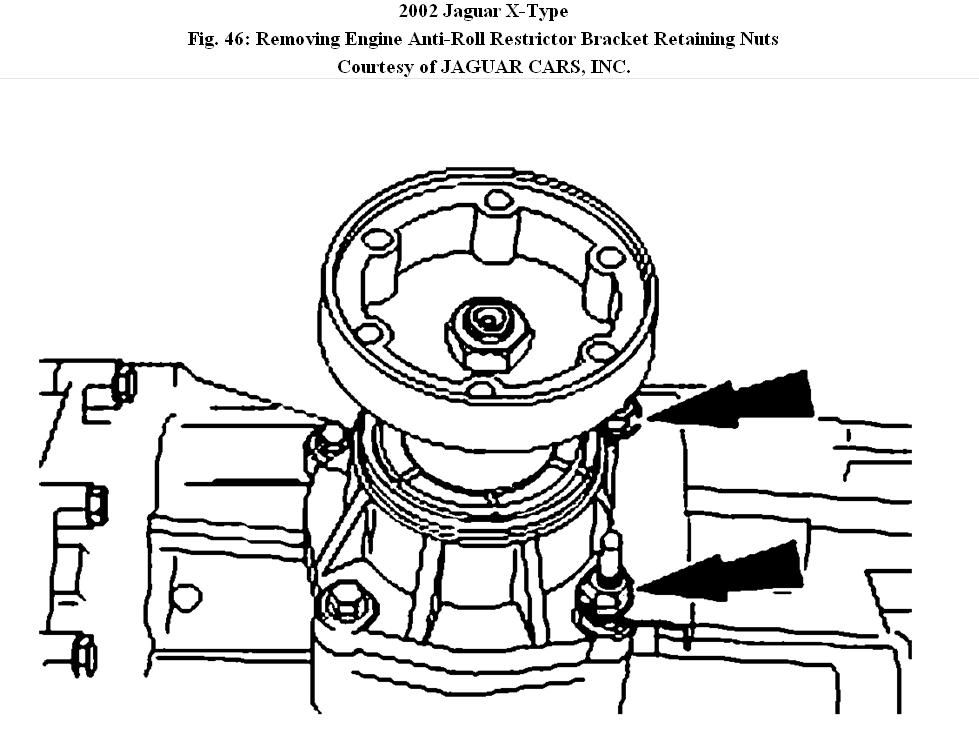
17.
Remove the engine anti-roll restrictor bracket retaining nuts.
Fig. 46: Removing Engine Anti-Roll Restrictor Bracket Retaining Nuts Courtesy of JAGUAR CARS, INC.
Remove the eng
ine anti-roll restrictor bracket.
18.
1/26/2012
TRANSFER CASE -2002 Jaguar X-Type
Page 3 of 4
Fig. 47: Removing Engine Anti-Roll Restrictor Bracket Courtesy of JAGUAR CARS, INC.
CAUTION: To prevent damage to the transfer box internal seal, make sure
that the link shaft is not retracted further than 200 mm (7.87
inches) from the transfer case.
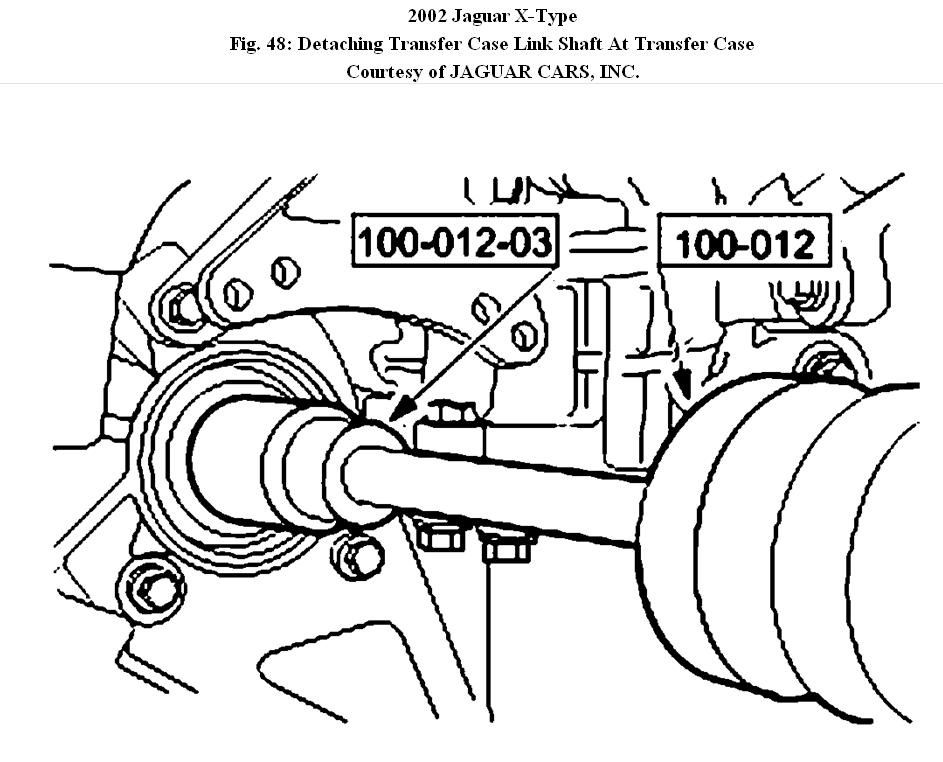
19.
Using the special tools, detach the transfer case link shaft from the transfer case.
Fig. 48: Detaching Transfer Case Link Shaft At Transfer Case Courtesy of JAGUAR CARS, INC.
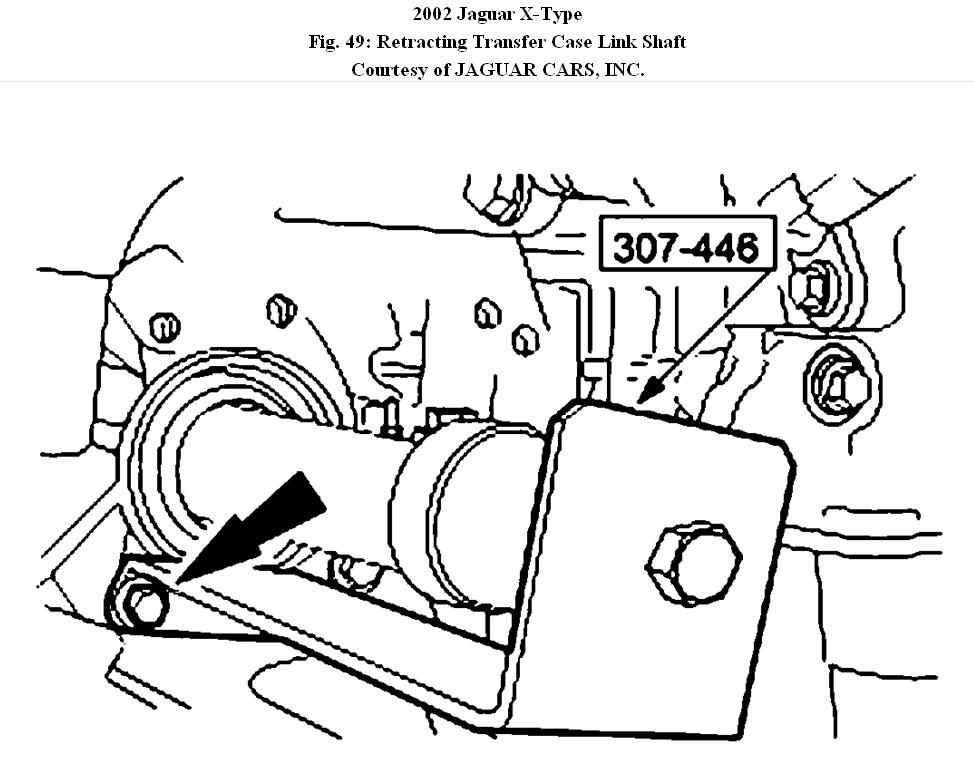
CAUTION: To prevent damage to the transfer box internal seal, make sure
that the link shaft is not retracted further than 200 mm (7.87 inches) from the transfer case.
20.
Using the special tool, retract the transfer case link shaft.
Fig. 49: Retracting Transfer Case Link Shaft Courtesy of JAGUAR CARS, INC.
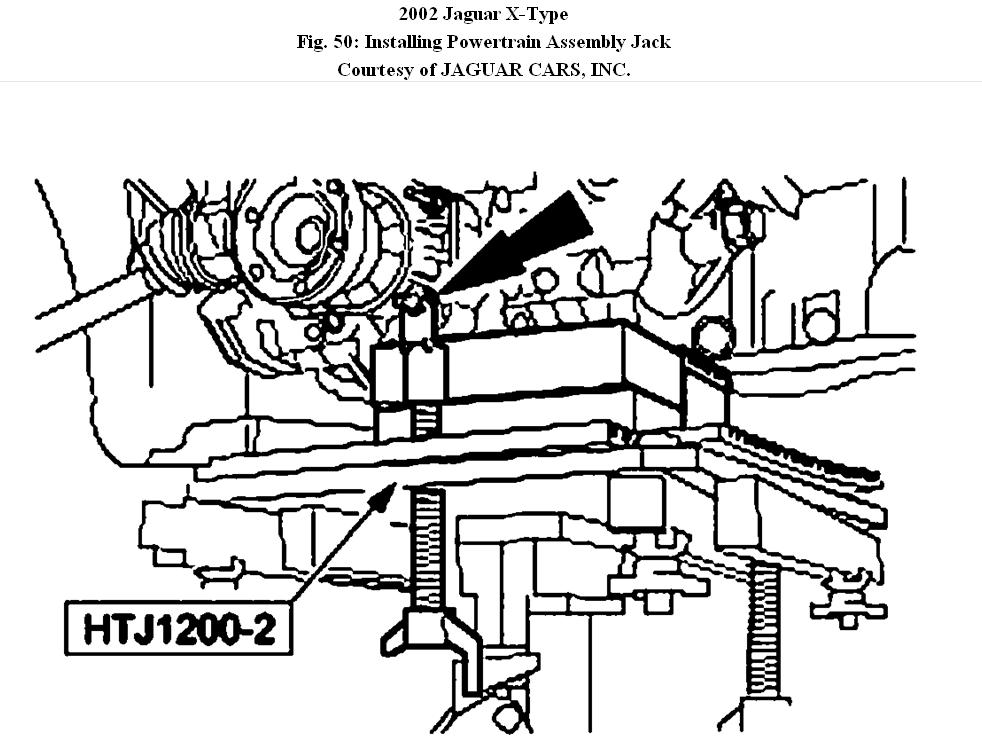
21.
Attach the special tool to the transfer case.
Fig. 50: Installing Powertrain Assembly Jack Courtesy of JAGUAR CARS, INC.
CAUTION: Make sure no transfer case oil is spilled as the transfer case is
removed. Failure to follow this instruction may result in
damage to the transfer case, if a new transfer case is not being
installed.
NOTE:
Powertrain assembly jack shown removed for clarity.
22.
Remove the transfer case.
Fig. 51: Removing Transfer Case Courtesy of JAGUAR CARS, INC.
CAUTION: Make sure no transfer case oil is spilled. Failure to follow this instruction may result in damage to the transfer case, if a new
transfer case is not being installed.
23.
Lower the transfer case on the powertrain assembly jack.
CAUTION: Make sure no transfer case oil is spilled. Failure to follow this
instruction may result in damage to the transfer case, if a new
transfer case is not being installed.
1/26/2012
TRANSFER CASE -2002 Jaguar X-Type
Page 4 of 4
24.
Remove and discard O-ring seal.
Fig. 52: Removing O-Ring Seal Courtesy of JAGUAR CARS, INC.
CAUTION: Make sure no transfer case oil is spilled. Failure to follow this
instruction may result in damage to the transfer case, if a new transfer case is not being installed.
25.
Remove and discard the link shaft snap ring.
Fig. 53: Removing Link Shaft Snap Ring Courtesy of JAGUAR CARS, INC.
CAUTION: Make sure no transfer case oil is spilled. Failure to follow this instruction may result in damage to the transfer case, if a new
transfer case is not being installed.
26.
Remove the link shaft limiter bracket.? Remove the retaining bolt.
? Remove the link shaft limiter bracket.
Fig. 54: Removing Link Shaft Limiter Bracket Courtesy of JAGUAR CARS, INC.
CAUTION: Make sure no transfer case oil is spilled. Failure to follow this instruction may result in damage to the transfer case, if a new
transfer case is not being installed.
27.
Remove the link shaft from the transfer case.
Fig. 55: Removing Link Shaft From Transfer Case Courtesy of JAGUAR CARS, INC.
CAUTION: Make sure no transfer case oil is spilled. Failure to follow this
instruction may result in damage to the transfer case, if a new
transfer case is not being installed.
NOTE:
If a new transfer case is being installed, drain the transfer case oil.
28.
If a new transfer case is being installed, drain the transfer case oil.
Images (Click to make bigger)
SPONSORED LINKS
Friday, March 25th, 2011 AT 4:59 PM