Hi and thanks for using 2carpros.com
Honestly, that isn't listed in any manual, so you are only going to get estimates on the spacing. I will tell you there isn't much more than an inch. I strongly recommend removing the tank before doing this. Not only is the tank a concern, but also fuel lines and wiring.
I suggest a carriage bolt installed from the bottom up. That way there will basically be nothing that can contact the tank or its components. You don't want anything that can poke downward and puncture the tank in the event of an accident.
If you decide to remove the tank, here are the directions specific to removal and replacement. The attached pictures correlate with these directions.
_________________________________________________
2010 Chrysler Truck Town & Country V6-3.8L
Fuel Tank - Removal
Vehicle Powertrain Management Fuel Delivery and Air Induction Fuel Tank Service and Repair Removal and Replacement Fuel Tank - Removal
FUEL TANK - REMOVAL
REMOVAL
Pic 1
WARNING: The fuel system is under constant pressure even with engine off. Before servicing any part of the fuel system, the pressure must be released.
1. Remove fuel cap.
2. Release pressure in fuel system, See: Fuel Pressure Release > Procedures > Fuel System Pressure Release Procedure.
3. Remove hose clamp (1) and remove fuel fill hose from fuel tank.
Pic 2
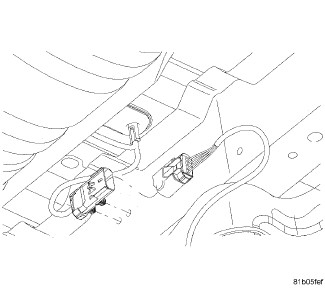
4. Disconnect fuel pump electrical connector from body harness connector.
Pic 3
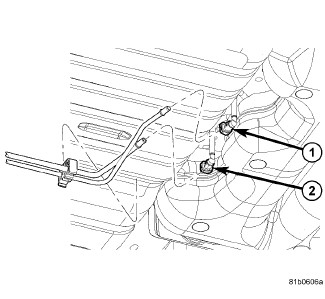
5. Disconnect fuel line quick connect fittings (1) and evaporator hose (2).
Pic 4
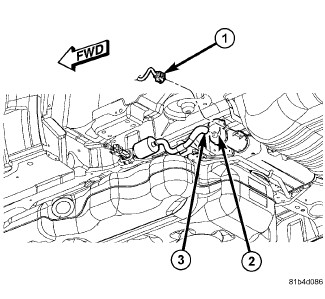
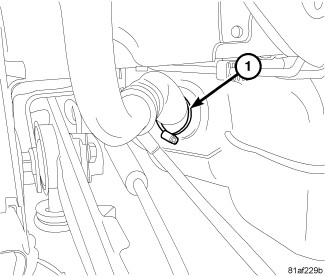
6. Disconnect electrical connector (1) from evaporative system integrity monitor (ESIM) switch (2).
7. Disconnect fuel fill vapor hose (4) from fuel tank control valve hose.
8. Disconnect fuel fill vapor hose (3) from ESIM switch (2).
Pic 5
WARNING: Support fuel tank with a transmission jack or equivalent. Use straps to secure the fuel tank to the jack. Failure to properly support and secure the fuel tank during removal may cause fuel to spill or fuel tank to fall from jack assembly.
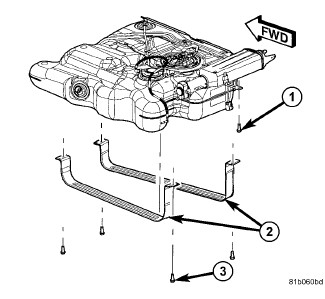
9. Remove fuel tank strap bolts (3) and straps (2).
10. Remove vapor canister bracket bolt (1).
11. Lower the fuel tank.
Pic 6
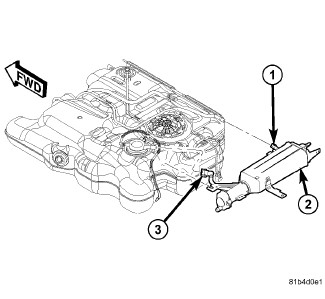
12. Disconnect evaporator quick connector (1) from vapor line.
13. Disconnect evaporator quick connector (3) from fuel tank control valve.
14. Remove vapor canister filter (2).
15. Remove fuel pump module, See: Fuel Tank > Removal and Replacement > Fuel Tank - Removal.
16. Remove all fuel and vapor lines from fuel tank.
17. Transfer fuel into an approved fuel storage container.
________________________________________________
Replacement
FUEL TANK - INSTALLATION
INSTALLATION
Pic 7
1. Install all fuel and vapor lines to fuel tank.
2. Install fuel pump module, See: Fuel Tank > Removal and Replacement > Fuel Tank - Installation.
3. Install vapor canister filter (2).
4. Connect evaporator quick connector (3) to fuel tank control valve.
5. Connect evaporator quick connector (1) to vapor line.
Pic 8
WARNING: Support fuel tank with a transmission jack or equivalent. Use straps to secure the fuel tank to the jack. Failure to properly support and secure the fuel tank during removal may cause fuel to spill or fuel tank to fall from jack assembly.
6. Position fuel tank onto a transmission jack or equivalent and raise fuel tank into vehicle position.
7. Install vapor canister bracket bolt (1). Tighten to 55 Nm (40.5 ft. lbs.).
8. Install straps (2) and fuel tank strap bolts (3). Tighten to 55 Nm (40.5 ft. lbs.).
Pic 9
9. Connect fuel fill vapor hose (3) to evaporative system integrity monitor (ESIM) switch (2).
10. Connect fuel fill vapor hose (4) to fuel tank control valve hose.
11. Connect electrical connector (1) to ESIM switch (2).
Pic 10
12. Connect fuel line quick connect fittings (1) and evaporator hose (2).
Pic 11
13. Connect the body harness connector.
Pic 12
14. Install fuel fill hose and hose clamp (1) to fuel tank. Tighten hose clamp (1) to 28 Nm (20.5 ft. lbs.).
15. Fill fuel tank and install fuel cap.
16. Use the scan tool ASD Fuel System Test to pressurize the fuel system. Check for leaks.
Let me know if this helps. Also, make sure to disconnect the battery when doing any work on or around the fuel tank.
Take care,
Joe
Images (Click to enlarge)
Jan 24, 2019 at 12:41 PM
(Merged)