Hello,
ROCKER ARMS & SHAFTS INSPECTION (SOHC)
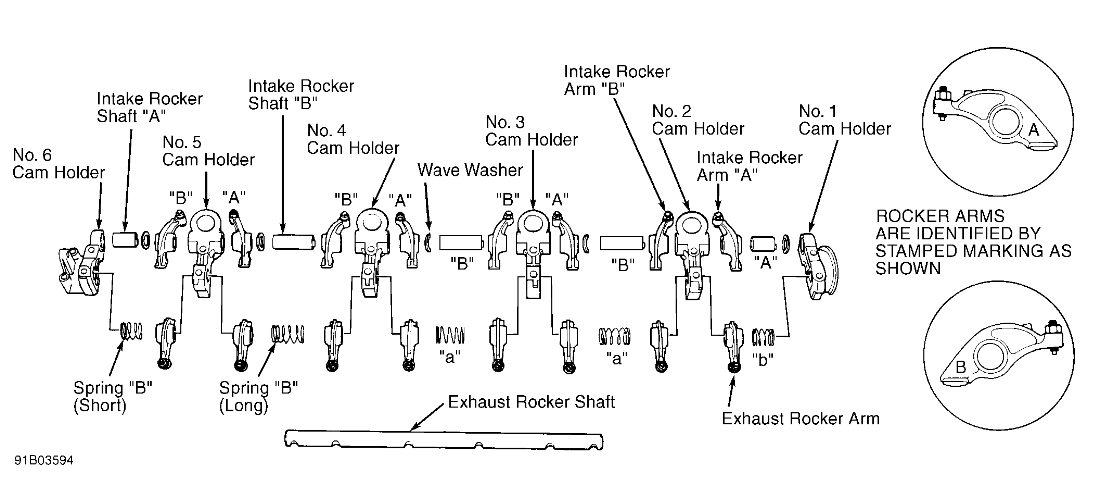
Inspect all rocker arm shafts for signs of scoring or damage. Inspect rocker arm shafts for a smooth surface. Inspect rocker arm face and adjusting screw face for cracking and wear. Replace rocker arm if cracked or worn.
Measure diameter of each rocker shaft at each rocker arm location. Measure inside diameter of each rocker arm and check for an out-of-round condition. Compare diameter of rocker shaft with corresponding rocker arm inside diameter.
Repeat procedure for all rocker arms. If rocker arm-to-shaft clearance is not within specification, replace rocker shaft and all rocker arm assemblies not within specification.
INSTALLATION (SOHC)
Loosen all rocker arm adjusting screw lock nuts and back off adjusting screws. Clean and dry all components and lubricate all contact points before installation. Assembly rocker arm assemblies. Position camshaft in cylinder head with keyway facing up (No. 1 piston TDC position).
Remove oil control orifice located under No. 3 camshaft holder (if equipped). Clean and reinstall using a NEW "O" ring. On all engines, lubricate camshaft lobes after installation.
Apply gasket sealer to mating surfaces of camshaft holders No. 1 and 6 (No. 1 and 5 on F22B1 engine) and cylinder head. Set rocker arm assembly and camshaft holders in place and loosely install bolts. Ensure rocker arms are properly positioned on valve stems.
Apply a light coat of oil to Seal Guide (07NAG-PT0010A) and camshaft oil seal inner lip. Using Seal Guide (07NAG-PT0010A), Installer Cup (07NAF-PT0010A) and Installer Shaft (07NAF-PT0020A), install camshaft oil seal. Ensure seal housing surface is dry.
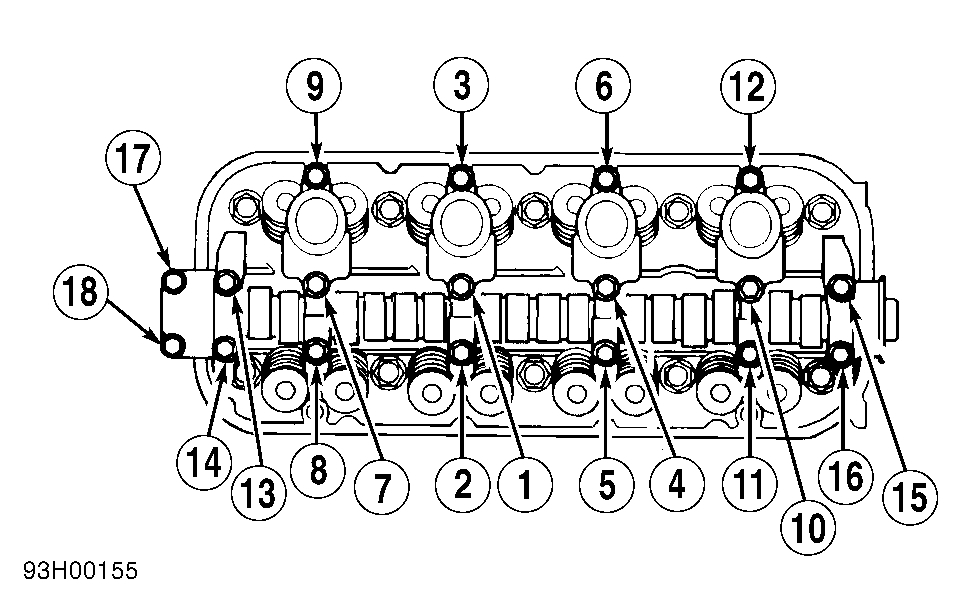
Ensure all rocker arms align with valves. Tighten camshaft holder bolts to specification in 2 steps according to sequence. Install back cover and camshaft pulley. Tighten camshaft pulley bolt to specification. Adjust valves to specification. Tighten adjustment screw lock nuts to specification. To complete installation, reverse removal procedure.
Camshaft Holders & Holder Plate Bolts
6-mm Bolts (2)
8-mm Bolts
Except Prelude 16Nm (22)
Prelude 19Nm (26)
Camshaft Pulley Bolt
1997 Except Prelude 43Nm (58)
1998 Except Prelude 27Nm (37)
Prelude 37Nm (50)
VALVE CLEARANCE SPECIFICATIONS
Application In. (mm)
DOHC
Intake Valves 0.006-0.007 (0.15-0.18)
Exhaust Valves 0.007-0.008 (0.18-0.20)
SOHC
Intake Valves 0.009-0.011 (0.23-0.27)
Exhaust Valves 0.011-0.013 (0.27-0.33)
A good link:
https://honda-tech.com/forums/honda-accord-1990-2002-2/how-adjust-valves-your-f22-2477017/
Hope this helps.
Cheers, Boris
Images (Click to enlarge)
Jun 11, 2024 at 2:36 AM