1993 Honda Accord

Tiny
AKENES76
  • MEMBER
  • 1993 HONDA ACCORD
  • 4 CYL
  • 2WD
  • AUTOMATIC
  • 120,000 MILES
I am having a hard time with the easiest task. I don't cal myself a mechanic by any stretch of the imagination. But I have done all my own maintenance and repairs on all my vehicles for 20 years.
But im at a loss!
On my 93 Honda accord a can not seam to figure out how I am going to replace the alternator on it. The voltage is too low and it's running down the brand new battery in it. I checked all the connections so my conclusion is the ALTERNATOR.
Please advise me how to step by step take out and replace the ALTERNATOR. Thanks everyone
kenesfamily@att. Net
Thursday, July 15th, 2010 AT 11:18 PM

5 Replies

Tiny
MHPAUTOS
  • MECHANIC
  • 31,938 POSTS
Hi there,

Thank you for the donation,

I had this on file so I hope it is of help for you.

Mark (mhpautos)
"Â Step 1
Determine which alternator your Honda Accord needs. Be sure the new alternator is compatible with your Accord's engine. Models made from 1976 to 1985 have a 1.6 L or 1.8 L engine, and 1986 to 1989 models have a 2.0 L engine. Models built from 1990 to 1993 are equipped with a 2.2 L engine. Models made from 1994 to 1997 have a 2.2 L or a 2.7 L engine.

"Â Step 2
Look at more recent generations of the Honda Accord. Models manufactured from 1998 to 2002 have 2.3 L or 3.0 L engines, and models made from 2003 to 2007 have a 2.4 L or 3.0 L engine. The eighth generation of the Honda Accord debuted in 2008 and is available with 2.0 L, 2.2 L, 2.4 L and 2.2 L turbo diesel engines.

"Â Step 3
Disconnect the negative and then positive battery cables with a socket wrench.

"Â Step 4
Remove the four-prong connector from the rear of the alternator. Remove the terminal nut from the rear of the alternator with a socket wrench, and disconnect the wire.

"Â Step 5
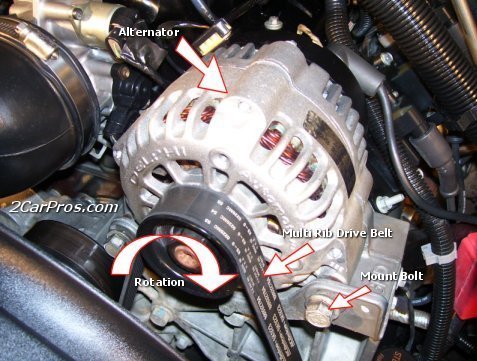
Loosen the bottom through-bolt and then the adjusting bolt with a socket wrench so that you can disconnect the alternator belt. You can now completely remove the adjusting bolt and lock nut along with the through-bolt. This allows you to remove the alternator.

"Â Step 6
Install the new alternator assembly. Replace the alternator belt and adjust it to the proper tension before you tighten the adjusting lock nut to 16 foot-lb. With a torque wrench. Torque the through-bolt to 33 foot-lb. With a torque wrench.

"Â Step 7
Use a socket wrench to secure the terminal wire to the alternator with the terminal nut. Connect the four-prong connector and both battery cables.
Was this
answer
helpful?
Yes
No
Monday, August 24th, 2020 AT 2:40 PM
Tiny
AKENES76
  • MEMBER
  • 2 POSTS
Thanks for the quick response!
The direction that you offered are correct and I did most of them before I wrote in. The issue I am having is there is no clearance between the alternator and the radiator fan and cooling lines. I have tried and a mechanic from american airlines has attempted also. Does this alternator have to come out thru the bottom or do I have to take the radiator and fans out? Please advise I'm stuck here!
Was this
answer
helpful?
Yes
No
Monday, August 24th, 2020 AT 2:40 PM
Tiny
MHPAUTOS
  • MECHANIC
  • 31,938 POSTS
Haven't sen one in a while, but I would remove the lower splash shield and see if it will drop out the bottom, if not then the radiator is not that hard to take out, maybe do it that way and kill 2 birds with one stone and do a coolant flush at the same time.

Mark
Was this
answer
helpful?
Yes
No
Monday, August 24th, 2020 AT 2:40 PM
Tiny
MIKE KENNY
  • MEMBER
  • 2 POSTS
I just did mine and the only way I could get it out is to remove the power steering pump and come up thru the top just remove the pump don't disconect the lines just set it out of the way
Was this
answer
helpful?
Yes
No
Monday, August 24th, 2020 AT 2:40 PM
Tiny
MHPAUTOS
  • MECHANIC
  • 31,938 POSTS
Hi there,

I just got a word back form a Honda tech, he said the same thing.

Mark (mhpautos)
Was this
answer
helpful?
Yes
No
Monday, August 24th, 2020 AT 2:40 PM

Please login or register to post a reply.

Sponsored links