Hi,
I need to confirm the engine size. Is it the 2.3L SOHC? If it is the aforementioned engine, the balance shaft belt needs to be removed. Here are the directions. This would actually be a good time to replace the timing belt. Here are the directions for both. The attached pics correlate with the directions.
____________________________________________
2002 Honda Accord DX Sedan L4-2254cc 2.3L SOHC MFI
Procedures
Vehicle Engine, Cooling and Exhaust Engine Cylinder Block Assembly Balance Shaft Belt Service and Repair Procedures
PROCEDURES
Timing Belt and Balancer Belt
Removal
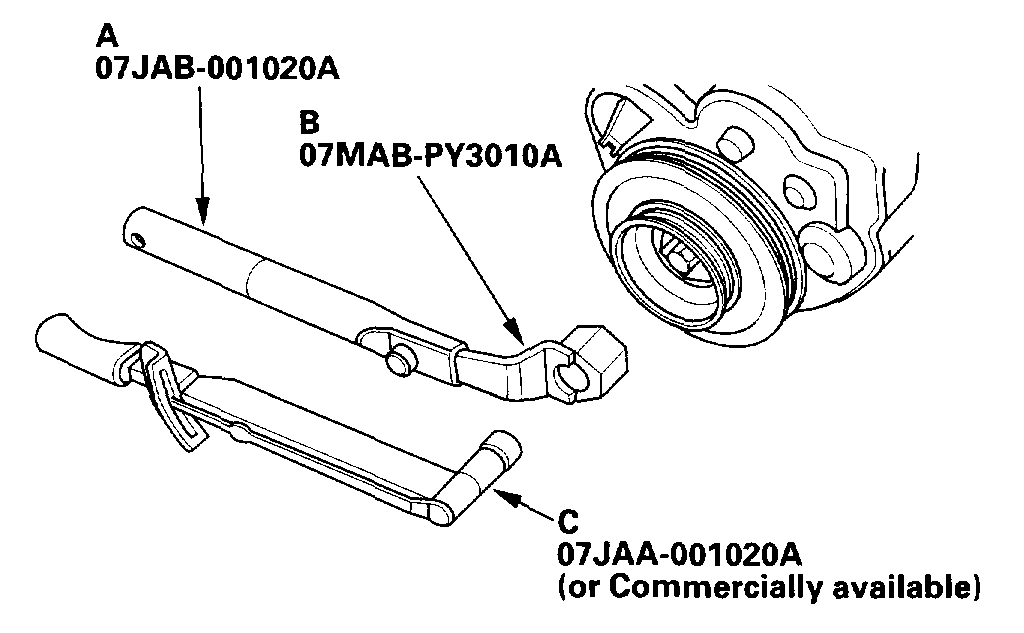
Special Tools Required
Holder Handle 07JAB-001020A
Holder Attachment, 50 mm, Offset 07MAB-PY3010A
Socket, 19 mm 07JAA-001020A or a commercially available 19 mm socket
1. Make sure you have the anti-theft code for the radio, then write down the frequencies for the radio's preset buttons.
2. Disconnect the battery negative terminal first, then the positive terminal.
Pic 1
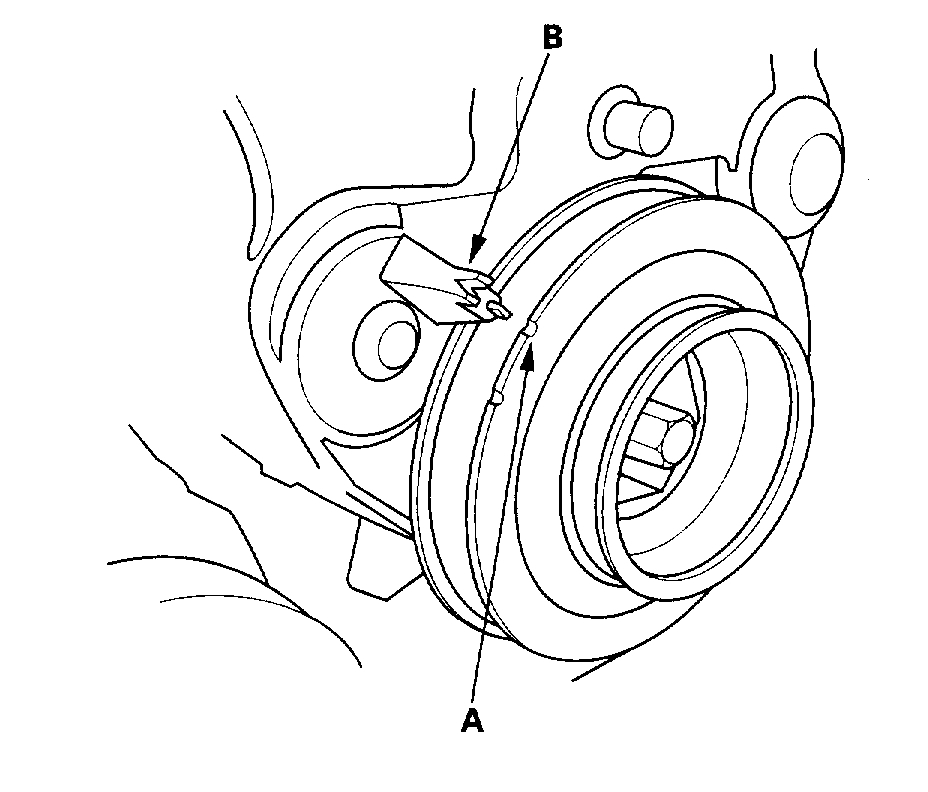
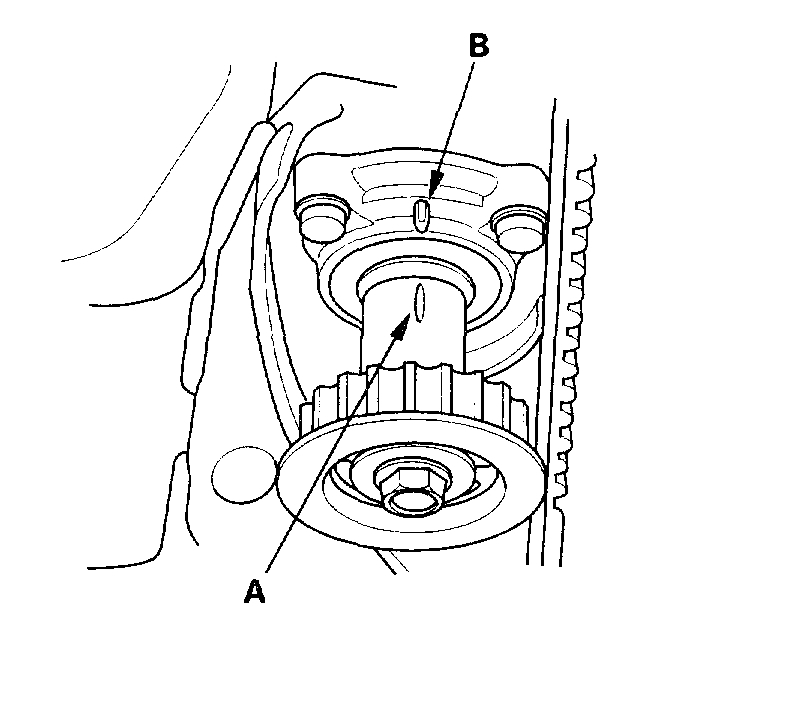
3. Turn the crankshaft pulley so its TDC mark (A) lines up with the pointer (B).
4. Remove the front tires/wheels.
Pic 2
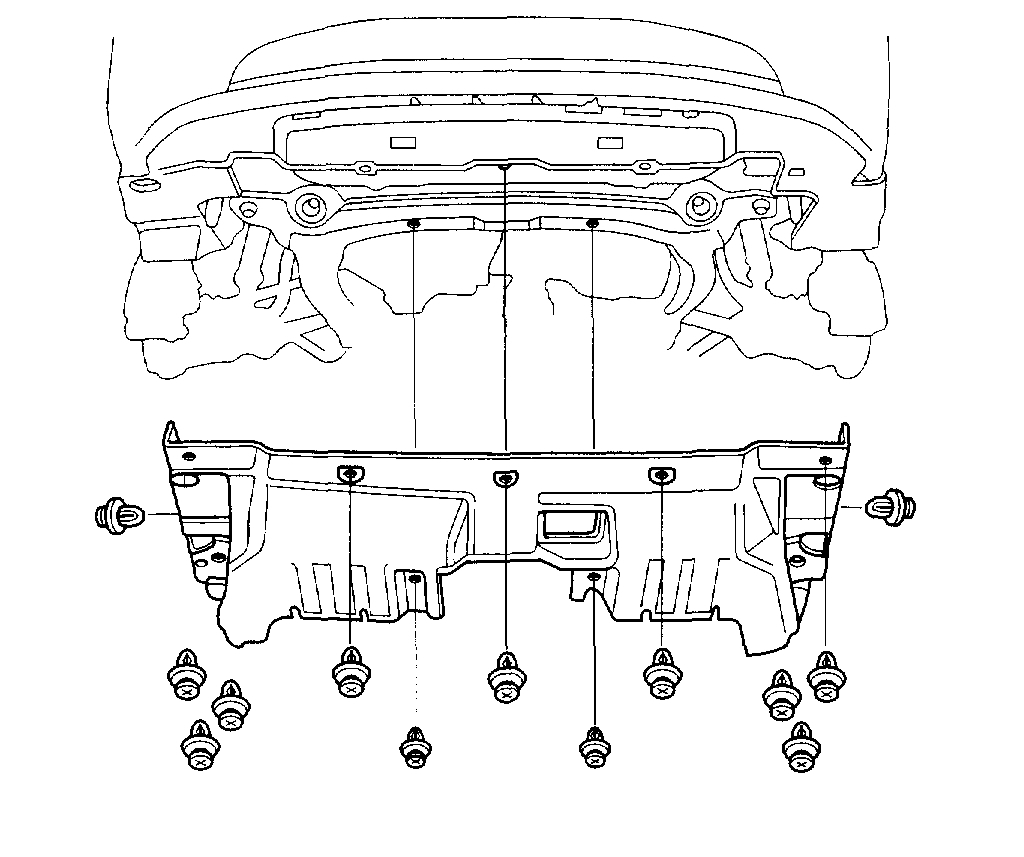
5. Remove the splash shield.
Pic 3
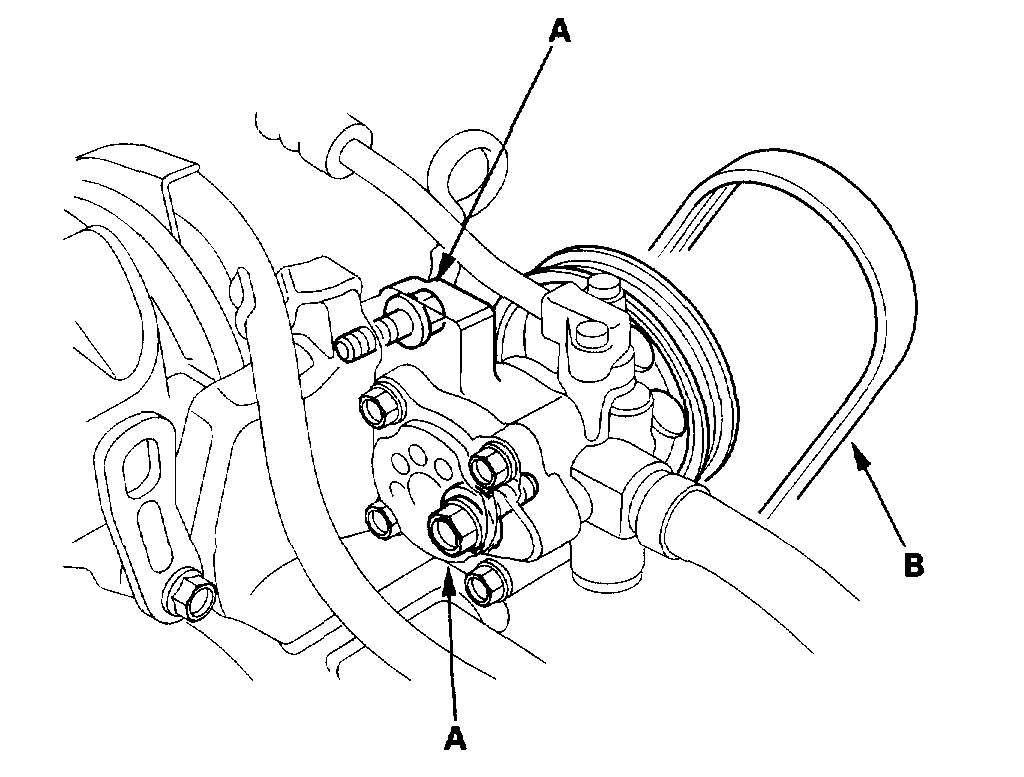
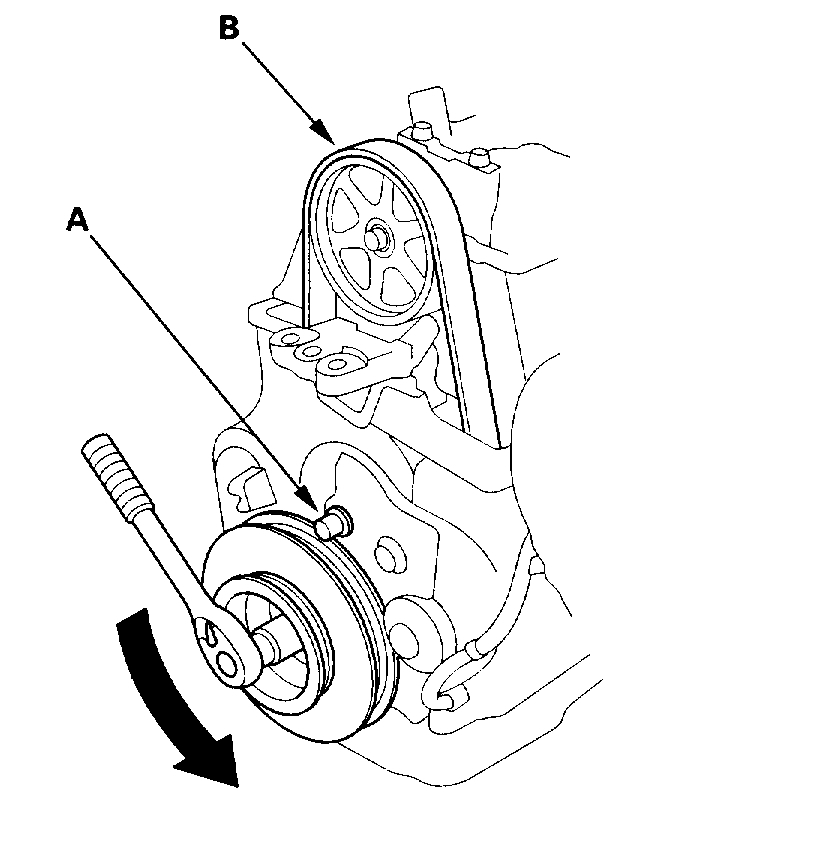
6. Loosen the mounting bolts (A), then remove the P/S belt (B).
Pic 4
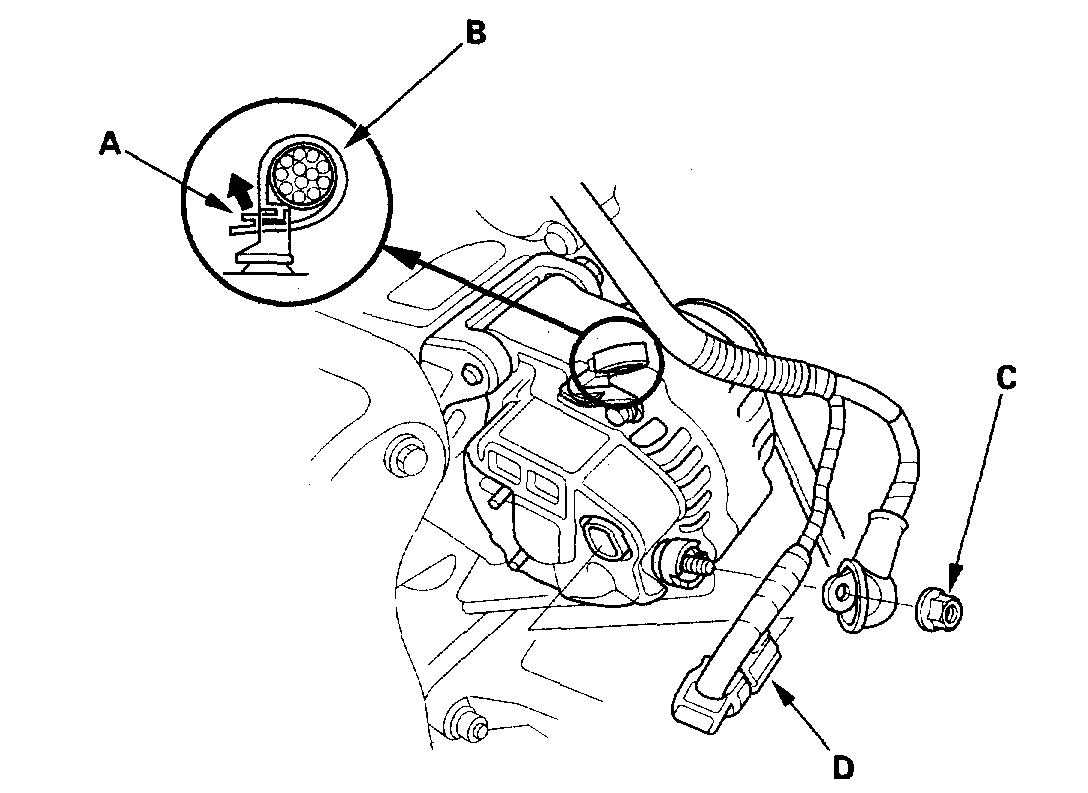
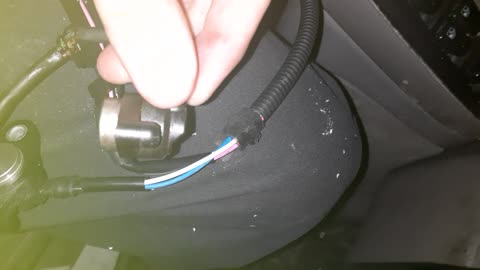
7. Disconnect the alternator wire harness.
1 Pull up the lock (A), then release the wire harness tie (B).
2 Pull back the boot and remove the 6 mm nut (c).
3 Disconnect the connector (D) from the alternator.
8. Remove the alternator.
9. Remove the alternator bracket.
10. Support the engine with a jack and wood block under the oil pan.
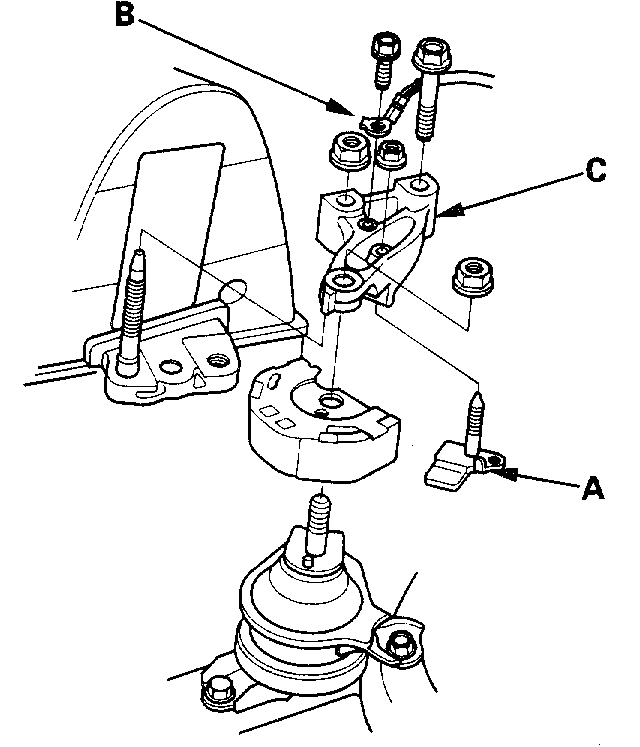
Pic 5
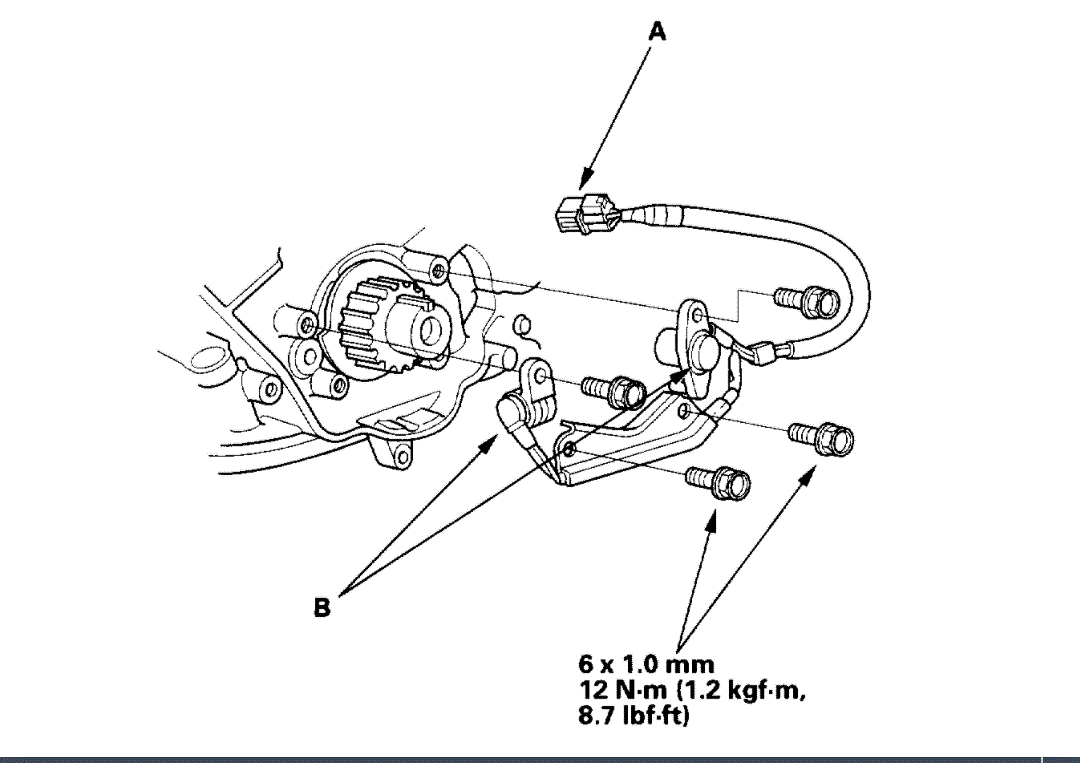
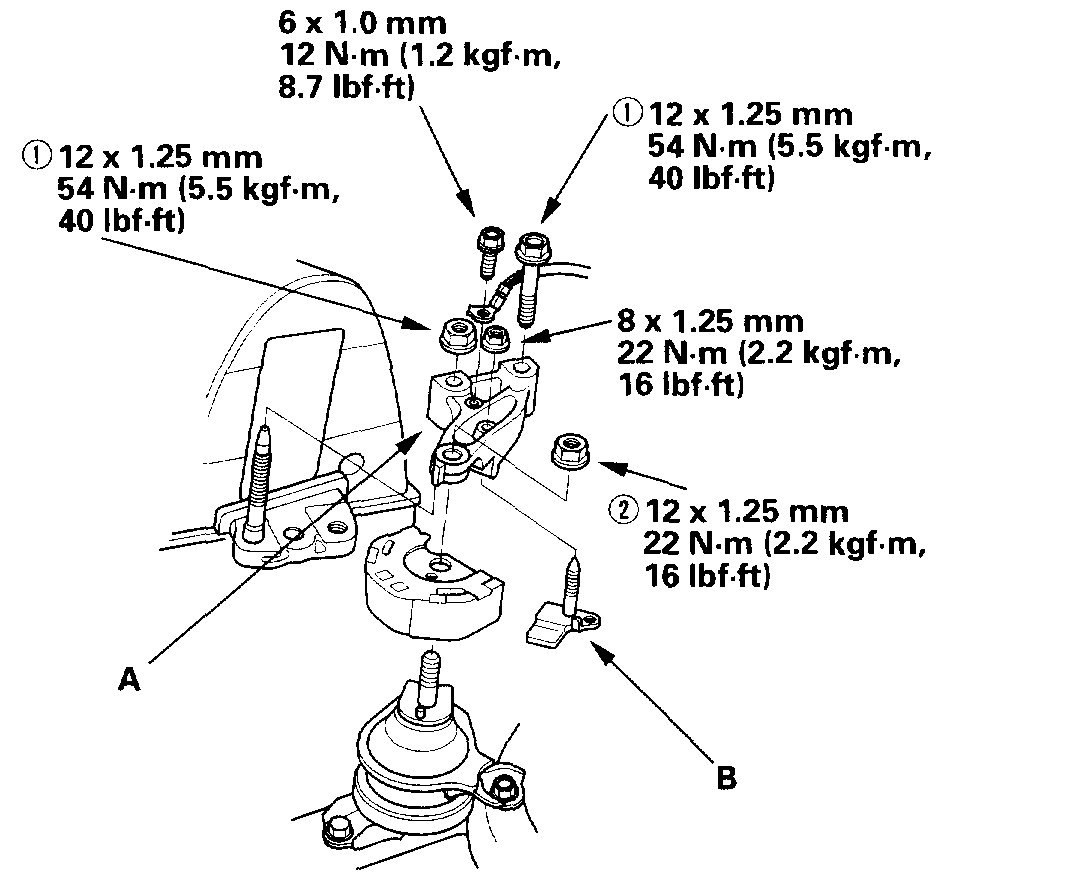
11. Remove the stopper (A) and ground cable (B), then remove the upper bracket (C).
12. Remove the cylinder head cover.
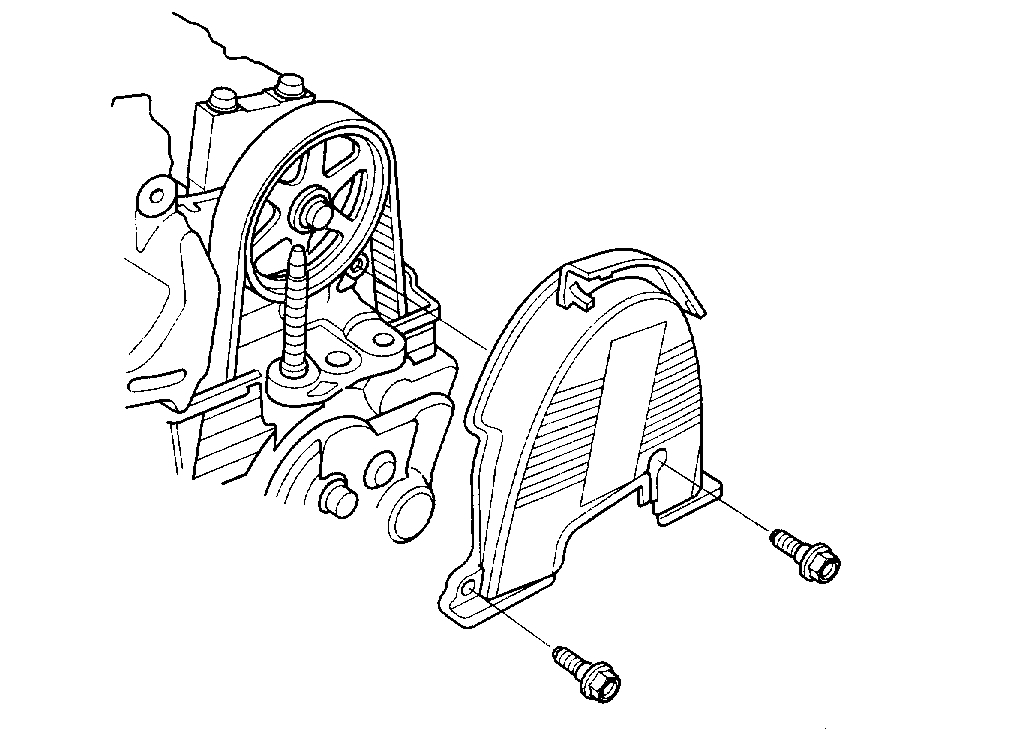
Pic 6
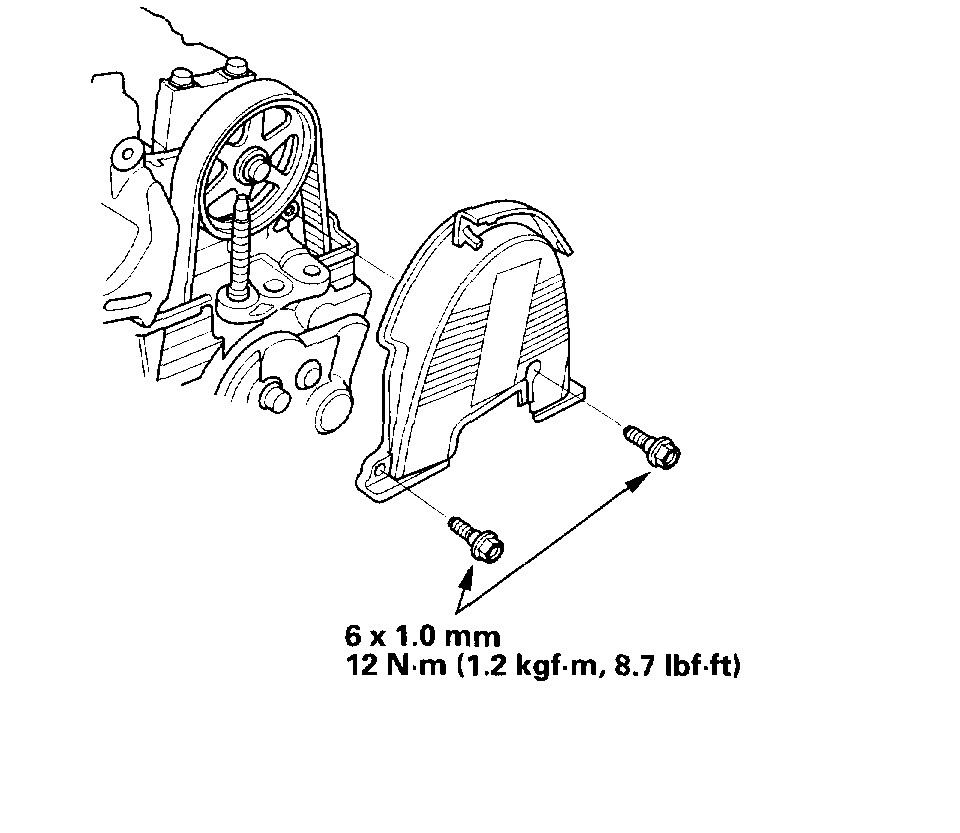
13. Remove the upper cover.
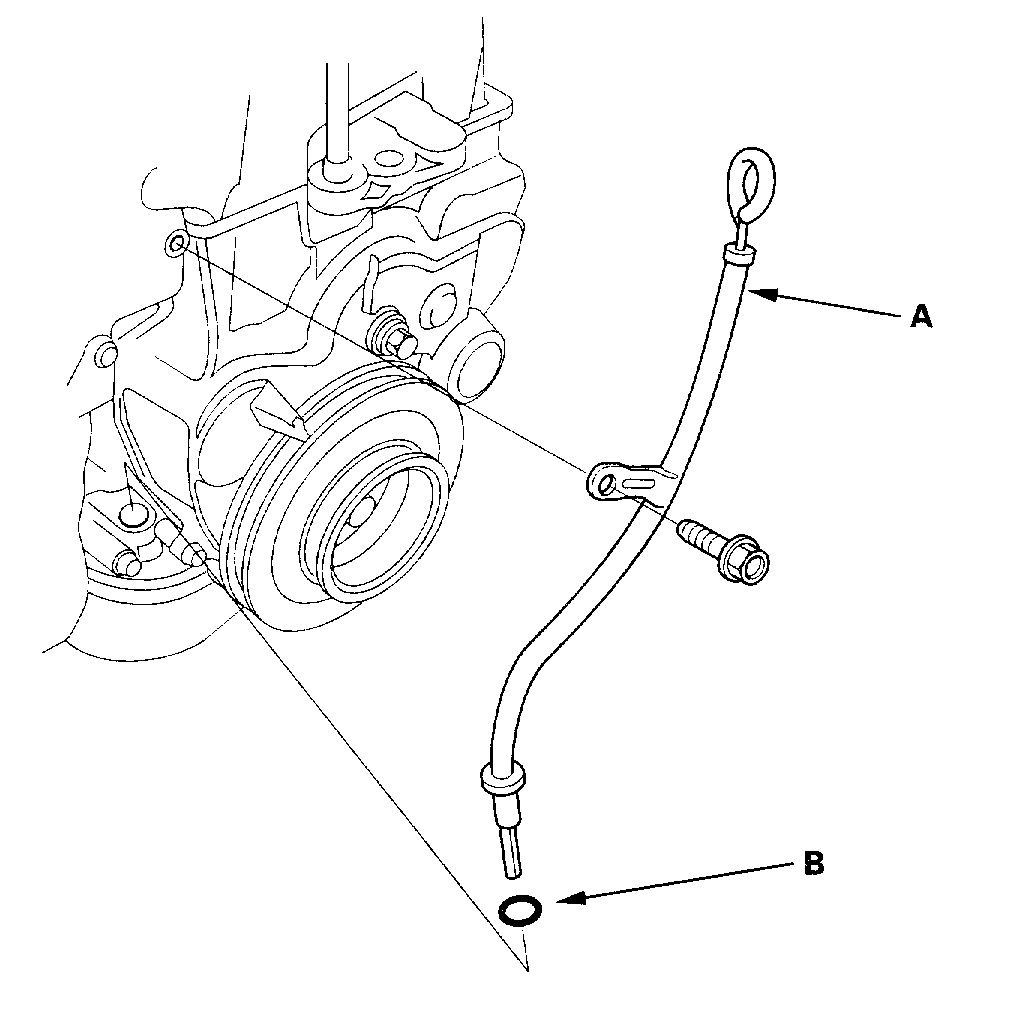
Pic 7
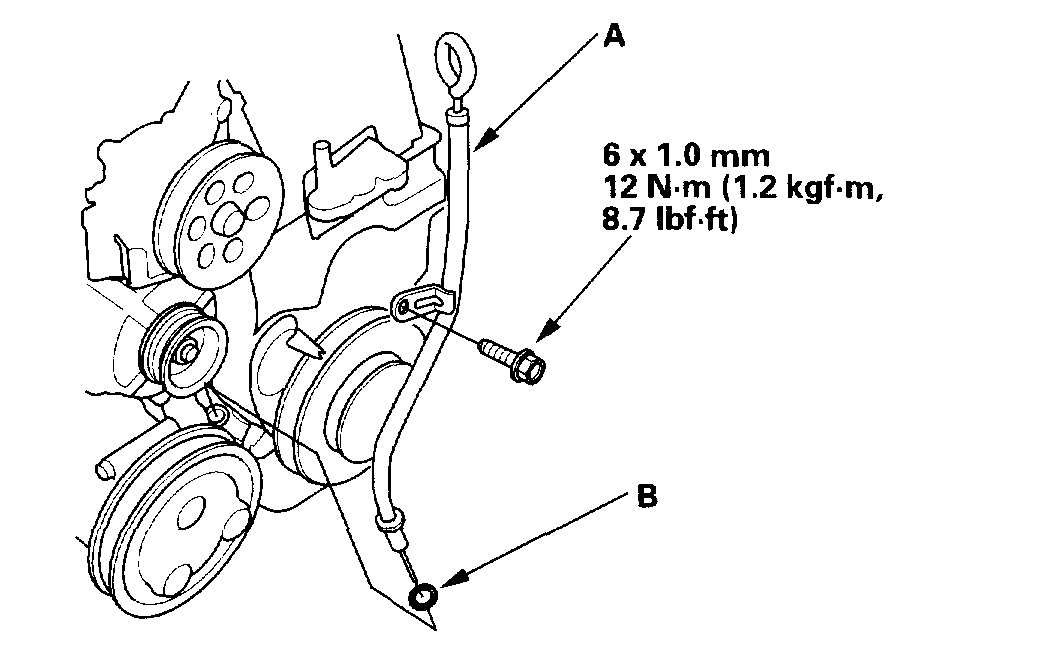
14. Remove the dipstick and tube (A). Discard the O-ring (B).
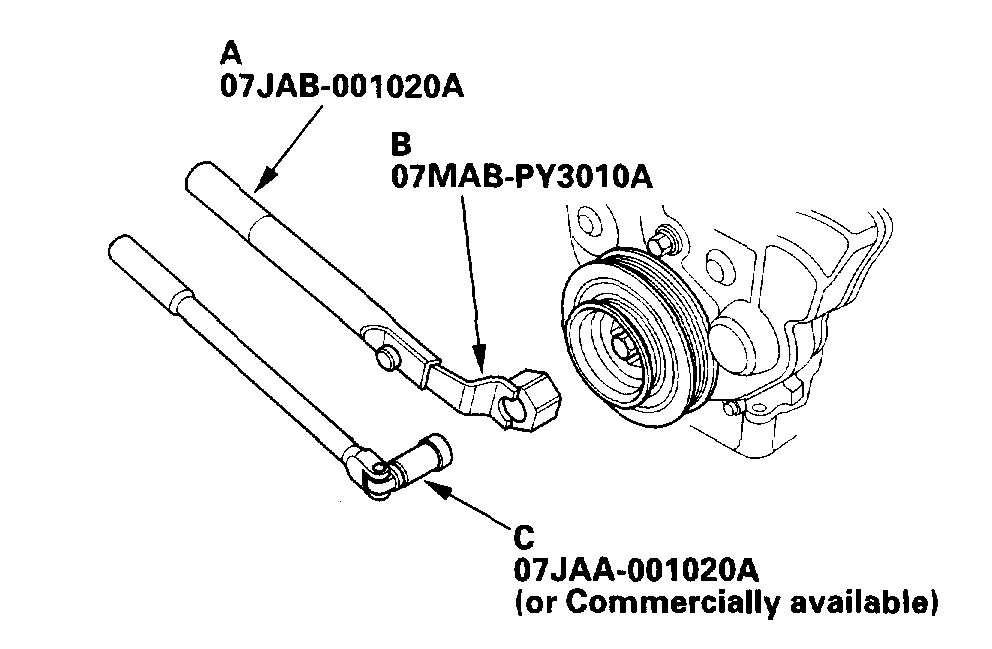
Pic 8
15. Hold the pulley with holder handle (A) and holder attachment (B).
16. Remove the bolt with a heavy duty 19 mm socket (c) and breaker bar.
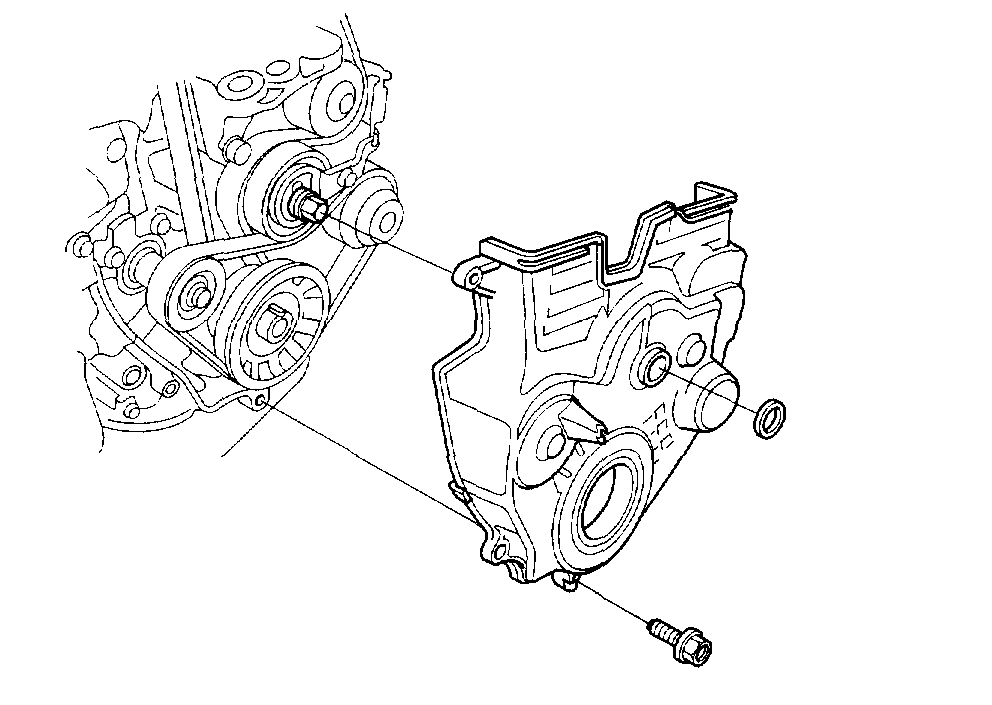
Pic 9
17. Remove the rubber seal from the adjusting nut, then remove the lower cover.
18. If you are removing only the balancer belt, go to step 19. If you are removing both the balancer belt and the timing belt, go to step 20.
Pic 10
19. Release tension from the balancer belt:
1 Install a 6 mm bolt (A)(from the timing cover) through the hole in the end of the timing belt adjuster arm to temporarily lock the arm in place.
2 Loosen the adjusting nut (B) 2/3 - 1 turn.
3 Push the tensioner (c) up to take tension off the balancer belt.
4 Retighten the adjusting nut (B).
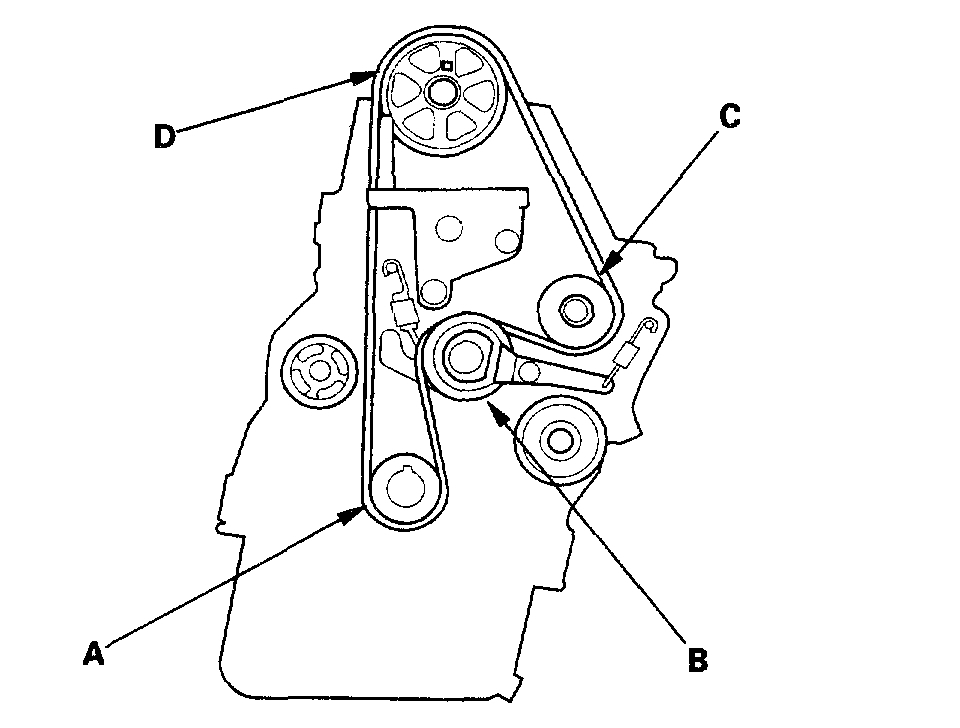
Pic 11
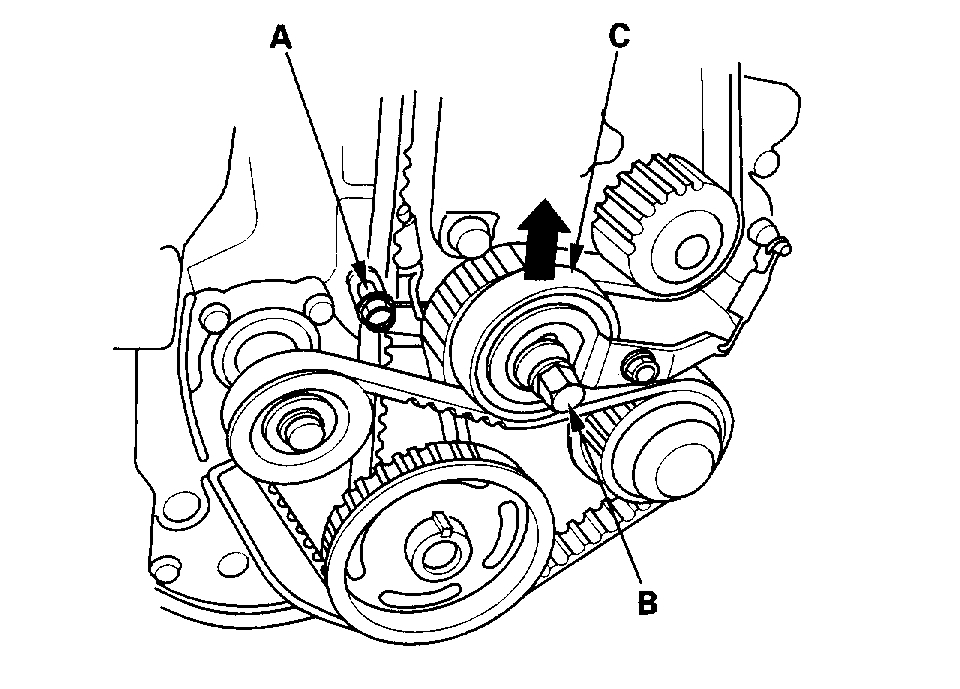
20. Release tension from the balancer belt and the timing belt:
1 Loosen the adjusting nut (A) 2/3 - 1 turn.
2 Push the balancer belt tensioner (B) up to take tension off the balancer belt.
3 Push the timing belt tensioner (c) down to take tension off the timing belt.
4 Retighten the adjusting nut (A).
21. Remove the balancer belt.
22. Remove the timing belt.
Installation
Special Tools Required
Holder Handle 07JAB-001020A
Holder Attachment, 50 mm, Offset 07MAB-PY3010A
Socket, 19 mm 07JAA-001020A or a commercially available 19 mm socket
NOTE:
If you are installing the timing belt and the balancer belt, go to step 1.
If you are installing only the balancer belt, go to step 7.
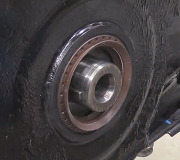
1. Remove and clean the balancer belt drive pulley.
2. Clean the timing belt pulleys, and the upper and lower timing cover.
Pic 12
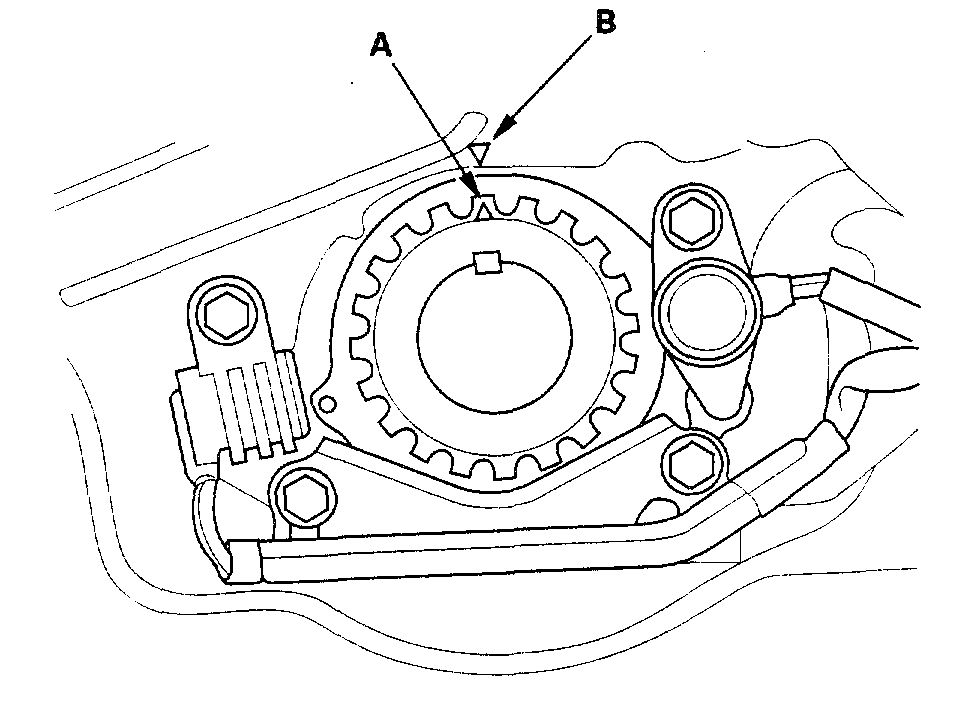
3. Set the crankshaft to TDC. Align the dimple (A) on the tooth of the timing belt drive pulley with the pointer (B) on the oil pump.
Pic 13
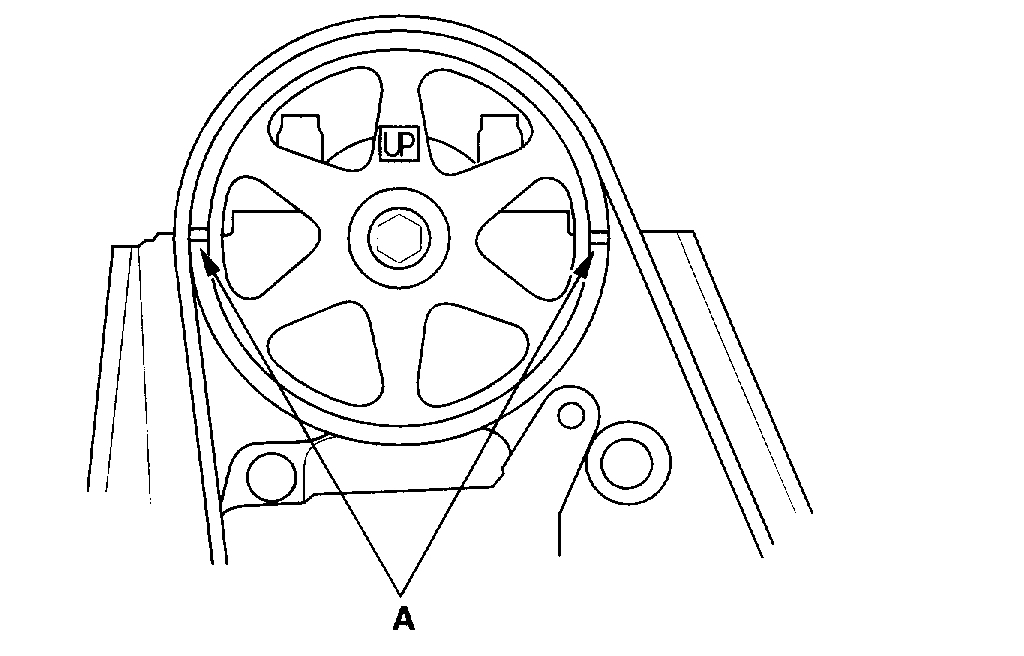
4. Clean the camshaft pulley and set it to TDC.
1 The "UP" mark (A) on the camshaft pulley should be at the top.
2 Align the TDC grooves (B) on the pulley with the too edge of the head.
Pic 14
5. Install the timing belt in a counterclockwise sequence, starting with the drive pulley.
1 Drive pulley (A).
2 Tensioner pulley (B).
3 Water pump pulley (C).
4 Camshaft Pulley (D).
6. Loosen and retighten the adjusting nut to tension the timing belt.
7. Clean any oil off both faces of the balancer belt drive pulley.
8. Check the lower cover rubber seal for cracks and other damage.
NOTE:
If the rubber seal is coming off, apply liquid gasket to the lower cover and reinstall the rubber seal. Wipe off any liquid gasket that is pressed out.
When replacing the rubber seal, clean the lower cover groove, cut the repair rubber seal to length, and put the rubber seal into the groove evenly.
9. Install the balancer belt drive pulley and the lower cover.
10. Temporarily install the crankshaft pulley and bolt.
11. Rotate the crankshaft pulley five or six turns counterclockwise to seat the timing belt on the pulleys.
Pic 15
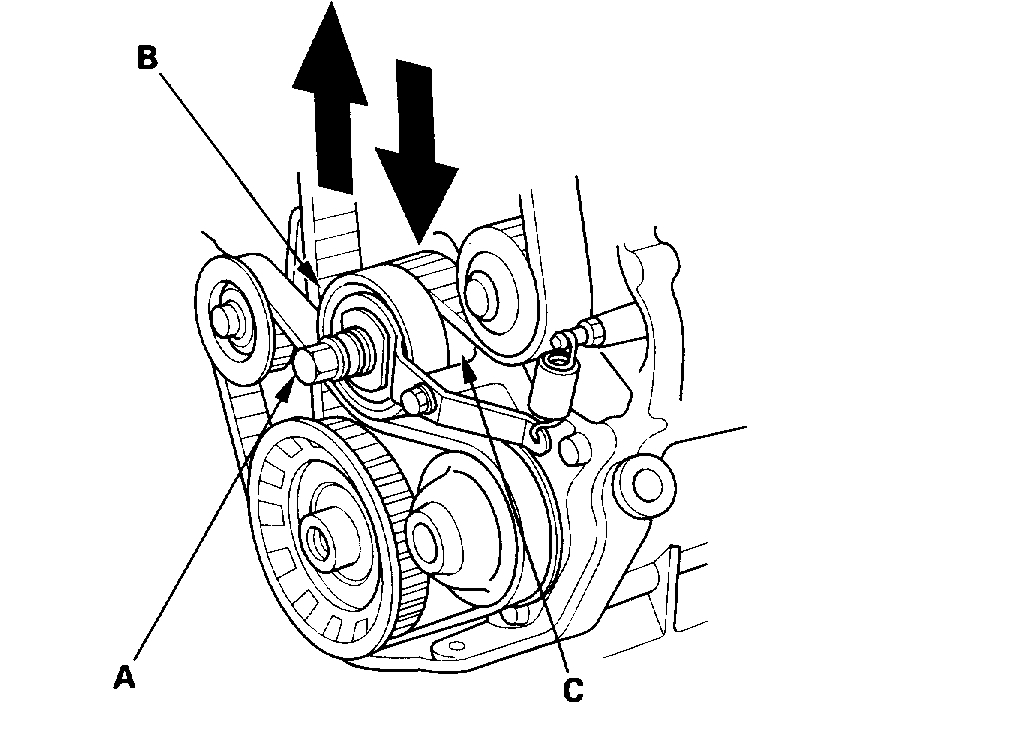
12. Adjust the belt tension.
1 Loosen the adjusting nut (A) 2/3 - 1 turn.
2 Rotate the crankshaft counterclockwise three teeth on the camshaft pulley (B).
3 Tighten the adjusting nut to 44 Nm (4.5 kgf-m, 33 ft. Lbs.)
pic 16
13. Turn the crankshaft pulley so its TDC mark (A) lines up with the pointer (B).
Pic 17
14. Check the camshaft pulley marks.
If the camshaft pulley marks are also at TDC, go to step 15.
If the camshaft pulley marks are not at TDC, remove the timing belt and repeat steps 3, 4 and 5.
15. Remove the crankshaft pulley and the lower cover.
16. Turn the crankshaft to TDC again.
17. Lock the timing belt adjuster arm in place with one of the 6 mm timing cover bolts.
18. Loosen the adjusting nut 2/3 - 1 turn, and make sure the balancer belt tensioner moves freely. Then push the tensioner up and retighten the adjusting nut.
Pic 18
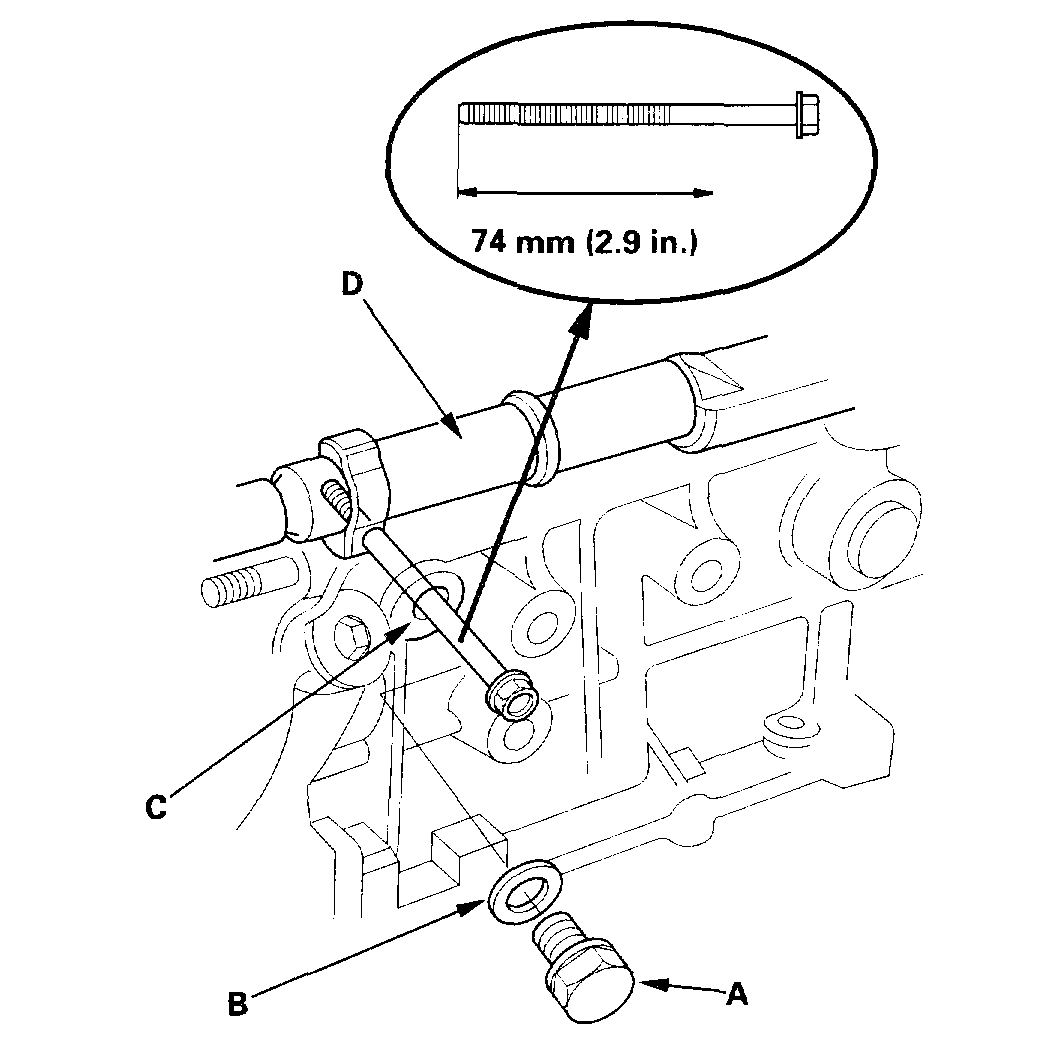
19. Align the rear balancer shaft pulley with a 6 x 100 mm bolt (or equivalent).
1 Remove the bolt (A) and washer (B) from the maintenance hole (C).
2 Scribe a line on a 6 x 100 mm bolt, 74 mm (2.9 inch) from the end.
3 Insert the bolt in the maintenance hole and into the hole in the balancer shaft (D) up to the line you scribed.
Pic 19
20. Align the groove (A) on the front balancer shaft with the pointer (B) on the oil pump housing as shown.
21. Install the balancer belt. Loosen the adjusting nut 2/3 - 1 turn to tension the balancer belt. Retighten the bolt.
22. Remove the 6 x 100 mm bolt from the maintenance hole and reinstall the sealing bolt. Tighten the bolt to 29 Nm (3.0 kgf m, 22 ft. Lbs.).
23. Adjust the balancer belt.
1 Temporarily reinstall the crankshaft pulley.
2 Loosen the adjusting nut 2/3 - 1 turn.
3 Turn the crankshaft pulley 1 turn counterclockwise, then tighten the adjusting nut.
24. Remove the 6 mm bolt from the timing bolt adjuster arm.
25. Check the lower cover rubber seal for cracks and other damage.
NOTE:
If the seal is coming off, reattach it with liquid gasket. Wipe off any excess liquid gasket.
When replacing the seal, clean out the groove in the cover, cut the repair strip to length, and press the new piece into the groove.
26. Remove the crankshaft pulley and reinstall the lower cover.
27. Install the rubber seal around the adjusting nut.
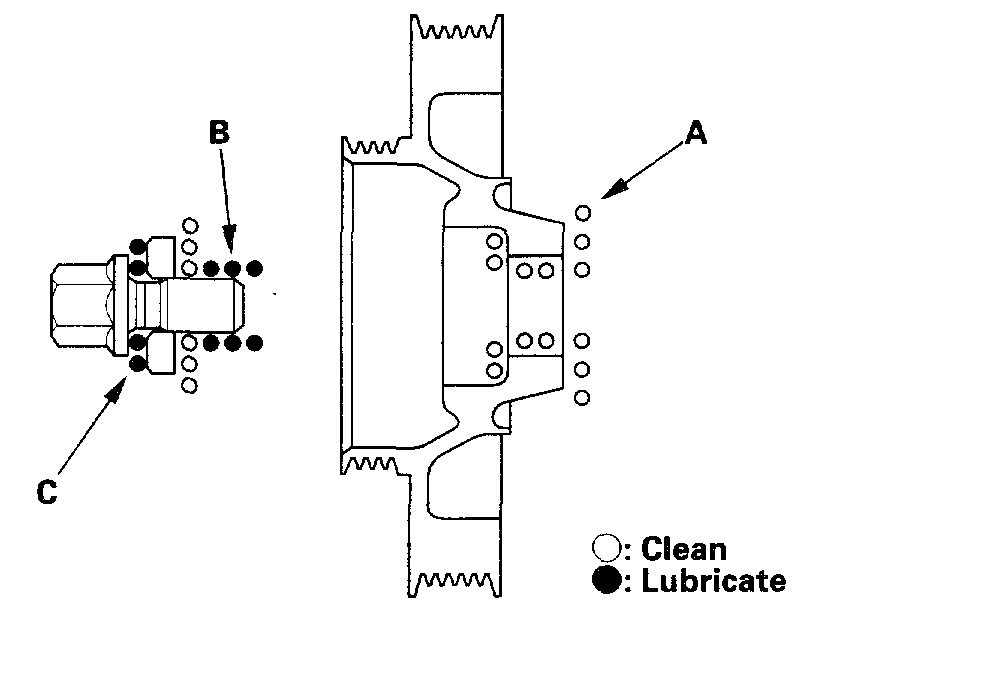
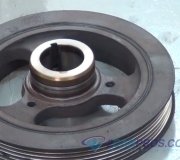
28. Clean the crankshaft pulley bolt and washer.
Pic 20
29. Clean all oil off the inside face (A) of the crankshaft pulley, and apply lubricant to the pulley bolt (B) and washer (C).
Pic 21
30. Install the crankshaft pulley, and hold with holder handle (a) and holder attachment (B).
31. Tighten the bolt to 245 Nm (250 kgf-m, 181 ft. Lbs.) With a torque wrench and 19 mm socket (c). Do not use an impact wrench.
Pic 22
32. Install the dipstick and tube (A) with a new O-ring (B).
Pic 23
33. Install the upper cover.
34. Install the cylinder head cover.
35. Install the alternator bracket.
36. Install the alternator.
37. Connect the alternator harness.
38. Install and adjust the power steering pump belt.
39. Install and adjust the alternator belt.
Pic 24
40. Install the upper bracket (A), then tighten the bolt and nuts in the numbered sequence shown.
41. Install the stop (B).
42. Install the battery. Clean the battery posts and cable terminals with sandpaper, then assemble them and apply grease to prevent corrosion.
43. Enter the anti-theft code for the radio, then enter the customer's radio station presets.
_____________________________
Let me know if this helps. If it is a different engine, let me know.
Take care,
Joe
Images (Click to make bigger)
Tuesday, December 29th, 2020 AT 11:27 PM