If you see any corrosion inside the cable, replace it. That means the entire cable is corroded.
Roy
REMOVAL
1. Turn the ignition switch to the OFF position. Be certain that all electrical accessories are turned OFF.
2. Disconnect and isolate the remote battery negative cable terminal.
3. Remove the battery from the vehicle.
4. One at a time, trace the battery cable retaining pushpins, fasteners and routing clips until the cables are free from the vehicle.
5. Remove the battery cables from the engine compartment.
INSTALLATION
1. Position the battery cables in the engine compartment.
2. One at a time, install the battery cable retaining pushpins, fasteners and routing clips until the cables are installed exactly where they were in the vehicle.
3. Install the battery in the vehicle.
4. Connect the remote battery negative cable terminal.
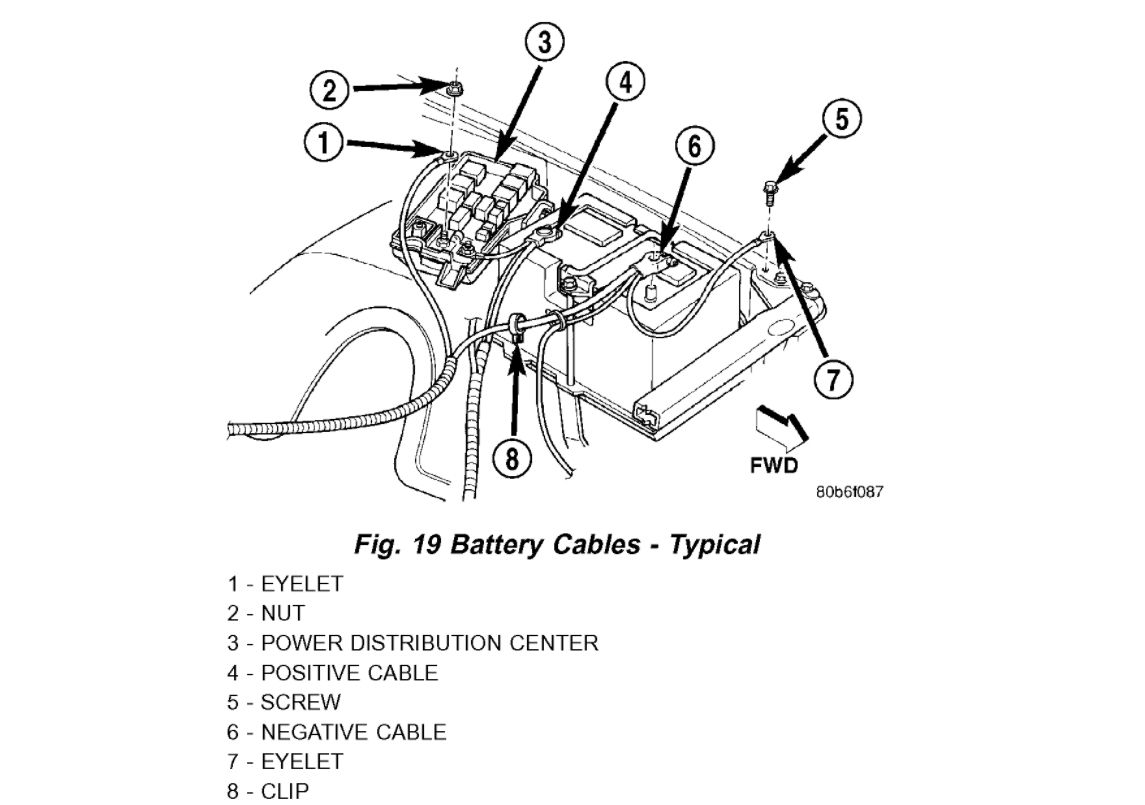
BATTERY CABLES
The battery cables (Fig. 19) are large gauge, stranded copper wires sheathed within a heavy plastic or synthetic rubber insulating jacket. The wire used in the battery cables combines excellent flexibility and reliability with high electrical current carrying capacity Refer to Wiring Diagrams for the location of the proper battery cable wire gauge information.
The battery cables cannot be repaired and, if damaged or faulty they must be replaced. Both the battery positive and negative cables are available for service replacement only as a unit with the battery positive cable wire harness or the battery negative cable wire harness, which may include portions of the wiring circuits for the generator and other components on some models.
The battery cables connect the battery terminal posts to the vehicle electrical system. These cables also provide a return path for electrical current generated by the charging system for restoring the voltage potential of the battery The female battery terminal clamps on the ends of the battery cable wires provide a strong and reliable connection of the battery cable to the battery terminal posts. The terminal pinch bolts allow the female terminal clamps to be tightened around the male terminal posts on the top of the battery. The eyelet terminals secured to the ends of the battery cable wires opposite the female battery terminal clamps provide secure and reliable connection of the battery to the vehicle electrical system.
Gasoline Engine Battery Cables
Gasoline engine models feature a stamped brass clamping type female battery terminal crimped onto one end of the battery cable wire and then solder-dipped. A square headed pinch-bolt and hex nut are installed at the open end of the female battery terminal clamp. The battery positive cable also includes a red molded rubber protective cover for the female battery terminal clamp. Large eyelet type terminals are crimped onto the opposite end of the battery cable wire and then solder-dipped. The battery positive cable wires have a red insulating jacket to provide visual identification and feature a larger female battery terminal clamp to allow connection to the larger battery positive terminal post. The battery negative cable wires have a black insulating jacket and a smaller female battery terminal clamp.
The battery positive cable terminal clamp is crimped onto the ends of two wires. One wire has an eyelet terminal that connects the battery positive cable to the B(+) terminal stud of the Power Distribution Center (PDC), and the other wire has an eyelet terminal that connects the battery positive cable to the B(+) terminal stud of the engine starter motor solenoid. The battery negative cable terminal clamp is also crimped onto the ends of two wires. One wire has an eyelet terminal that connects the battery negative cable to the vehicle powertrain through a stud on the front of the left engine cylinder head. The other wire has an eyelet terminal that connects the battery negative cable to the vehicle body through a ground screw on the left front fender inner shield, just ahead of the battery. An additional ground wire with two eyelet terminals is used to provide ground to the vehicle frame. One eyelet terminal of this ground wire is installed under the head of the battery negative cable terminal clamp pinch-bolt, and the other eyelet terminal is secured with a ground screw to the outer surface of the left frame rail, below the battery.
Image (Click to make bigger)
Tuesday, November 3rd, 2020 AT 7:08 AM