1) DTC P0340 This code indicates error has been detected in CMP sensor circuit. Possible causes for this fault are:
* CID circuit open or shorted wiring harness.
* PWR GND or VPWR circuit open (Hall Type CMP).
* SIG RTN circuit open (Variable Reluctance Type CMP).
* Faulty CMP sensor.
* Faulty ICM.
* Faulty PCM.
If engine starts, go to step 2). If engine does not start, go to CIRCUIT TEST A
.
2) Attempt To Generate DTC P0340 Clear PCM memory. Start engine. Raise engine speed to 1500 RPM for 10 seconds. Return to idle speed. Raise speed to 1500 RPM for 10 seconds again. Turn ignition off. Perform QUICK-TEST to retrieve Continuous Memory DTCs. If DTC P0340 is not present, go to CIRCUIT TEST Z. If DTC P0340 is present, go to next step for Hall Type CMP or step 5) for Variable Reluctance Type CMP. 3) Check VPWR Circuit Voltage Turn ignition off. Disconnect CMP wiring harness connector. Turn ignition on. Measure voltage between VPWR terminal at CMP sensor wiring harness connector and negative battery terminal. If voltage is 10.5 volts or more, go to next step. If voltage is less than 10.5 volts, repair open in VREF circuit. Clear PCM memory and repeat QUICK TEST. 4) Check PWR GND To CMP Sensor Turn ignition off. Ensure CMP sensor is disconnected. Measure resistance between PWR GND circuit at CMP sensor wiring harness connector and negative battery terminal. If resistance is less than 5 ohms, go to next step. If resistance is 5 ohms or more, repair open in PWR GND circuit. Clear PCM and repeat QUICK TEST.
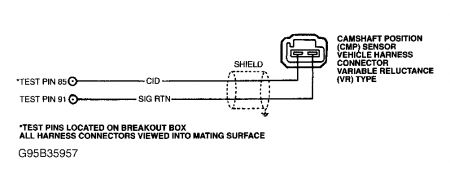
5) Check Resistance Of CID Circuits Leave ignition off. Disconnect PCM 104-pin connector. Inspect for damaged terminals and repair if necessary. Install EEC-V Breakout Box (014-000950), leaving PCM disconnected. Measure resistance between test pin No. 85 (CID) at breakout box and CID terminal at CMP sensor wiring harness connector. Also measure resistance as follows:
? On all variable reluctance type, also measure resistance between test pin No. 91 (SIG RTN) and SIG RTN terminal at CMP sensor wiring harness connector.
If each resistance measurement is less than 5 ohms, go to next step. If either resistance is 5 ohms or more, repair open circuit. Clear PCM memory and repeat QUICK TEST.
6) Check CID Circuit For Short To Power Leave CMP sensor disconnected. Turn ignition on. Measure voltage between test pin No. 85 and test pins No. 51 and 103 (PWR GND) at breakout box. If voltage is less 1.0 volt, go to next step. If voltage is 1.0 volt or more, repair CID circuit short to power. Clear PCM memory and repeat QUICK TEST.
7) Check CID Circuit For Short To Ground Turn ignition off. Leave CMP sensor and PCM disconnected. Disconnect scan tester from DLC (if applicable). Measure resistance between test pin No. 85 and test pins No. 51, 103 (PWR GND) and 91 (SIG RTN) at breakout box. If resistance is 10,000 or more, go to next step. If any resistance measurement is less than 10,000 ohms, repair short to ground or SIG RTN in CID circuit. Clear PCM memory and repeat QUICK TEST.
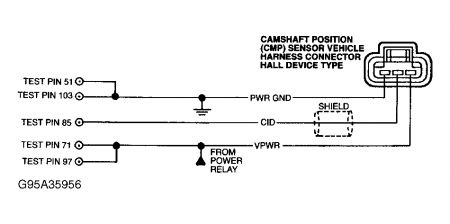
1) 8) Check For Short In PCM Leave ignition off and CMP sensor disconnected. Connect PCM to breakout box. Measure resistance between test pin No. 85 and test pins No. 23, 51, 71, 91, 97 and 103 at breakout box. If each resistance measurement is 500 ohms or more, go to next step for Variable Reluctance type CMP or step 10) for Hall type CMP. If any resistance measurement is less than 500 ohms, replace PCM and repeat QUICK TEST.
2) 9) Check CMP Sensor Output Turn ignition off. Reconnect CMP sensor wiring harness connector. Set DVOM on AC scale to monitor less than 5 volts. Start engine. Measure voltage between test pins No. 85 and test pins No. 51 and 103 while varying engine speed. If voltage varies more than 0.1 volt, replace PCM and repeat QUICK TEST. If voltage does not vary more than 0.1 volt, replace CMP sensor and repeat QUICK TEST.
3) 10) Check CMP Sensor Output Turn ignition off. Disconnect PCM. Ensure CMP sensor is installed properly. Reconnect CMP sensor wiring harness connector. Using starter, bump engine (do not allow engine to start) for at least 10 engine revolutions. Measure voltage between test pins No. 85 and test pins No. 51 and 103. If voltage switches from below 2 volts to more than 8 volts, replace PCM and repeat QUICK TEST. If voltage does not switch as specified, replace CMP sensor and repeat QUICK TEST.
.
Sunday, November 2nd, 2008 AT 5:43 AM