AXLE SHAFT & BEARING
CAUTION:DO NOT damage rubber "O" rings in groves on axle shafts, under "C" locks.
Removal (With Rear Disc Brakes)
On vehicles with air suspension, turn air suspension switch to OFF position. On all vehicles, raise and support vehicle. Remove wheel assemblies. Remove housing cover, and drain lubricant. Remove rear brake caliper retaining bolts, and wire caliper aside. Remove rear brake rotor.
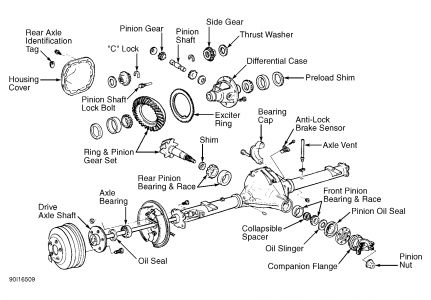
Remove and discard differential pinion shaft lock bolt. Remove pinion shaft. See Fig. 2 . Push axle shaft inward and remove "C" locks. Remove axle shaft, being careful not to cut axle seal. Using a Axle Wheel Bearing Puller (T83T-1225-A) and Slide Hammer (T50T-100-A), remove bearing and oil seal as a unit.
Fig. 2: Exploded View Of Axle Assembly (Typical)
Courtesy of FORD MOTOR CO.
Removal (With Rear Drum Brakes)
On vehicles with air suspension, turn air suspension switch to OFF position. On all vehicles, raise and support vehicle. Remove wheel assemblies. Remove housing cover, and drain lubricant. Remove brake drum.
Remove and discard differential pinion shaft lock bolt. Remove pinion shaft. See Fig. 2 . Push axle shaft inward and remove "C" locks. Remove axle shaft, being careful not to cut axle seal. Using a Axle Wheel Bearing Puller (T83T-1225-A) and Slide Hammer (T50T-100-A), remove bearing and oil seal as a unit.
Installation (All Models)
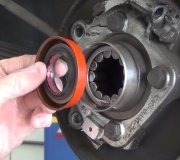
Lubricate bearing with rear axle lubricant. Using a driver, install bearing. Lubricate lip of oil seal with Premium Long-Life Grease (XG-1-C). Using Axle Seal Replacer (T97T-1177-B) and Handle (T80T-4000-W), install oil seal. If seal becomes cocked during installation, remove seal and replace with a NEW one.
Carefully insert axle in housing to avoid damaging oil seal. Install "C" locks, and push shafts outward to seat locks in counterbore of differential side gears. Install pinion shaft. Apply Loctite to NEW pinion shaft lock bolt, and tighten to specification. See TORQUE SPECIFICATIONS .
Clean gasket mating surfaces and apply 1/8 - 3/16" wide bead of silicone sealant on axle housing cover. Install housing cover. Tighten cover bolts to specification in a crisscross pattern. See TORQUE SPECIFICATIONS .
Fill differential with proper lubricant until fluid level is about 1/4" below bottom of filler plug hole. See LUBRICATION . To complete installation, reverse removal procedures.
AXLE HOUSING ASSEMBLY
Removal & Installation (With 8.8" & 9.75" Ring Gear)
WARNING:DO NOT remove an air spring or any component holding air spring under any circumstance when air spring is pressurized.
Raise and support vehicle. Release parking brake. Scribe alignment marks on companion flange and drive shaft yoke for installation reference. Remove 4 drive shaft bolts, and wire drive shaft aside. Remove axle shafts. See AXLE SHAFT & BEARING .
Disconnect rear ABS sensor harness connector. Disconnect vent hose. Disconnect rear brake line junction block from axle housing. DO NOT disconnect brake lines from junction block. Disconnect parking brake cable brackets and brake line from axle housing. Remove backing plate bolts, and wire backing plates aside.
Position a suitable jack under rear axle housing and strap housing to jack. Remove lower shock bolts. Remove U-bolt assemblies. Remove axle housing from vehicle. To install, reverse removal procedure. Tighten nuts and bolts to specification. See TORQUE SPECIFICATIONS .
Removal & Installation (With 10.25" Ring Gear)
Raise and support vehicle. Release parking brake. Remove rear wheel assemblies. Disconnect parking brake cable from support bracket. Disconnect both parking brake cables from parking brake cable equalizers (both side).
Disconnect parking brake cable assembly under vehicle, next to leaf spring. Secure parking brake cables to axle housing. Disconnect rear ABS sensor harness connector. Scribe alignment marks on companion flange and drive shaft yoke for installation reference.
Remove 4 drive shaft bolts and wire drive shaft aside. Disconnect rear axle brake line and vent tube at frame. Position a suitable jack under rear axle housing and strap housing to jack. Remove lower shock bolts.
Remove U-bolt assemblies. Remove axle housing from vehicle. To install, reverse removal procedure. Bleed brake system. Tighten nuts and bolts to specification. See TORQUE SPECIFICATIONS .
PINION FLANGE & OIL SEAL
NOTE:Pinion flange and oil seal replacement affects bearing preload. Preload must be carefully reset during reassembly.
Removal
Raise and support vehicle. Scribe alignment marks on pinion flange and drive shaft end yoke for installation reference. Remove drive shaft bolts, and wire drive shaft aside. Using an INCH-lb. torque wrench, measure and record torque required to rotate pinion through several revolutions.
Mark pinion flange in relation to pinion shaft for installation reference. Hold pinion flange and remove pinion nut. Using Puller (T77FP-4220-B1), remove pinion flange. Using screwdriver, remove pinion seal.
Installation
NOTE:If oil seal becomes cocked during installation, remove seal and install new oil seal.
Ensure pinion shaft splines are free of burrs. Remove burrs with fine crocus cloth if necessary. Lubricate area between oil seal lip, and install oil seal into axle housing using Pinion Oil Seal Replacer (T83T-4676-A).
Align marks on pinion flange and pinion. Apply a small amount of lubricant to pinion flange splines. Install pinion flange and NEW pinion nut. Hold pinion flange and gradually tighten nut while rotating pinion.
NOTE:If desired preload is exceeded, a NEW collapsible spacer must be installed. Tighten nut to obtain proper preload.
Check pinion bearing preload often, until correct preload is obtained. See DIFFERENTIAL SPECIFICATIONS . DO NOT back off pinion nut to reduce preload. Connect rear end of drive shaft to pinion flange, aligning scribed marks.
Apply locking compound to drive shaft bolt threads and tighten bolts to specification. See TORQUE SPECIFICATIONS . Fill differential with proper lubricant until fluid level is about 1/4" below bottom of filler plug hole. See LUBRICATION . To complete installation, reverse removal procedures.
Monday, May 17th, 2021 AT 1:19 PM