Removal
Disconnect negative battery cable. Wedge a wood block (approximately 7" long) between clutch pedal and floor to hold clutch pedal up beyond its normal position. Disconnect clutch cable at release fork.
Remove clutch cable casing from rib on transaxle case. Remove 2 upper transaxle-to-engine bolts. Remove top bolt that secures air management valve bracket to transaxle (if necessary). Raise and support vehicle.
Remove nut and bolt securing lower control arm ball joint to steering knuckle assembly. Discard nut and bolt. Repeat procedure on other side. Using Half-Shaft Remover (D83P-4026-A), pry lower control arm away from knuckle. Repeat procedure on other side.
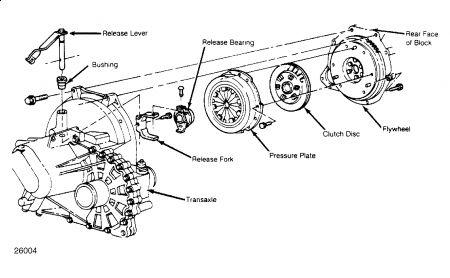
Fig. 1: Exploded View of FWD Clutch Assembly
Courtesy of FORD MOTOR CO.
CAUTION:To prevent damage to oil seal, use care when using pry bar to remove CV joint.
Using large pry bar, pry left side inboard CV joint assembly from transaxle. Install Transaxle Plugs (T81P-1177-B) to prevent transaxle from draining. Swing steering knuckle and half-shaft outward from transaxle. Secure half-shaft (using wire) in a near level position to prevent damage. Repeat procedure on other side.
Disconnect back-up light switch on top of transaxle. Remove 3 starter bolts and remove starter. Remove shift mechanism-to-shift shaft attaching nut and bolt. Disconnect mechanism from shift shaft. Remove shift mechanism stabilizer bar from transaxle and remove control selector indicator switch arm from shaft. Remove 2 stiffener braces from front of bellhousing and remove speedometer cable. Remove all subframe-to-engine mount bolts, support subframe remove remaining subframe-to-body bolts and lower subframe.
Secure transaxle jack under transaxle and remove 2 bolts attaching rear support mount to floorpan brace. Loosen nut on bottom of front support mount. Remove 3 bolts securing front mount to transaxle. Lower transaxle until it clears rear mount. Support engine block with a screw type jack stand and wood block under oil pan. Remove 4 engine-to-transaxle bolts and lower transaxle from vehicle.
If same pressure plate is to be installed, index mark pressure plate to flywheel. On 1.8L models, install Flywheel Locking Tool (T84P-6375-A). On all models, loosen pressure plate attaching bolts evenly in a crisscross fashion to avoid distorting cover. Remove pressure plate and clutch disc from flywheel. Mount a dial indicator so tip of indicator is against outer clutch disc-to-flywheel contact surface of flywheel. Position pry bar between rear crankshaft flywheel mounting flange and engine block.
Pry crankshaft fully rearward. With crankshaft still fully rearward, rotate crankshaft one complete revolution while noting variation of reading on dial indicator which indicates runout
If runout exceeds specification, use a crisscross sequence to loosen flywheel mounting bolts. Remove flywheel. Repeat runout reading procedure as in step 8), except place dial indicator tip against crankshaft rear flange face. If crankshaft rear flange is cause of excessive runout, remachine crankshaft rear flange face or replace crankshaft.
Remove pin attaching release bearing to clutch release fork. Remove set bolt attaching clutch release fork to clutch release shaft on transaxle. Slide clutch release shaft assembly out from transaxle.
Installation
Install clutch disc with flatter side toward flywheel as marked. Position clutch disc and align dowel pins of pressure plate onto flywheel. Start pressure plate bolts but do not tighten to flywheel. Install clutch disc aligner into crankshaft pilot bearing.
With clutch aligned, tighten pressure plate bolts in a crisscross sequence until they are just seated. Tighten pressure plate bolts to specification and remove clutch aligner.
Before installation of transaxle, lubricate outside diameter of transaxle front bearing retainer, inside of release bearing, clutch release fork fingers and contact surface of release shaft. Remove flywheel locking tool on 1.8L models.
To complete installation of transaxle, reverse removal procedure. Use new nut and bolt when attaching lower control arm ball joint to steering knuckle. Reinstall subframe and all subframe-to-engine mount bolts. Tighten to 60-86 ft.lbs (81-116 N.m).
Saturday, July 4th, 2009 AT 6:34 AM


