Loosen the fuel filler cap.
Relieve the fuel system pressure on your vehicle.
Check for proper ground on the fuel tank. Clip a 12V test light to a power source. If you cannot access one near the fuel tank, use a long jumper wire to the positive terminal of the battery. Then touch the fuel tank with the test light pick. If the light glows with a bright light, you have a good ground; otherwise, your broken ground connection to the tank might be the cause for the fuel sending unit malfunction. Repair as necessary.
Check for incoming voltage to the sending unit. Clip the 12V test light to a good ground on the vehicle. Any unpainted, metal part of the car's under-body will do. Then back probe the sending-unit power wire. If the light glows with a bright light, the unit is receiving power; otherwise, the power source is disconnected. Check the circuit and make the necessary repairs.
Disconnect the ground battery cable using a wrench.
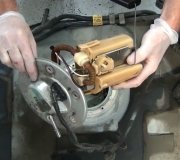
Gain access to the fuel-sending unit on the fuel tank and disconnect hoses and electrical connectors from the sending unit assembly.
Detach the fuel-sending unit from the fuel tank. On some models, you may unscrew the fuel sending assembly from the tank using a Phillips screwdriver; others require a tank-unit cam tool or spanner wrench.
Lift the fuel-sending unit off the tank and out of the vehicle.
Set your ohmmeter to the appropriate range to read the lowest and highest resistance on the sending unit. Check your service manual to obtain the resistance range on your particular unit.
Hook the ohmmeter leads to the sending unit positive and negative wires. You do not have to observe polarity for this test.
Turn on the ohmmeter and slide the sending unit's float arm from the lowest to the highest position as you check your meter reading. The resistance reading on the meter should go down smoothly as the float travels up to its highest point. Move the float down, and the reading should go up smoothly on the meter. If you receive erratic readings or readings not within the manufacturer specifications, replace the sending unit.
Place the sending unit float next to your ear and shake it. If you can hear liquid inside the float, replace the float or sending unit.
Wednesday, March 10th, 2010 AT 5:12 PM