Engine overheating

Tiny
JOEY MAHARAJ
  • MEMBER
  • 2001 MITSUBISHI LANCER
  • 4 CYL
  • 2WD
  • AUTOMATIC
  • 60,000 MILES
Good day mechanics, 4g15 sohc, cs3 engine overheated. Needle went up 3/4 so I put on the blower to help with the temperature to drop. When I went home I checked to see if the fan was coming on, it wasn't. The next morning I started the vehicle and it ran fine everything was good went and did a diagnostic, water pump good fan module and motor good, every thing seems to be intact. So the technician told me to go and clean out the radiator because the he had checked it and the radiator was boiling up and not going down when he mash the X cable. So I went and take the radiator apart by a radiator tech and he said nothing wrong with the radiator, the fan working but it coming on and off, he said that the radiator boiling because it has air in the system and that the head gasket has a slight leak and is about to blow. So he told me to go back by the diagnostic place and let them do it over. When I went back they tested it over and yes the head gasket has gone, but before I took out the radiator to clean, the car had cut off while I was on the road. Note: temperature was good that time, so I went by a electrician and he tested the 2nd piston coil wire plug in on the harness and knock up some fuse box next to the battery and it run find never cutoff. I forgot to mention the car was cranking but not starting when I had cut off on the road. Can this be the engine not getting a good compression due to the head leaking air? Because there is no white residue on the engine oil cap and the radiator coolant level is full. Should I change the head gasket alone or the whole head and block need replacing? I know that the piston rings may have worn a little due to it overheating and that when changing head gasket u does have to shave the head and change valve seal, plug wire seals, tapet cover seals and check for crack in the block and piston. Any advice?
Tuesday, March 17th, 2020 AT 7:41 AM

2 Replies

Tiny
ASEMASTER6371
  • MECHANIC
  • 52,797 POSTS
Good morning,

If it is the head gasket, and it sounds like it is, you will need to remove the head and send it to a machine shop and have it checked for cracks and being warped.

If it all is good, then you can put it back together.

If you get coolant in the cylinders, the engine will act like that.

Roy

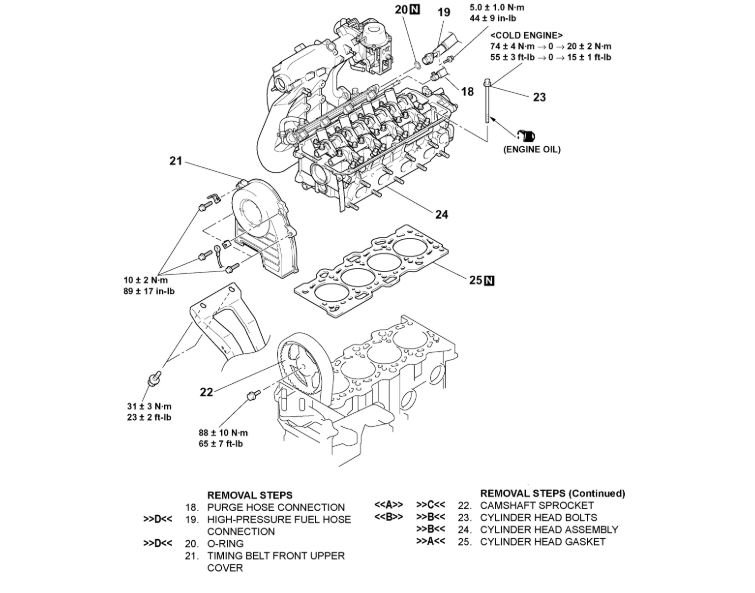
REMOVAL AND INSTALLATION

Required Special Tools:
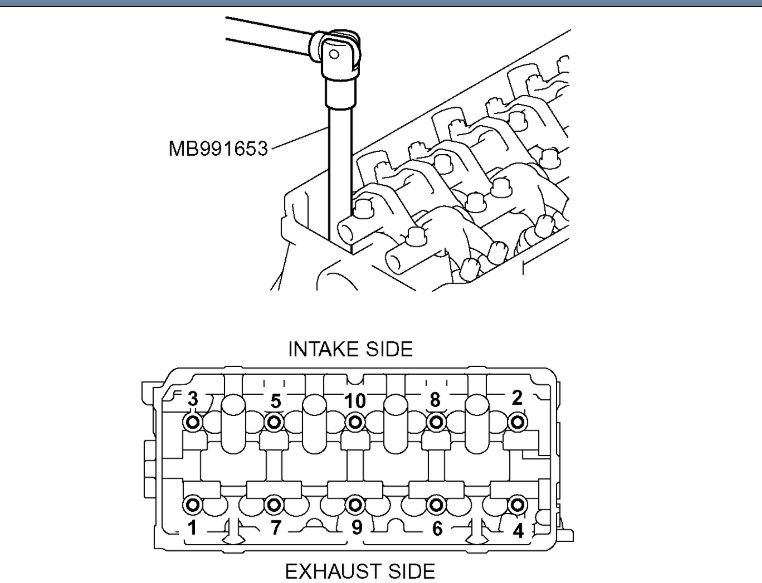
MB991653: Cylinder Head Bolt Wrench
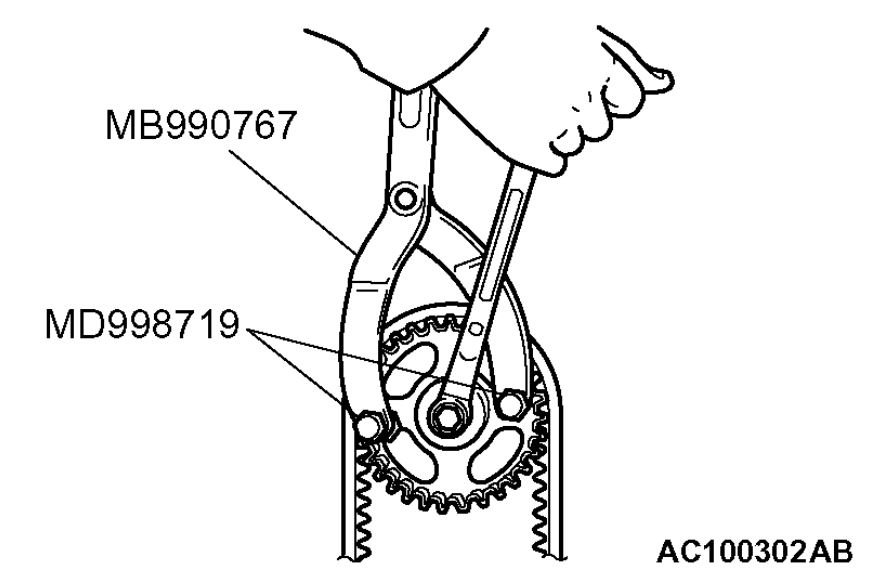
MB990767: End Yoke Holder
MD998719: Crankshaft Pulley Holder Pin

REMOVAL SERVICE POINTS
[[A]] CAMSHAFT SPROCKET REMOVAL

CAUTION: Always turn the crankshaft in the forward direction (clockwise).

ImageOpen In New TabZoom/Print

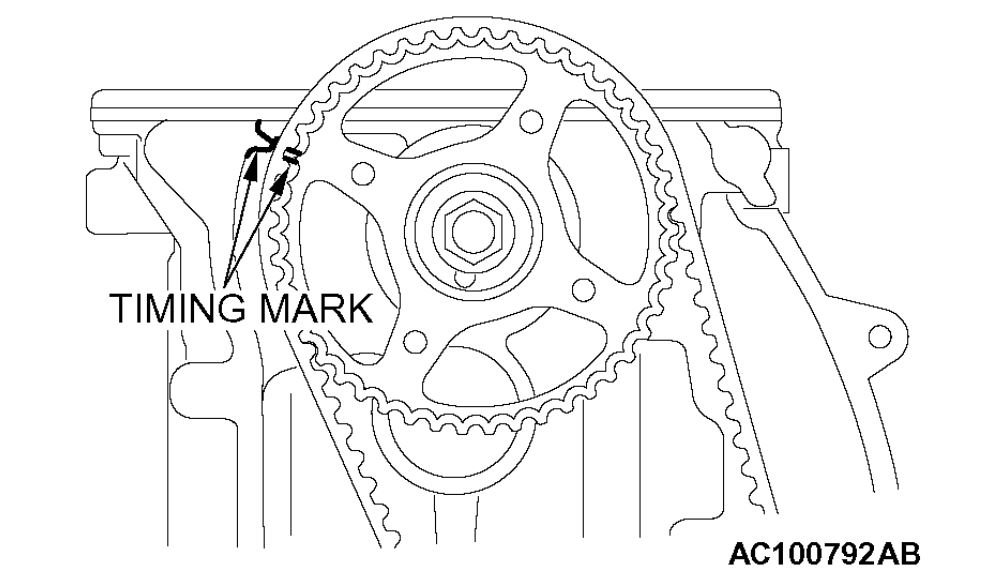
1. Turn the crankshaft in the forward direction (clockwise) to align the timing mark so that number 1 cylinder is at TDC on the compression stroke.

ImageOpen In New TabZoom/Print

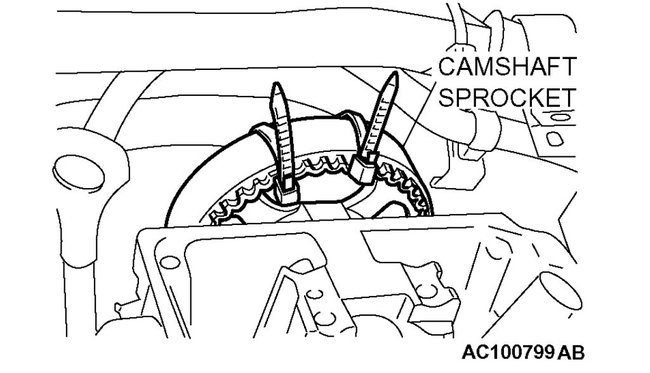
2. Secure the camshaft sprocket and the timing belt with tie-wraps to prevent slippage between the camshaft sprocket and the timing belt.

ImageOpen In New TabZoom/Print

3. Use special tools MB990767 and MD998719 to stop the camshaft sprocket from turning.

CAUTION: Do not turn the crankshaft after the camshaft sprocket is removed.

4. Remove the camshaft sprocket.

B]] CYLINDER HEAD BOLTS REMOVAL

CAUTION: Be careful not to damage or deform the plug guides when removing the cylinder head bolts. Plug guides cannot be replaced separately.

ImageOpen In New TabZoom/Print

Using special tool MB991653, loosen the bolts in two or three steps in the order of the numbers shown in the illustration, then remove the bolts. Remove the cylinder head assembly.

INSTALLATION SERVICE POINTS
]]A[[ CYLINDER HEAD GASKET INSTALLATION
1. Wipe off all oil and grease from the gasket mounting surface.
2. Match the shapes of the cylinder head holes with their respective cylinder head gasket holes.

]]B[[ CYLINDER HEAD ASSEMBLY/CYLINDER HEAD BOLTS INSTALLATION

imageOpen In New TabZoom/Print

1. Before installing the cylinder head bolts, check if length (A) is within limits. If it is outside the limit, replace the bolts.
Limit (A): 96.4 mm (3.8 inches)
2. Apply a small amount of engine oil to the thread section and the washer of the cylinder head bolt.

CAUTION:
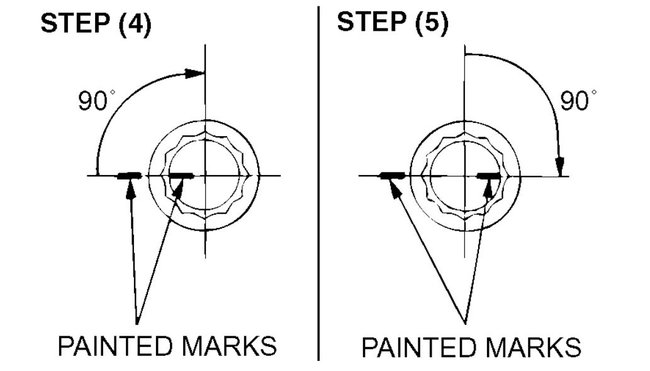
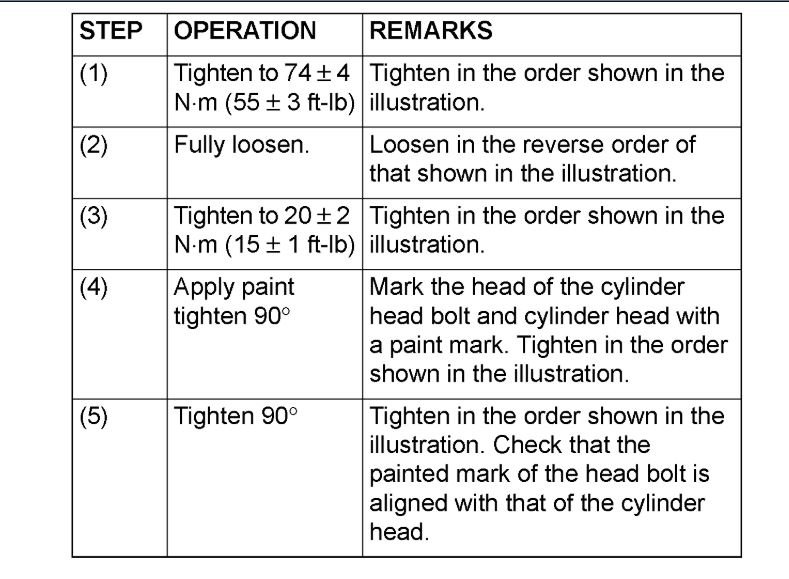
Always tighten cylinder head bolts at a 90 degree angle.
If it is less than 90 degree angle, the bolt will loosen.
If it is more than 90 degree angle, remove the head bolt and repeat the procedure from step 1.

ImageOpen In New TabZoom/Print

imageOpen In New TabZoom/Print

imageOpen In New TabZoom/Print

3. Using special tool MB991653, tighten the bolts by the following procedure.

C[[ CAMSHAFT SPROCKET INSTALLATION

imageOpen In New TabZoom/Print

Use special tools MD998719 and MB990767 in the same way as during removal to install the camshaft sprocket.

D[[ O-RING/HIGH-PRESSURE FUEL HOSE INSTALLATION

CAUTION: Do not allow engine oil to enter the fuel rail.

ImageOpen In New TabZoom/Print

1. Apply a small amount of new engine oil to the O-ring.
2. While turning the high-pressure fuel hose to the right and left, slide it into the fuel rail. Be careful not to damage the 0ring. After installing, check that the hose turns smoothly.
3. If the hose does not turn smoothly, the O-ring is probably binding. Disconnect the high-pressure fuel hose and check the O-ring for damage.
4. Re-insert the fuel rail and confirm the hose turns smoothly.
Was this
answer
helpful?
Yes
No
+1
Tuesday, March 17th, 2020 AT 8:12 AM
Tiny
SCGRANTURISMO
  • MECHANIC
  • 4,897 POSTS
Hello,

Okay, the good news here is the piston rings will not wear because the engine got a little hot. What usually happens when an engine overheats is that the aluminum cylinder head which has a much lower melting point than the cast iron block will warp due the heat and cause the head gasket to fail. If you are going to change the head gasket, you will need to have the cylinder head trued up at a machine shop, which usually costs around $20.00. I would recommend replacing the timing belt at this time as well since you are going to be there. If you are worried about your vehicle's piston rings being worn and leaking compression out that way, or are just curious to see where the head gasket is blown at. here is a link to a guide below explaining how to do a compression test:

https://www.2carpros.com/articles/how-to-test-engine-compression

Do a compression test and when you identify the problem cylinder, take a teaspoon of clean engine oil and dump down that cylinders spark plug hole and retest the compression in that cylinder. If the compression rises than the rings are the cause of the compression loss. If it stays the same, then the rings are not the cause of the compression loss. Please go through this guide and get back to us with what you find out. We can go from there.

Thanks,
Alex
2CarPros
Was this
answer
helpful?
Yes
No
+1
Tuesday, March 17th, 2020 AT 8:18 AM

Please login or register to post a reply.

Sponsored links