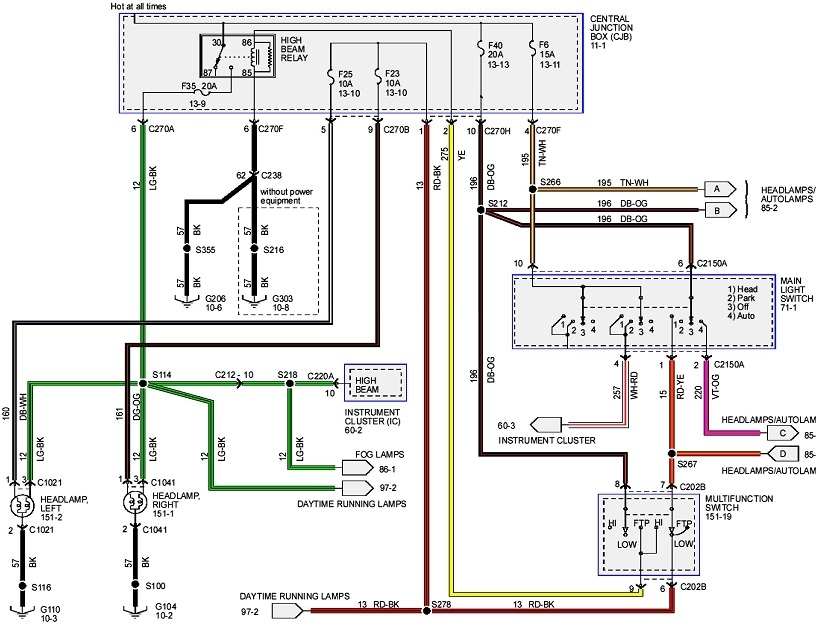
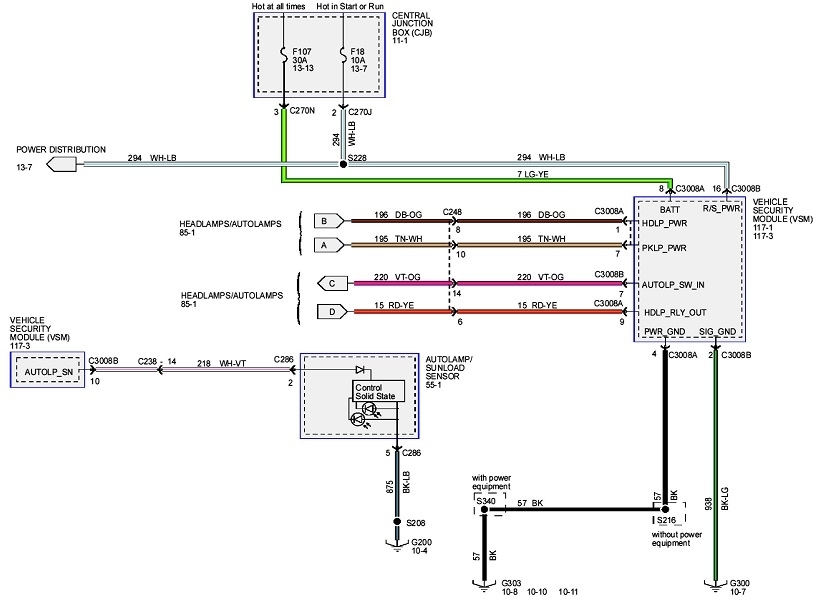
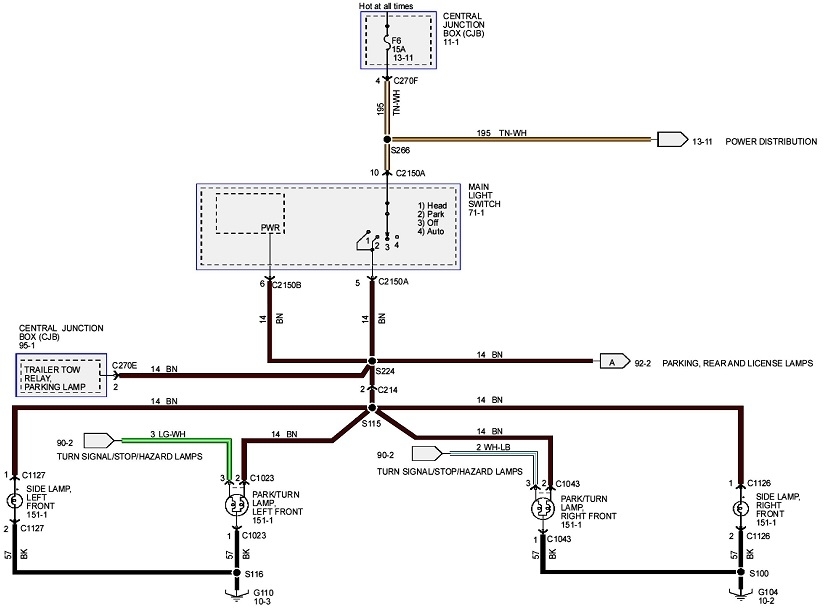
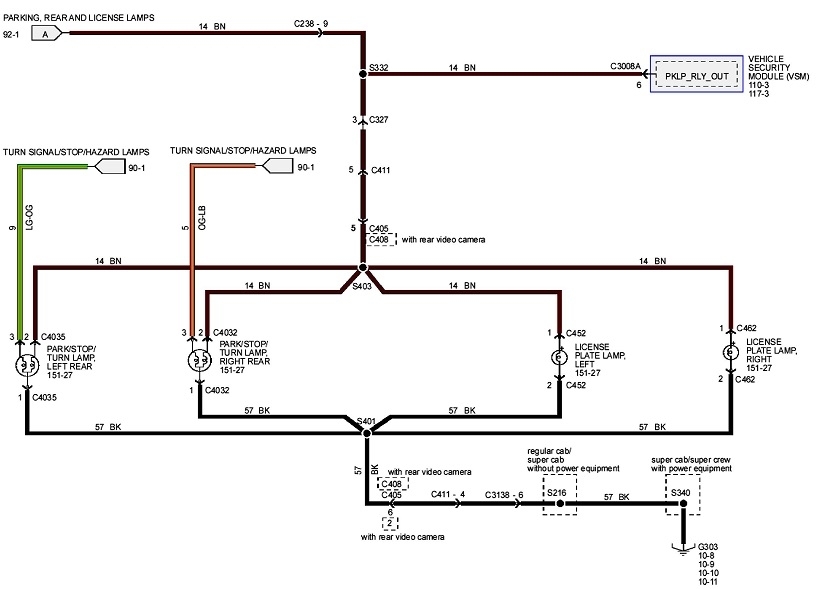
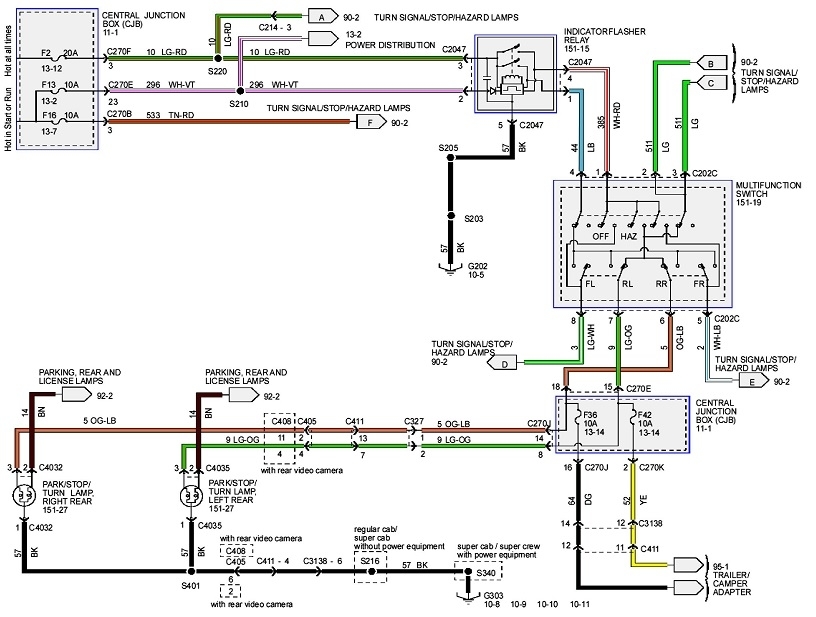
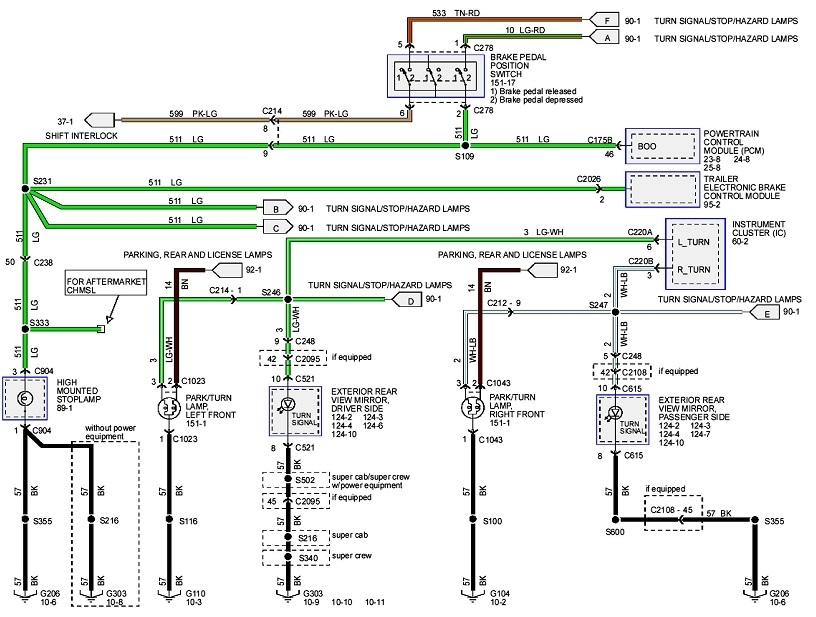
These first two diagrams are for the head lights. Second two are for the parking lights. Next two are for the turn signals. Don't worry if you don't know how to read them. I posted them in case we need them later. If you look on the left side of the first one and see the designation, "LG-BK", that means it's a light green wire with a black stripe, or "tracer".
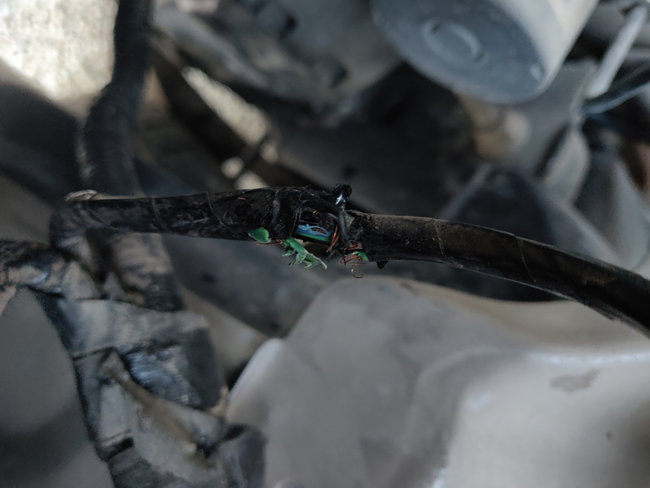
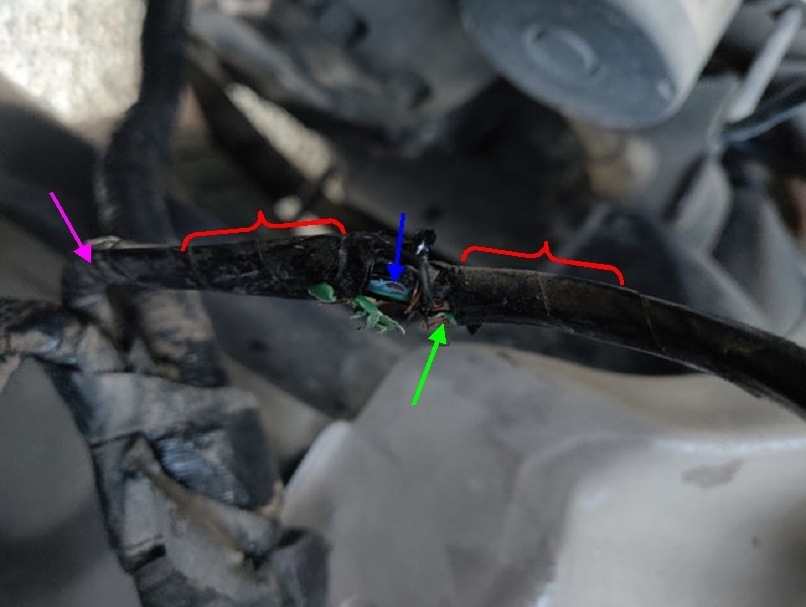
You posted a dandy photo that tells the whole story. This repair is not outside the capabilities of a competent do-it-yourselfer, but I have all kinds of pointers to help you make a quality repair. The first step is to remove the black plastic wrap I indicated with the red brackets. You'll find that is not electrical tape and it isn't sticky. I never use electrical tape under the hood or inside the vehicle as it will unravel into a gooey mess on a hot day. If this harness is near a tire, meaning down low, you might get away with sealing this with electrical tape when we're done. Heat isn't such a problem down there.
Next step is to pull out each wire that's cut. Use a side cutter, (wire cutter), to trim the ends, then I nip the insulation, then tug off about 3/8" inch, leaving the bare wire exposed. There's more to this story in a minute, but for starters, find a wire that is the same color on both sides of the break. Those two ends are going to be spliced back together. In some rare instances you may run into two different wires that are the same color. When that happens, most of the time one will be fatter than the other so you can tell them apart. GM is the one manufacturer that works really hard to make this confusing. I've already run into over a half dozen tan wires in one head lamp harness, and they're all for different functions. If you don't find any two wires of the same size and color, we shouldn't need these diagrams. The repair is just going to involve soldering the red wire to the red wire and the blue wire to the blue wire.
Next step is to slide on a piece of heat-shrink tubing onto one of the wires. Have enough of the black plastic wrap peeled off so you can slide the tubing on far enough from the bare wire that is doesn't melt and shrink from the heat of the soldering operation. If you can keep the tubing a good inch and a half away, that should be enough as long as the soldering doesn't take too long. The tubing should be roughly twice as long as the bare copper wire, or around an inch and a quarter to even as much as an inch and a half.
I prefer to slide the strands of each wire into each other, then press them flat. That only works if there's no tension pulling them apart when you let go of them. Another way is to twist the bared strands around each other like one of those twisty donuts. That provides the better mechanical connection which you should have before relying on the solder to provide the electrical connection. Either way, when you can let go of the joint and it stays together, feel for any sharp points of a strand sticking up. Careful, because they can smart when they poke you. Press those points down so they don't pierce the heat-shrink tubing later.
The heat-shrink tubing should be roughly twice the diameter of the wire's insulation. You can find an entire kit of various sizes and lengths at Harbor Freight Tools, any hardware store, auto parts store, and probably even Walmart. If you go to an auto parts store or any new-car dealer's parts department, you can get moisture-proof tubing, but at a much higher cost. This is very much preferred for use in the area you're working in. It has hot-melt glue that will ooze out and seal moisture from getting to the bare copper.
Now for the fun part. I use a small pencil-type soldering iron, but for this type of repair, a soldering gun will work well and maybe better. When the tip is hot, wipe it on something to clean off any old solder. The film that's left will be shiny silver. That's referred to as "tinning" the tip. It promotes good heat transfer which is essential. The goal is to heat the bare copper wire until solder on the other side gets hot enough to melt. It's common to touch the end of the roll of solder to the tip to get the heat transfer flowing faster, but the ultimate goal after that is we want the solder to melt on the other side of the joint. Once it melts on the wire, it will flow through the strands toward the heat source. That's why if you only touch the solder to the gun's tip, the solder will just pool there and not flow through the strands.
When it looks like the strands are fully saturated with solder, pull the gun away and be careful to not bump or shake the wire until the solder hardens. That only takes a few seconds, and you'll see the solder turn a dull gray. It takes about ten seconds before it's cool enough to touch. Feel again for any sharp points sticking up. I use a regular pair of pliers to squeeze them down.
Once you have no sharp points sticking up, slide the tubing over the joint and center it, then warm it with a lit match or a small hot air gun. You'll see it shrink and form to the joint. If you're using the moisture-proof stuff, remove the heat as soon as you see the glue squeeze out the ends. Heating it too much can lead to the tubing melting and splitting open, then you'll have to cut the joint out and start over.
That wire is done. You can move on to the next one the same way.
When I get involved with a large harness and dozens of broken wires, I like to splice and solder all of them first, and slide the heat-shrink tubing in place, but I don't warm it yet until I see all the functions working properly. My truck, for example, was a crash rebuilder and I had to fix almost 60 wires. I didn't realize that two of them were just slightly different in color. I mixed them up. Now I get a warning message on the dash that my left back-up light is burned out when it's the right one that doesn't work. I have to cut those apart some day to correct my mistake. Would have been real easy to take care of that if I hadn't warmed the tubing already.
The hardest part of these repairs is getting a solid splice. As such, you can't improve on the blue wire where I added the blue arrow. The wire appears to be intact, so I would leave that one alone. You do want to seal that split from water though. The best way to do that is with "RTV gasket sealer". There's a number of different formulations, but for this purpose they'll all work. Being from a Chrysler dealership, I'm very familiar with their two sealants. One is black. It stays more rubbery and peels off a little easier. The other is gray. It cures harder and is somewhat harder to scrape off when another repair is needed in the future. The advantage to the gray stuff is it will bond and seal through a light film of oil. All surfaces must be perfectly clean and dry when using the black stuff. Other dealers have similar products with their own names on them. You don't need a real lot of sealant to seal the crack in the insulation, but it does take some time to cure. Consider putting that on those wires just before you can let the project sit for a few hours.
One comment I wanted to cover is the wires you splice this way are going to end up as much as maybe a half inch shorter than they were before. My purple arrow shows an area of the harness that will lend itself to pulling the wires closer together so the joints can be made. With a large bundle like you have here, that might put some tension on your repaired wires, and with additional vibration and bouncing down the road, that could lead to a splice tearing apart. If that happens years from now, and possibly with a different owner, that can lead to some intermittent problems with elusive causes. A clue to watch for is the inability to make the mechanical joint without the wire strands pulling apart when you let go of them. When this happens, the far better solution is to add in an inch of new wire of the same diameter, or "gauge", and solder two splices for each wire. You can seal both joints at the same time with one longer piece of heat-shrink tubing. You can make a loop out of any excess length of that wire so it can be tucked in alongside the rest of the wires. That will insure there's no tension on the splices.
The next step is to verify all of the circuits are working properly. It's rare to run into problems when you only have to repair a half dozen wires, but it's better to know for sure before closing up the harness. For a pretty repair, you can buy a roll of plastic wrap, but for as little as you need, you might harvest a piece off a car in a salvage yard. The problem is that stuff is always anchored on the ends in some way at the factory. I'd use electrical tape here. The goal is to hold the wires together in a bundle, and to simply reduce the tendency for water to get in. Don't stretch the tape real tight. The wires will want to slide back and forth just a little at times. Wrapping the tape too tightly causes some wires to tug in other places instead. If that happens to be the terminals in a connector, it can lead to intermittent connections later.
The last step is to check if that section of the harness was anchored in some way. That is done to prevent vibration from work-hardening the copper, leading to cracked wires, and to insure the harness can't fall down onto hot or moving parts. Tires and steering linkages in particular are notorious for damaging harnesses that aren't held securely in their proper places. Often you'll find plastic anchors held onto a harness with that plastic wrap. They have some type of feathered end that gets poked into a hole in sheet metal. Nylon tie straps work great too. You can buy a package of a few dozen for a couple of bucks. I don't like to hold harnesses up with "mechanic's wire". That's just soft steel wire in a roll. It's too thin and could cut into the wires over time, especially if there's a lot of tension holding the harness up. That wire will rust apart too and let the harness fall down, then you get to do the repairs all over again.
Images (Click to enlarge)
Sep 5, 2021 at 8:52 PM