Welcome to 2CarPros.
If you can hear it trying to work, then you may have jammed the lock linkage in some way. It isn't hard to have happen. You need to remove the door panels again and inspect the linkage. Something is stopping it from moving, especially if it won't lock with the key.
____________________________
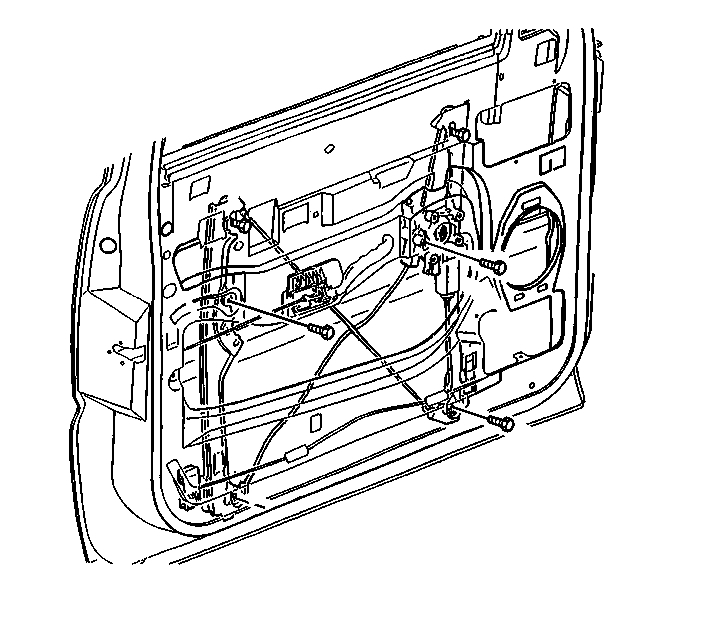
Here are directions specific to regulator replacement. Picture 1 correlates with these directions.
___________________________
FRONT SIDE DOOR WINDOW REGULATOR REPLACEMENT (POWER)
Front Side Door Window Regulator Replacement (Power)
Removal Procedure
1. Raise and support the window glass.
2. Remove the trim panel. Refer to Front Side Door Trim Panel Replacement See: Front Door Panel > Removal and Replacement
3. Remove the water deflector. See: Front Door Window Glass Weatherstrip > Removal and Replacement
4. Disconnect the harness from the electric window motor assembly.
5. Remove the 2 bolts that hold the window glass to the regulator.
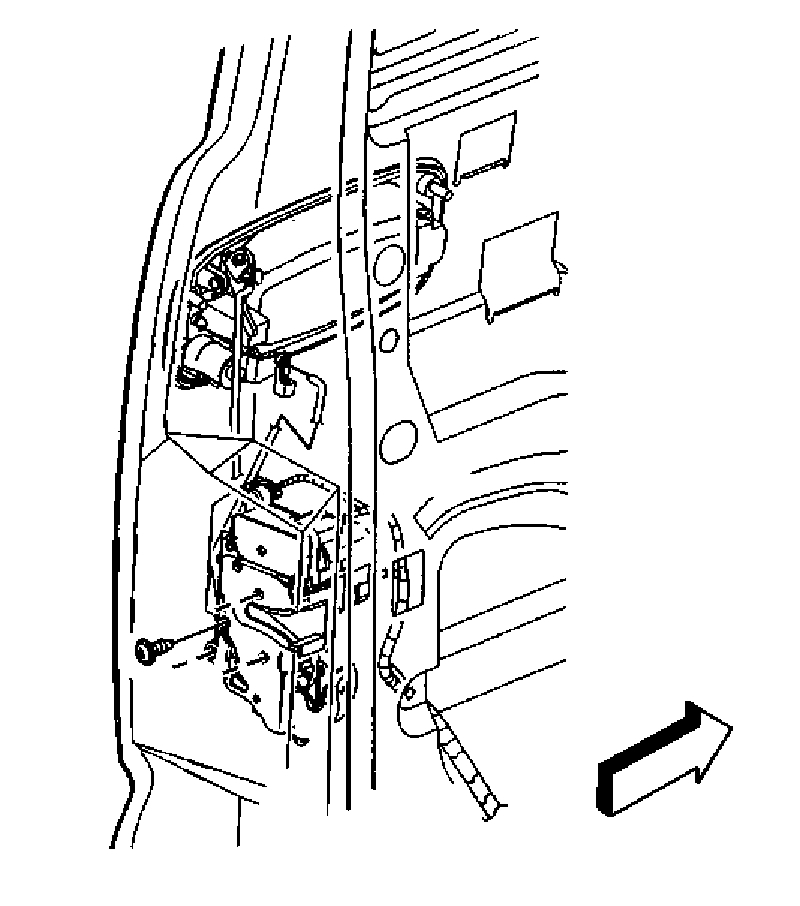
see pic 1
6. Remove the bolts from the window regulator.
7. Remove the window regulator assembly from the door by folding both sides of the window regulator assembly together.
8. Remove the window regulator motor. Refer to Front Side Door Window Regulator Motor Replacement (See: Front Door Window Motor > Removal and Replacement > Front Side Door Window Regulator Motor Replacement).
Installation Procedure
1. Install the window regulator motor. Refer to Front Side Door Window Regulator Motor Replacement (See: Front Door Window Motor > Removal and Replacement > Front Side Door Window Regulator Motor Replacement).
pic 1
2. Position the regulator to the inside door structure. A slight twisting motion of the regulator is needed.
3. Ensure the regulator is positioned firmly in the door.
Notice: Refer to Fastener Notice See: Windows > Vehicle Damage Warnings
Important: Place Permatex Threadlocker, Part Number 24200, GM P/N 12345382, onto the regulator bolt threads prior to tightening.
4. Install the bolts to the window regulator.
Tighten the bolts to 9 Nm (80 lb in).
5. Align the window glass to the regulator.
6. Install the bolts that hold the window to the regulator.
Tighten the bolts to 9 Nm (80 lb in).
7. Install the water deflector.
8. Install the trim panel.
9. Lower the window and inspect the operation.
__________________________________________________
Here are the directions for replacing the actuator. I'm adding them so you can see all the linkages. Also, make sure the one which connects at the inside door handle is properly routed and movable.
LOCK ACTUATOR REPLACEMENT - FRONT DOOR
LOCK ACTUATOR REPLACEMENT - FRONT DOOR
REMOVAL PROCEDURE
1. Raise the window glass.
2. Remove the door trim panel.
3. Remove the water deflector.
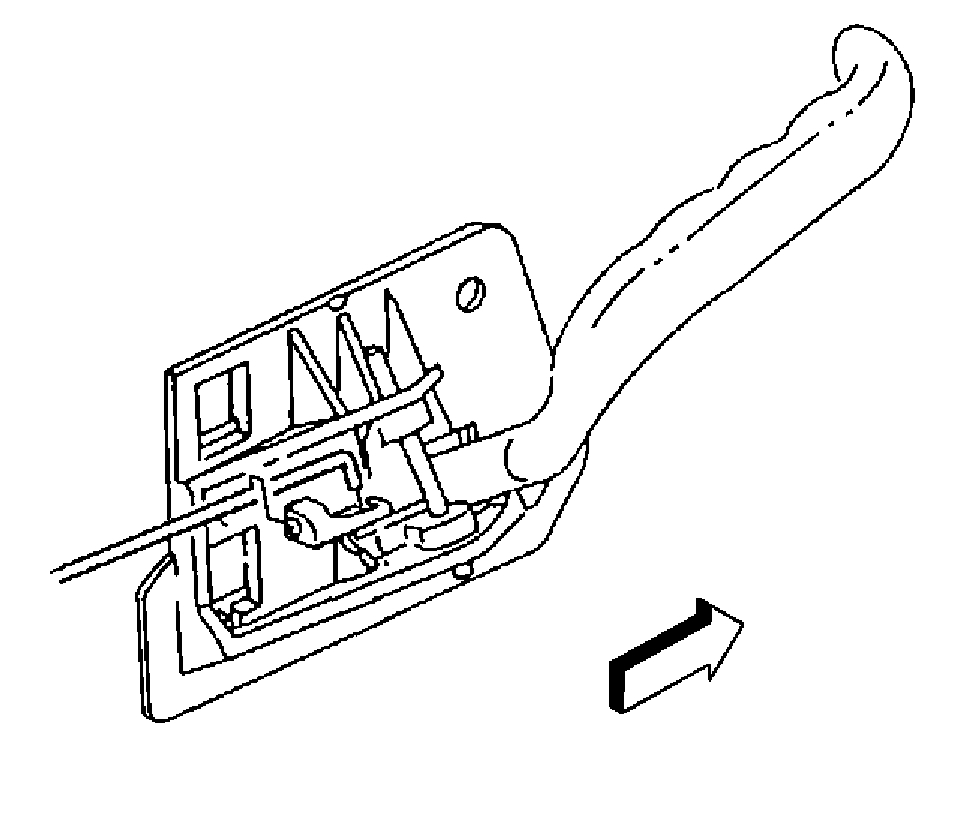
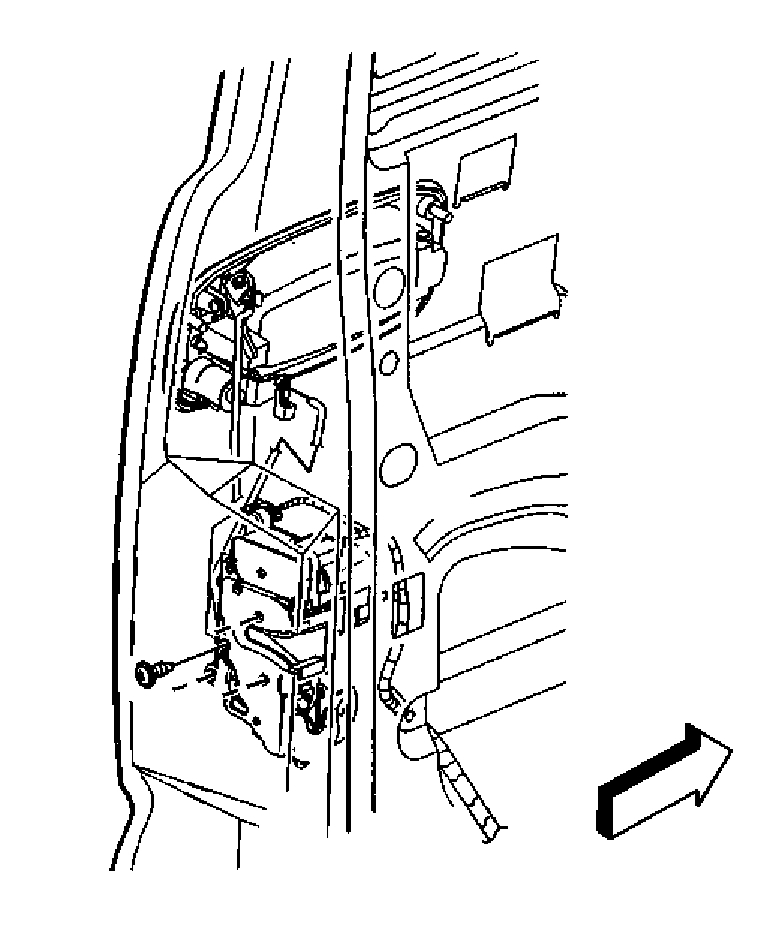
pic 2
4. Disconnect the inside door lock rod from the handle retainer clip.
pic 3
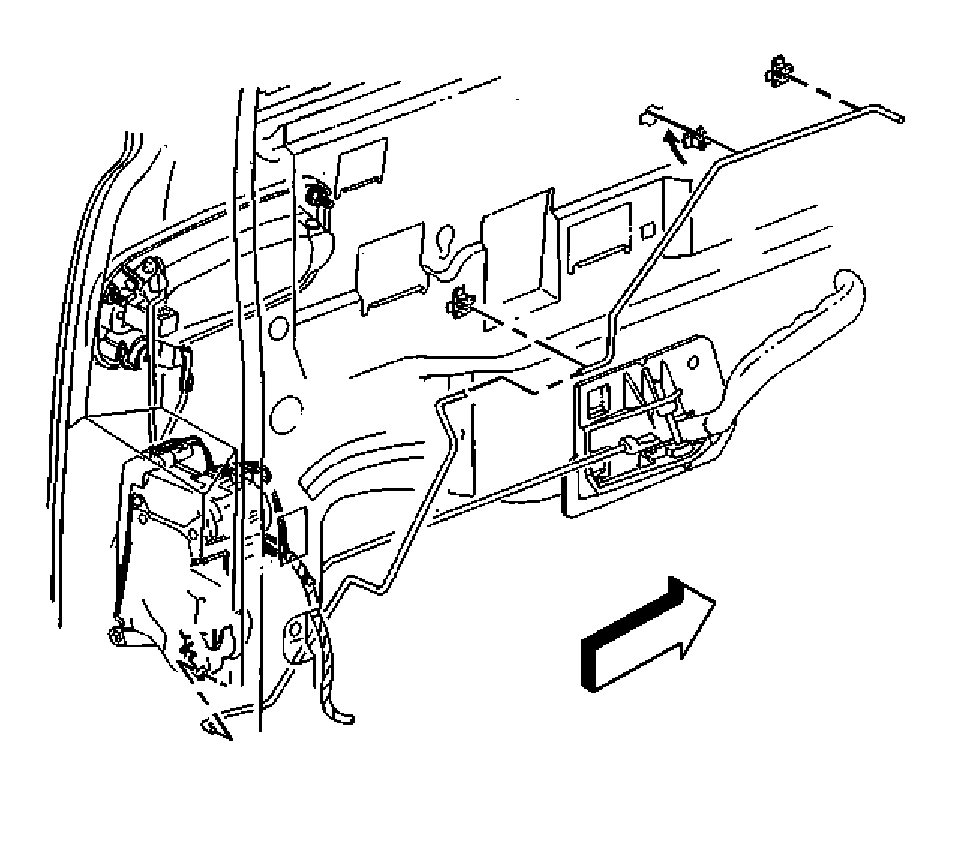
5. Disconnect the manual door lock rod from the door retainer clips.
pic 4
6. Remove the rubber plug in order to disengage the outside handle rod retainer.
pic 5
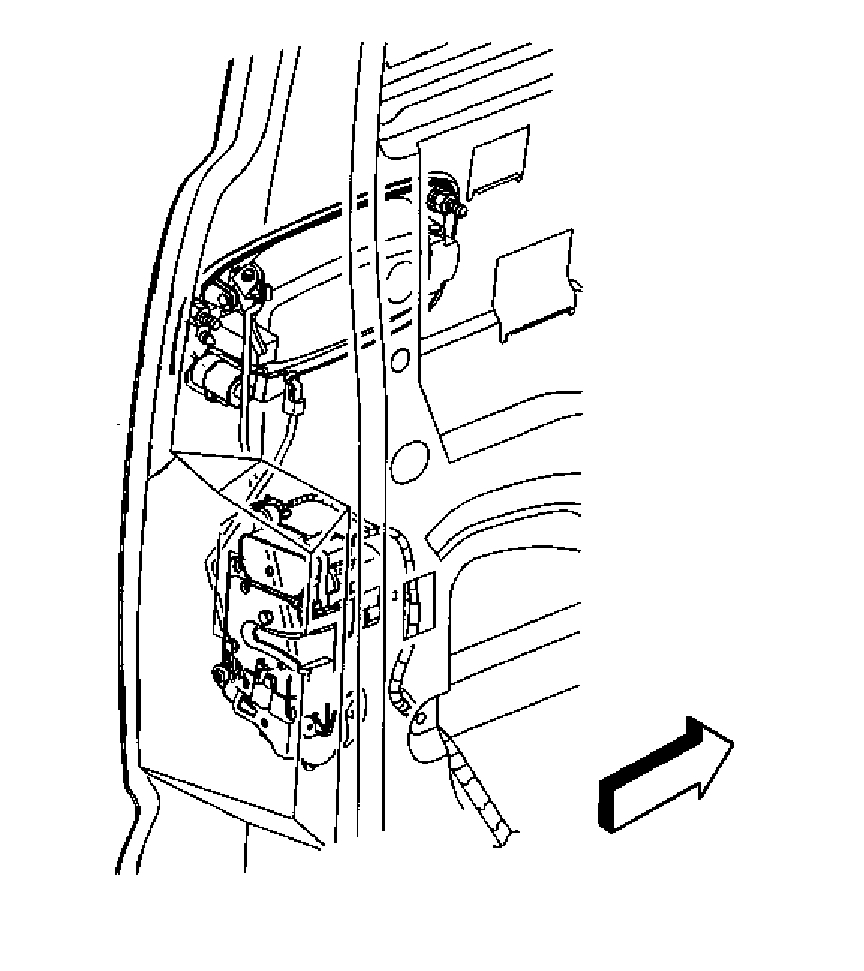
7. Disconnect the cylinder lock rod.
8. Remove the bolts which retain the door lock actuator to the door.
9. Remove the door lock actuator and control rods as an assembly.
10. Disconnect the electrical connector from the door lock actuator, if equipped.
11. Remove the control rods as necessary.
INSTALLATION PROCEDURE
1. Install the control rods to the assembly.
2. Connect the electrical connectors to the door lock actuator, if equipped
3. Install the door lock actuator to the door.
4. Connect the outside door handle control rod.
5. Connect the cylinder lock rod.
NOTE: Refer to Fastener Notice in Service Precautions.
6. Install the bolts which retain the door lock actuator to the door.
Tighten
Tighten the screws to 9 N.m (80 lb in).
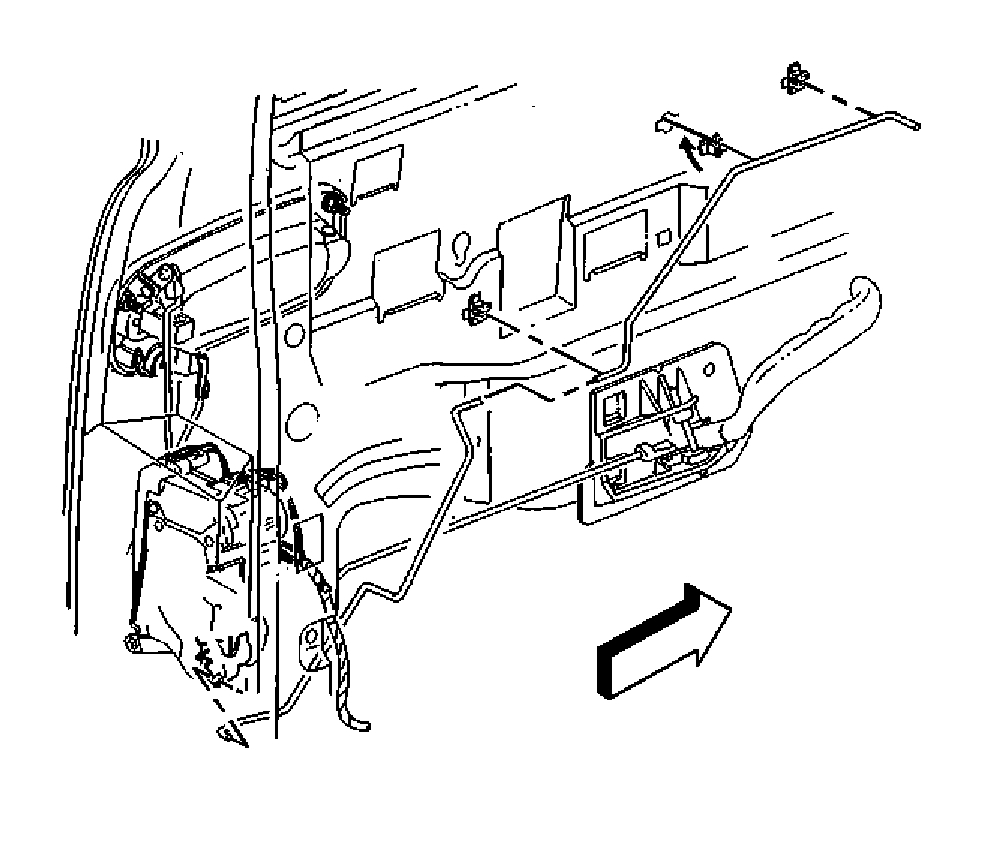
pic 6
7. Connect the manual door lock to the door retainer clips.
pic 7
8. Connect the inside door handle control rod to the lock assembly.
pic 8
9. Connect the inside door lock rod to the handle retainer clip.
10. Install the water deflector.
11. Install the door trim panel.
12. Inspect the operation of all the related components.
_________________________________________________________________
Either one of the linkages is jammed or was left disconnected. Check that and let me know what you find.
Joe
Images (Click to enlarge)
Apr 25, 2019 at 2:43 PM