Hi,
If you plan to replace the head gasket, here are the directions for removal and replacement. You will need to reset the timing. I will include that last.
______________________________________________________-
2004 Honda Truck CR-V 4WD L4-2.4L
Cylinder Head Removal
Vehicle Engine, Cooling and Exhaust Engine Cylinder Head Assembly Service and Repair Procedures Cylinder Head Removal
CYLINDER HEAD REMOVAL
Cylinder Head Removal
NOTE:
- Use fender covers to avoid damaging painted surfaces.
- To avoid damage, unplug the wiring connectors carefully while holding the connector portion.
- To avoid damaging the cylinder head, wait until the engine coolant temperature drops below 100°F (38°C) before loosening the cylinder head bolts.
- Mark all wiring and hoses to avoid misconnection.
Also, be sure that they do not contact other wiring or hoses, or interfere with other parts.
1. Drain the engine coolant.
2. Relieve fuel pressure.
3. Remove the fuel feed hose.
4. Remove the drive belt.
5. Remove the intake manifold.
pic 1
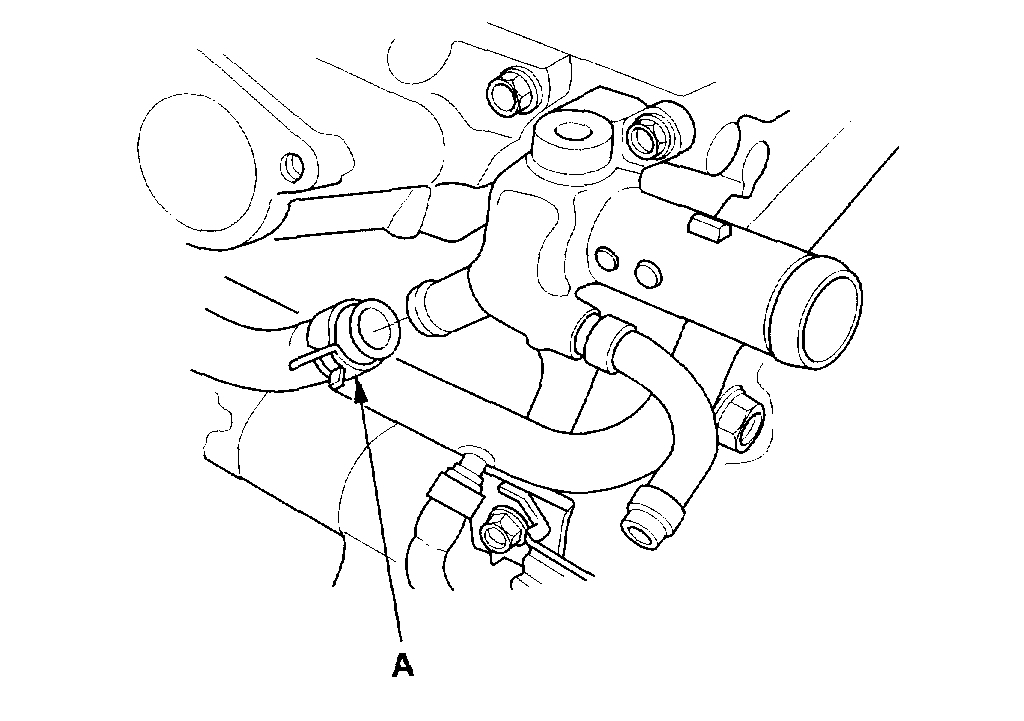
6. Remove the water bypass hose (A).
7. Remove the exhaust manifold.
8. Remove the cam chain.
9. Remove the engine wire harness connectors and wire harness clamps from the cylinder head.
- Four injector connectors
- Engine Coolant Temperature (ECT) sensor connector
- Top Dead Center (TDC) sensor connector
- Camshaft Position (CMP) sensor connector
pic 2
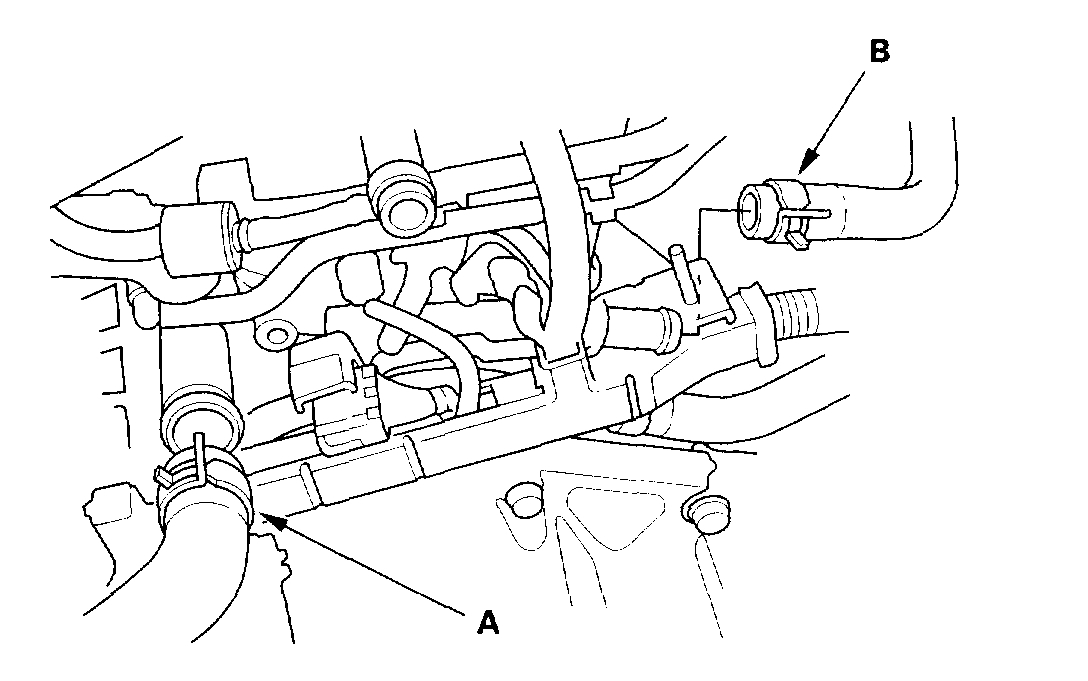
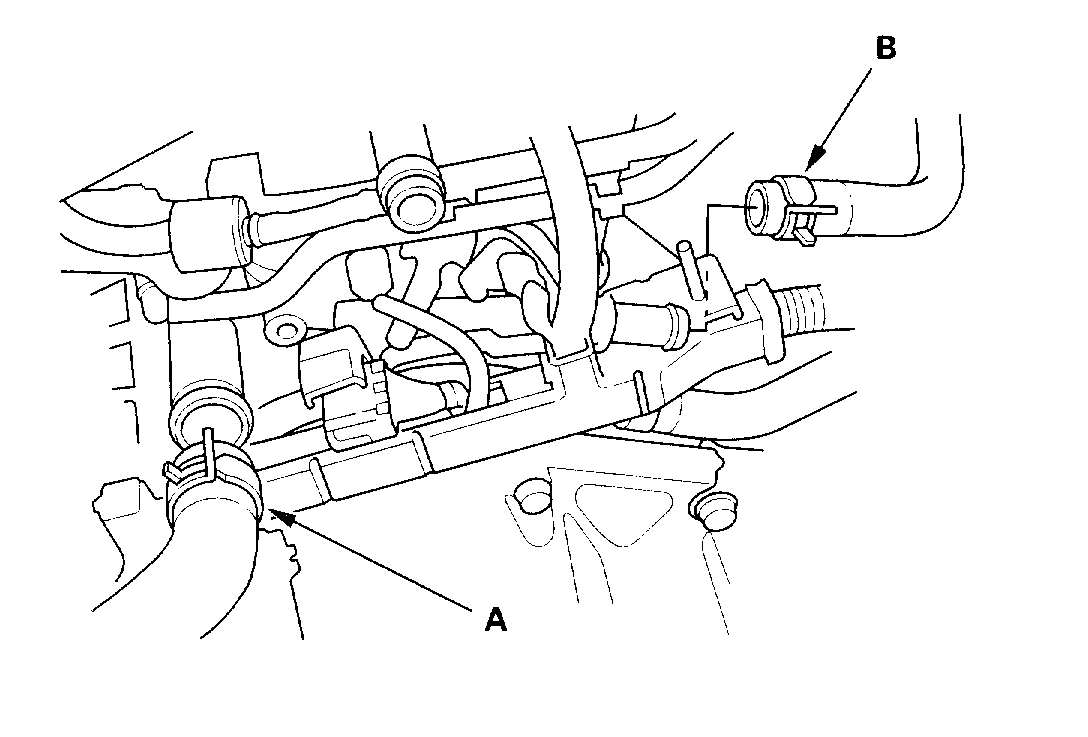
10. Remove the upper radiator hose (A) and heater hose (B)
pic 3
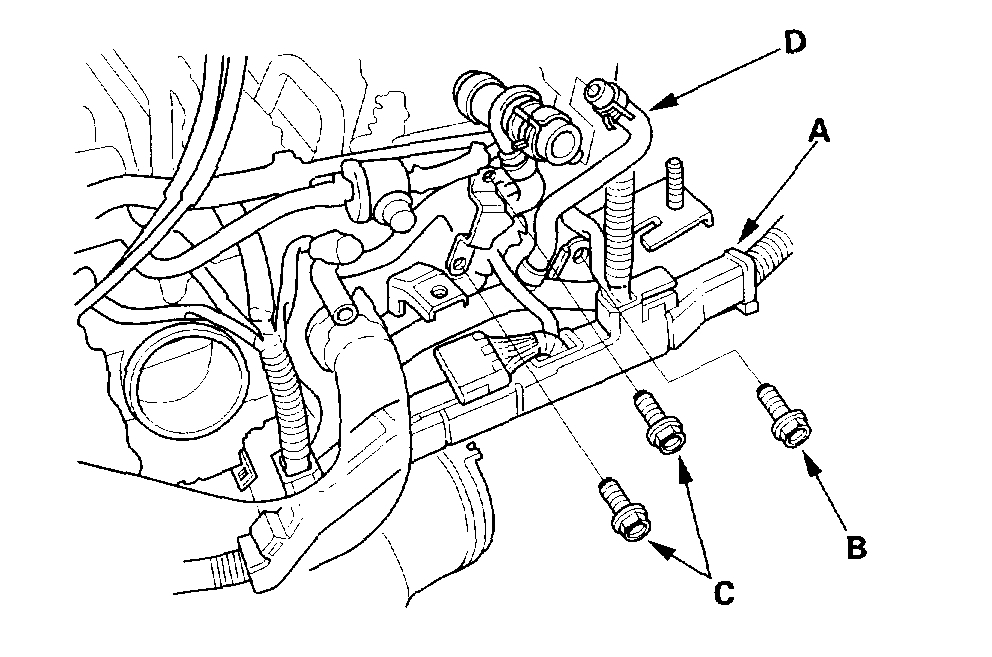
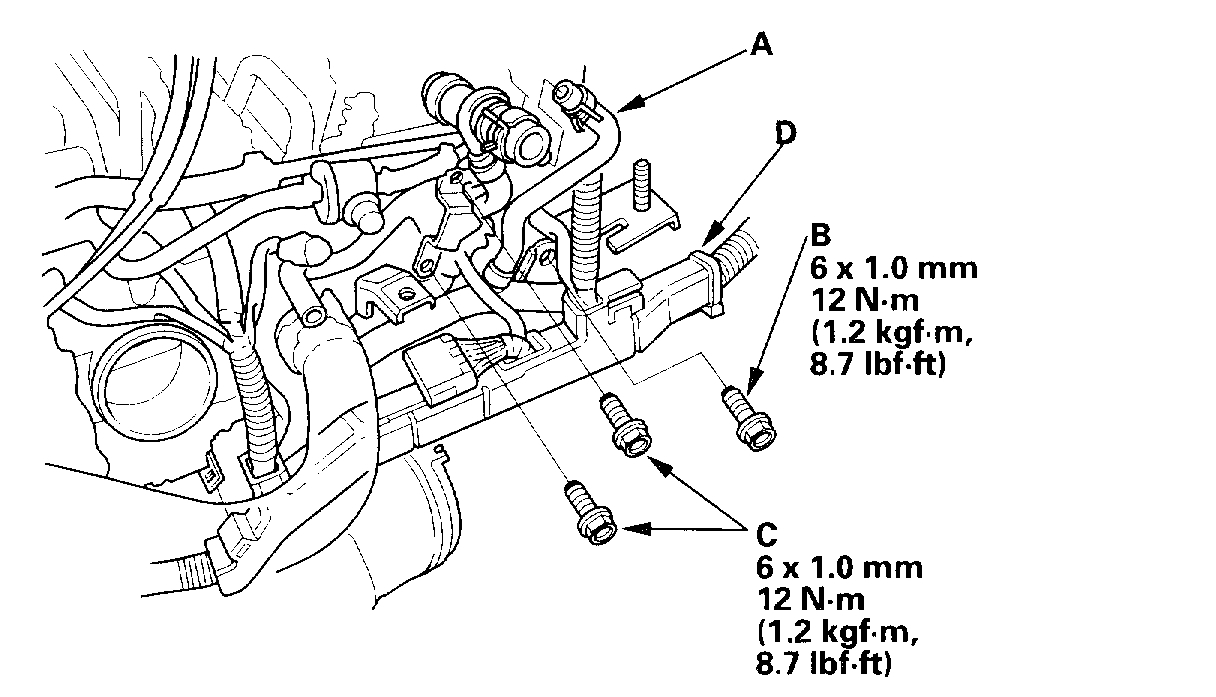
11. Remove the harness holder (A) from the bracket, then remove the connecting pipe mounting bolt (B) and brake booster vacuum line mounting bolts (C).
12. Remove the water bypass hose (D).
13. Remove the rocker arm assembly.
pic 4
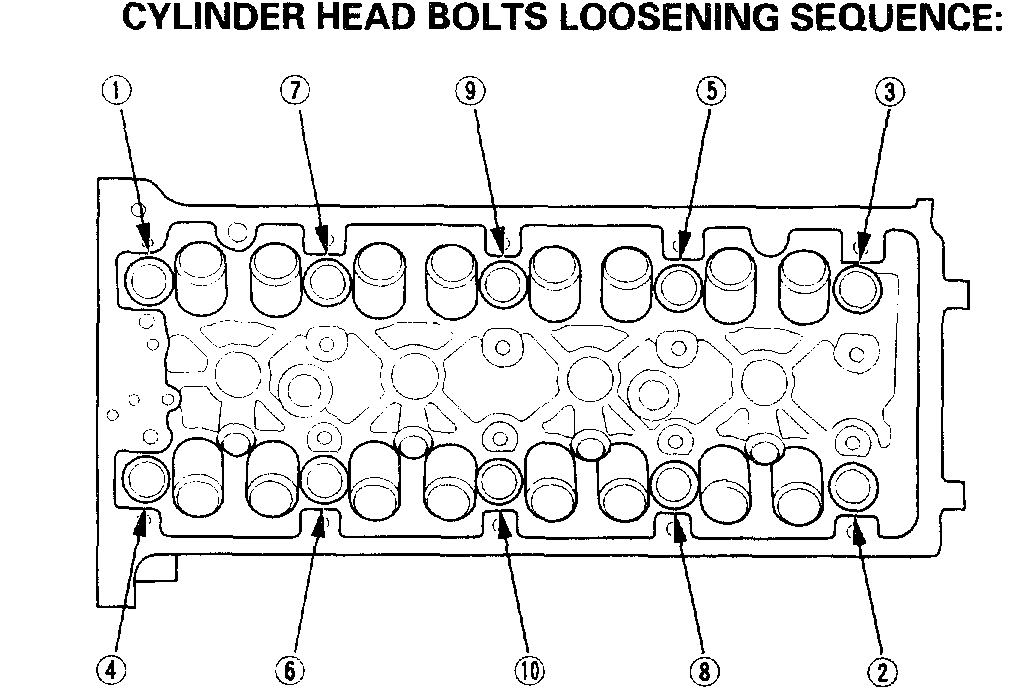
14. Remove the cylinder head bolts. To prevent warpage, unscrew the bolts in sequence 1/3 turn at a time; repeat the sequence until all bolts are loosened.
15. Remove the cylinder head.
_____________________________________________________
2004 Honda Truck CR-V 4WD L4-2.4L
Cylinder Head Installation
Vehicle Engine, Cooling and Exhaust Engine Cylinder Head Assembly Service and Repair Procedures Cylinder Head Installation
CYLINDER HEAD INSTALLATION
Cylinder Head Installation
Install the cylinder head in the reverse order of removal:
1. Clean the cylinder head and block surface.
pic 5
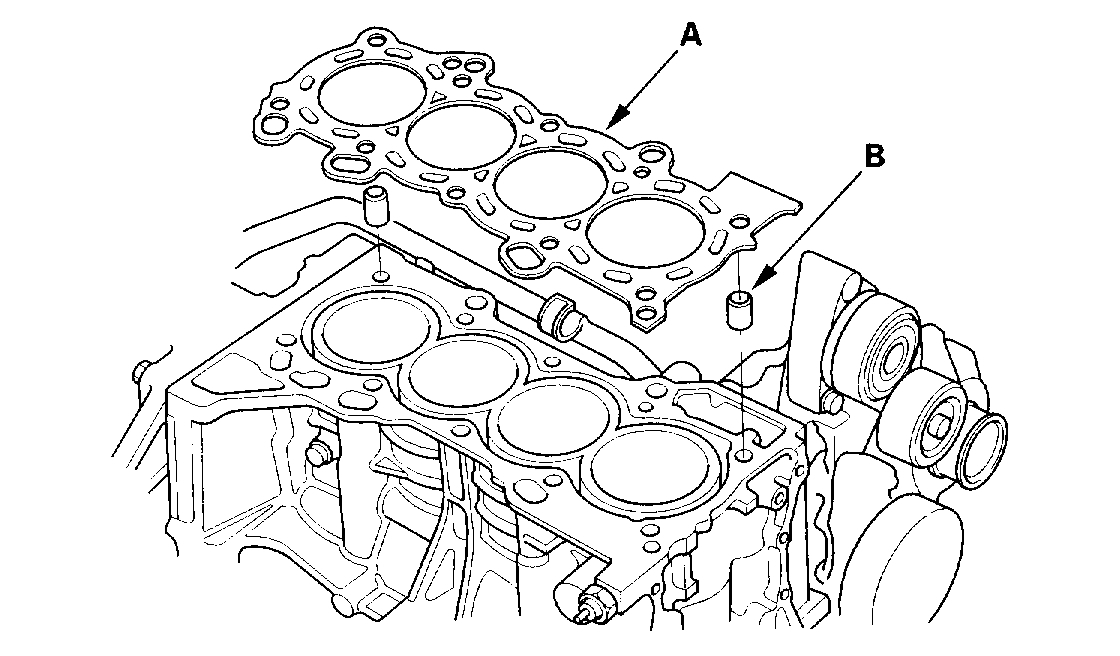
2. Install the new cylinder head gasket (A) and dowel pins (B) on the cylinder block. Always use a new cylinder head gasket.
pic 6
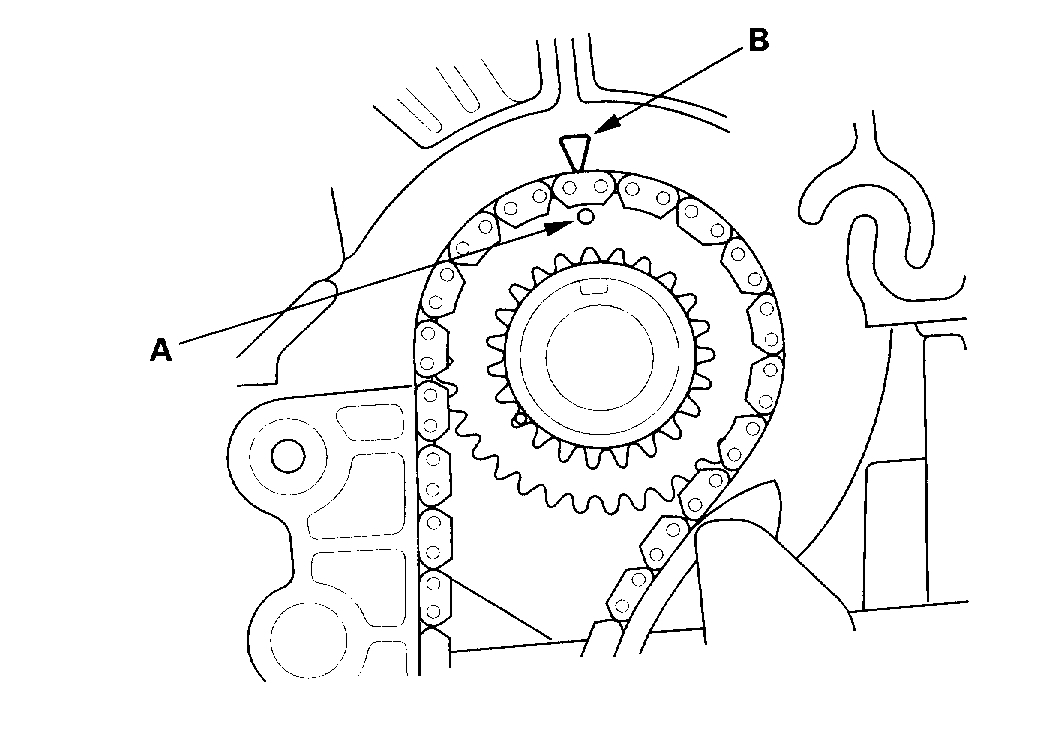
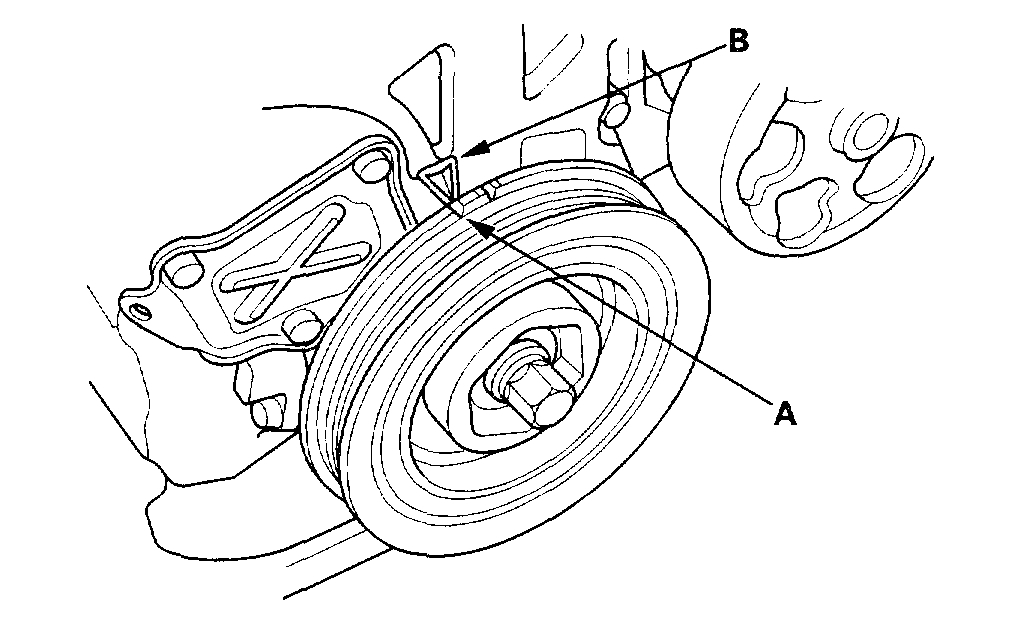
3. Set the crankshaft to top dead center (TDC). Align the TDC mark (A) on the crankshaft sprocket with the pointer (B) on the cylinder block.
4. Install the cylinder head on the block.
pic 7
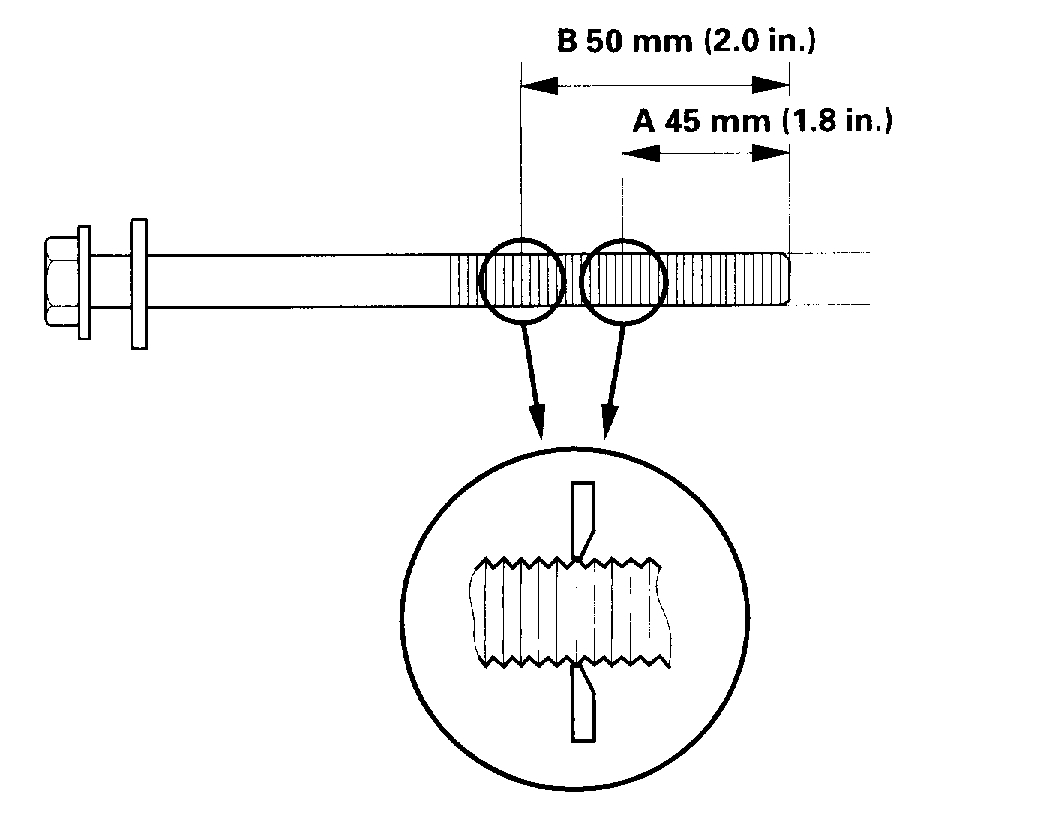
5. Measure the diameter of each cylinder head bolt at point A and point B.
6. If either diameter is less than 10.6 mm (0.42 inch), replace the cylinder head bolt.
7. Apply engine oil to the bolt threads and under the bolt heads of all the cylinder head bolts.
pic 8
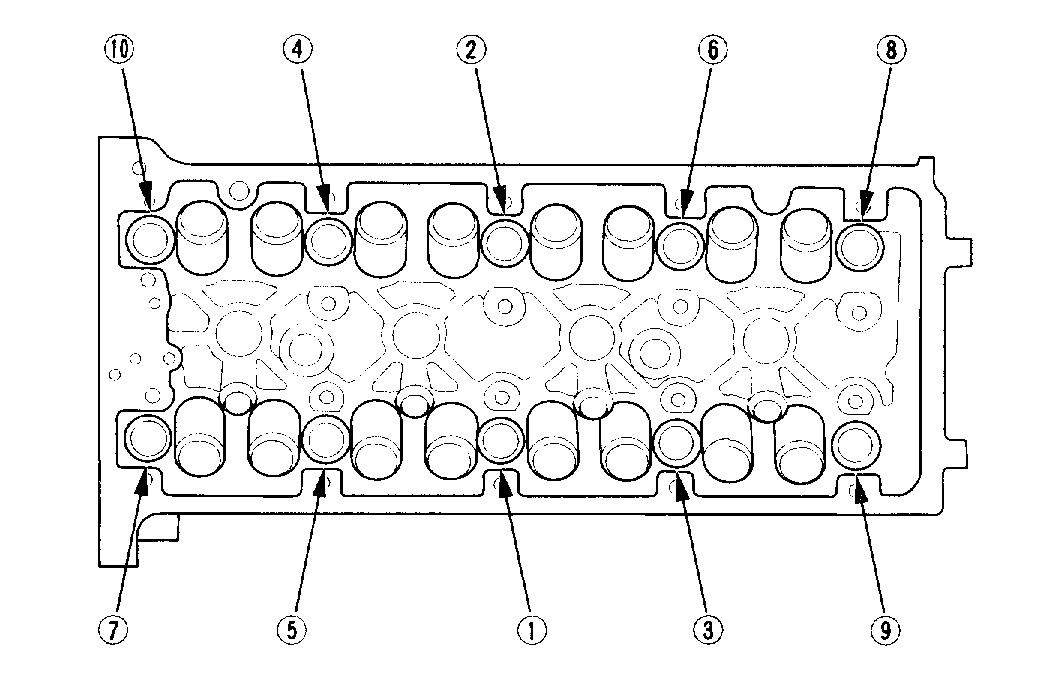
8. Tighten the cylinder head bolts in sequence to 39 Nm (4.0 kgf-m, 29 ft. lbs.). Use a beam-type torque wrench. When using a preset-type torque wrench, be sure to tighten slowly and do not overtighten. If a bolt makes any noise while you are torquing it, loosen the bolt and retighten it from the first step.
pic 9
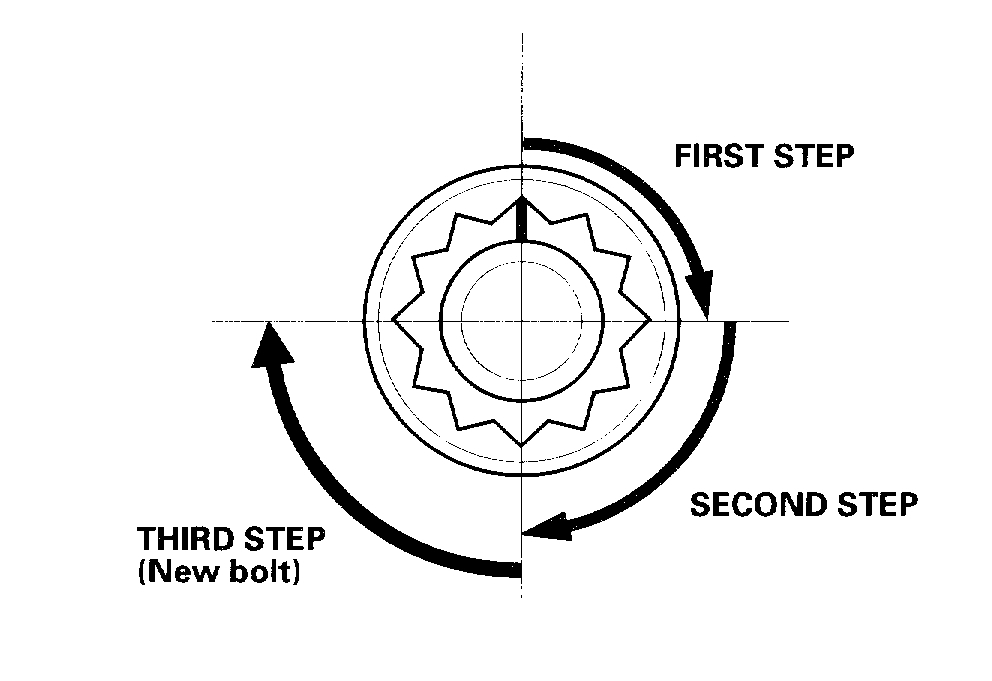
9. After torquing, tighten all cylinder head bolts in two steps (90° per step). If you are using a new cylinder head bolt, tighten the bolt an extra 90°.
10. Install the rocker arm assembly.
pic 10
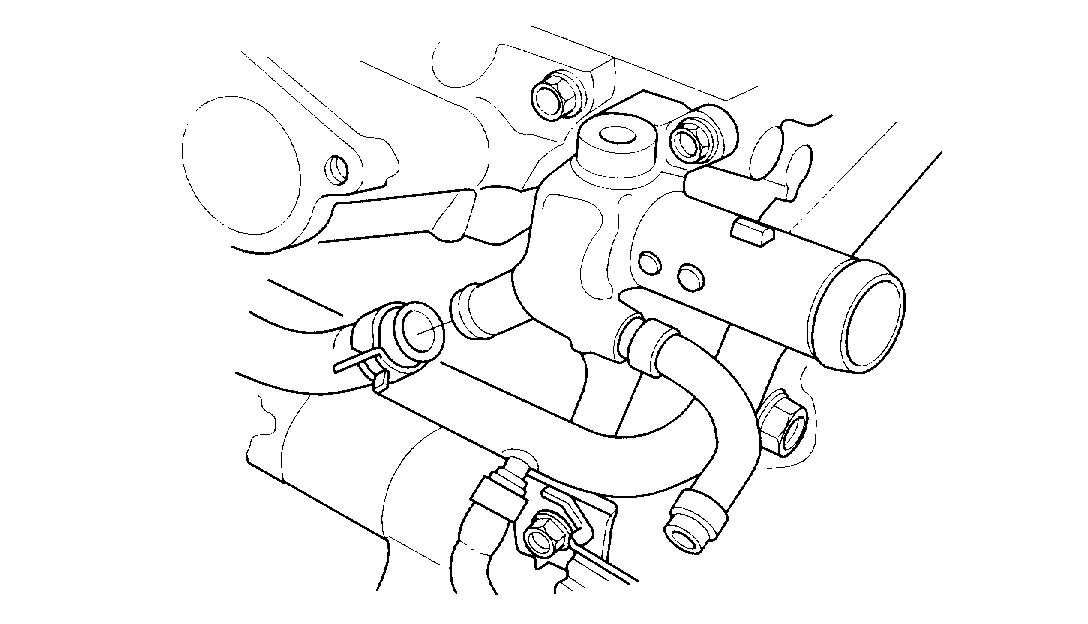
11. Install the water bypass hose (A).
12. Tighten the connecting pipe mounting bolt (B) and brake booster vacuum line mounting bolts (C), then install the harness holder (D) on the bracket.
pic 11
13. Install the upper radiator hose (A) and heater hose (B).
pic 12
14. Install the water bypass hose.
15. Install the intake manifold.
16. Install the exhaust manifold.
17. Install the cam chain.
18. Connect the fuel feed hose.
19. Adjust the valve clearance.
20. Install the drive belt.
21. Clean the battery posts and cable terminals with sandpaper, then assemble them and apply grease to prevent corrosion.
22. After installation, check that all tubes, hoses and connectors are installed correctly.
23. Inspect for fuel leaks. Turn the ignition switch ON (II) (do not operate the starter) so that the fuel pump runs for about 2 seconds and pressurizes the fuel line. Repeat this operation two or three times, then check for fuel leakage at any point in the fuel line.
24. Refill the radiator with engine coolant, and bleed air from the cooling system with the heater valve open.
25. Inspect the idle speed.
26. Inspect the ignition timing.
_____________________________________
Here are the directions for replacing the timing chain. It includes everything.
2004 Honda Truck CR-V 4WD L4-2.4L
Cam Chain Replacement
Vehicle Engine, Cooling and Exhaust Engine Timing Components Timing Chain Service and Repair Procedures Cam Chain Replacement
CAM CHAIN REPLACEMENT
Cam Chain Removal
NOTE: Keep the cam chain away from magnetic fields.
pic 13
1. Turn the crankshaft pulley so its Top Dead Center (TDC) mark (A) lines up with the pointer (B).
2. Remove the front tires/wheels.
pic 14
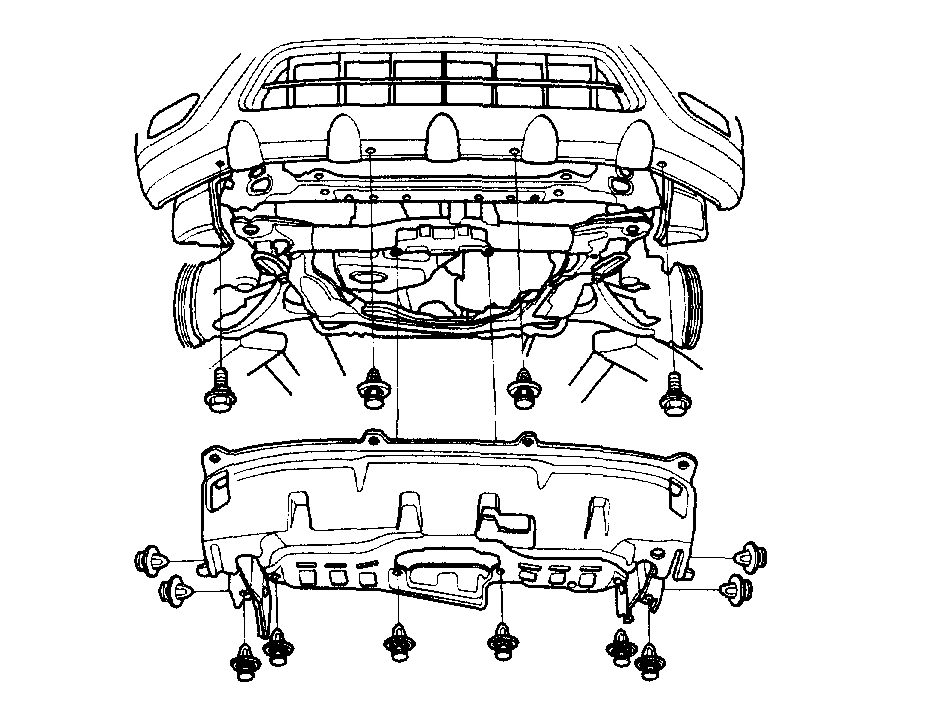
3. Remove the splash shield.
4. Remove the drive belt.
5. Remove the cylinder head cover.
6. Remove the crankshaft pulley.
pic 15
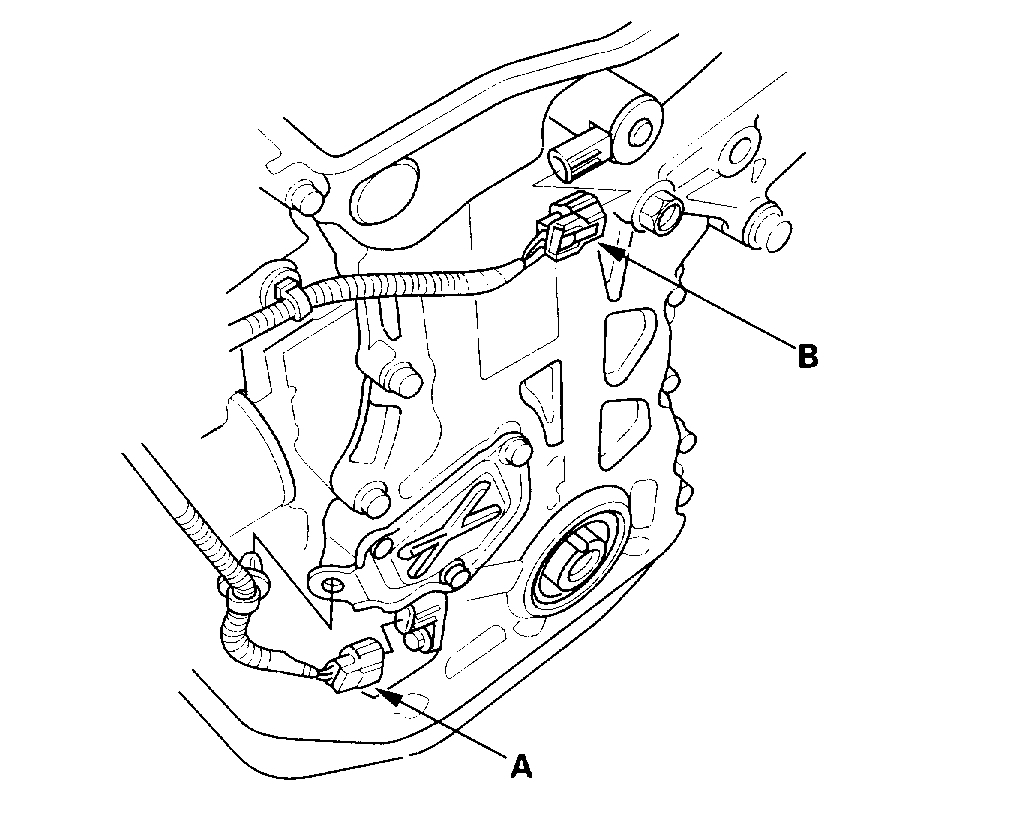
7. Disconnect the Crankshaft Position (CKP) sensor connector (A) and Variable Valve Timing Control (VTC) oil control solenoid valve connector (B).
8. Remove the VTC oil control solenoid valve (see step 1).
9. Support the engine with a jack and wood block under the oil pan.
pic 16
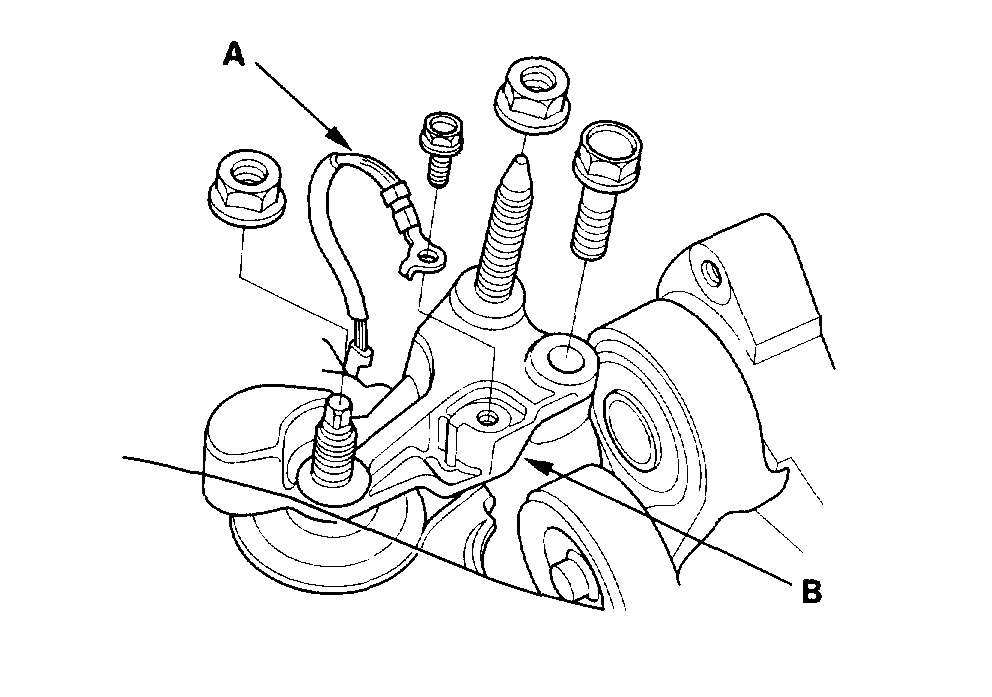
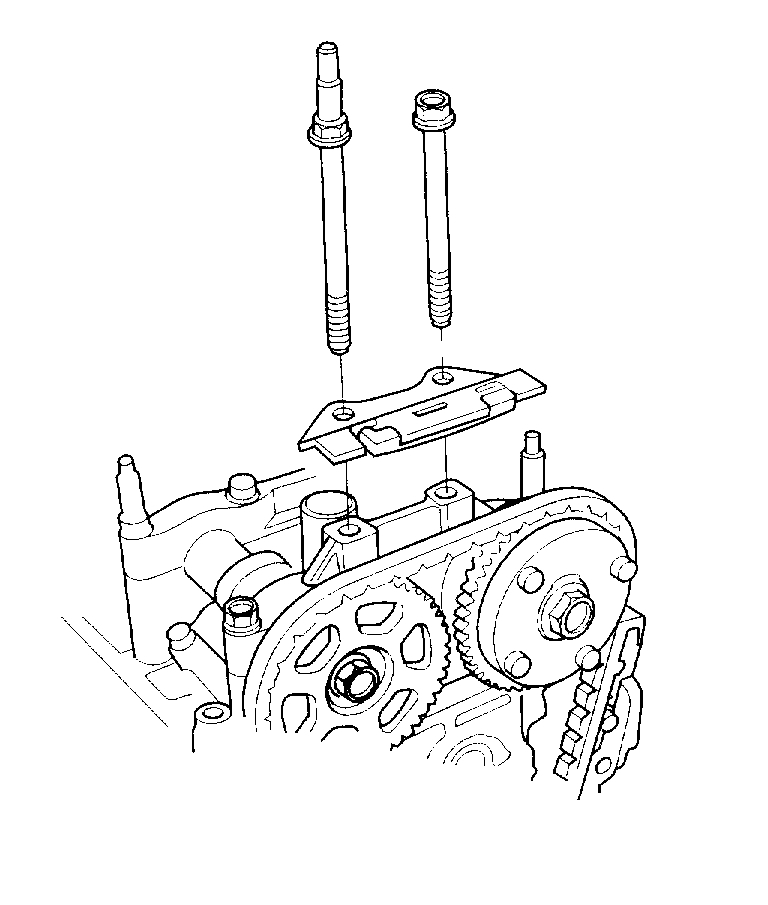
10. Remove the ground cable (A), and remove the upper bracket (B).
pic 17
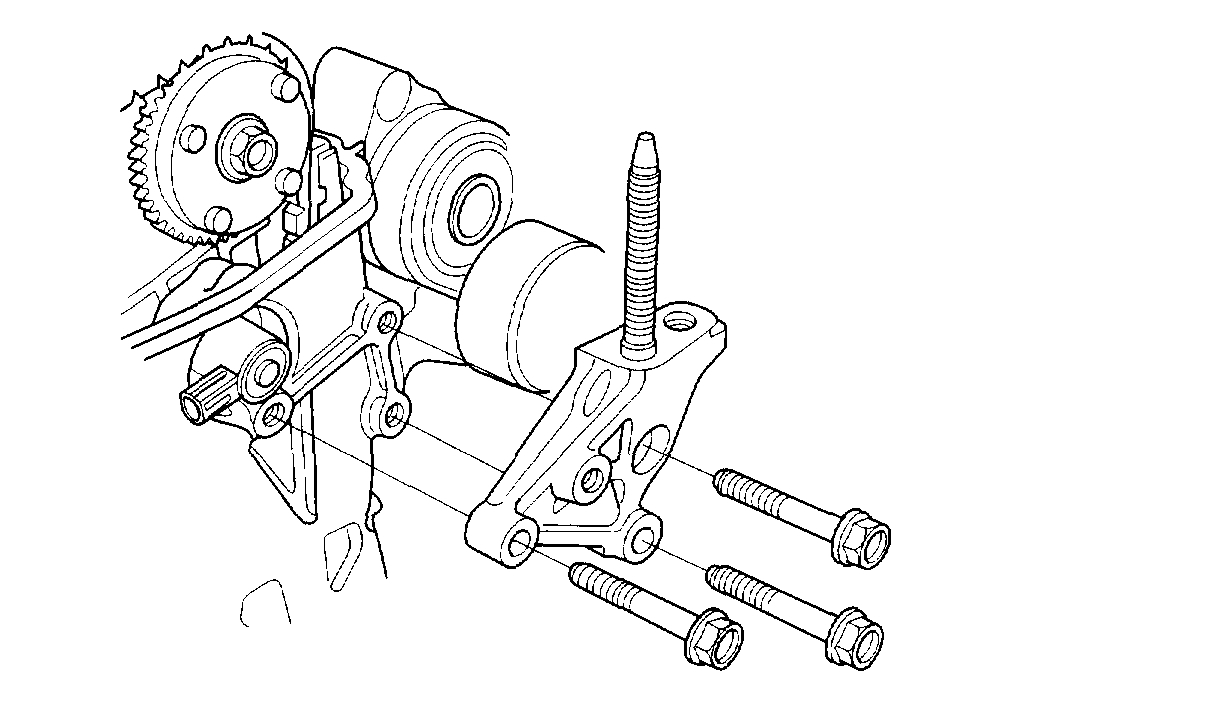
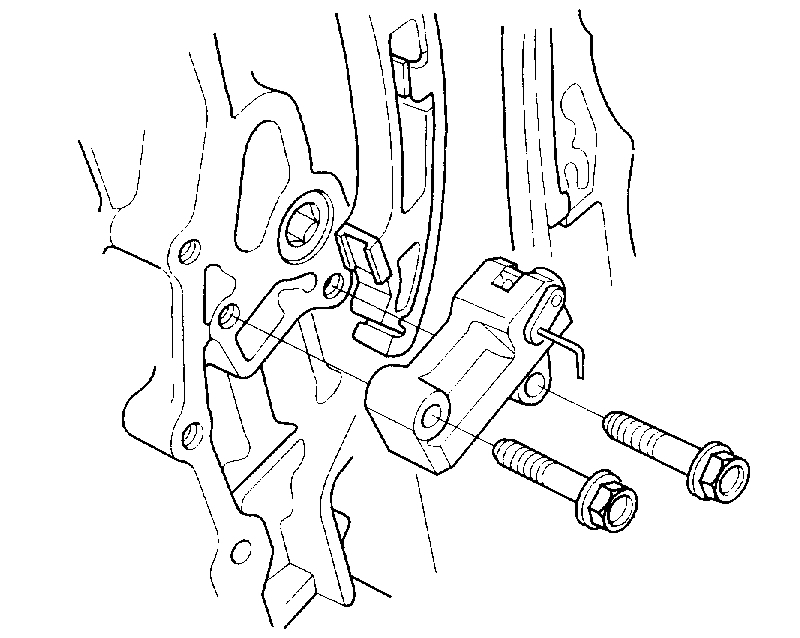
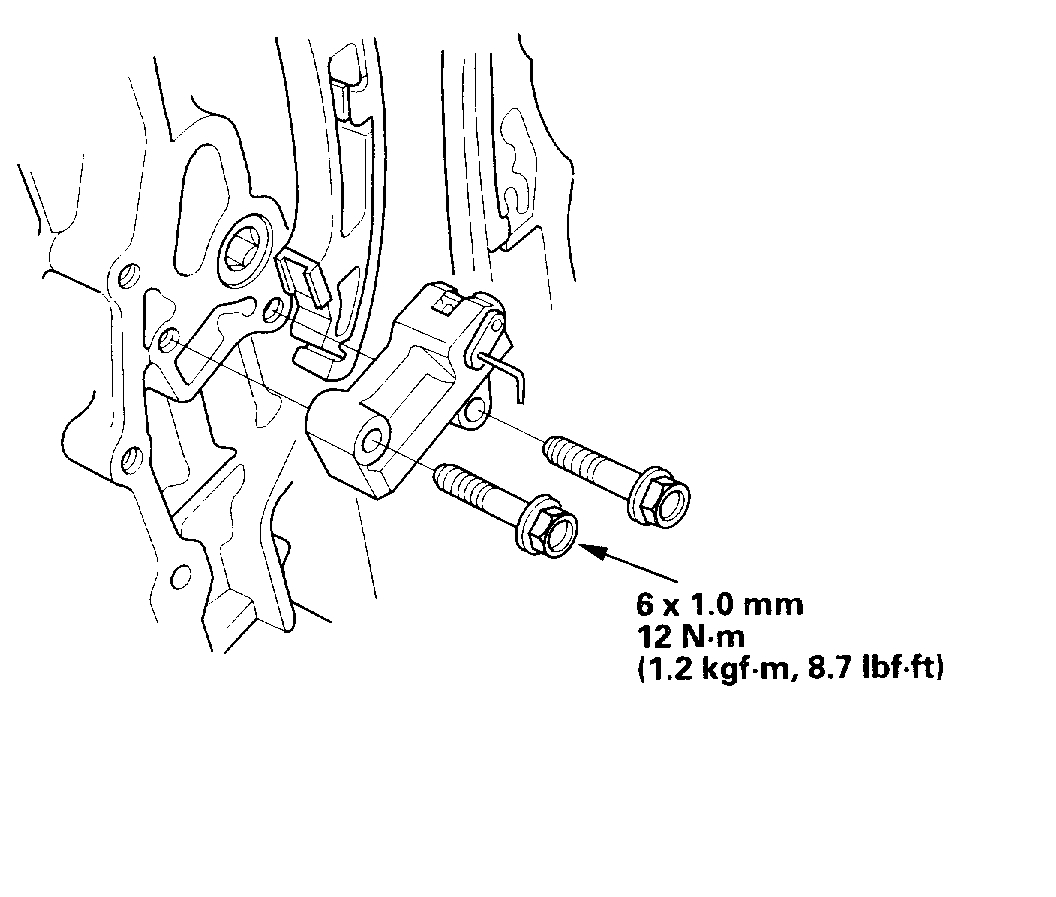
11. Remove the side engine mount bracket.
pic 18
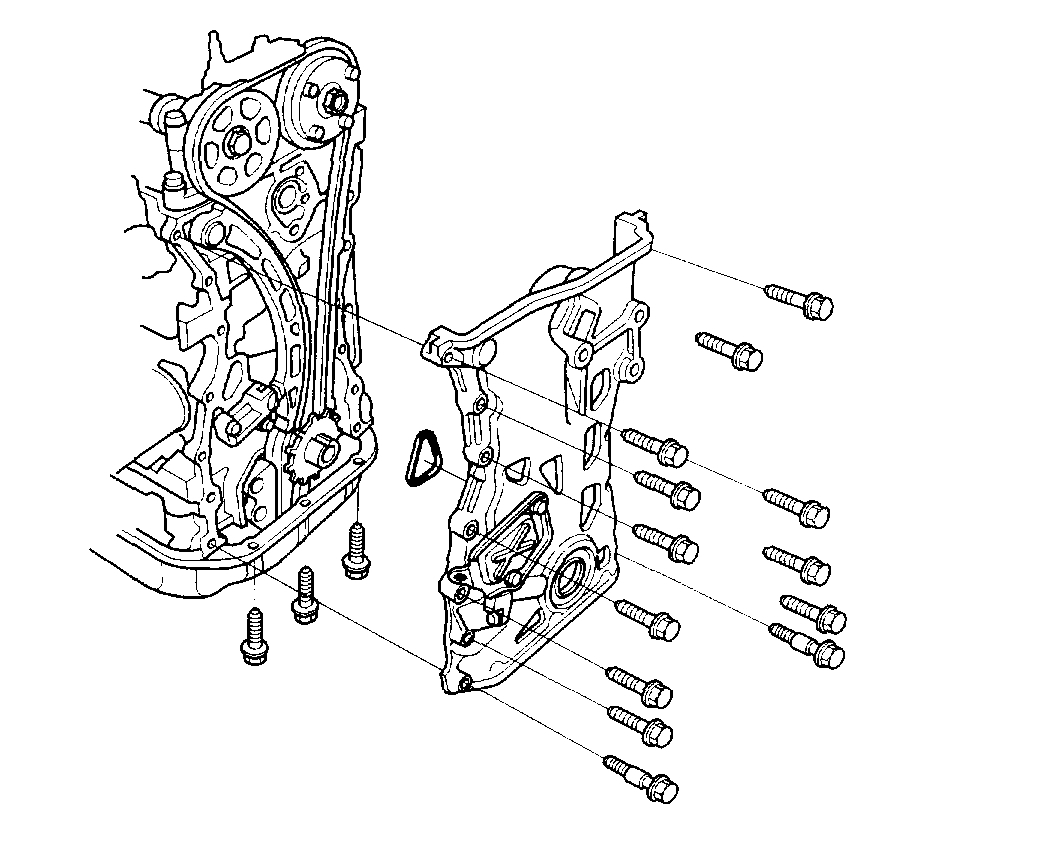
12. Remove the chain case.
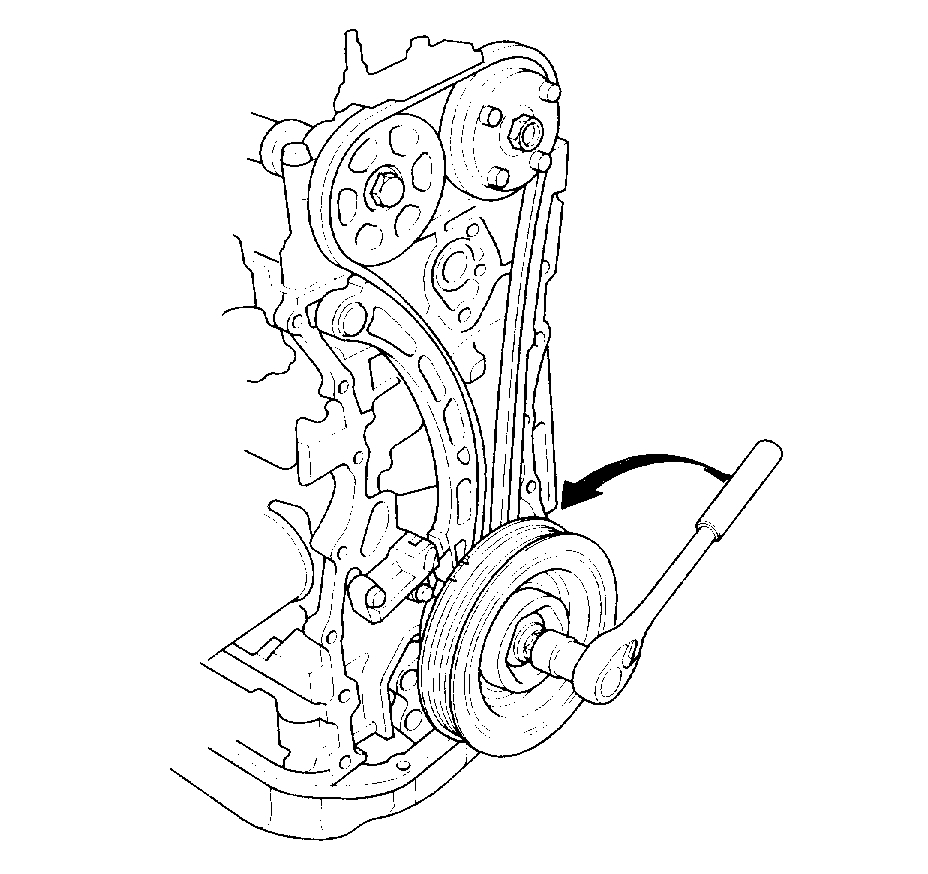
13. Loosely install the crankshaft pulley.
pic 19
14. Turn the crankshaft counterclockwise to compress the auto-tensioner.
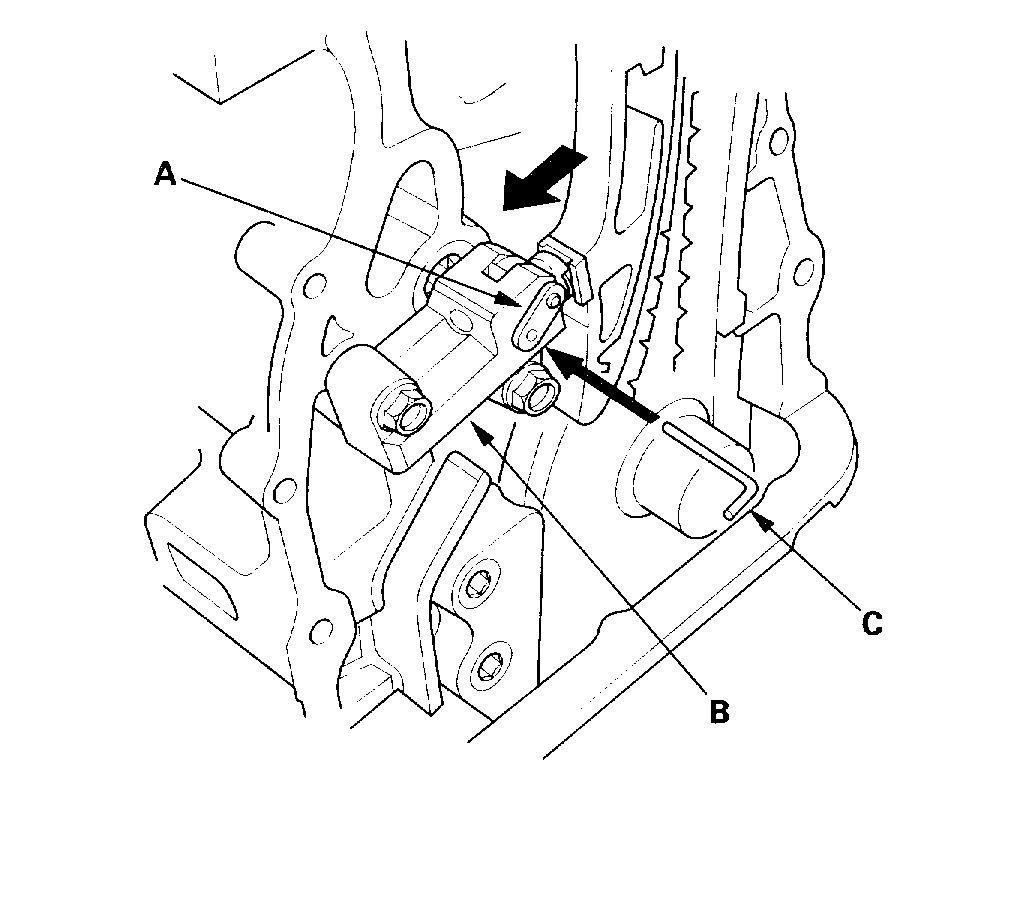
pic 20
15. Align the holes on the lock (A) and the auto tensioner (B), then insert a 1.5 mm (0.06 inch) diameter pin (C) into the holes. Turn the crankshaft clockwise to secure the pin.
pic 21
16. Remove the auto-tensioner.
pic 22
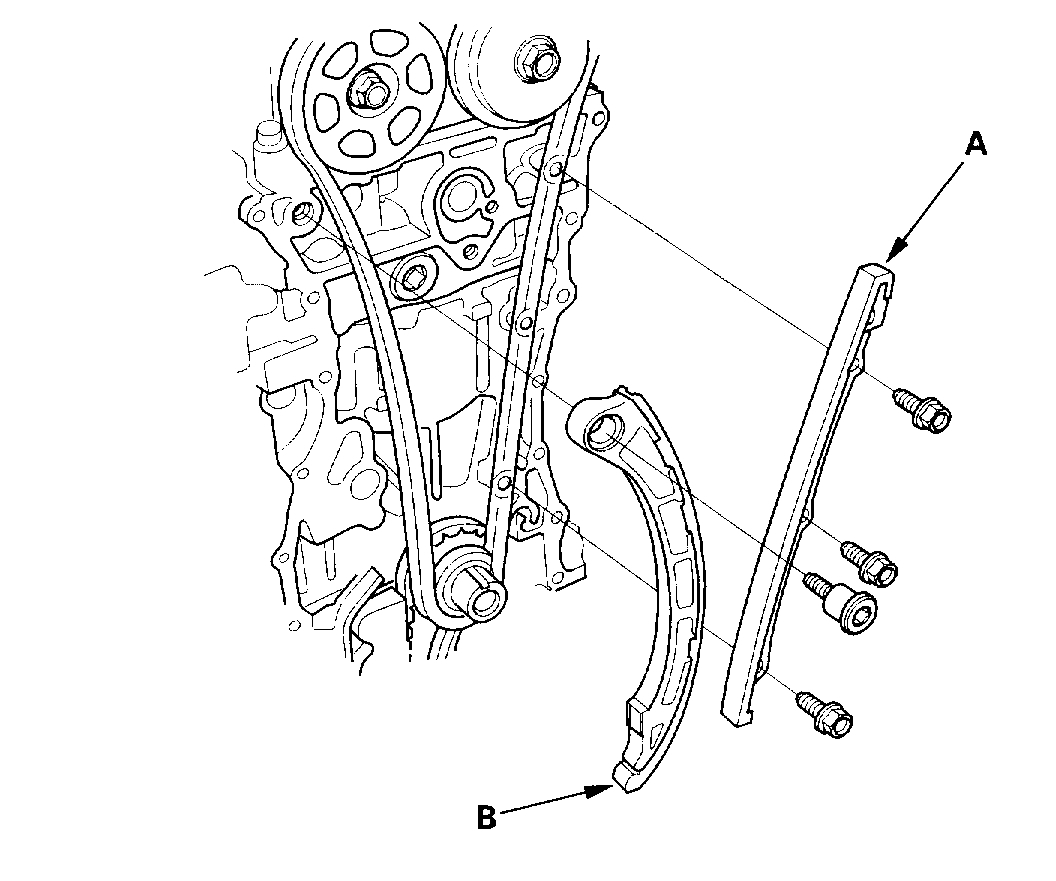
17. Remove the cam chain guide B.
pic 23
18. Remove the cam chain guide A (A) and tensioner arm (B).
19. Remove the cam chain.
Cam Chain Installation
NOTE: Keep the cam chain away from magnetic fields.
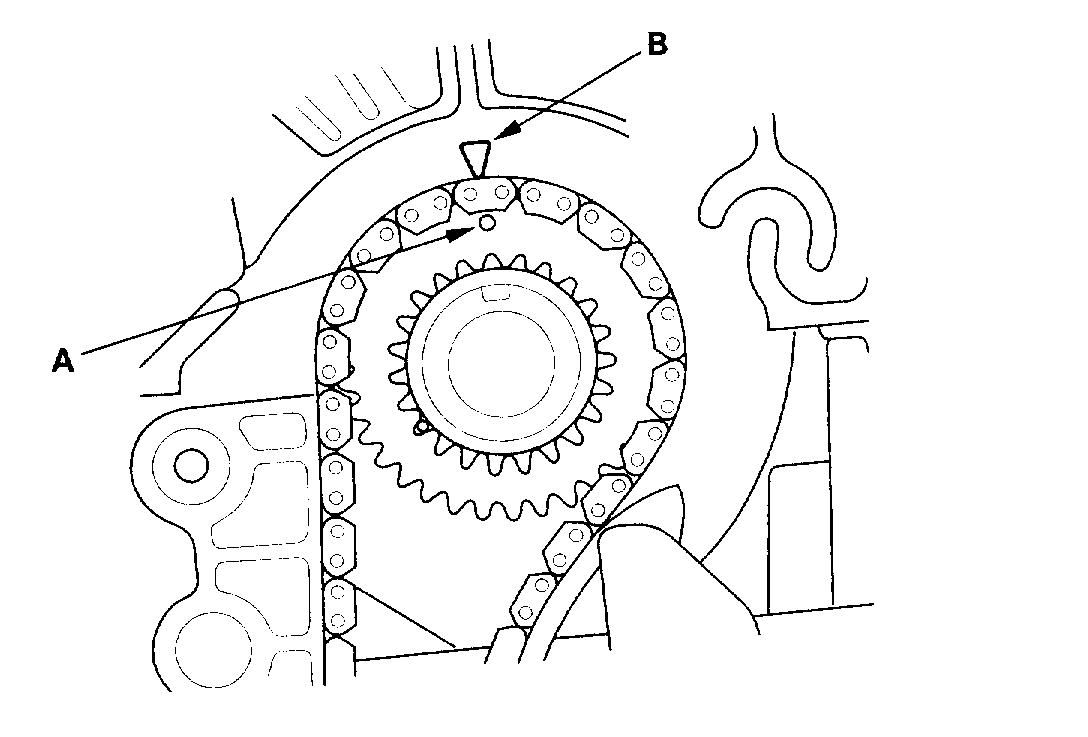
pic 24
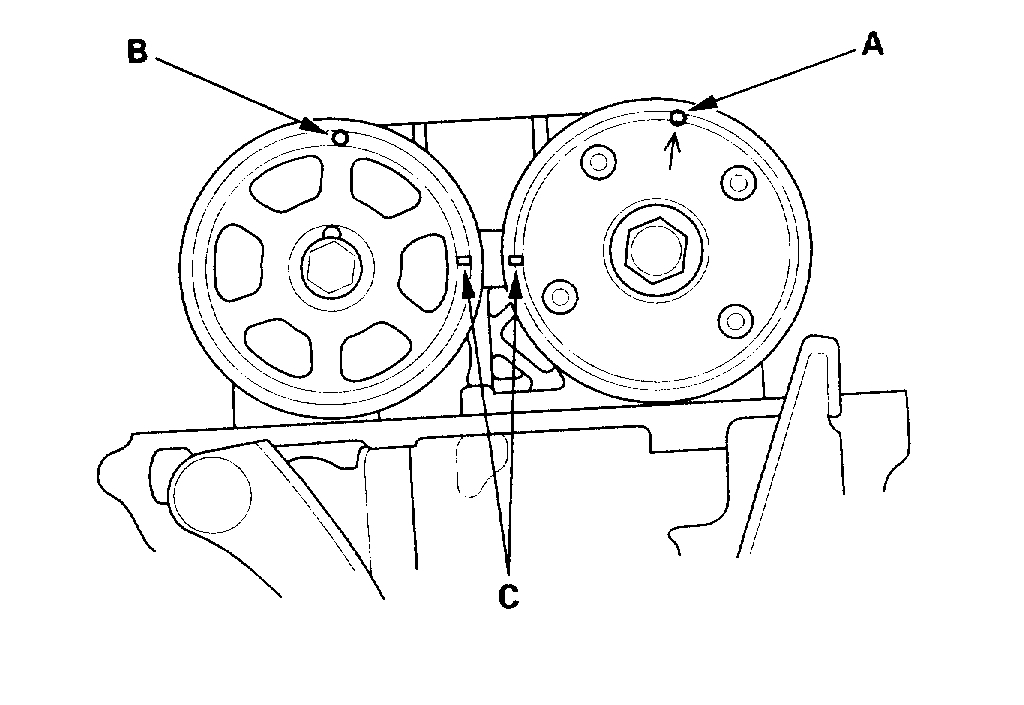
1. Set the crankshaft to Top Dead Center (TDC). Align the TDC mark (A) on the crankshaft sprocket with the pointer (B) on the cylinder block.
pic 25
2. Set the camshafts to TDC. The punch mark (A) on the variable Valve Timing Control (VTC) actuator and the punch mark (B) on the exhaust camshaft sprocket should be at the top. Align the TDC marks (C) on the VTC actuator and exhaust camshaft sprocket.
pic 26
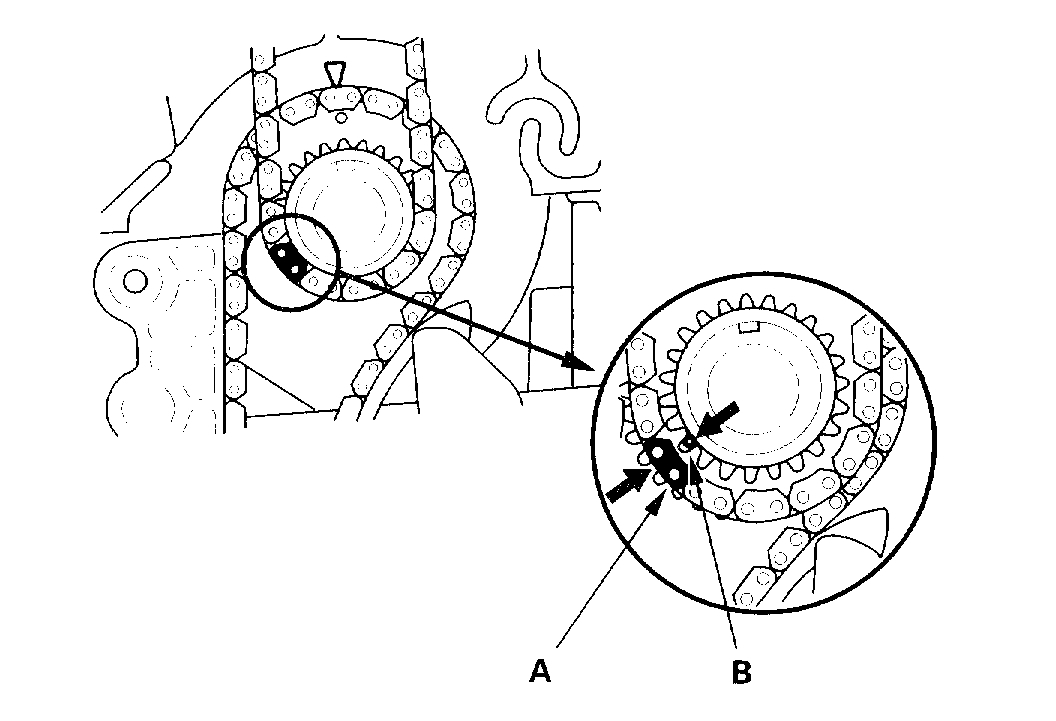
3. Install the cam chain on the crankshaft sprocket with the colored piece (A) aligned with the punch mark (B) on the crankshaft sprocket.
pic 27
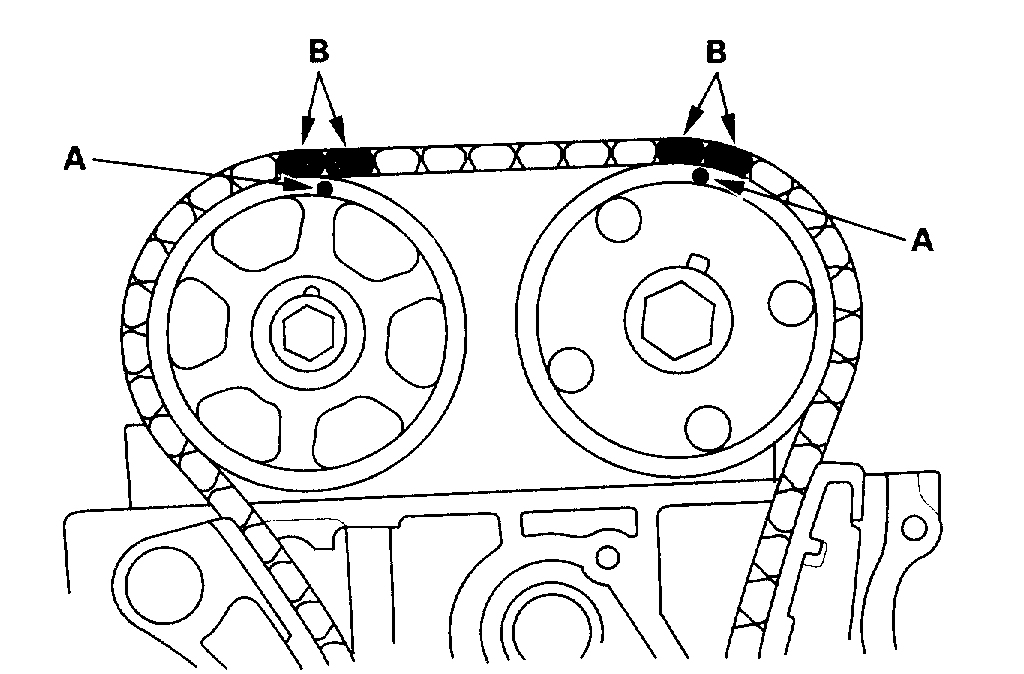
4. Install the cam chain on the VTC actuator and exhaust camshaft sprocket with the punch marks (A) aligned with the two colored pieces (B).
pic 28
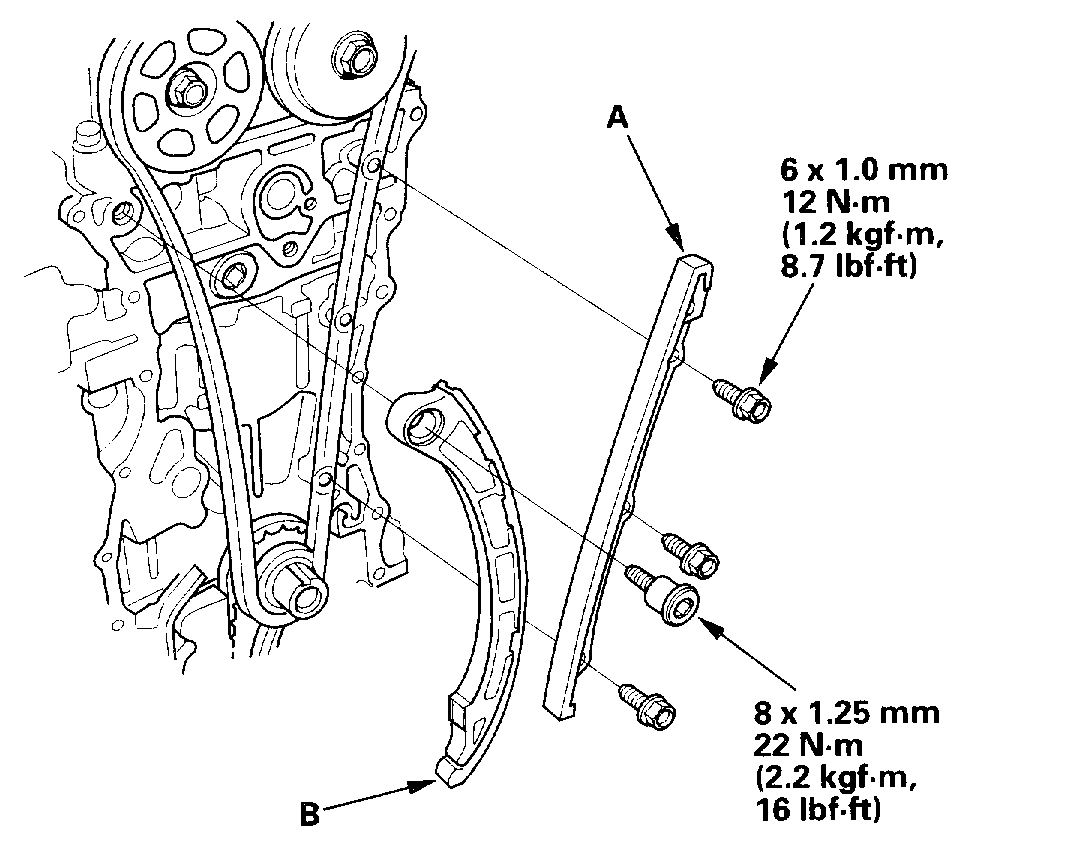
5. Install the cam chain guide A (A) and tensioner arm (B).
pic 29
6. Install the auto-tensioner.
pic 30
7. Install the cam chain guide B.
pic 31
8. Remove the pin from the auto-tensioner.
9. Check the chain case oil seal for damage. If the oil seal is damaged, replace the chain case oil seal.
10. Remove old liquid gasket from the chain case mating surfaces, bolts, and bolt holes.
11. Clean and dry the chain case mating surfaces.
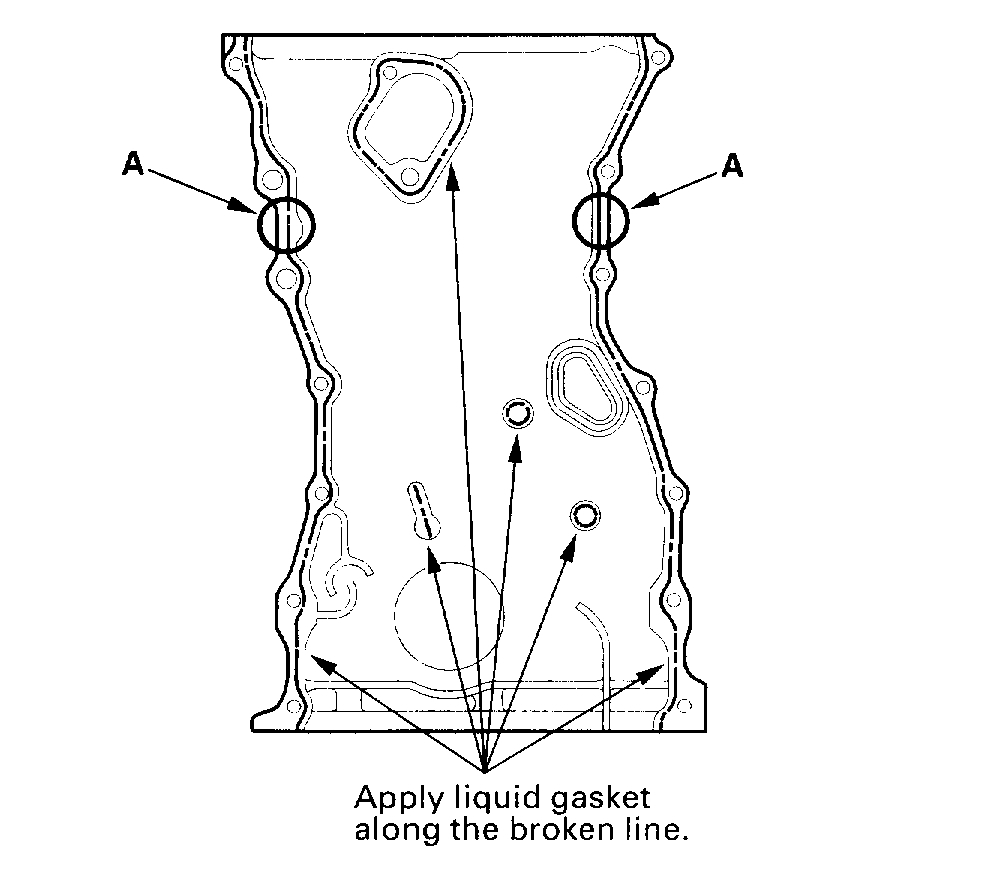
pic 32
12. Apply liquid gasket, P/N 08718-0009, evenly to the cylinder block mating surface of the chain case and to the inner threads of the holes.
13. Apply liquid gasket to the cylinder block upper surface contact areas (A) on the chain case.
pic 33
14. Apply liquid gasket, P/N 08718-0009, evenly to the oil pan mating surface of the chain case and to the inner threads of the holes.
NOTE: Do not install the parts if 5 minutes or more have elapsed since applying liquid gasket. Instead, reapply liquid gasket after removing old residue.
pic 34
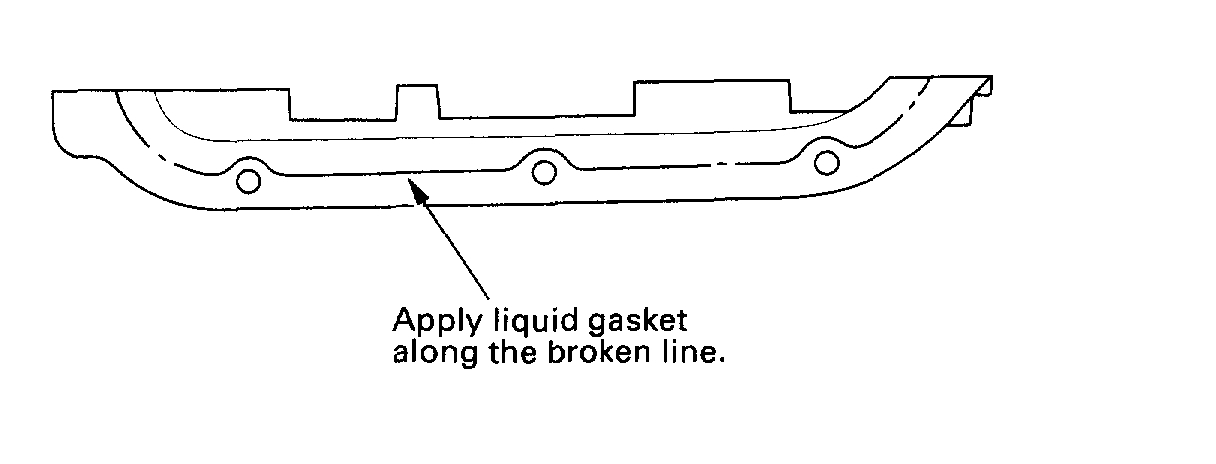
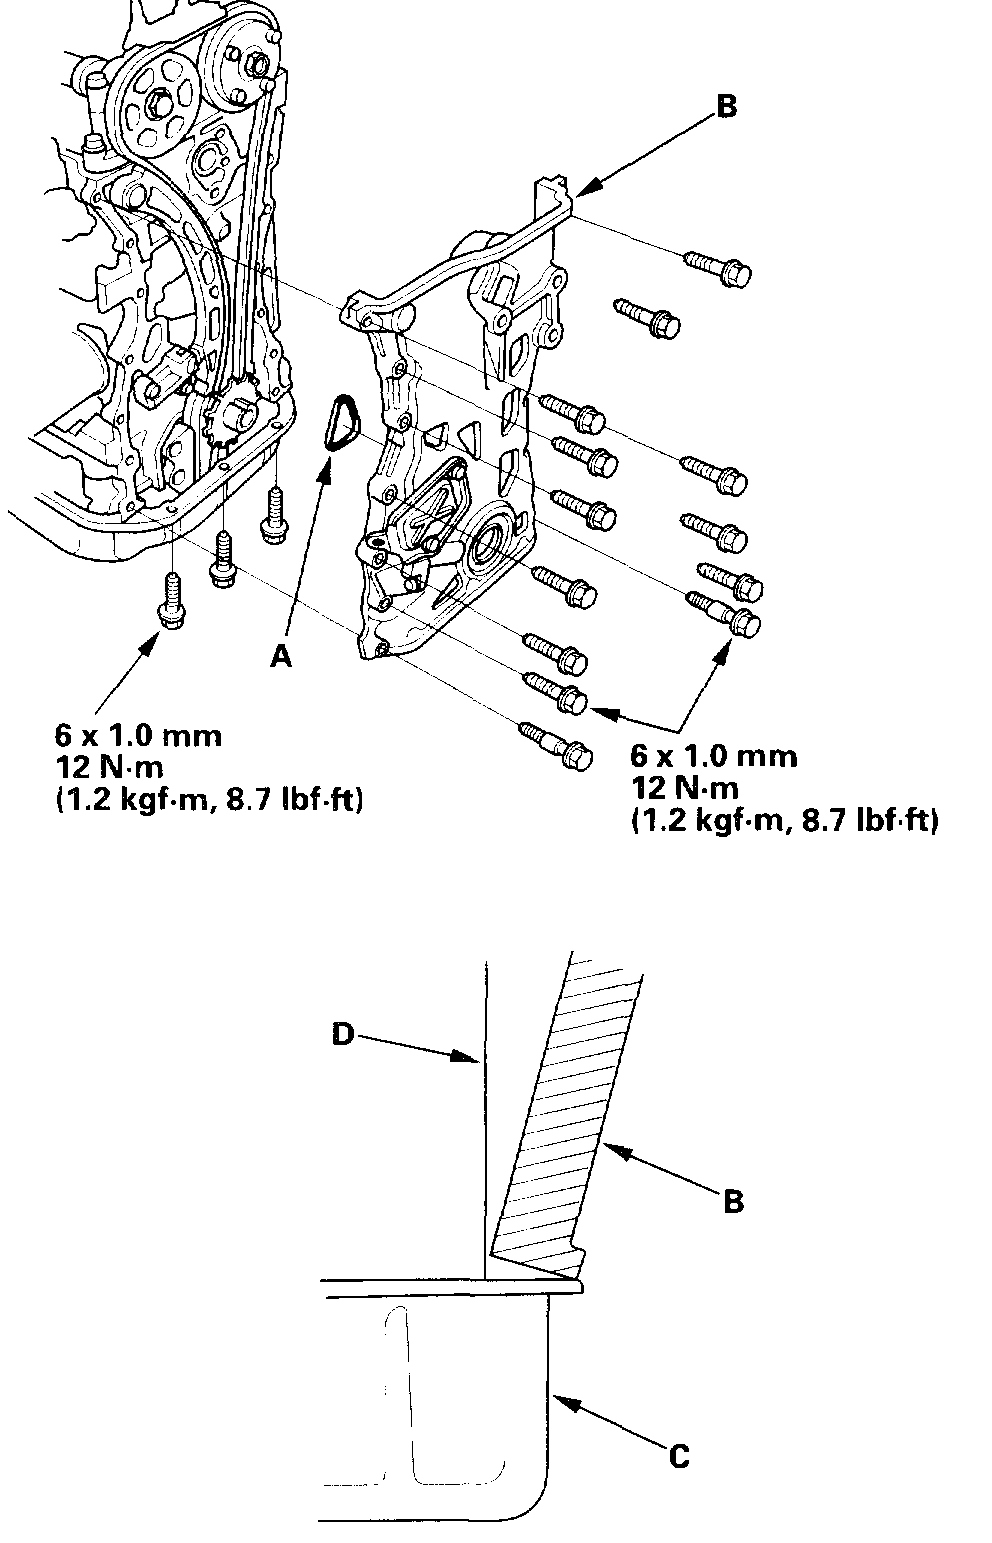
15. Install the new O-ring (A) on the chain case. Set the edge of the chain case (B) to the edge of the oil pan (C), then install the chain case on the cylinder block (D).
NOTE: When installing the chain case, do not slide the bottom surface on the oil pan mounting surface.
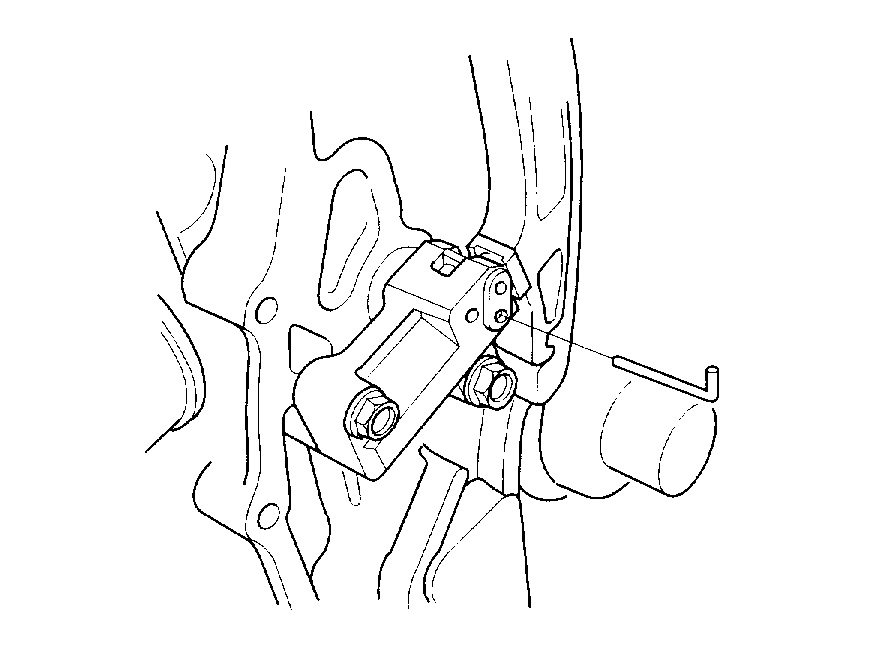
pic 35
16. Install the side engine mount bracket.
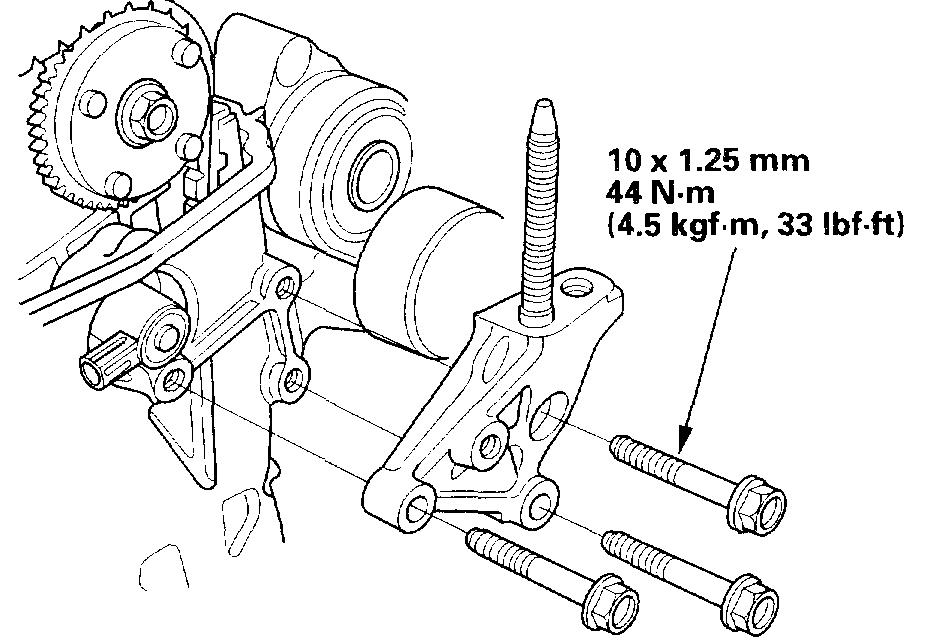
pic 36
17. Install the upper bracket (A), then tighten the bolt/nuts in the numbered sequence shown.
18. Install the ground cable (B).
19. Install the Variable valve timing control (VTC) oil control solenoid valve (see step 1).
pic 37
20. Connect the Crankshaft Position (CKP) sensor connector (A) and VTC oil control solenoid valve connector (B).
21. Install the crankshaft pulley.
22. Install the cylinder head cover.
23. Install the drive belt.
pic 38
24. Install the splash shield.
______________________________________
I hope this helps. Let me know if you need anything and if this takes care of the problem.
Take care,
Joe
Images (Click to enlarge)
Dec 10, 2019 at 5:29 PM