Welcome to 2CarPros.
The fluid is from the hydraulic clutch system. Either the clutch master cylinder is bad, the slave cylinder or the hydraulic line between them. I will provide directions for replacement for all, but you need to look at the pictures I attach and then inspect your vehicle to see where the fluid came from to determine exactly what part needs replace.
_________________________________
I am going to start with the slave cylinder and pray it isn't the cause because the transmission needs removed to replace it. If the slave cylinder is bad, fluid will be seen where the engine and transmission mount together (at the bottom).
Here are directions for the slave. It starts with remove transaxle. I will supply those directions last on this page. All picture correlate with the directions.
____________________________
REPAIR PROCEDURES
Removal
1. Remove the transaxle assembly.
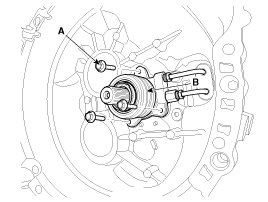
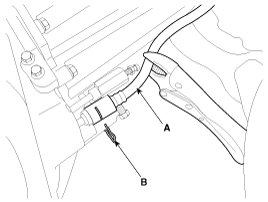
2. Remove the concentric slave cylinder assembly (B) from the transaxle case by removing bolts (A-3ea).
Tightening torque:
11.8 - 14.7 N.M (1.2 - 1.5 kgf.M, 8.7 - 10.8 lb-ft)
pic 1
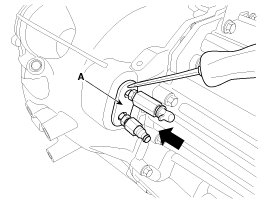
3. Remove the concentric slave cylinder assembly (B) by pushing the rubber (A) to forward.
Pic 2
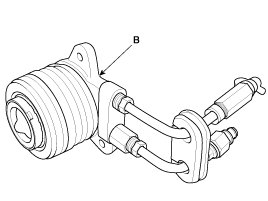
pic 3
Installation
1. Installation is in reverse order of removal.
CAUTION:
- Install the concentric slave cylinder bolts. Not to be bent or twisted, Tighten them in diagonal directions.
- Cup, Inner surface of body and outer surface of tube guide must be free from flaws.
- When it is assembled, it must be free from invasive foreign matters and oil leakage.
Adjustment
Concentric Slave Cylinder Air Bleeding Procedure
CAUTION:
Use the specified fluid. Avoid mixing different brands of fluid.
Specified fluid: SAE J1703 (DOT 3 or DOT 4)
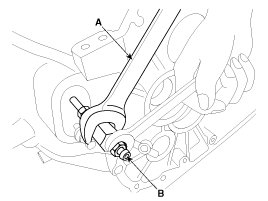
1. After disconnecting a cap from the concentric slave cylinder air bleeder, insert a vinyl hose in the plug.
2. Loosening the plug screw, press and release the clutch pedal about 10 times.
NOTE:
Using a flare nut wrench, hold the air bleeder body, being careful not to rotate it (A). Then use a second flare nut wrench on the plug screw to bleed the clutch master cylinder.
3. Tighten the plug(B) during the clutch pedal pressed. Afterwards, raise the pedal with a hand.
4. After pressing the clutch pedal 3 times more, loosen the plug(B) and retighten it with the pedal pressed. Raise it again, then.
5. Repeat the step 4 two or three times. (Until there is no bubble in the fluid)
Tightening torque:
6.8 - 9.8 N.M (0.7 - 1.0 kgf.M, 9.2 - 13.3 lb-ft)
pic 4
6. Refill the clutch master cylinder with the specified fluid.
CAUTION:
1. Do not clamp the pipe of a concentric slave cylinder.
2. Be careful not to damage O-rings.
_____________________________________________
REPAIR PROCEDURES
Removal Clutch Master Cylinder
If this is bad, chances are you will see fluid on the firewall running down and even on the tubing.
NOTE:
Do not spill brake fluid on the vehicle; it may damage the paint if brake fluid does contact the paint, wash it off immediately with water.
1. Disconnect the push rod from the clutch pedal by removing the snap pin (A) and washer (B).
Pic 5
2. Remove the air cleaner assembly and air duct.
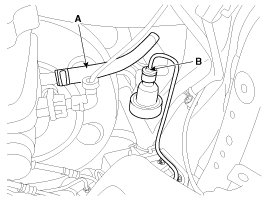
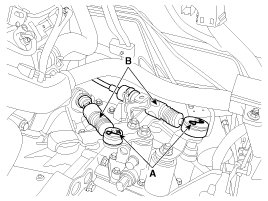
3. Disconnect the clutch tube (B) and reservoir hose (A) from the clutch master cylinder.
Pic 6
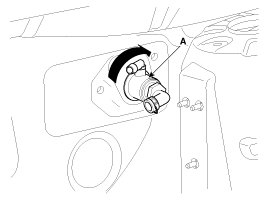
4. Remove the clutch master cylinder by turning it clockwise (A).
Pic 7
Installation
1. Installation is in reverse order of removal.
A. Perform bleeding air procedure in concentric slave cylinder after pouring the brake fluid.
_______________________________
Make sure to also check the line between the two for leaks. However, that usually isn't an
issue.
______________________________
Okay, I really hope you don't need this next part, but if the slave is bad, the transaxle needs removed. Here are the directions.
______________________________
Removal
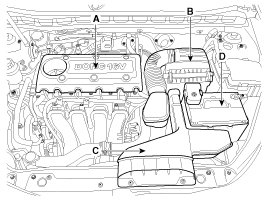
1. Remove the following items;
A. Engine cover (A).
B. Air cleaner assembly (B) and air duct (C).
C. Battery and battery tray (D).
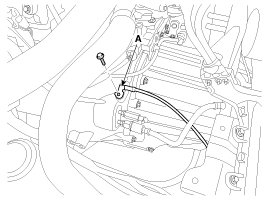
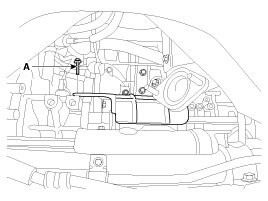
Pic 8 Disconnect the speed sensor connector (A).
3. Disconnect the back up lamp switch connector (B).
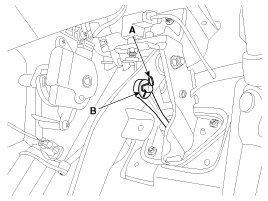
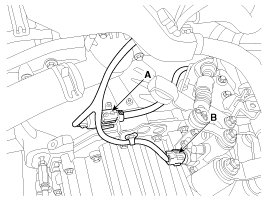
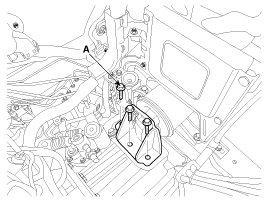
Pic 9 Remove the ground (A).
Pic 10. Disconnect the cable assembly (B) after removing the washer and pin (A).
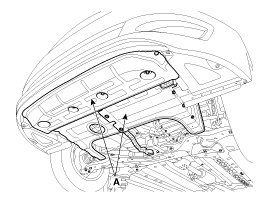
Pic 11. Disconnect the concentric slave cylinder tube (A) after removing the pins (B).
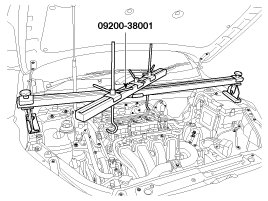
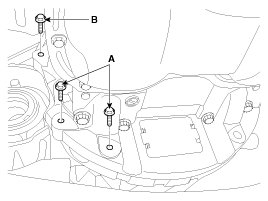
Pic 12 Using the SST (09200-38001), hold the engine and transaxle assembly safely.
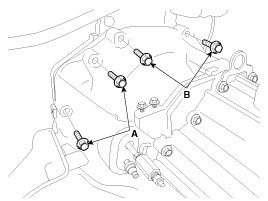
Pic 13 Remove the manual transaxle upper mounting bolt (B-2ea) and the starter motor mounting bolt (A-2ea).
Tightening torque:
42.2 - 54.0 N.M (4.3 - 5.5 kgf.M, 31.1 - 39.8 lb-ft)
pic 14. Remove the cover (A).
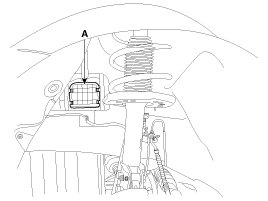
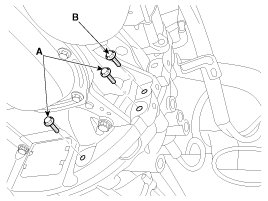
Pic 15. Remove the manual transaxle mounting support bracket bolts (A-2ea).
Tightening torque:
88.3 - 107.9 N.M (9.0 - 11.0 kgf.M, 65.1 - 79.8 lb-ft)
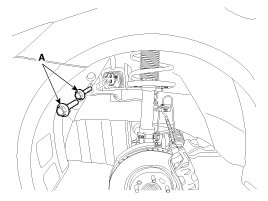
pic 16. Remove the support mounting bracket bolts (A-3ea).
Tightening torque:
58.9 - 78.5 N.M (6.0 - 8.0 kgf.M, 43.4 - 57.9 lb-ft)
pic 17. Remove the under cover (A).
Tightening torque:
7.8 - 11.8 N.M (0.8 - 1.2 kgf.M, 5.8 - 8.7 lb-ft)
pic 18
13. Remove the following items;
A. Drive shaft assembly.
B. Sub frame assembly.
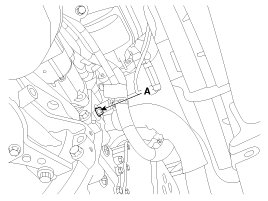
14. Remove the drive shaft cover mounting bolt (A).
Pic 19. Remove the wiring bracket installation bolt (A).
Pic 20
16. Remove the mounting bolts (A-4ea, B-2ea) of lower part of the transaxle, and the left side cover and remove the transaxle assembly by supporting it with a jack.
Tightening torque:
(A) 42.2 - 48.1 N.M (4.3 - 4.9 kgf.M, 31.1 - 35.4 lb-ft)
(B) 42.2 - 53.9 N.M (4.3 - 5.5 kgf.M, 31.1 - 39.8 lb-ft)
CAUTION:
Be careful not to damage other system or parts near by when removing the engine and transaxle assembly.
Pic 21
pic 22
Installation
1. Installation is the reverse of removal.
A. Adding Manual transaxle fluid.
B. Perform bleeding air procedure in concentric slave cylinder after pouring the brake fluid.
____________________________
I hope this is helpful. Please feel free to ask questions or let me know if you need help.
Take care,
Joe
Images (Click to make bigger)
Saturday, June 29th, 2019 AT 8:32 PM