Car will not crank

Tiny
RAMBLERTED
  • MEMBER
  • 1985 CHRYSLER NEW YORKER
  • 2.6L
  • 4 CYL
  • 2WD
  • AUTOMATIC
  • 122,123 MILES
Just purchased car. Nothing on key on except interior accessories. Opened fuse panel and timer relay missing, might this be the issue? Hard to diagnose as I feel like I have no starting point. Everything else is in tact throughout the vehicle. I towed car home and dropped in a new battery. Have not tried anything else yet. 1985 Chrysler Executive Limousine. Basically a 1985 New Yorker. It has the 2.6.
Sunday, March 31st, 2019 AT 5:51 PM

24 Replies

Tiny
JACOBANDNICKOLAS
  • MECHANIC
  • 108,355 POSTS
Welcome to 2CarPros.

When you say nothing but accessories work when you turn the key on, do you mean that none of the dash lights turn on to indicate the key is on? If they don't, I suggest by starting at engine grounds and body grounds. Since this vehicle was modified, a lot was done. To make it a limo, more than just the body was stretched.

Start with grounds if none of the dash lights come on. If they do come on, check to see if you are getting power to the starter. Here is a link to test that:

https://www.2carpros.com/articles/starter-not-working-repair

Here are a few links that you may find helpful:

https://www.2carpros.com/articles/how-to-use-a-test-light-circuit-tester

https://www.2carpros.com/articles/how-to-use-a-voltmeter

https://www.2carpros.com/articles/how-to-check-wiring

As far as the timer, that shouldn't have anything to do with this. I am suggesting to start in these areas because the problem is electrical. Also, make sure the main fuses in the power distribution box under the hood are actually getting power.

Let me know what you find.

Joe
Was this
answer
helpful?
Yes
No
Sunday, March 31st, 2019 AT 7:42 PM
Tiny
CARADIODOC
  • MECHANIC
  • 33,760 POSTS
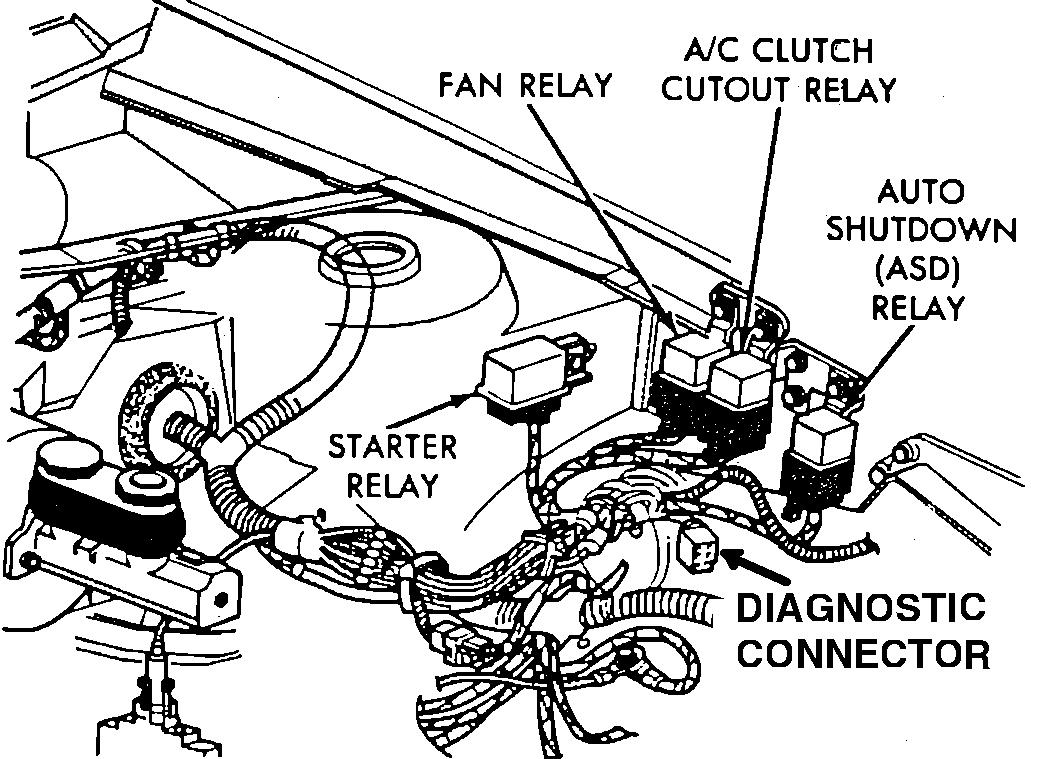
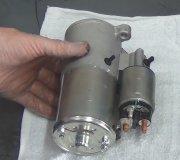
This should be pretty straight forward unless there is some kind of aftermarket accessory added to the starting system. Sorry that my online service manual company is not operating right now, but we should be able to handle this without a wiring diagram. The relays are mounted on the left inner fender right behind the battery. One of those is for the starter system. The drawing is for a '90 Shadow, showing the relays for that model. It is the only one I have saved, but it shows what your starter relay should look like. I think yours is on the inner fender, not on the left strut tower shown here.

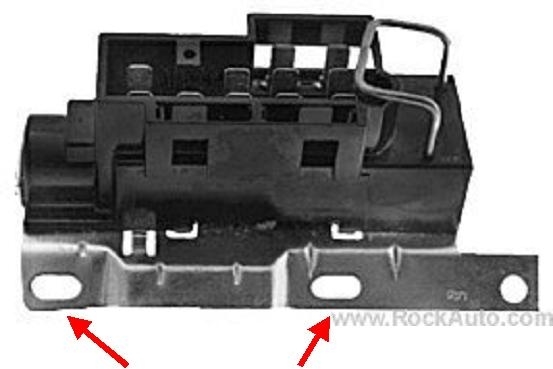
Most of the cars used a fat red and a fat brown wire on the starter relay. A third terminal typically has two small yellow wires. If I remember correctly, the fourth wire is a small black one. The entire starter system can be broken down into four circuits, each with a test point in this relay socket. You can do the tests with an inexpensive digital voltmeter, but for the type of tests we're doing here, a test light can be more accurate. If you don't know how to use one, take a look at this article:

https://www.2carpros.com/articles/how-to-use-a-test-light-circuit-tester

For the first two tests, connect the ground clip as shown in step 2, with the clip on the battery's negative post. Unplug the starter relay, then probe the terminal for the red wire. The test light should light up brightly. Next, probe the terminal with the yellow wire(s). If I have the wire colors wrong, check at both small wires. You should find nothing at first, and it should switch to 12 volts when a helper turns the ignition switch to the crank position.

If you have voltage on those two terminals, concentrate now on only the remaining two. Remove the test light's ground clip and move it to the battery's positive post. The light will light up now when we find a good ground circuit. In fact, that's what the last two tests do. Probe each of those two remaining terminals. The test light should turn on brightly at both terminals. The fat brown wire reads through the starter solenoid, then to ground. If you don't get the correct result, the most common suspect is that wire is corroded or disconnected at the starter motor.

The small black wire reads to ground through the neutral safety switch. If that one is dead, try shifting between "park" and "neutral" a few times. Try it in "reverse" too in case the shifter linkage is out of adjustment.

99 percent of the time you're going to find one of those four circuits is dead, most commonly the neutral safety switch circuit, and next, the ignition switch circuit.

If you find the correct result on all four terminals, the relay itself is the logical suspect. They did have some trouble with age because they aren't sealed against water entry. Typically corrosion builds up between the contacts. You may or may not hear the click when the ignition switch is turned to the crank position. If there's no click, it's because the corrosion is preventing the movable contact from moving. If you do hear it click, those contacts could be corroded away.

If you don't have a test light yet, you can check half of the system another way. Be sure the transmission is in "park" in case the engine starts. We don't want the neighbors laughing at you as you chase after the car. This test bypasses the ignition switch and the neutral safety switch, and just checks the medium-current starter solenoid circuit and the high-current starter circuit. Unplug the relay, then use a stretched-out cotter pin to jump the fat brown and fat red wires together momentarily by touching those two terminals together. The starter should crank the engine. The engine will not start if you leave the ignition switch off. If it cranks, we know those two circuits are okay.

Let me know what you've found up to this point.
Was this
answer
helpful?
Yes
No
Sunday, March 31st, 2019 AT 7:45 PM
Tiny
RAMBLERTED
  • MEMBER
  • 13 POSTS
Test light from ground to red wire at starter relay it lights. Test light from ground to yellow wire with ignition †cranked and held’ no light. Test light on positive to fat brown wire it lights. Test light on positive and small black wires it lights. Jumped brown and red wires and starter engages. So is it the ignition switch?
Was this
answer
helpful?
Yes
No
Friday, April 5th, 2019 AT 9:23 PM
Tiny
CARADIODOC
  • MECHANIC
  • 33,760 POSTS
That is correct, but it's better to say it's the ignition switch circuit. The switch itself doesn't fail real often on this model, especially for the starter circuit. The photo shows what the switch looks like. It's mounted on the top or the right side of the steering column, under the dash. My nifty red arrows are pointing to the two slotted holes the mounting screws go through. Those have 5/16" hex heads. Sometimes those work loose, then the switch shifts a little. It's the switch itself that gives you the solid "click" feel when you turn the key, but the lock cylinder is what limits the travel of the linkage going down to the switch. When the switch moves out of adjustment, you can't get it far enough to engage the starter circuit.

A clue the switch is misadjusted is the accessory circuits often turn on when you move the lock cylinder to the "lock" position so the key can be removed. This usually won't happen when the two screws are loose because the switch slides back and forth instead of switching.

Check that switch first to see if it's loose or misadjusted. If it looks like the switch is defective, we can do a couple of voltage checks to verify that, but that is hard to do with the switch installed. It's hard to get a probe up there into the terminals. We'll discuss that further if necessary.

Don't forget to plug the starter relay back in.
Was this
answer
helpful?
Yes
No
Friday, April 5th, 2019 AT 10:30 PM
Tiny
RAMBLERTED
  • MEMBER
  • 13 POSTS
The switch does not seem loose but the key seems sorta sticky, more like it does not travel fully. I made a quick video. By the way thank you very much for your help with this. I’m not sure if it is the lock cylinder or the switch.
Was this
answer
helpful?
Yes
No
Saturday, April 6th, 2019 AT 8:06 AM
Tiny
JACOBANDNICKOLAS
  • MECHANIC
  • 108,355 POSTS
Welcome back:

I have to be honest, I doubt the tumbler is the problem. In this case, I would remove the switch and check it for operation. There is an actuator rod that runs between the lock cylinder and the switch. I would remove them and see if you can actuate the switch manually.

To remove it first place the lock cylinder in the lock position and remove the key

Remove the buzzer unit (one screw).

There are two screws that hold in the switch. Remove them and turn the switch 90° and slide off the rod.

To install it, first place the rod into the slider. And mount the switch (don't tighten)

Position the ignition switch with the actuator rod in the second detent from top.

Push down lightly to remove lash in the rod itself.

Once lash is removed, then tighten the switch and install the remaining parts.

Do this and let us know what you find. Normally the switch doesn't go bad on these, but based on your video, I have a feeling something has. Also, once the rod is disconnected make sure the lock cylinder turns freely.

I attached a picture of the components.

Let us know what you find.

Joe
Was this
answer
helpful?
Yes
No
Saturday, April 6th, 2019 AT 6:07 PM
Tiny
RAMBLERTED
  • MEMBER
  • 13 POSTS
Dropped the column down, removed the high beam switch (mounted on same screws as the ignition switch) then removed the ignition switch. With the switch out the key and rod move freely. Re-attached the switch per instructions and the rod does not move easily. If I pull the rod towards the wheel with my hand I can force it in to accessory position (not possible using the key). I can also push the rod forward with some force and get it to go all the way into start position (also not possible with the key). Therefore I am to assume it is the switch and i’ll Jump on eBay and find me one?
Was this
answer
helpful?
Yes
No
Saturday, April 6th, 2019 AT 8:27 PM
Tiny
JACOBANDNICKOLAS
  • MECHANIC
  • 108,355 POSTS
Welcome back:

It does sound like the switch is the problem. If it is tight, there is most likely an issue internally with it.

Let us know if that takes care of the problem.

Joe
Was this
answer
helpful?
Yes
No
Saturday, April 6th, 2019 AT 10:26 PM
Tiny
CARADIODOC
  • MECHANIC
  • 33,760 POSTS
Also look at the connector terminals in the switch and the connector. If two of them are dark or the plastic around them is melted, what happened was the section used for accessories including the heater fan, overheated. You'll need to replace those two terminals in the connector, otherwise they will have too much electrical resistance and that will generate heat which will migrate inside and damage the new switch contacts. I can describe how to replace those terminals if it becomes necessary.
Was this
answer
helpful?
Yes
No
Saturday, April 6th, 2019 AT 10:45 PM
Tiny
RAMBLERTED
  • MEMBER
  • 13 POSTS
Thanks to everyone for all the advice but I’m still stuck, literally! Installed a new switch and things are still the same as before. The rod does not move freely with the key in any position. Before installing the switch I could move it easily in all positions. Yes I installed it in the second position (one past accessory).
Was this
answer
helpful?
Yes
No
Saturday, April 13th, 2019 AT 6:42 PM
Tiny
CARADIODOC
  • MECHANIC
  • 33,760 POSTS
Check if there is a wire ring inserted into two holes. If it has that, it is to hold it in a certain position while it is installed. That ring must pulled out. If you look back at the photo I posted, it's at the top right, right above the red arrow.
Was this
answer
helpful?
Yes
No
Saturday, April 13th, 2019 AT 7:37 PM
Tiny
RAMBLERTED
  • MEMBER
  • 13 POSTS
Good thought, I pulled the ring though.
Was this
answer
helpful?
Yes
No
Saturday, April 13th, 2019 AT 7:53 PM
Tiny
RAMBLERTED
  • MEMBER
  • 13 POSTS
Is there supposed to be a thumb ring on the ignition lock cylinder?
Was this
answer
helpful?
Yes
No
Saturday, April 13th, 2019 AT 9:55 PM
Tiny
CARADIODOC
  • MECHANIC
  • 33,760 POSTS
There was a plastic trim ring, but that doesn't affect the operation.
Was this
answer
helpful?
Yes
No
Saturday, April 13th, 2019 AT 10:00 PM
Tiny
RAMBLERTED
  • MEMBER
  • 13 POSTS
Anything else I can look at. Maybe remove the switch and see if the rod is bent? Is the a column lock that could be binding? Could the lock cylinder somehow be to blame?
Was this
answer
helpful?
Yes
No
Saturday, April 13th, 2019 AT 11:03 PM
Tiny
CARADIODOC
  • MECHANIC
  • 33,760 POSTS
You're in an area now not of my expertise. I only rebuilt one column many years ago, and only adjusted a few of these switches. Hopefully JACOBANDNICKOLAS will have more ideas.

If you remove the switch, will the linkage move freely with the key? If it does not, and the car has tilt-wheel, there is a joint in the linkage but I can't remember what it looks like. Next, try to operate the switch by hand to verify it moves smoothly.

I do know the dimmer switch linkage on the left side has a similar articulating connection when the car has tilt-wheel. Those are miserable puzzles to put together. I've always managed to get them to work, but then it amazes me when they don't fly apart again. I can't even describe what I've done with those. I just keep poking at it until it works.
Was this
answer
helpful?
Yes
No
Monday, April 15th, 2019 AT 5:37 PM
Tiny
RAMBLERTED
  • MEMBER
  • 13 POSTS
With the switch removed the key and shaft move freely except in the final position (start). The more I played with things the worse they have become. Now the shifter operates even without the key in the ignition. I do not have a steering wheel puller so I think I may have to hit a salvage yard to find a good working column as it is clear something is wrong internally.
Was this
answer
helpful?
Yes
No
Friday, April 19th, 2019 AT 6:30 PM
Tiny
CARADIODOC
  • MECHANIC
  • 33,760 POSTS
Do a search for "Pull-A-Part" and see if they have a yard near you. They used to have 23 yards and I've been to 16 of them. Lately they added more in the southwest. All their yards are very clean and well-organized, parts are inexpensive, and customers and employees have always been friendly and helpful. You pay your buck, take your own tools, and you can spend all day there. They have hand-washing stations too. There are a lot of other similar yards popping up, but none will be as clean as these.

Look for a joint connector under the dash where you loosen a 13 or 15mm nut, then the shaft comes apart there. The nut stays in place. As you turn it, the special bolt backs out until it can be removed, then the connector swivels to come off the shaft. The other way to disconnect the shaft is to go under the hood and tap out a roll pin, then slide the coupler up off the splined shaft on the rack and pinion assembly. I made a special punch for this purpose that was angled for better access and a little smaller than needed so it wouldn't get stuck. On some models this is not a difficult procedure, but on others it can be frustrating.
Was this
answer
helpful?
Yes
No
Friday, April 19th, 2019 AT 7:09 PM
Tiny
RAMBLERTED
  • MEMBER
  • 13 POSTS
Had a column shipped in UPS. Internals work great but they sent a column without cornering lights even though I specified. I can return but I want to get this thing running. Should I attempt to switch the sticky column switch to my new column or just install and forget about connecting the two cornering light connectors?
Was this
answer
helpful?
Yes
No
Friday, May 3rd, 2019 AT 9:27 PM
Tiny
CARADIODOC
  • MECHANIC
  • 33,760 POSTS
I can't find any reference to a turn signal circuit without cornering lights, so my guess is you were sent a column from a different model. Chrysler has always been real good about parts interchangeability, so I suspect you're going to find the connector on the new column matches the one on the car and will plug in just fine, but three wires will be missing in the column's plug. These three diagrams are all of the signal circuit. The fourth one is a copy of the third diagram, but I circled the extra switch for the cornering lights.

My suggestion would be to stuff the column in and get the starting system working, then take the old one apart down to the signal switch and see if you can pull it out and transplant it into the new column. You'll need a steering wheel puller which you can find at Harbor Freight Tools or any auto parts store. Some parts stores rent or borrow tools too. That's a better alternative when you are likely to never need it again.

The hardest part of replacing the signal switch, other than getting the steering wheel off, is passing the 2"-wide connector up through the 1"-wide hole. The trick is when you remove the switch from your new column, tie about a three-foot-long piece of wire to the plug. As soon as the connector comes out dragging the wire with it, take the wire off and tie it to the old switch connector you're going to use. Pull the wire down from under the dash to pull the connector down.

The other trick is to bend all the wires to orient the connector so it slides down the narrow way. If it hangs up, pull the wire harness back a few inches, then try again. If it keeps getting stuck, hold back on the harness as you pull the wire. That tension will cause the connector to straighten out a little and help it pass what it's catching on.

On most of these columns there is also a black plastic cover that should be popped off to get the harness through. That is held on with four plastic pop clips. A wire cutter works well to pry those out, but be careful to not snip the heads off. If you break any of those clips, you have those from the old column, or you can find replacements at an auto parts store or any body shop.

Be aware too to only use the puller to remove the steering wheel. I saw a fellow hold the wheel up with his knees, then smack the shaft with a hammer. He found out the shaft is in two pieces held together with a plastic rivet. That is designed to sheer off in a crash and let the column collapse. When he smacked it, the steering wheel dropped about six inches, and he had to wait many days to find a replacement column. That shear pin will not break easily or unintentionally as long as you don't take your frustrations out on it with a hammer.
Was this
answer
helpful?
Yes
No
+1
Saturday, May 4th, 2019 AT 9:49 PM

Please login or register to post a reply.

Sponsored links