Car pulls on highway curves at a certain point of steering

Tiny
BLACKBOY454
  • MEMBER
  • 1993 SATURN SL2
  • 130,000 MILES
Louie, I hope you'll be reading this
i started noticing that my steering isn't as solid as it used to be a while ago and when I had been driving on a highway I don't drive everyday around a curve I had noticed that when the steering got to a certain point the car would yank me in the direction I was turning. It would doing turning left or right mostly at highway speeds, between 60 and 75.
i just got done replacing the rack and pinion in it tonight and had the car aligned and it seems to be better off turning left but turning right is still pulling really hard at that sweet spot in a curve.
i dont think it is the tie rod ends because the passenger side one is brand new as of tonight 10/21/2013 and the driver side one was replaced 2 years ago, along with other parths in the following list: both balljoints, tie rod ends, both strut mounts, all 4 engine mounts, wheel bearings, transmission, clutch kit, plugs and wires, oil pan gasket, valve cover gasket.
i know some of the parts in that list are irrelevant to the steering system but all of that was done around the same time frame when the engine was out of the car for the tranny replacement. I had a friend who has experience in mechanics look at it and he is confused as well, he is thinking the most likely candidate is the control arm but both of those were replaced 2 years ago and it doesnt seem like that is enough time to make that part go bad. Any help would be appreciated because I am stumped and dont have a ton of cash to bring the car to a mechanic.

thanks in advance. Matt
Monday, October 21st, 2013 AT 5:27 PM

56 Replies

Tiny
CARADIODOC
  • MECHANIC
  • 33,750 POSTS
Simple cause and easy fix. This only happens on GM front-wheel-drive cars. The clue is the clutch and engine work. To work on them on GM products you have to drop the engine cradle. It is absolutely critical that you mark the four bolts in some way so that cradle is reinstalled in the same orientation. If it is reinstalled off-center to one side, the two lower control arms will shift too because they're attached to it. That moves the bottoms of both spindles and causes both front wheels to tip in the same direction. That changes one of the three basic alignment angles called "camber". Camber affects the way each tire wants to pull. They will pull in the direction they're leaning. Most GM front-wheel-drive cars are not adjustable for that from the factory but they can be made adjustable. The problem is that is not the whole story. Most alignment mechanics measure and adjust camber but with the shifted engine cradle, the angle of the two front struts has shifted too. That's called "steering axis inclination", (SAI). All alignment computers measure it automatically but we rarely look at those numbers unless we suspect hidden crash damage.

When only camber is adjusted during the alignment, even though the wheels are set properly for least tire wear an no pull, in effect, the upper strut mounts, which are the upper steering pivot points, are not equal. One strut is standing up too straight and one is leaning over too far. That will make for a real unstable car and driving it will be miserable and tiring. It will dart one way or the other unexpectedly, and as the front end goes up and down over bumps in the road you'll see the steering wheel turn left and right on its own.

Have the car aligned but tell the mechanic he has to readjust SAI because the cradle was removed. That just involves loosening the four bolts, then using a long pry bar to slide the cradle to one side. There is no spec. Given for SAI on most cars. All that is necessary is both sides are the same within 0.2 degrees. Most cars will have in the area of 28 to 32 degrees. Changing SAI changes camber so the wheels will have to be readjusted again after SAI is done. Changing camber does not change SAI.

If toe is not adjusted to specs that will also make the car hard to control. The tires will be steering in slightly different directions, and the car will follow the tire with the most weight on it. The clue there is there will be a choppy or feather edge wear pattern on the tread of both tires.
Was this
answer
helpful?
Yes
No
Monday, October 21st, 2013 AT 9:08 PM
Tiny
SATURNTECH9
  • MECHANIC
  • 30,870 POSTS
Cardiodoc this isn't your typical gm car most of the car is only found on the Saturn S model. To set the subfram straight and even is easy no marking needed. In front of the front subframe bolts you have alignment holes loosen the subframe then use a long 3/8" drive extension to line up the hole on the subframe with the frame of the car.
Was this
answer
helpful?
Yes
No
Monday, October 21st, 2013 AT 9:46 PM
Tiny
BLACKBOY454
  • MEMBER
  • 162 POSTS
Louie do you have an idea of how quick adjusting the subframe can be done by myself with the help of my brother? I could try to get it done on a saturday but naturally I cant be down my vehicle again. And then I would have to get the tires aligned again? I hope my friend who did the alignment yesterday is spot on. His method has been working for his vehicles for years and it worked on mine quite nicely 2 years ago. And another question for clarification, I would also need to adjust for camber on the point where the struts meet the wheel as well?
Was this
answer
helpful?
Yes
No
Tuesday, October 22nd, 2013 AT 6:26 AM
Tiny
SATURNTECH9
  • MECHANIC
  • 30,870 POSTS
If you have air tools you can do it by yourself in less then ten mins. You didn't have a four wheel alignment done on a computer alignment machine?Also the front camber an toe will can be adjusted on that car. In the rear you can adjust the rear toe and camber as well. Your alignment needs to be on a machine not by eye or with a tape measure.
Was this
answer
helpful?
Yes
No
+1
Tuesday, October 22nd, 2013 AT 9:00 AM
Tiny
BLACKBOY454
  • MEMBER
  • 162 POSTS
Ok, I guess I will have to suck it up and shell out the cash for a professional alignment. I'll let you know how it goes. Unfortunately I do not have air tools, just hand tools but I should have the proper ones to get the job done.
Was this
answer
helpful?
Yes
No
Tuesday, October 22nd, 2013 AT 12:32 PM
Tiny
CARADIODOC
  • MECHANIC
  • 33,750 POSTS
Hi saturntech9. Thanks for the additional comments, but I'd like some clarification please. Like I said, it's an easy fix, ... On the alignment computer, to just shift the cross member, but the impression I got from you is those holes are drilled or punched on the assembly line after the cross member has been installed and adjusted. If that's the case, all that would be needed is to realign them when reinstalling it after it was removed. I thought the holes were just there to allow the cross member to be shifted around. The bolts center the cross members on Chrysler products. A lot of cross members are welded on Fords. If the holes just need to be lined up, is that true for other GM models? I always used black spray paint to make "witness" marks so an alignment wasn't needed after the service.

Blackboy454, it sounds like your friend is using a carpenter's level to make alignment adjustments. If not, don't laugh. I saw a guy do that on a couple of '70s cars with uncommonly good results, but that is not nearly accurate enough for your car. With the equipment of that era we could adjust camber to within about 1/16 of a degree. (For reference, 0.0 degrees is a wheel standing straight up and down, and 90 degrees, if you can imagine it, would be the wheel laying flat on its side). The typical GM car called for around 3/4 degree positive camber on the front, wheel tipped out on top, and the tolerance was something like 1/2 degree. All cars today get much more precise and all alignment computers can be set to read to 0.01 degree. You won't see that small increment with a level, a string, a pendulum, or tape, measure.

Also consider that when the car is sitting on the alignment rack, the tires are free to squirt out on sliding plates and go to their natural resting spot. That can't happen when you let the car down from a jack. Where the tires rest on the rack is not the same as when driving down the road. They have found that for best tire wear and handling on the road, the alignment specs we set the car to pertain to a car sitting on those slip plates.

As a related side note, all of this only applies to a car that is sitting at the correct ride height. If the springs are sagged from age, or Heaven forbid the ride height is altered, the alignment will mean nothing. The suspension geometry changes with changes in ride height and alignment specs are designed around the changes that take place when starting from the correct ride height.

When your alignment is done, you should have a perfectly straight steering wheel and the car should not pull to either side when you let go of the steering wheel. Those two things can be seen right away. The third thing is proper tire wear and that takes a while to show up.

Check out this master artwork I drew for my students. This shows SAI and what happens when the cross member is shifted to the side a little. The camber adjustment point is the connection between the top of the dark black spindle and the two bolts at the lower end of the strut. Those bolts are loosened and the spindle / wheel / tire is pulled or pushed to the desired setting.

You mentioned moving the upper strut mounts. That will change camber AND SAI. That was how camber was supposed to be adjusted on a lot of Ford products in the '80s. Sagged springs and sheet metal often resulted in us having to adjust both struts all the way to the left side of the car and while that did bring camber close enough to specs to get rid of most of the pulls and tire wear, you could sense that the handling wasn't quite right. The Ford engineers haven't been able to build a car or truck with a decent suspension system for decades. Your car can be easily adjusted to provide excellent tire wear and handling, but only with a proper 4-wheel alignment. The rear wheels do not have to be adjusted if none is needed, but a 4-wheel alignment indexes the two front wheels off the rear ones to insure the steering wheel is straight. All alignment computers measure all four wheels automatically so you don't have to specify you want a 4-wheel alignment like we had to in the '80s.
Was this
answer
helpful?
Yes
No
+1
Tuesday, October 22nd, 2013 AT 1:57 PM
Tiny
BLACKBOY454
  • MEMBER
  • 162 POSTS
To add onto my disclosed history of the car, 2 years ago the strut mounts were replaced and we aligned the tilt of the wheels with a metal Square on a completely flat cement slab the car was parked on and then adjusted the tow in by running a string from the rear tires to the front and adjusted the tie rod ends accordingly. This had been perfect for almost 2 years, when I let go of the wheel it went down the road straight and just slightly starts to veer to the right like a proper alignment should, according to my dad. And I think in mid august to early september this year I had a mishap with a highway on ramp. The cement dropped off a decent amount, im guessing 8 to 12 inches. I was looking over my left shoulder to veer and my rookie mistake was not making sure my angle of approach was right. My front passenger side tire went off of that ledge and heard a loud bang, what I assume was the frame hitting the edge of the cement. I stopped immediately on the freeway, which you're not really supposed to do, to check it out. I saw no visual damage what so ever, no leaking fluids, and the car drove fine so I put it out of my mind as I got lucky. Now im thinking that mis hap may have had enough force to alter the position of the subframe. Other than that event I know of nothing that would have altered the position or alignment.

On another note one of my calipers is acting up and causes some brake steering. But I dont feel any brakes holding up and if they were holding up it would drag me to one side or the other going down the straight and not just on curves.
The tires are all brand new as well as of a couple weeks ago. The problem was a little more noticable after the new tires were put on and before the rack and pinion was replaced, I think it was more noticable because of the increased grip from the new tires.
I am still a novice when it comes to cars but know more than your average high schooler. I am about to graduate from my college program and already have a job in my field of study as an IT technician. Unfortunately still dont make enough to have my vehicle professionally service which explains my presence on this site.
Thanks again both of you for all your help.
Was this
answer
helpful?
Yes
No
Tuesday, October 22nd, 2013 AT 2:29 PM
Tiny
SATURNTECH9
  • MECHANIC
  • 30,870 POSTS
Cardiodoc yes there are two holes in front of the two subframe bolts one in the subframe and on in frame Line the two up with the subframe then the subframe is aligned. Matt that drop off could have bent something and it threw the alignment off. Ether way you need a computer alignment. Cardiodoc to set camber on those you loosen the lower strut bolts and tilt the wheel. To set front caster you would grind the upper strut Mount holes.
Was this
answer
helpful?
Yes
No
Tuesday, October 22nd, 2013 AT 5:49 PM
Tiny
CARADIODOC
  • MECHANIC
  • 33,750 POSTS
Lots of dandy information here so just let me add a few comments I thought of. First of all, no instructor will ever teach that an alignment should leave the car drifting to the right. The thought is that if you fall asleep at the wheel, you'll drift into the ditch instead of oncoming traffic. To me that is an excuse for why someone didn't align my car properly. Experience here plays a much bigger role than learning in a school because you have to become familiar with the stretch of road you use for test-driving customers' cars. I was the alignment specialist at a very nice Chrysler dealership through all of the '90s, and for those ten years I always followed the same route and knew how the cars should act. I knew they should pull a lot to the left in one spot and that they'd drift a little to the right in another spot. If that's what the car did, I knew they owner wouldn't be back with a pulling complaint. Without that experience the only thing you have to go on is the numbers on the alignment computer screen. If the car pulls when you're done, you don't know if it's the road, the tires, the brakes, or you messed up the alignment.

As I mentioned earlier, I watched a coworker align two '70s cars, a Lincoln Continental and a Chevy Impala, with a carpenter's level, and the stupid idiot, (my friend), got good results. That can work for a lot of cars but it's very easy to have no pull and a straight steering wheel when both tires are tipped in or out too much on top. As long as they're equal, those two things will be okay but there can be tire wear on the inner or outer edges that will take a long time to show up.

Getting back to that drift to the right, that WILL occur on most roads if you set "camber" exactly equal on both sides. That's the tip in or out on top of the wheel / tire. I can't remember the specs for every car but a huge percentage of GM front-wheel-drive cars call for 0.00 degrees, and that's what you would get with a carpenter's square. Beyond that, we always adjust the left wheel to tip out on top a fuzz more than the right one. Camber makes a tire want to steer or pull in the direction it's leaning, so it has to be right for proper tire wear, and it has to be equal to go straight. The reason for making the left wheel higher is to offset "road crown". All roads slant to the right so rain will run off. When camber is exactly equal on both sides, the car will drift to the right because of that road crown. That adds to why many people think it's normal to have that drift. I found that every Chrysler front-wheel-drive model needed exactly 0.06 degrees more camber on the left to make them go straight. You'll never see that with a carpenter's level. Besides the fact the tire bulges out on the bottom from the car's weight, that tiny amount would equal about 1/64" at the top part of the sidewall. If you tried to make that adjustment sitting on the ground instead of slip plates, Chryslers and most GMs are adjusted at the two lower strut mounting bolts like saturntech9 said. That brings the top 2/3 of the wheel and tire out, (if that's the way you're adjusting it), but since the lower ball joint becomes the pivot point in effect, the bottom 1/3 moves in as the wheel moves. The tire tread is going to stick to the road and the sidewalls will just flex. You will only see the results of that change with a level or square at the top of the tire, not at the bottom, so you'll only see half of what really took place. It would be more accurate to place the level between the upper and lower edges of the wheel, not on the sidewalls of the tire. That is why we need slip plates on the alignment rack, ... So the bottom of the tire can slide around freely.

The only thing I would feel fairly confident on after using a square is you got both wheels set the same. I learned over time that most GM front-wheel-drive cars are quite forgiving of road crown. Where Chryslers need 0.06 degree camber pull to the left, GMs didn't need any extra camber to go straight.

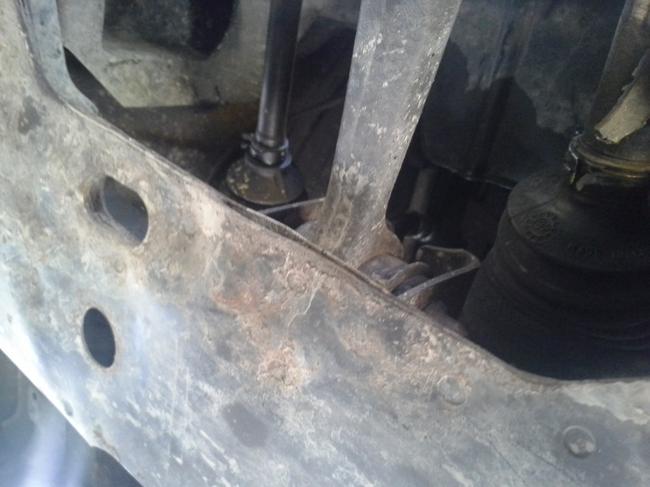
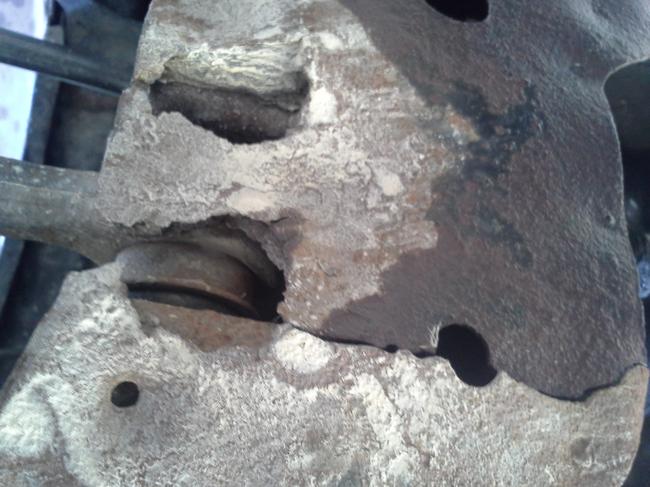
By the way, the reason I jumped on the cross member at first is you said there was engine work, clutch work, and now the steering rack. Any of those are potential reasons to remove the cross member, and by far the most common complaint after that is miserable steering control and the steering wheel shifts position as the car goes up and down over bumps.

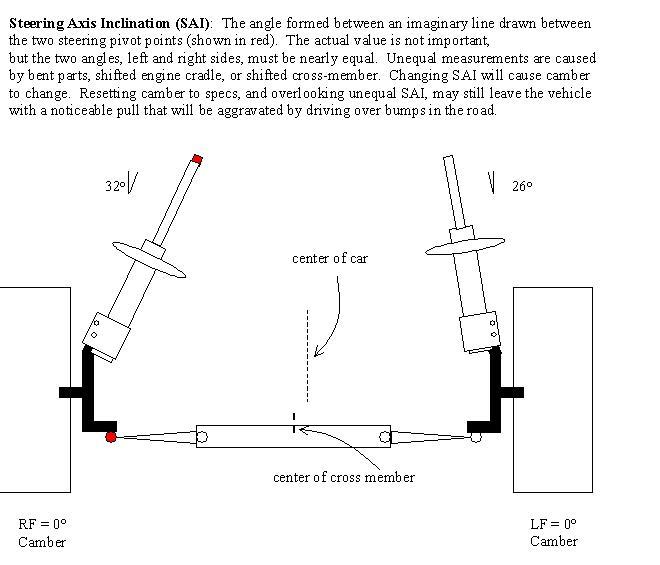
"Caster" that saturntech9 mentioned is the angle of an imaginary line drawn between the two steering pivot points as you look from the side of the car. In your case that's the lower ball joint and the upper strut mount. On older vehicles that was the lower and upper ball joints. Caster is easiest to visualize if you look at the rake of a bicycle or motorcycle fork. It tilts to the rear on top. That's positive caster and is what makes it possible to ride no-handed. Weight on the assembly makes the tire squirt out straight ahead. On cars it makes each wheel want to turn toward the center. They offset each other when the steering linkage is connected between them. Caster has very little effect on tire wear but it mainly affects pulling to one side and steering wheel return after cornering. Big heavy cars and trucks used to be easy to steer up to the late '50s and early '60s because they used negative caster, but steering wander became a problem when higher speeds on the highways became common. Making the caster positive and higher, in the area of 3 degrees, got rid of the wander and made the vehicles more stable, but it made it a lot harder to turn the steering wheel. That's why they added power steering. The biggest thing is that it must be the same on each side. Positive caster makes the left wheel want to turn to the right just from having the car's weight on it, and the right wheel wants to turn to the left. When you connect the steering linkage between them, they balance each other out and the car goes straight. When caster is higher on one wheel, that one wants to turn toward the center of the car harder than the other one and that results in a pull. Here's the clinker though. On 99 percent of front-wheel-drive cars, unequal caster results in no noticeable pull. I've never gotten an acceptable answer although it might be related to my next comment, but on rear-wheel-drive cars caster has exactly half the effect on pull as camber. '60s and '70s Chryslers called for 1/2 degree camber on the left and they specified 1/4 degree on the right, knowing that was what was needed to offset road crown. GMs often called for around 3/4 degree and we also put in that 1/4 degree pull to the left. However, if you wanted to, you could achieve the exact same offset to road crown by adjusting in 1/2 degree more caster on the right. These were big, heavy cars, but that tiny 1/4 degree was very noticeable when it was missing. I had one front-wheel-drive car in the mid '90s that had 3.0 degrees difference in caster after crash damage was repaired. I sent it back to the body shop, but they assured me nothing was wrong. Surprisingly it did go perfectly straight after the alignment. Caster wasn't adjustable and it didn't cause a problem. That's why front-wheel-drive cars don't have caster adjustments. The few older imports that did only had two settings depending on how you rotated the upper strut mount. Even they knew it wasn't critical. As far as moving the upper strut mount forward or backward, I don't remember ever finding it necessary to attempt that, but on most cars, shifting the strut could lead to the coil spring rubbing on the inner fender. One notable exception is the Camaro / Firebird that has caster adjustment capabilities built in, but those are rear-wheel-drive.

Your comment about a brake pull got my attention too because that is no longer a reliable indicator of anything due to design changes in the suspension geometry. Older cars had about 70 percent of the weight on the two front tires. Front-wheel-drive models have about 80 percent on the front. We used to have the brake hydraulic system split so one half ran the front brakes and the other half ran the rears. With so much weight on the front, if you'd pop a brake line and only had the rear brakes working, the car would go and go until they found you in the next county. To address that, all front-wheel-drive vehicles I'm familiar with use a "split-diagonal" hydraulic system. Each front wheel is on a different system so if you pop a line you'll still have 50 percent of your braking power. The left front and the right rear wheels are on the same system. Now the issue is if you pop a line, only one front brake will work. On older cars that would result in a real hard brake pull to that side. I drove a car that a guy blocked the leaking line to one front wheel. It just about tore the steering wheel out of your hands when you hit the brakes. The reason that doesn't happen on front-wheel-drive cars is the engineers changed a non-adjustable alignment angle called "scrub radius". In my pretty artwork up above, I described SAI as the line through the upper and lower steering pivots. If you extend that line down to the road, it used to intersect the tire tread right in the middle. The effect of that was to make the left half of the tread stick to the road, (or "scrub), and try to turn the entire tire to the left. The right half of the tread wanted to turn the tire to the right, and the two forces balanced each other out. By the way, altering ride height, installing taller tires, or installing wheels with a deeper offset, like we liked to do in the '70s, changes scrub radius. Now that we're smarter we understand the ramifications of doing that, ... So we don't.

On the front-wheel-drive cars scrub radius is changed so that imaginary line intersects the road further outside on the tire tread. Now, perhaps 3/4 of the tread wants to pull toward the center of the car and only 1/4 wants to pull away from it. The two tires still offset each other equally and the car goes straight, but when you have a brake hydraulic failure on, ... Let's say the left side, when you hit the brakes, the right brake will make that tire want to pull back which turns it to the right. With 3/4 of the tread now pulling to the left, that is enough to offset that and the car stops in a straight line without having to do anything with the steering wheel. I've found that on most Chryslers you won't see anything in the steering wheel but you'll of course have a mushy brake pedal from the leak. On almost all other cars you'll see a very tiny wobble in the steering wheel when you hit the brakes but the car will still stop in a straight line. That barely perceptible wobble will go unnoticed by almost all car owners but it's a valuable clue, especially on GM cars. They have a valve in the brake master cylinder that shifts position to block off the two ports feeding the hydraulic system with a leak. You don't lose all the brake fluid that way, which is nice, but other than the red "brake" warning light on the dash, you won't have any other symptoms. People have been known to drive like that for months staring at that light and not realizing they only have half their brakes. The steering wheel wobble is the clue.

The other somewhat common complaint is new brake pads wear out real quickly on one side but look like new on the other side. People who understand how brakes work assume one caliper is sticking and not releasing, but in reality it is the only one that is working and has to do all the stopping. The warning light will usually not be on and you won't really feel the loss in braking power.

Sorry to get so far off the subject, but that is why brake pulls act differently than you would expect. To illustrate scrub radius further, my daily driver is an old rusty trusty '88 Grand Caravan. It's getting so bad that I've had to weld up holes rusted right through the wheels. Right now I have one leaking so badly I have to pump that tire up every morning. It drives perfectly straight, but when I come home late at night the left tire is down to about 20 pounds, which is real easy to see, and it makes the van pull hard to the right. All our experience and common sense says a vehicle should pull toward the flat tire but in this case it pulls the other way. That tire is scrubbing much harder on the road surface than the right tire, and 3/4 of that tread is pulling to the right. Try explaining that to a knowledgeable customer complaining of a pull to the right being caused by the left tire.

As for your string to adjust front toe, we used to do that on race cars where it wasn't real critical on short tracks, but you have to remember that is setting "total toe" which only addresses tire wear. If both wheels are misadjusted to the same direction, left or right, an equal amount, total toe will still be correct but the car will steer that way. To make up for that you have to turn the steering wheel the other way to bring the wheels back to straight ahead. That's the complicated way of saying the steering wheel will be off-center. With rack and pinion steering it's easy to know which way to turn a tie rod to turn the wheel, and you can turn each one an equal amount in opposite directions, (lengthen one, shorten the other), to keep total toe the same but center the steering wheel. On the alignment computer however, most cars call for 1/16" total toe-in, plus or minus 1/16", and to get that 1/16" of change requires turning a tie rod about 1/32" of a revolution. I used to put chalk lines on them so I could see how far I was turning each one, and I learned it was impossible to set them precisely by doing it freehand. You need the precision of the alignment computer to get it right.

I had to change the first outer tie rod end at 200,000 miles, and being the smart guy I thought I was, since I was just replacing one part, I drove the van to see where the steering wheel was, then stopped and adjusted that same tie rod until the steering wheel was straight again. Logic says if total toe was correct before and the steering wheel was straight, if it's straight now, total toe should be right again. Guess again. There was some feather-edging that showed up a couple of months later. Of course, being the smart fellow I REALLY am, I knew how to "read" that pattern and know which way to tweak the adjustment. The point is the tire wear will show up eventually before you'll see a crooked steering wheel when toe is off just a little.

Sorry for getting so long-winded. As a former instructor, I can't help myself when someone takes an interest in how their car works and wants to learn more. That's why a lot of us are here.
Was this
answer
helpful?
Yes
No
+1
Wednesday, October 23rd, 2013 AT 2:19 AM
Tiny
SATURNTECH9
  • MECHANIC
  • 30,870 POSTS
To change the rack and lion on this car you don't have to ness with the subframe. Matt did the rack cone with new inner tie rods? Also did you check the tie rods it didn't come with?
Was this
answer
helpful?
Yes
No
Wednesday, October 23rd, 2013 AT 8:29 AM
Tiny
BLACKBOY454
  • MEMBER
  • 162 POSTS
Ok so i'm still in the process of reading the info provided by caradiodoc.
Louie the rack and pinion came with the inner tie rod ends installed already with the rubber boot and clip in place, I thankfully did not have to touch them. The outter tie rod ends just screw on and the jam nut holds them in place, I think its a 18 or 19mm nut. The driver side is now 2 years old and due to me or my brother losing the nut for the other tie rod end I just said screw it and I got a whole new tie rod end for the passenger side so I would have the proper nut that goes with it.
You completely lost me at rack cone.
If the problem was the tie rod ends the driver side tie rod is the only culprit left, aside from the power steering pump itself. The pressure line was also replaced because the old one twisted and kinked in the removal process. Fortunately the return line didn't because the local parts store did not have that one in stock. The return line was not replaced.
As for the installation of the rack and pinion and attachment of the hoses I cannot comment on any details, I was not present when it was done by my brother.
Was this
answer
helpful?
Yes
No
Wednesday, October 23rd, 2013 AT 1:01 PM
Tiny
SATURNTECH9
  • MECHANIC
  • 30,870 POSTS
I only mention the tie rods because you want right make sure there good before getting the alignment as well as the ball joints.
Was this
answer
helpful?
Yes
No
Wednesday, October 23rd, 2013 AT 1:47 PM
Tiny
BLACKBOY454
  • MEMBER
  • 162 POSTS
The ball joints were both replaced 2 years ago with that list of work that we did.
Was this
answer
helpful?
Yes
No
Wednesday, October 23rd, 2013 AT 2:21 PM
Tiny
BLACKBOY454
  • MEMBER
  • 162 POSTS
Previous 2 pics are the subframe alignment holes, pics on this comment are a possible rust problem.
The clean looking point where the ball joint attaches is the passenger side and the really rusty one is on the driver
Was this
answer
helpful?
Yes
No
Saturday, October 26th, 2013 AT 9:51 AM
Tiny
SATURNTECH9
  • MECHANIC
  • 30,870 POSTS
With all that rust I would loosen the frame and use a big dead blow hammer to align the holes.
Was this
answer
helpful?
Yes
No
Saturday, October 26th, 2013 AT 2:50 PM
Tiny
BLACKBOY454
  • MEMBER
  • 162 POSTS
I was able to loosen the front bolts no problem, both of the rear ones are being a pain in the butt though. And I wish I had a deadblow hammer. As of right now I was just riding my motorcycle around today and the car is on jack stands.
Was this
answer
helpful?
Yes
No
Saturday, October 26th, 2013 AT 3:34 PM
Tiny
SATURNTECH9
  • MECHANIC
  • 30,870 POSTS
They have a pretty good dead blow hammer at harbor freight for 10 and they have 20 percent coupons all the time. Its a 10LB hammer.I have had mine from there or yrs.
Was this
answer
helpful?
Yes
No
Saturday, October 26th, 2013 AT 4:45 PM
Tiny
BLACKBOY454
  • MEMBER
  • 162 POSTS
Louie, do you think that the rust on the frame in the first 2 pics will be a problem. My brother said that its possible that the metal is flexing, but the bottom is the only thing that is rusted around the driver side control arm/ball joint. The square bracket still looks pretty solid on top and where the actual bolt holds the control arm to the subframe and I hadnt had an issue with it before. I dont think its anymore rusty than it was over 2 years ago when we did all that work to it. I find it hard to believe that the same amount of rust on the subframe is suddenly contributing to a problem. But you have to admit, it looks pretty bad on the driver side with that crack under the subframe. I dont have any harbor freights near me, not that I know of so I will probably just go to my local menards or other hardware store and get a big deadblow hammer to knock that sucker into place.
Was this
answer
helpful?
Yes
No
Saturday, October 26th, 2013 AT 6:18 PM
Tiny
SATURNTECH9
  • MECHANIC
  • 30,870 POSTS
From the pic the rust over by the lower control arm doesn't look that bad I wouldn't say its flexing.
Was this
answer
helpful?
Yes
No
Saturday, October 26th, 2013 AT 7:22 PM
Tiny
BLACKBOY454
  • MEMBER
  • 162 POSTS
Quick update, I did not find a 10lb deadblow hammer anywhere, biggest I found was a 4lb, and I wasnt going to wait for an online order to be shipped. I bunji corded a wood block in front of the metal to not bend it, more than I had before I got smarter, and was able to knock it in place. Its not 100% but a lot better than what it was, before there was about a centimeter off and now i'd say it is about 1 to 2 mm off. So not by much. Tightened up the bolts and going to be calling around to see which car shop offers the best deal on alignments.
Was this
answer
helpful?
Yes
No
Sunday, October 27th, 2013 AT 5:18 PM

Please login or register to post a reply.

Sponsored links