Hi and thanks for using 2CarPros.com. I assume the rear braked are a drum system. The first things I want you to look at is this like that describes symptoms.
https://www.2carpros.com/articles/brake-pedal-goes-to-the-floor
Now, with rear drum brakes, it is very common for the shoes to get out of adjustment. The result is a spongy pedal, which is similar to what you described. Safely lift the rear of the vehicle, block the tires so it cannot move, and support it with jack stands. Place the transmission in neutral. Spin the rear tires, one at a time. There should be a slight drag. If there is not and they spin freely, they need adjusted or replaced.
Here are general directions for rear drum brake shoe replacement:
https://www.2carpros.com/articles/how-to-replace-rear-brake-shoes-and-drums
Here a video brake shoe replacement:
https://youtu.be/r82BLijWuNQ
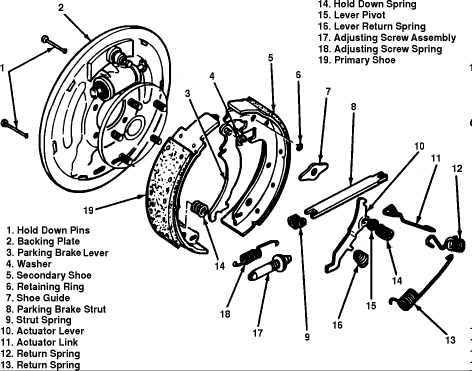
Here are specific directions for your vehicle. Additionally, I attached an exploded view of the brake system as a guide.
Raise and support vehicle, then remove tire and wheel assembly.
Remove brake drum. If brake lining is dragging on brake drum, back off brake adjustment by rotating adjustment screw. Refer to individual truck chapter for procedure. If brake drum is rusted or corroded to axle flange and cannot be removed, lightly tap flange to drum mounting surface with a suitable hammer.
Using brake spring pliers or equivalent, unhook primary and secondary return springs. Observe location of brake parts being removed to aid during installation.
Note: For additional information see Brake Spring Removal and Installation Notes. See: Fundamentals and Basics
Remove brake hold-down springs with suitable tool.
Lift actuating lever, then unhook actuator link from anchor pin and remove.
Remove actuating lever(s) and return spring.
Spread shoes apart and remove parking brake strut and spring.
Disconnect parking brake cable from lever, then remove brake shoes from backing plate.
Separate brake shoes by removing adjusting screw and spring, then unhook parking brake lever from shoe assembly.
Clean dirt from brake drum, backing plate and all other components.
Here are specific directions for adjustment:
These brakes have self-adjusting shoe mechanisms that assure correct lining-to-drum clearances at all times. The automatic adjusters operate only when the brakes are applied as the vehicle is moving rearward or when the car comes to an uphill stop.
Although the brakes are self-adjusting, an initial adjustment is necessary after the brake shoes have been relined or replaced, or when the length of the adjusting screw has been changed during some other service operation.
Frequent usage of an automatic transmission forward range to halt reverse vehicle motion may prevent the automatic adjusters from functioning, thereby inducing low pedal heights. Should low pedal heights be encountered, it is recommended that numerous forward and reverse stops be made until satisfactory pedal height is obtained.
If a low pedal condition cannot be corrected by making numerous reverse stops (provided the hydraulic system is free of air) it indicates that the self-adjusting mechanism is not functioning. Therefore it will be necessary to remove the brake drum, clean, free up and lubricate the adjusting mechanism. Then adjust the brakes, being sure the parking brake is fully released.
Using a suitable punch, knock out lanced area in backing plate or drum. If drum is installed on vehicle when this is done, remove drum and clean brake compartment of all metal.
Notice: When adjustment is completed, a new hole cover must be installed in the backing plate.
Using suitable tool, turn brake adjusting screw to expand brake shoes at each wheel until wheel can just be turned by hand. Drag should be equal on all wheels.
Back off adjusting screw at each wheel 30 notches.
If shoe still drags slightly on drum, back off adjusting screw an additional one or two notches.
When adjusting screw has been backed off approximately 12 notches, brakes should be free of drag. Heavy drag at this point indicates tight parking brake cables.
Install adjusting hole cover in brake backing plate.
Check parking brake for proper adjustment.
I hope this helps. If you find this is not the problem, there are no leaks, and everything is working properly, I would suspect the master cylinder has gone bad again. The air noise you hear can be normal due to increased pedal travel or you could have one of the following:
Leaking vacuum line.
Leaking vacuum booster diaphragm.
Damaged gasket silencer.
Master cylinder going bad allowing brake fluid to enter the booster.
I hope this helps. Let me know if you have other questions.
Take care,
Joe
Mar 15, 2021 at 11:47 AM