Hi and thanks for using 2CarPros.com.
To start, here are general directions for checking an alternator. It basically will tell us if the battery is receiving a charge from the alternator. You will need to use a volt or multi-meter. Here is a link showing how that's done, one for checking wiring, and then the alternator check:
https://www.2carpros.com/articles/how-to-use-a-voltmeter
https://www.2carpros.com/articles/how-to-check-wiring
https://www.2carpros.com/articles/how-to-check-a-car-alternator
Here are the directions for diagnosing a charging problem with your vehicle from Alldata. It it is much more involved. All pictures attached correlate with these directions.
_______________________________________________
CHARGING CIRCUIT/SYSTEM TROUBLESHOOTING
Charging Circuit Troubleshooting
If the charging system indicator does not come on or does not go off, or the battery is dead or low, test the following items in the order listed below:
Battery
Charging system indicator
Alternator and regulator circuit
Alternator control system (U.S. models)
Charging System Indicator Test
1. Turn the ignition switch ON (II).
Does the charging system indicator come on?
YES - Go to step 2.
NO - Go to step 3.
2. Start the engine.
Does the charging system indicator go off?
YES - Charging system indicator circuit is OK. Go to Alternator and Regulator Circuit Test.
NO - Go to step 3.
3. Turn the ignition switch OFF.
4. Troubleshoot the multiplex control system. See: Body Control Systems > Component Tests and General Diagnostics
Is the multiplex control system OK?
YES - Go to step 5.
NO - Check the multiplex control system as indicated by the DTC.
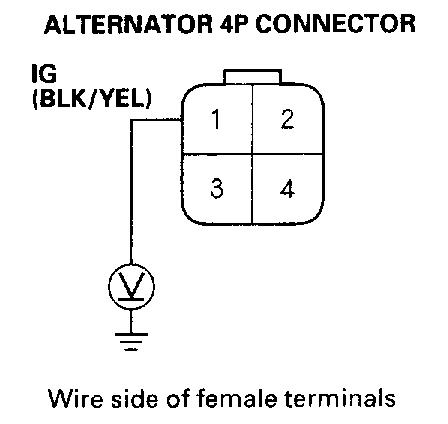
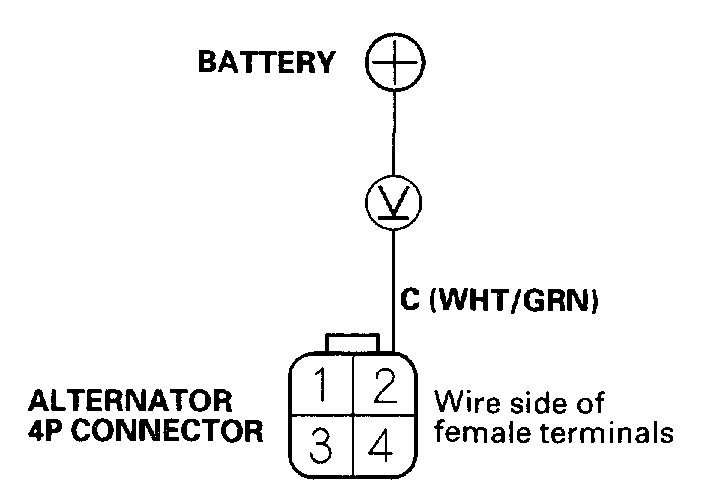
5. Disconnect the alternator 4P connector from the alternator.
6. Measure the voltage at the No.1 terminal of the alternator 4P connector with the ignition switch ON (II).
Is there battery voltage?
YES - Go to step 7.
NO - Check for a blown No.4 (10 A) fuse. If the fuse is OK, repair open in the wire between the alternator and the under-dash fuse/relay box.
7. Turn the ignition switch OFF.
8. Disconnect the negative cable from the battery.
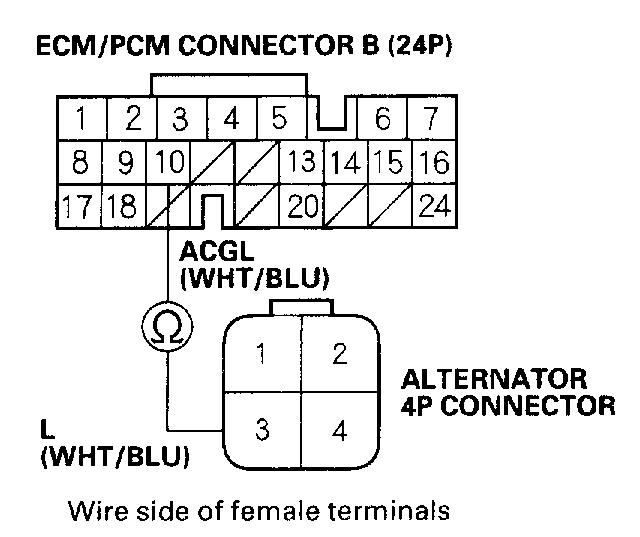
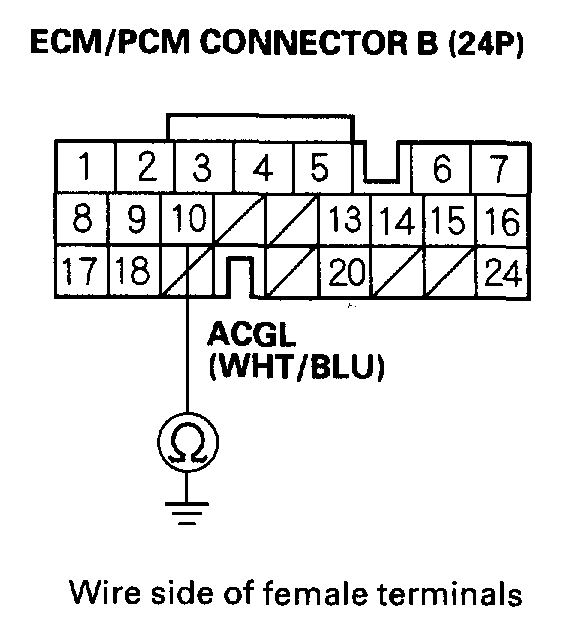
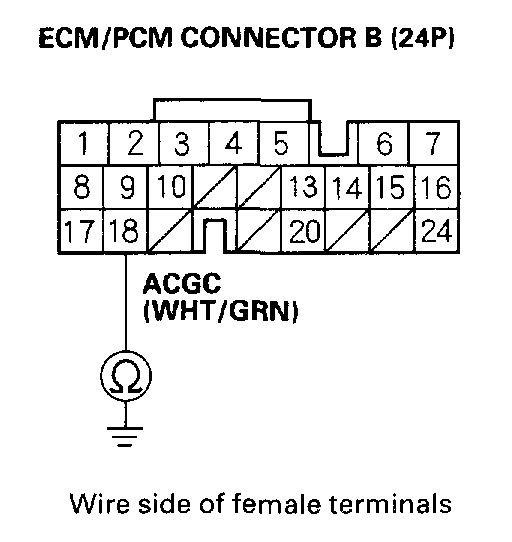
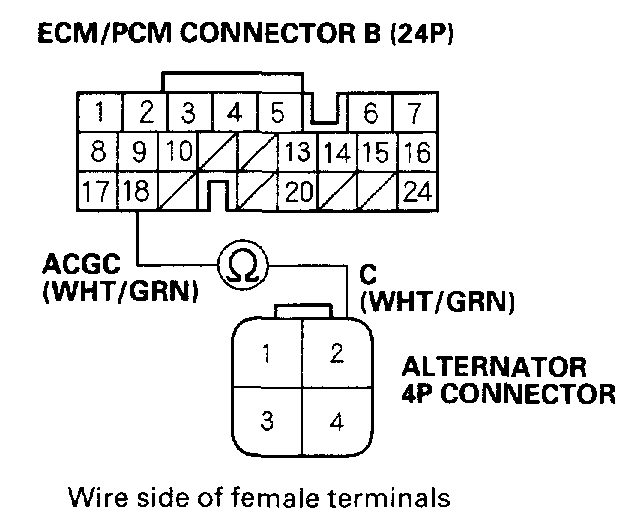
9. Disconnect Engine Control Module (ECM)/Powertrain Control Module (PCM) connector B (24P).
10. Check continuity between the ECM/PCM connector terminal B10 and alternator 4P connector terminal No.3.
Is there continuity?
YES - Go to step 11.
NO - Repair open in the wire between the alternator and the ECM/PCM.
11. Check continuity between the ECM/PCM connector terminal B10 and body ground.
Is there continuity?
YES - Repair short in the wire between the alternator and the ECM/PCM.
NO - Reconnect the negative terminal to the battery and go to alternator and regulator test.
Alternator and Regulator Circuit Test
1. Be sure the battery connections are good, and that the battery is sufficiently charged.
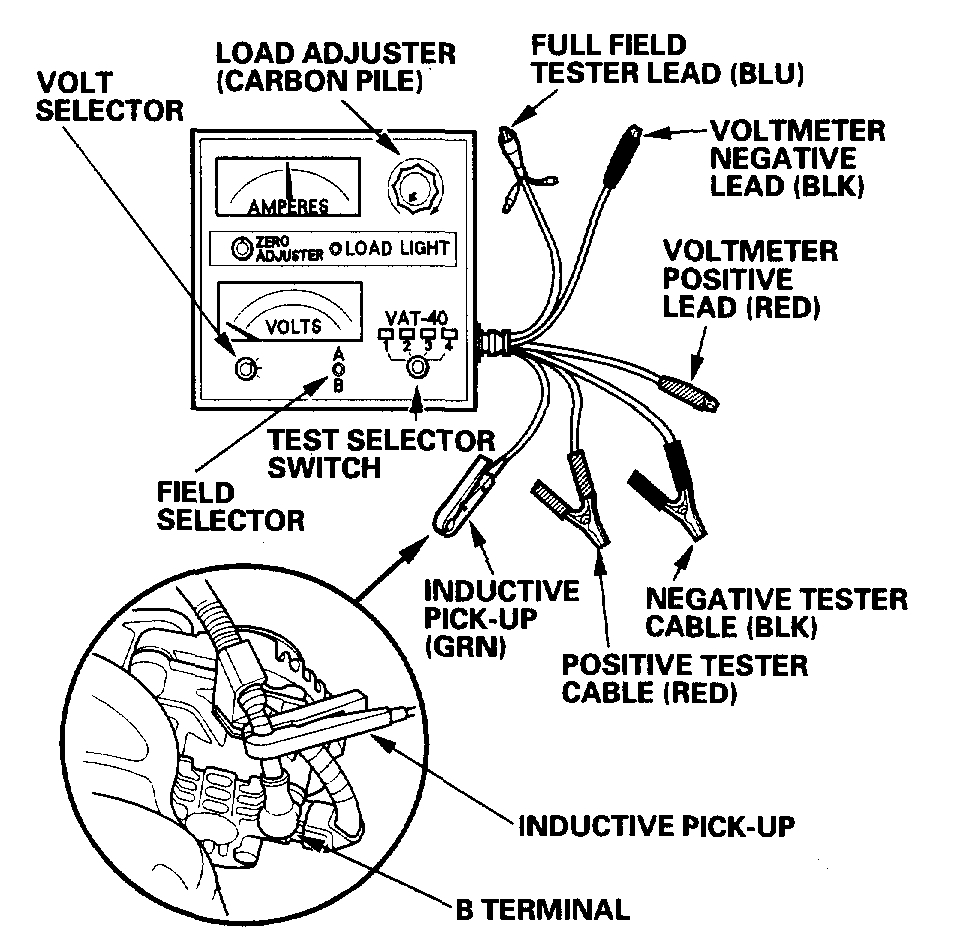
2. Connect a VAT-40 (or equivalent tester), and turn the selector switch to position 1 (starting).
3. Shift to [P] or [N] (A/T, CVT) or neutral, and start the engine. Hold the engine at 3,000 rpm, with no load until the radiator fan comes on, then let it idle.
4. Raise the engine speed to 2,000 rpm, and hold it there.
Is the voltage over 15.1 V?
YES - Replace the voltage regulator.
NO - Go to step 5.
5. Release the accelerator pedal, and let the engine idle.
6. Make sure all accessories are turned off. Turn the selector switch to position 2 (charging).
7. Remove the inductive pick-up, and zero the ammeter.
8. Place the inductive pick-up over the B terminal wire of the alternator so that the arrow points away from the alternator.
9. Raise the engine speed to 2,000 rpm, and hold it there.
Is the voltage less than 13.5 V?
YES - Go to alternator control system test
NO - Go to step 10.
10. Apply a load with the VAT-40 until the battery voltage drops to between 12 - 13.5V.
Is the amperage 60 A or more?
YES - The charging system is OK.
NO - Repair the alternator.
Alternator Control System Test (U.S. models)
1. Check for proper operation of the electrical load detector (ELD) by checking the malfunction indicator lamp (MIL). If a DTC is present, diagnose and repair the cause before continuing with this test.
2. Disconnect the alternator 4P connector from the alternator.
3. Start the engine, and turn the headlights (high beam) ON.
4. Measure voltage between the alternator 4P connector terminal No.2 and the positive terminal of the battery.
Is there 1 V or less?
YES - Go to step 8.
NO - Go to step 5.
5. Turn the headlight and ignition switch OFF.
6. Disconnect engine control module (ECM)/powertrain control module (PCM) connector B (24P).
7. Check for continuity between ECM/PCM connector terminal B18 and body ground.
Is there continuity?
YES - Repair short to ground in the wire between the alternator and ECM/PCM.
NO - Check that the terminals are firmly seared at the connecters. If OK, Reprogram the ECM/PCM if it does not have the latest software, or substitute a known-good ECM/PCM, then recheck. If the symptom/indication goes away with a known-good ECM/PCM, replace the original ECM/PCM.
8. Turn the headlight and ignition switch OFF.
9. Disconnect the ECM/PCM connector B (24P).
10. Check for continuity between ECM/PCM connector terminal B18 and alternator 4P connector terminal No.2.
Is there continuity?
YES - Repair the alternator.
NO - Repair open in the wire between the alternator and ECM/PCM.
________________________________________________________________
Let me know if this helps or if you have other questions.
Take care,
Joe
Images (Click to make bigger)
Monday, August 20th, 2018 AT 8:20 PM