Good evening.
If all the pressures are correct then it is possible that the actuator is the issue.
When you command heat and cold, can you hear the mode door move.
The procedure is a full dash removal to access the actuator. it is on top of the case under the windshield.
Roy
https://www.2carpros.com/articles/car-air-conditioner-not-working-or-is-weak
https://www.2carpros.com/articles/replace-blend-door-motor
CAUTION: Electronic modules are sensitive to static electrical charges. Avoid exposing any modules to static electrical charges, as this may cause damage to the modules.
1. Remove the driver air bag module.
2. Remove the passenger air bag module.
3. Close the glove compartment.
4. If equipped, remove the floor console.
imageZoom/Print
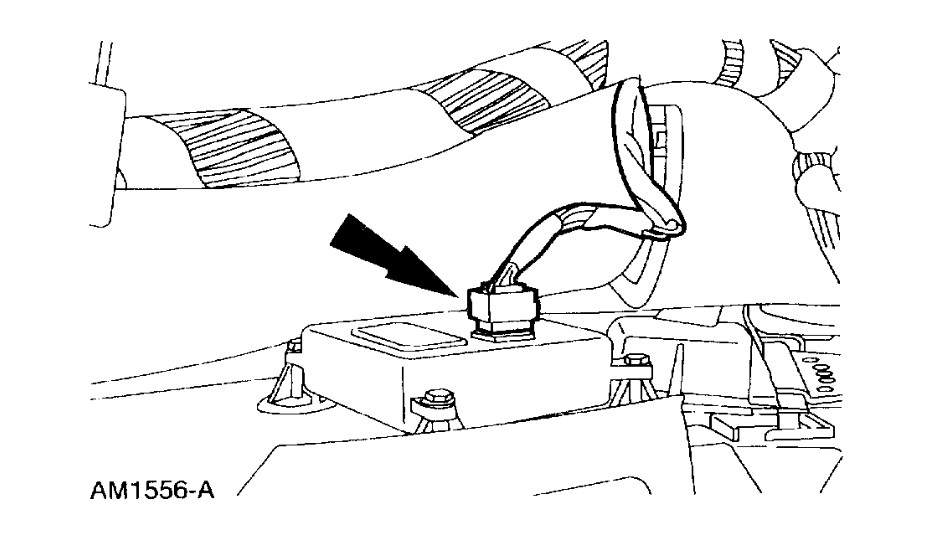
5. Position the speed control actuator aside.
1 Remove the nut.
2 Disconnect the electrical connector.
imageZoom/Print
6. Loosen the bolt and disconnect the LH bulkhead electrical connector.
imageZoom/Print
7. Release the retainers and position the bulkhead electrical connector through the dash panel.
imageZoom/Print
8. Disconnect the A/C temperature sensor electrical connector.
imageZoom/Print
9. Disconnect the RH engine compartment in-line wiring harness connectors.
10. Remove the RH fender splash shield.
imageZoom/Print
11. Remove the RH instrument panel lower insulator.
- Remove the pin-type retainers.
- Disconnect the power point electrical connector.
- Disconnect the courtesy lamp.
imageZoom/Print
12. Remove the LH and RH scuff plates.
imageZoom/Print
13. Remove the LH and RH A-pillar lower trim panels.
imageZoom/Print
14. Disconnect the antenna cable in-line connector.
imageZoom/Print
15. Remove the RH ground bolts.
imageZoom/Print
16. Disconnect the RH bulkhead electrical connectors.
1 Loosen the bolt.
2 Disconnect the RH bulkhead electrical connectors.
imageZoom/Print
17. Disconnect the RH wiring harness electrical connector.
imageZoom/Print
18. If equipped, disconnect the Electronic Automatic Temperature Control (EATC) hose from the evaporator housing.
imageZoom/Print
19. Position the LH and RH front door weatherstrip seals aside.
imageZoom/Print
20. Feed the RH wiring harness through the dash panel.
imageZoom/Print
21. Disconnect the climate control head vacuum harness connector.
imageZoom/Print
22. If equipped with floor console shift, remove the pin-type retainer and position the carpet aside.
imageZoom/Print
23. If equipped with steering column shift, remove the pin-type retainer and the instrument panel tunnel brace cover.
imageZoom/Print
24. Remove the instrument panel tunnel brace.
1 Remove the nuts.
2 Remove the instrument panel tunnel brace.
imageZoom/Print
25. Remove the LH instrument panel insulator.
1 Remove the pin-type retainers.
2 Position the LH instrument panel insulator aside.
- Disconnect the courtesy lamp.
imageZoom/Print
26. Remove the instrument panel steering column opening cover.
1 Remove the screws.
2 Remove the instrument panel steering column opening cover.
imageZoom/Print
27. Remove the instrument panel steering column opening cover reinforcement.
1 Remove the bolts.
2 Remove the instrument panel steering column opening cover reinforcement.
imageZoom/Print
28. Disconnect the parking brake release vacuum connector.
imageZoom/Print
29. Disconnect the vacuum connector.
imageZoom/Print
30. Position the steering column brace aside.
1 Remove the nut.
2 Position the steering column brace aside.
imageZoom/Print
31.Separate the intermediate shaft from the steering column shaft.
1 Remove and discard the pinch bolt.
2 Separate the intermediate shaft from the steering column shaft
imageZoom/Print
32. If equipped with steering column shift, disconnect the transmission shift cable from the steering column.
1 Disconnect the cable from the steering column shift tube lever.
2 Disconnect the cable from the steering column bracket.
imageZoom/Print
33. Remove the LH ground bolt.
imageZoom/Print
34. Disconnect the LH wiring harness electrical connectors.
imageZoom/Print
35. Remove the defroster opening grille.
- If equipped, disconnect the electrical connectors.
imageZoom/Print
36. Remove the three instrument panel cowl top screws.
image
37. Remove the RH instrument panel cowl side nut.
imageZoom/Print
38. Remove the upper LH instrument panel cowl side nut.
imageZoom/Print
39. Remove the lower LH instrument panel cowl side bolt.
40. Remove the instrument panel from the vehicle.
NOTE: Two technicians are needed to carry out this step.
May 9, 2018 at 5:14 PM