Hi and thanks for using 2carpros.com.
First, several things can cause it not to start. Take a look through this link:
https://www.2carpros.com/articles/car-cranks-but-wont-start
Based on how you described the issue my first suspect is the crankshaft position sensor. Take a look through this link:
https://www.2carpros.com/articles/symptoms-of-a-bad-crankshaft-sensor
Now, the easiest way for me to identify a bad crank sensor is by checking for an RPM signal with a live data scanner when the engine is cranking. If you don't have one, see if a parts stores will lend or rent one to you. Here is a quick video that shows how one is used:
https://youtu.be/b2IJGfImVvw
With that being said, when it fails to start, check to see if there is spark to the plugs. Here is a link showing how to check.
https://www.2carpros.com/articles/how-to-test-an-ignition-system
If you determine the sensor is bad, here is a link that shows in general how one is replaced.
https://www.2carpros.com/articles/crankshaft-angle-sensor-replacement
Here are the directions specific to your vehicle for sensor replacement:
______________________________
PROCEDURES
1. REMOVE ENGINE UNDER COVER
2. REMOVE ALTERNATOR
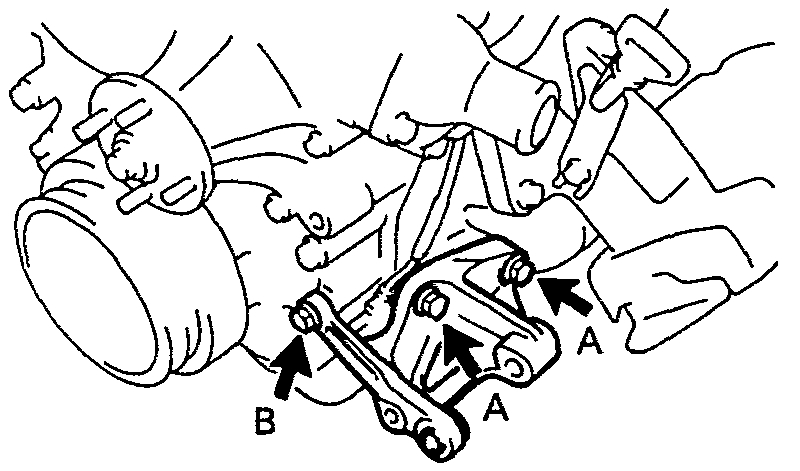
3. REMOVE ALTERNATOR BRACKET
- Remove the 3 bolts and bracket.
Torque:
Bolt A: 74.5 N.m (760 kgf.cm, 55 ft.lbf)
Bolt B: 18 N.m (180 kgf.cm, 13 ft.lbf)
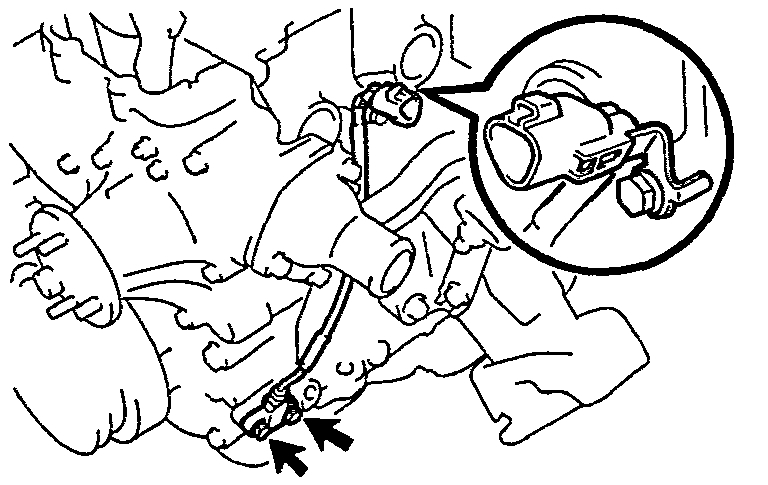
4. DISCONNECT CRANKSHAFT POSITION SENSOR CONNECTOR
5. REMOVE CRANKSHAFT POSITION SENSOR
- Remove the 2 bolts and crankshaft position sensor.
Torque: 8.5 N.m (85 kgf.cm, 74 in.lbf)
- Remove the O-ring.
INSTALLATION HINT:
- Always use a new O-ring when installing the crankshaft position sensor.
- Apply a light coat of engine oil on the O-ring.
INSTALLATION
INSTALLATION HINT:Installation is in the reverse order of removal.
___________________________________________
If you find the sensor isn't the issue, check fuel pump pressure when it fails to start. Here is a link that shows how that is done.
https://www.2carpros.com/articles/how-to-check-fuel-system-pressure-and-regulator
Here are the fuel specs for your vehicle:
uel Pressure Specifications
With Fuel Pressure Regulator vacuum hose disconnected .................... 265-304 kPa (38-44 psi)
With Fuel Pressure Regulator vacuum hose connected .................... 226-265 kPa (33-38 psi)
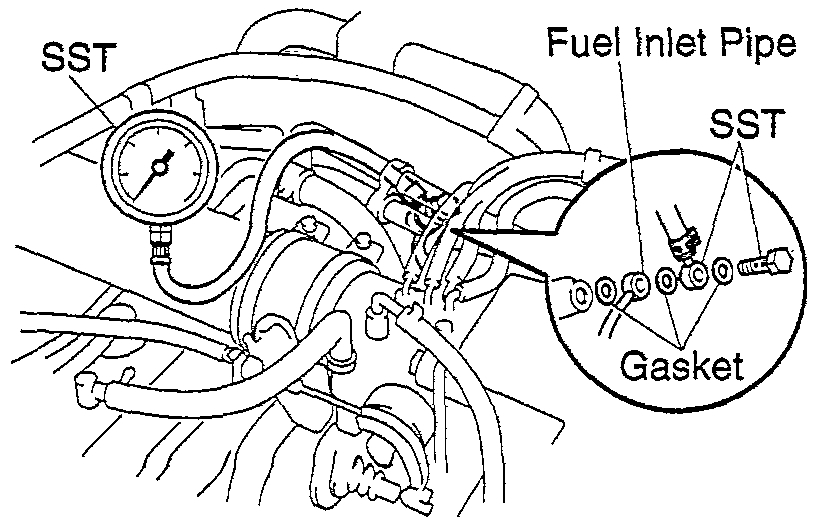
Here are the directions for checking pressure specific to your vehicle. See pics 3 and 4.
______________________________________
COMPONENT TESTS AND GENERAL DIAGNOSTICS
1. Check that the battery positive voltage is above 12 volts.
2. Disconnect the negative (-) terminal cable from the battery.
3. Remove the union bolt and 2 gaskets, and disconnect the fuel inlet pipe from the delivery pipe.
HINT:
- Put a suitable container or shop rag under the delivery pipe.
- Slowly loosen the union bolt.
4. Install the fuel inlet pipe and SST (pressure gauge) to the delivery pipe with the 3 gaskets and SST (union bolt).
SST 09268-45012
Torque: 29 N.m (300 kgf.cm, 22 ft.lbf)
- Wipe off any splattered gasoline.
5. Connect the TOYOTA hand-held tester to the DLC3.
6. Reconnect the negative (-) terminal cable to the battery.
7. Turn the ignition switch ON.
8. Measure the fuel pressure.
Fuel pressure: 265 - 304 kPa
(2.7 - 3.1 kgf/sq.cm, 38 - 44 psi)
- If pressure is high, replace the fuel pressure regulator.
- If pressure is low, check these parts:
- Fuel hoses and connections
- Fuel pump
- Fuel filter
- Fuel pressure regulator
- Injectors
9. Disconnect the TOYOTA hand-held tester from the DLC3.
10. Start the engine.
11. Measure the fuel pressure at idle.
Fuel pressure: 206 - 255 kPa
(2.1 - 2.6 kgf/sq.cm, 31 - 37 psi)
- If pressure is not as specified, check the vacuum sensing hose and fuel pressure regulator.
12. Stop the engine.
13. Check that the fuel pressure remains as specified for 5 minutes after the engine has stopped.
Fuel pressure: 147 kPa (1.5 kgf/sq.cm, 21 psi) or more
- If pressure is not as specified, check the fuel pump, pressure regulator and/or injector.
14. After checking fuel pressure, disconnect the negative (-) terminal cable from the battery and carefully remove the SST to prevent gasoline from splashing. SST O9268-45012
15. Reconnect the fuel inlet pipe to the delivery pipe with 2 new gaskets and the union bolt.
Torque: 29 N.m (300 kgf.cm, 22 ft.lbf)
16. Reconnect the negative (-) terminal cable to the battery.
17. Check for fuel leakage.
______________________________________
Okay, lets get these things checked first. One of them is causing the issue. As far as the idle issue, that could be related to the idle air control valve. However, I need you to repost that question separately. When we start focusing on multiple issues, it creates confusion.
Let me know the results of your findings. I hope this helps.
Take care,
Joe
Images (Click to make bigger)
Thursday, December 13th, 2018 AT 8:59 PM