When working on your car you will need to learn how to use a floor jack. While doing your own repairs and services please follow these repair and service guides to help get your started. Make sure to have a high quality jack stands, after all it is holding up the car while you are underneath it.
Let's Jump In!
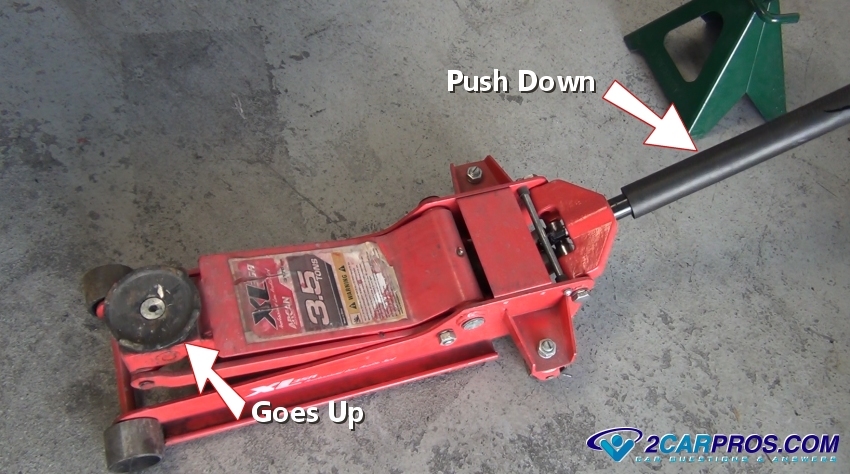
Now that we have a good idea on how it works let's test it. First close the valve
by turning the handle clockwise until tight. Next push the handle down repeatedly,
this will cause the lifting plate to rise with each pump of the handle. If when
the valve is tight and the lifting plate will not rise up while you are pumping
then it's either broken or low on hydraulic fluid. To check the fluid level, locate
the fluid fill plug (usually at the rear of the hydraulic pump or near the U joint)
and remove it, then add hydraulic oil or automatic transmission fluid works well
as well. You will need a small funnel or tube to connect to the container to add
fluid.
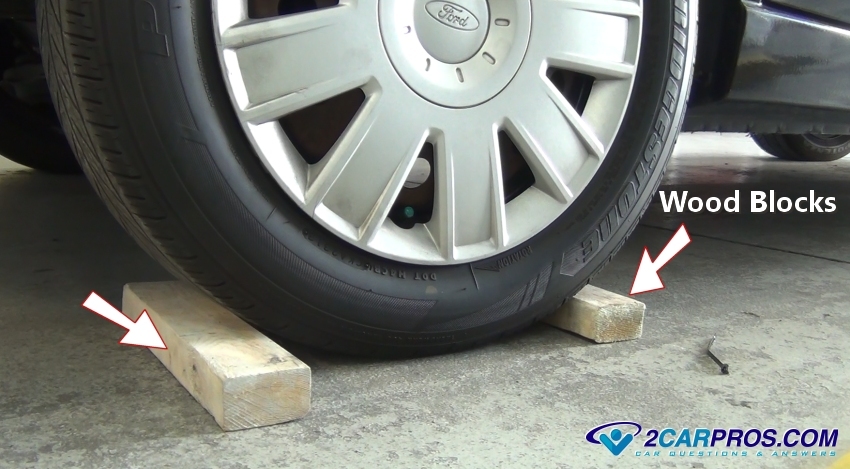
Before you begin raising your vehicle you must install wood blocks to the wheels
of the opposite end of the vehicle being lifted. This is because if you raise the
vehicle by the wheels that are keeping the vehicle from rolling such as the rear
wheels on a rear wheel drive vehicle, the vehicle will want to move on you because
the tires that were holding it in place are now off of the ground and the front
wheels will let the vehicle roll freely. Pay attention to the drive wheels or the
emergency brake wheels to help hold the vehicle in place.
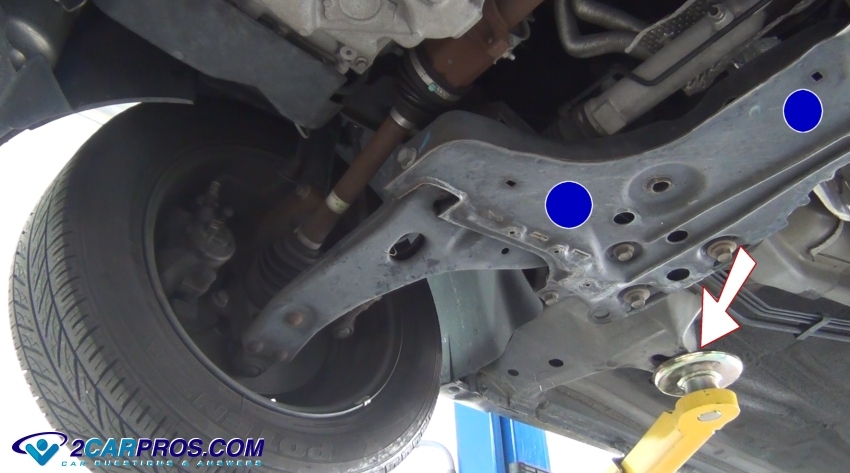
Now you know how the floor jack works and how to block the wheels. It is time
to know where to and where not to place the jack stands when holding the vehicle
once lifted. In the picture below it shows safe places which are shown by the blue
dots and the arrow shown. The left blue dot near the control arm works well when
you are just removing one tire, if you are lifting the complete front end of the
car the right dot works best. The arrow also works well to raise one side of the
vehicle.
Watch the Video!
Please watch this video of the job being done, then continue down the guide to glean additional helpful information.
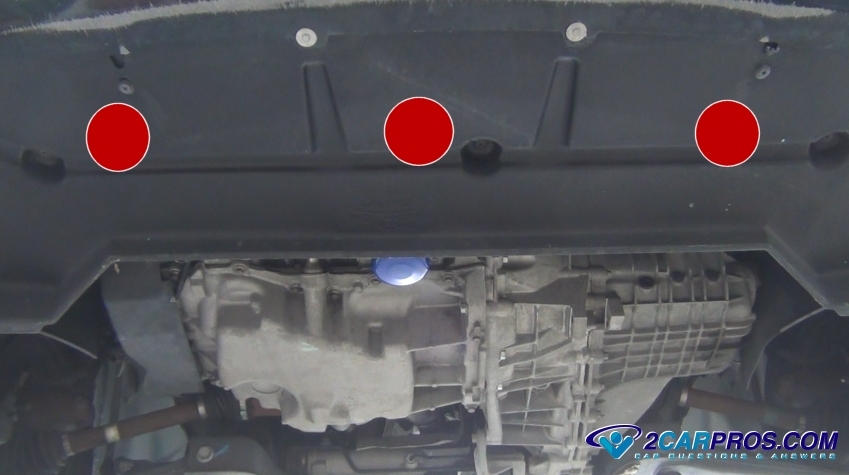
There are a lot of places that you can do damage to your vehicle when jacking
it up, be sure you NEVER place the lifting plate on the engine or transmission (red
dots) to raise the vehicle. To add to this list: fuel lines, emergency brake cables,
CV axles, drive shaft, exhaust system and suspension components such as control
arms and sway bars will cause damage.

Here is another example of where NOT to place the lifting plate, on plastic covers,
these covers are held in place usually by flimsy metal which holds the radiator
and air conditioner condenser and can be easily damaged by the force of the jack.
In general if you hear a crunching sound when lifting the vehicle up, it’s causing
damage, once you learn where and where not to lift from you will be able to spot
safe places more easily.
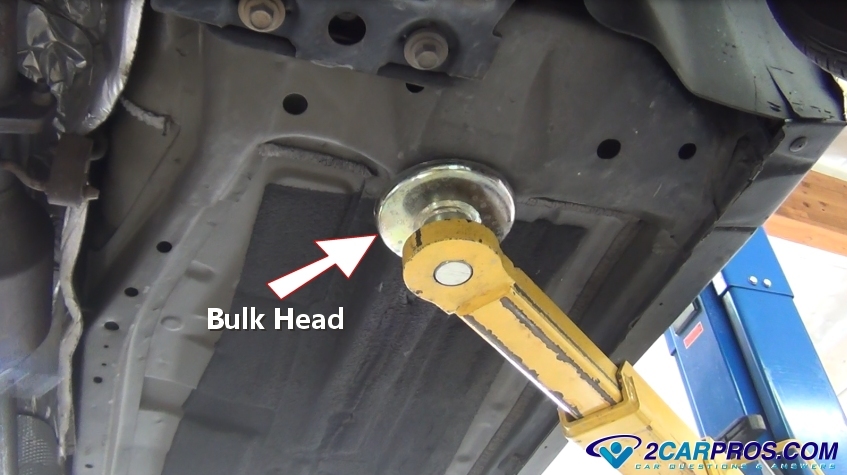
On uni-body vehicles there will be a front frame bulkhead which is the strongest
place to lift the vehicle, there is a bulkhead on each side. Some vehicles will
have an arrow or markings to indicate where to place the jack. Trucks, SUV's and
larger vehicles will have a more pronounced frame which will be easy to see and
is where the floor jack’s lifting plate should be placed. It takes a little bit
of practice, but once you get the hang of it you will be able to instantly locate
these safe spots to place the lifting plate.
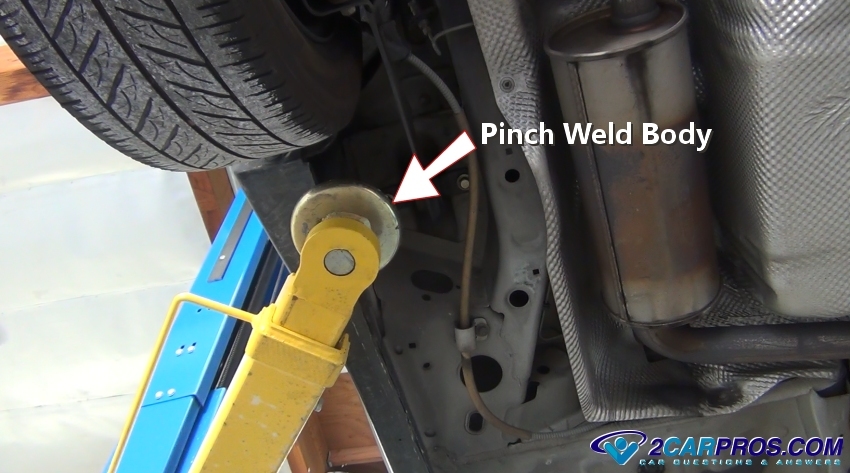
Every vehicle is constructed and welded at the bottom edge which connects the
body to the bottom plate of the vehicle. This pinch molding as they call it, is
welded together at the factory and provides a great place to lift the vehicle from.
Never lift the vehicle from the running boards or side steps on SUV's and trucks.
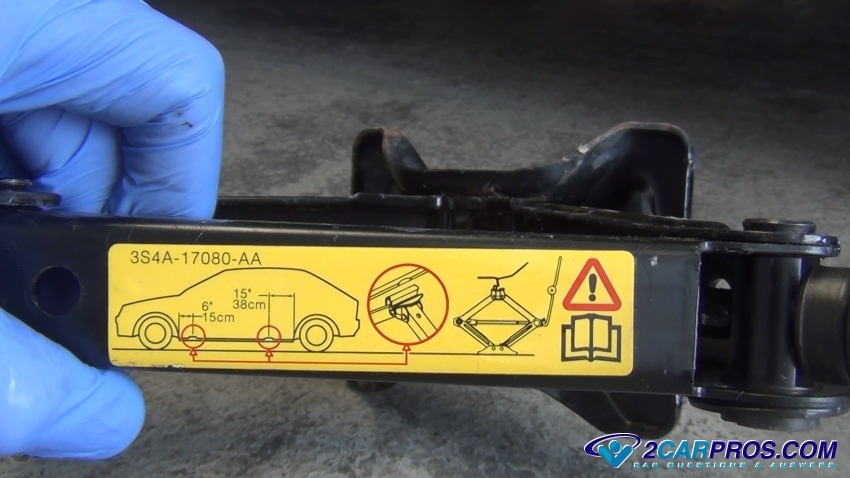
If you are still not sure where to lift the car from, check the diagram on the
vehicle’s spare tire jack, or in the owner’s manual which is normally located in
the glove box. This will give you specific places to lift the vehicle from.
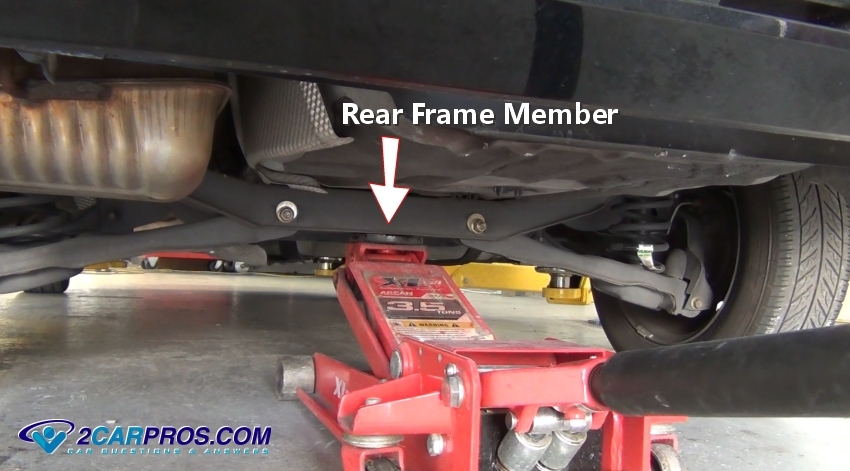
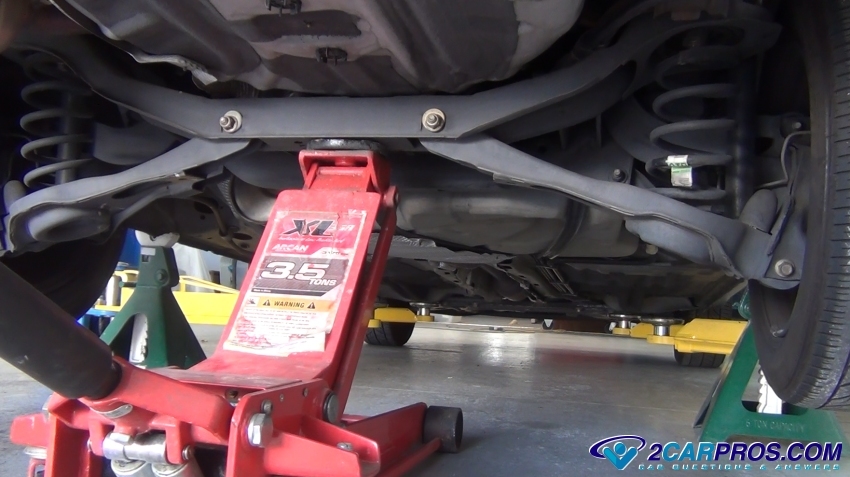
To lift the rear of the vehicle up to work on the rear brakes, shocks, fuel or
EVAP system etc., locate the rear frame member for front wheel drive car’s. Position
the lifting plate directly under this frame, tighten the handle and start to pump
until contact is made, be sure the lifting plate is centered on the frame, this
will help it become more secure while lifting. Do not add wood blocks, these can
break and split, causing problems, metal on metal is the safest way.
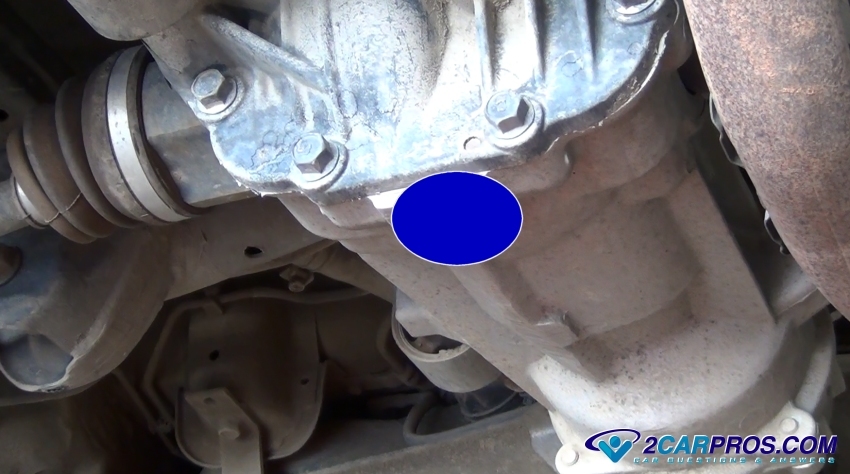
On rear wheel drive vehicles and trucks the center of the differential is the
safest place to raise the vehicle from. Center the lifting plate directly under
this point to raise the entire rear of the vehicle. This position works on both
straight axle and independent rear suspension vehicles.
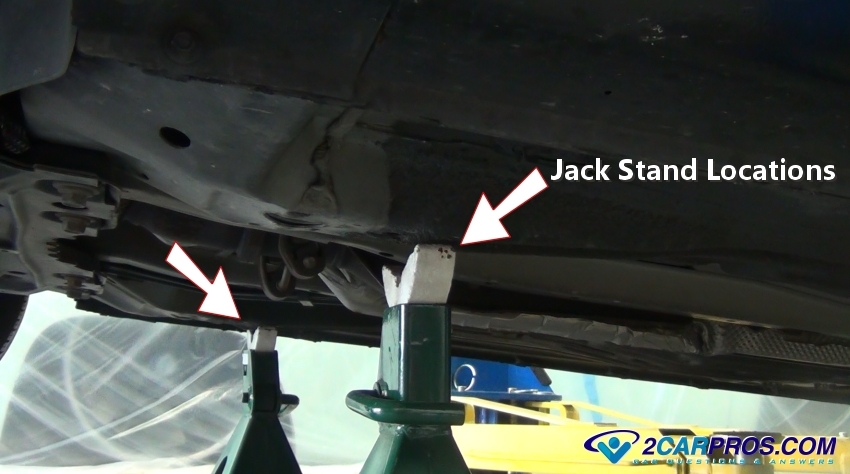
This is how the vehicle should look when properly lifted and secures with jack
stands. There is no need to remove the hydraulic jack, you can just leave it there
if it’s not in the way while work is being done such as replacing brakes. NEVER
GET UNDER A CAR WITHOUT JACK STANDS! A vehicle is very heavy and trusting the floor
jack alone is not wise.
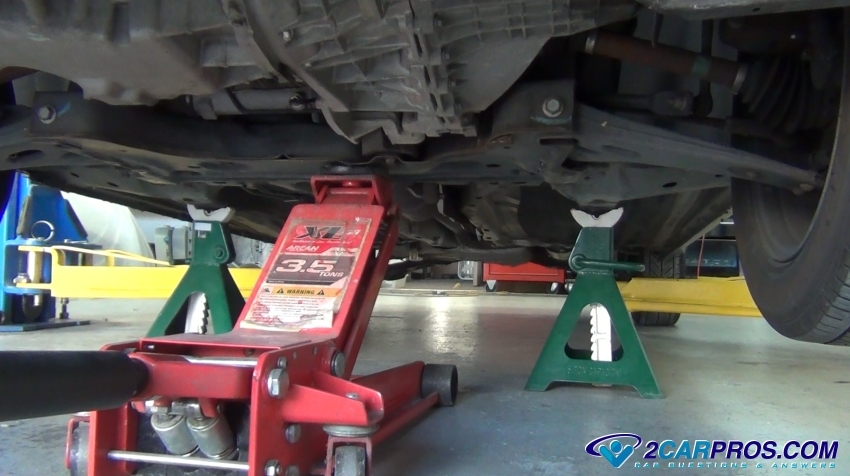
Once the front is lifted, position and adjust the jack stands under the main
frame, bulk head or pinch welds of the vehicle. Here’s a great safety tip; when
you are working on a job that includes removing the tires, after you have removed
them lay them down flat under the vehicle, this will give an added layer of protection
against the vehicle falling all the way down to the ground.
This is how the front of the vehicle should look when lifted and secured with
jack stands, much like the rear of the vehicle, leave the floor jack under the vehicle,
as long as it doesn't get in the way of the repair or service being performed.
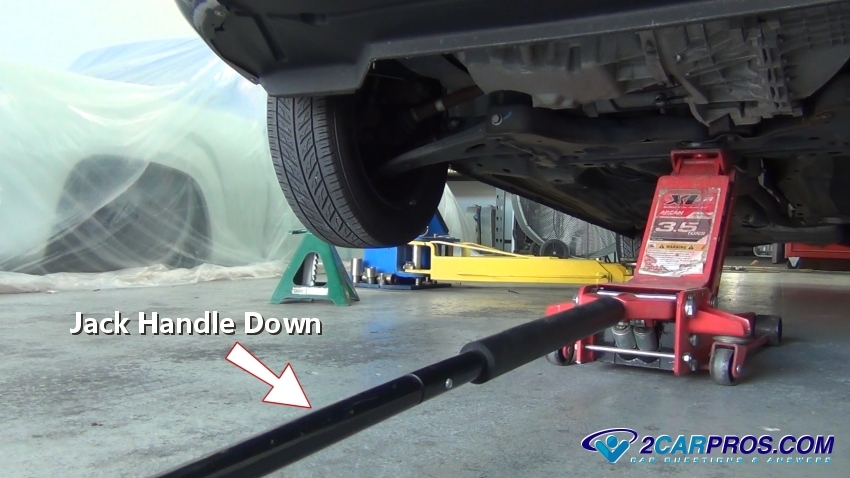
Once the job has been completed it’s time to lower the vehicle down. First raise
the vehicle up and off of the stands then remove the stands and slowly lower the
handle completely and slowly turn the handle counterclockwise. This can take some
practice because if you loosen the handle too quickly the vehicle will drop abruptly;
the best practice is to lower the vehicle slowly. The reason for the handle being
low is to avoid contact with the vehicle when it’s being lowered down. You are all
set better informed about how to raise and lower a vehicle then most, I hope you
enjoyed this article and video please visit use anytime we are here to help you
fix your car right.
Questions?
Our certified technicians are ready to answer floor jack questions for free. We hope you saved money and learned from this guide. We are creating a full set of car repair guides. Please subscribe to our 2CarPros YouTube channel and check back often for new videos which are uploaded regularly.