How to Replace and Test a Blower Motor Fan

Fan blower motor not working? We are a team of ASE certified mechanics that have created this guide to help replace a burned out blower motor and test the electrical system that powers it. This guide will also show you what you are paying for when taking your car in for repairs.

What Goes Wrong?

A blower motor is a basic 12 volt (DC) medium size electric motor that pulls a respectable amount of amperage (about 15 amps) which in time can burn out and stop working. As the blower motor ages the amperage that it takes to run the motor increases that overloads the electrical system which can cause additional problems. This is due to normal bearing and brush wear that occurs in all motors of this type. This wear can sometime be correlated to an audible ticking or squeaking noise when the fan is operating.

 When this heater motor stops one of three things has happened the electrical supply has quit, the motor has burned out or the system ground has failed. A sign that the motor is going bad is when the system is on and the car hits a bump and the motor will start to work. This is telling you the brushes have worn out and the blower motor needs replacing.

no air

This Guide Includes

  • Blower motor replacement
  • Blower motor testing
  • Electrical circuit testing

Let's Get Started!

The blower motor can be located in one of two places which is under the dash or hood on the passenger side of the vehicle. There is one blower motor that works for all climate control modes: air conditioner, heater and defroster. Some manufactures make accessing this motor difficult and you will need to remove the complete or a portion of the heater plenum (box) for replacement, this is not common.

Step 1: Accessing the Blower Motor

Start by checking under the hood and looking around the passenger's side for something that looks like this:

under hood blower motor

If you cannot find the blower motor under the hood it will be located under the dash on the passenger side. You may need to remove the mounting screws of the lower panel to gain access to the motor for removal.

lower cover

This heater motor location is under the dash. Let's start the removal which is the same for under hood or dash applications.

blower motor with wiring

Step 2: Remove the Blower Motor

Locate and disconnect the a/c blower motor wiring by releasing the safety tab on the side of the connector. This connector can have one or four wires depending if the system is manually or automatically controlled. These different systems will vary the fan speed by using a solid state speed controller apposed to a basic resistor.

Once the electrical connector is removed check its condition while looking for corrosion or burned terminals which are a sign of high resistance or increased amperage draw. If the connector is melted it must be replaced by splicing in a new part which you can get from the dealer, auto parts store or Amazon. Opposed to a crimp connector, it's best to solider these wires together to cut down on resistance which helps the motor last longer.

disconnect blower fan wiring connector

Identify the heater motor and the mounting screws holding it into the heater box. These screws are mounted in the plastic housing and are not to terribly tight so they can be removed easily. Some of these screws can be hidden under metal braces, plastic tabs or wiring so use a small mirror if needed.

small mirror to find screws

Start by removing the mounting screws one at a time. The motor will then start to fall out of the heater box. While holding the blower motor in place remove the last screw.

remove blower motor mounting screws

After all of the screws have been undone grasp the motor and remove it from the housing. This can take some maneuvering so hang in there and be careful not to damage the fan blade (squirrel cage) against the heater plenum.

blower motor removed

Step 3: Install the New Blower Motor

Once the old motor has been removed compare it to the new unit. In some cases an electronic speed controller is used in climate controlled systems and will need to be transferred to the new motor but this is not typical. On some replacement units you will need to transfer the old fan blade over to the new assembly. This is done by removing the mounting nut or clip and then forcing the blade off of the motor shaft using a large standard screwdriver. Do not use oil or lube of any kind to help installation of the fan onto the replacement motor because it will allow the fan to slip on the shaft which will create problems.

new blower fan motor

Before installing the new motor into the plenum check for obvious obstructions such as leaves, sticks, ink pens, tooth picks or small toys which can get into the system via the inlet or outlet vents. These foreign partials can keep the motor from working freely and could cause premature failure. When the new assembly is ready to be installed fit the motor by maneuvering and rotating it gently. Then push it back into the plenum while lining up the mounting holes.

installing new blower motor

While the motor is in place start to install the mounting screws while holding it toward the plenum. Do not tighten any of the screws until all screws have been threaded in by hand. This will make the installation go mush easier without the potential of stripping the screws out. Tighten each screw in a cross pattern, do not over tighten. This will ensure the proper alignment of the fan blade in the housing. If this step is not done properly it can cause the blade to contact the housing creating a rubbing or clicking noise when the motor is operating.  

installing blower motor screws

Check the wiring connector locating tang which indicates the orientation of the connector before it's installed into the motor. This tang is to ensure you don't install the connector incorrectly which would cause electrical problems.

inspect blower fan motor connector

Then carefully re-insert the blower fan motor electrical connector by securing it into position. You should hear an audible click telling you the connector is installed correctly. Gently tug on the wiring to ensure its correct installation. Then reinstall the lower dash cover and install the mounting screws by hand. Tighten them snuggly, do not over tighten, again these screws are going into plastic.

reinstall blower fan motor wiring connector

Finally start the engine up and turn the climate control on and listen for the fan to come on. It should sound smooth and be blowing from the vents in a strong flow. If you hear a rattle, squeak or ticking turn the system off and remove the blower motor to recheck the installation.

Watch the Video!

Here is a video of the blower motor getting replaced.

Testing the Blower Motor and Electrical System

Start testing by turning the ignition switch to the on position throughout this test procedure.

Step 1: Check the Blower Fan Operation

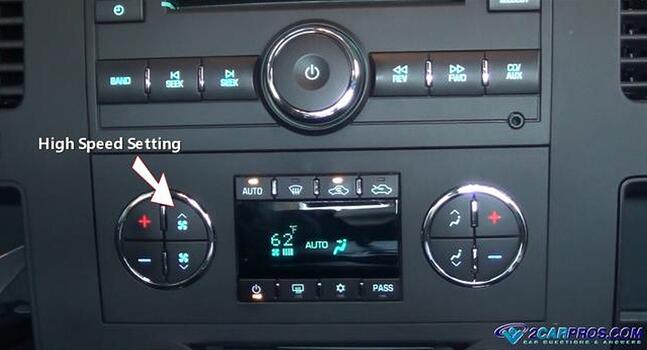
With the key in the on position turn the fan switch to the high speed setting, then to the medium and low speeds to test its performance.

high speed setting

Feel the flow of the air coming out of the vents if no air is felt then continue with this guide.

no air

Step 2: Check the Electrical System

The blower fan unitizes power from a fuse or relay in the fuse panel. With the ignition key in the on position test the fuse which can be identified by the fuse box cover or in the vehicles owner's manual. If the fuses are okay, proceed to next step. If the fuse is blown replace the fuse with a new one. If the new fuse blows nine times out of ten the problem is the blower motor which has developed a short and needs replacement. Some vehicles are equipped with a blower motor relay which should also be checked. Other possibilities for a short are a system wiring failure.

blower motor fuse testing

Locate and disconnect the motor wiring connector. Use a test light and a sharp metal object such as a hooked scribe to check for power at the connector (large wires). This test confirms power and the ground of the circuit. If the test light illuminates then power is getting to the blower motor which is telling you the blower motor is bad. This test can also be used by piercing the wires of the wiring harness as well.

If the test light fails to light up the ground or power circuit has shorted and a wiring schematic is needed to troubleshoot the problem further. If the blower motor only has one wire it is used for power. In this case a grounded test light is used for testing.

test for blower motor power

Step 3: Test the Blower Motor

To test the motor prepare a positive power and negative ground lead from a 12 volt power source (car battery). Use caution to not allow the clips to contact each other or sparks and heat will occur.

blower motor testing power

While grasping the motor firmly attach the power and negative wiring clips to the wiring harness. If the unit only has a power lead attach the ground wire to the frame of the motor.

Once the circuit is completed the motor will or wont spin confirming the motor failure. These units typically fail intermittently. Intermittent power failure from the heater switch, fuse holder or climate control relay could also be a problem so even though the circuit might currently have power.

attach clips to blower motor

Blower Fan Works on High Only

This is a classic blower motor resistor problem which is common on older cars and trucks that use manual fan speed switch controls. This problem will also occur on climate control systems when the speed controller has burned out omitting full power to the blower motor. This can also occur with the ignition key off.

When the blower fan is switched onto the high speed setting the circuit uses a straight connection from positive and negative battery power. When the motor is switched onto the lower speeds the electrical power is routed through a series of resistors or a solid state assembly that drops the voltage down to 6 volts, 8 volts and then 10 volts (low, medium low, medium) which in turn makes the blower motor turn slower.

Step 1: Locate the Resistor

The location of this resistor is usually near the blower motor itself which cools the unit when it's in operation. Both of these parts are located in the heater plenum box either inside the vehicle on the passenger side or under the hood mounted near the firewall on the passenger side. 

blower motor resistor

Step 2: Test the Resistor

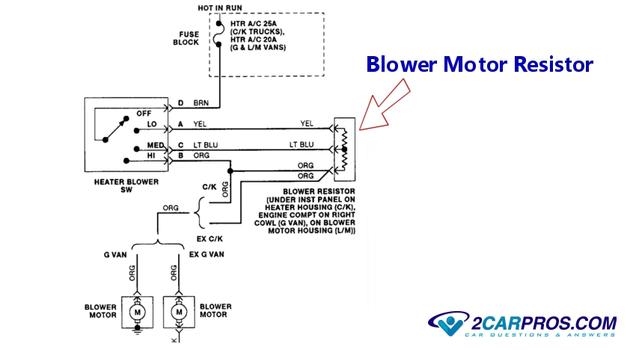
Use a grounded test light and locate the outgoing wire from the resistor to the blower motor (usually orange or red). While moving the switch to each fan speed test for power. If there is no power on any of the lower speeds the resistor has failed and needs replacement.

Below is a typical wiring diagram for the blower motor circuit which is basically the same for all vehicles utilizing this manual system.

blower motor resistor wiring

Step 3: Replace the Resistor

Turn the ignition key off and remove the fan resistor to inspect for burn marks which are an indication of failure. If an area shows signs of extreme heat (burned) it needs to be replaced. Also inspect the resistor connector for heat damage at the terminals and replace or repair it as needed by splicing in a new connector. Anytime you replace the resistor its a good idea to replace the blower motor as well to prevent premature failure due to high amperage draw.

Questions?

If you have any questions about blower motors please visit our forum. If you need car repair advice please ask our community of mechanics, we are happy to help.

Article published