Heater core plenum removal and replacement instructions please?

Tiny
SPNHRG
  • MEMBER
  • 2 POSTS
  • 2000 CHEVROLET SILVERADO
Does the whole dash need to come out and the refrigerant need to be drained from the a/c to remove and replace the heater core. I know all other coolants need to be drained, just never seen one where the a/c condenser had to be removed. Also if you have any pictures or diagrams on this I would really appreciate you sending them along with your answer.
Was this
answer
helpful?
Yes
No
Tuesday, May 25th, 2021 AT 11:37 AM (Merged)
Tiny
BLUELIGHTNIN6
  • MECHANIC
  • 16,542 POSTS


https://www.2carpros.com/forum/automotive_pictures/261618_Graphic_759.jpg


https://www.2carpros.com/forum/automotive_pictures/261618_Graphic2_107.jpg


https://www.2carpros.com/forum/automotive_pictures/261618_Graphic21_1.jpg

Was this
answer
helpful?
Yes
No
Tuesday, May 25th, 2021 AT 11:37 AM (Merged)
Tiny
AJKSSNOW
  • MEMBER
  • 2 POSTS
  • 2000 CHEVROLET SILVERADO
How do I remove the heater core? Step by step with photos if available I plan to get some hoses and try to back flush it to see if I can get anything out of it and if that helps but, I plan to keep this truck for a long time and do not want to be in a situation where I need heat and it goes out again. So I plan to replace the core and would like to know the proper sequence with any pics or diagrams that may help me. Thanks for your support, Allen
Was this
answer
helpful?
Yes
No
Tuesday, May 25th, 2021 AT 11:38 AM (Merged)
Tiny
IMPALASS
  • MECHANIC
  • 3,112 POSTS
Hi Allen,

You will need to discharge and recharge the air conditioner first here is a guide to help you do that.

https://www.2carpros.com/articles/re-charge-an-air-conditioner-system

Here is a guide to give you an idea of what you are in for when doing the job.

https://www.2carpros.com/articles/replace-heater-core

(There is a complete diagram set for replacing the heater core below)

Just for info are you running Prestone, green coolant? Only reason I ask is if you were running the Dex-Cool. . .. . ..it has a tendency to gum up in the heater/radiator cores. . ...

REMOVAL PROCEDURE


https://www.2carpros.com/forum/automotive_pictures/248015_1_110.jpg


Drain the engine coolant. Refer to Draining and Filling Cooling System in Engine Cooling.
Disconnect the heater hoses.
Disconnect the temperature control cable from the heater/ventilation module.
Disconnect the mode control cable from the heater/ventilation module.
Remove the instrument panel (IP) carrier (2).
Disconnect the electrical harnesses and the ground connections as necessary.


https://www.2carpros.com/forum/automotive_pictures/248015_2_59.gif


Remove the heater/ventilation module mounting nuts and the screws.
Remove the heater/ventilation module assembly. Set the module assembly on a bench.
Remove the heater core cover screws.


https://www.2carpros.com/forum/automotive_pictures/248015_3_39.gif


Remove the heater core cover.


https://www.2carpros.com/forum/automotive_pictures/248015_4_30.gif


Remove the heater core.

INSTALLATION PROCEDURE


https://www.2carpros.com/forum/automotive_pictures/248015_5_22.gif


Install the heater core.


https://www.2carpros.com/forum/automotive_pictures/248015_6_18.gif


Install the heater core cover. NOTE: Refer to Fastener Notice in Service Precautions.
Install heater core cover screws. Tighten Tighten the screws to 1.6 N.m (14 lb in) .
Install the heater/ventilation module assembly to the vehicle.
Install the heater/ventilation module mounting nuts and the screws. Tighten
Tighten the screws to 4 N.m (35 lb in) .
Tighten the nuts to 9 N.m (80 lb in) .


https://www.2carpros.com/forum/automotive_pictures/248015_7_8.gif


Connect the electrical harnesses and the ground connections as necessary.
Install the instrument panel carrier (2).
Connect the mode control cable to the heater/ventilation module.
Connect the temperature control cable to the heater/ventilation module.
Connect the heater hoses.
Refill the engine coolant. Refer to Draining and Filling Cooling System in Engine Cooling.

(Check out the heater core diagrams below)

Please let us know if you need anything else to get the problem fixed.

Cheers
Was this
answer
helpful?
Yes
No
+6
Tuesday, May 25th, 2021 AT 11:38 AM (Merged)
Tiny
AJKSSNOW
  • MEMBER
  • 2 POSTS
My fluid is the orange type. Once done I will let you know the results.

I do have a couple of additional questions on the data you sent me.

1) Is there more information as to what the numbers mean on the schematic? I see the drawing is showing these but nothing to reference them to.

2) If I am understanding this correctly it appears that I need to take the entire heater/A/C module out. If so, this information is very vauge and if possible is there a manual I can get that gives much more details? Is there a manual with pictures of the objects being removed? If so where may I purchase it at? I guess I am looking for a specific book on my truck and not a range of years that show general information.

Thanks again,
Allen
Was this
answer
helpful?
Yes
No
-1
Tuesday, May 25th, 2021 AT 11:38 AM (Merged)
Tiny
IMPALASS
  • MECHANIC
  • 3,112 POSTS
Allen

We see tons of problems with the orange, Dex-cool..plugs radiators also

The data .the numbers must be from another pic that the manual uses the only number the pic uses it #2

I have attached that for you. . .. . .the module removal / installation

More detailed well. there is a link I attach below and here Find a car repair manual for your car repair questions. That you can purchase a manual

You might see if that is what you want

If not detailed enough what you may be wanting is the actual service manual I have a 1995 Impala SS and purchased the entire service manuals for this price.but I have detail.

HEATER/VENT MODULE REPLACEMENT

REMOVAL PROCEDURE


https://www.2carpros.com/forum/automotive_pictures/248015_21_1.jpg


Drain the engine coolant. Refer to Draining and Filling Cooling System in Cooling System.
If equipped remove the auxiliary battery.
Disconnect the heater hoses.
Remove the accumulator.
Remove the instrument panel carrier.
Remove the HVAC module drain hose.
Disconnect the electrical harnesses and the ground connections as needed.


https://www.2carpros.com/forum/automotive_pictures/248015_22_1.jpg


Remove the mounting nuts and the screws from the HVAC module.
Remove the HVAC module assembly from the vehicle.

INSTALLATION PROCEDURE


https://www.2carpros.com/forum/automotive_pictures/248015_23_1.jpg


If you are replacing the HVAC module, transfer the components from the old HVAC module as necessary.
Install the HVAC module assembly to the vehicle. NOTE: Refer to Fastener Notice in Service Precautions.
Install the mounting nuts and the screws to the HVAC module.
Tighten

Tighten the mounting screws to 4 N.m (35 lb in) .
Tighten the mounting nuts to 9 N.m (80 lb in)


https://www.2carpros.com/forum/automotive_pictures/248015_24_2.jpg


Connect the electrical harnesses and the ground connections.
Install the HVAC module drain hose.
Install the instrument panel carrier.
Install the accumulator.
Connect the heater hoses.
Install the auxiliary battery.
Fill the cooling system. Refer to Draining and Filling Cooling System.
Was this
answer
helpful?
Yes
No
Tuesday, May 25th, 2021 AT 11:38 AM (Merged)
Tiny
LAURENW
  • MEMBER
  • 1 POST
  • 1999 CHEVROLET SILVERADO
  • 6.0L
  • V8
  • 4WD
  • AUTOMATIC
  • 300,000 MILES
Which bolts remove the HVAC box from the firewall of the 1999(.5) truck listed above 2500?
Was this
answer
helpful?
Yes
No
Tuesday, May 25th, 2021 AT 11:39 AM (Merged)
Tiny
ASEMASTER6371
  • MECHANIC
  • 52,797 POSTS
Good afternoon,

There are 6 bolts securing the case to the firewall. Check out the diagrams (Below). Please let us know if you need anything else to get the problem fixed.

Roy
Was this
answer
helpful?
Yes
No
Tuesday, May 25th, 2021 AT 11:39 AM (Merged)
Tiny
2CP-ARCHIVES
  • MEMBER
  • 4,540 POSTS
  • 1999 CHEVROLET SILVERADO
  • 190,000 MILES
Instructions on how to replace the heater
Was this
answer
helpful?
Yes
No
Tuesday, May 25th, 2021 AT 11:39 AM (Merged)
Tiny
HMAC300
  • MECHANIC
  • 48,601 POSTS
You have to pull the dash first then the heater core, this is really involved as the a/c charge has to be blown then recharged.

Removal & Installation

NOTE: Heater core may be accessible without removing A/C heater assembly. Drain engine coolant. Remove passenger's side door sill plate and kick panel. Pull
passenger's side of carpet back enough to access bolt at rear of heater case cover plate. If all heater case cover plate screws are accessible,  begin procedure
at step 6). If removing evaporator core,  start at beginning of procedure.

1. Disable air bag system. See AIR BAG SYSTEM SAFETY article in GENERAL INFORMATION. Remove glove box by squeezing sides together. Remove 2 instrument panel retaining bolts from glove box
opening. Remove center floor duct. Remove center support bolt.
2. On diesel models,  remove Powertrain Control Module (PCM) and mounting tray. On all models,  remove trim panels. Remove both kick panels. Remove blower motor cover and blower motor. See HEATER
SYSTEMS Â RWDÂ TRUCKSÂ &Â VANS Â EXCEPTÂ TRACKER.
3. Remove driver's lower instrument panel cover and knee bolster. Lower steering column. Remove instrument panel left and right pivot bolts located at lower corners of instrument panel. Remove 3 screws from
defroster vent near windshield. Disconnect any connectors and tilt instrument panel back far enough to access heater case. Remove coolant recovery reservoir from engine compartment.
4. Drain engine coolant. Disconnect heater hoses at core. Disconnect inlet and outlet lines at evaporator core,  and cap openings. Remove accumulator. Remove A/C heater assembly to firewall screws and bolts.
Remove A/C heater assembly from vehicle.
5. Remove 4 screws attaching evaporator case cover. Remove evaporator core from A/C heater assembly.
6. Remove 7 screws attaching heater case cover plate. Remove screws and bracket attaching heater core to A/C heater assembly. See Fig. 12. Remove heater core.
7. To install,  reverse removal procedure. Torque fasteners to specification. See TORQUE SPECIFICATIONS. Replace any seals. Lubricate new "O" rings with clean refrigerant oil prior to installation. Add one
ounce of clean refrigerant oil to evaporator. Evacuate,  charge,  and leak test A/C system. Fill cooling system. Start engine and check for leaks.
Was this
answer
helpful?
Yes
No
Tuesday, May 25th, 2021 AT 11:39 AM (Merged)
Tiny
THAZ6969
  • MEMBER
  • 1 POST
  • 1999 CHEVROLET SILVERADO
  • V8
  • 4WD
  • AUTOMATIC
  • 123,000 MILES
How do I replace a heater core in a 1999 Chevrolet Silverado?
Was this
answer
helpful?
Yes
No
Tuesday, May 25th, 2021 AT 11:39 AM (Merged)
Tiny
JACOBANDNICKOLAS
  • MECHANIC
  • 108,269 POSTS
Here is what I could find.

Disconnect the negative battery cable.
Drain the engine cooling system into a clean container for reuse.
Disconnect the heater hoses from the heater core.
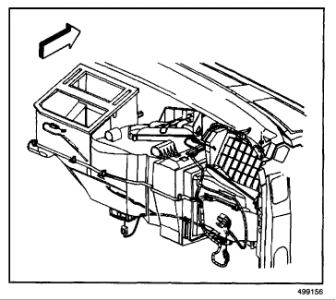
Remove the instrument panel storage compartment.
Disconnect the electrical connectors, as necessary, that may be in the way.
Remove the center floor air distribution duct.
Remove the hinge pillar trim kick panels.
Remove the blower motor cover screws and the cover.
Remove the blower motor screws and the blower motor.
Remove the steering wheel and the steering column (standard & tilt).
Remove the instrument panel fasteners and pull the instrument panel back far enough to gain access to the heater assembly.
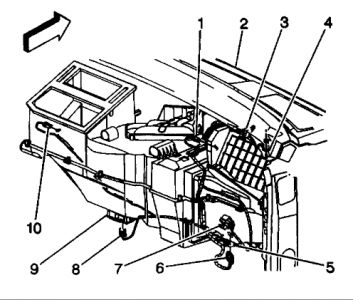
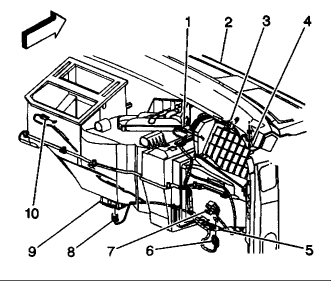
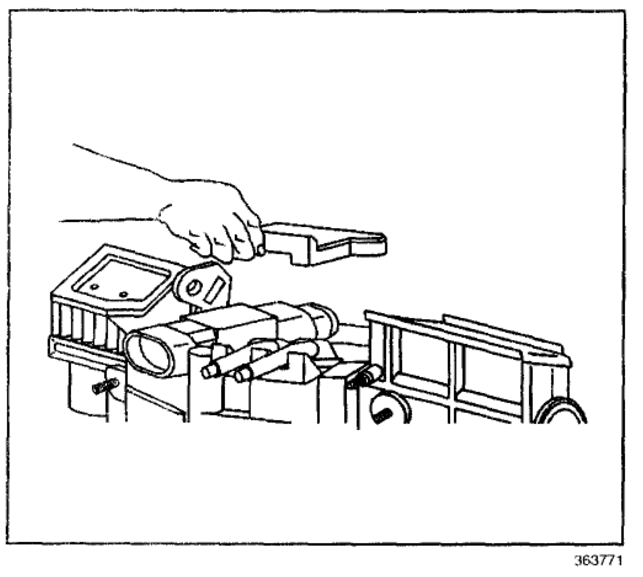
While holding the heater assembly against the firewall, remove the screw located on the interior side near the evaporator pipe, if equipped.
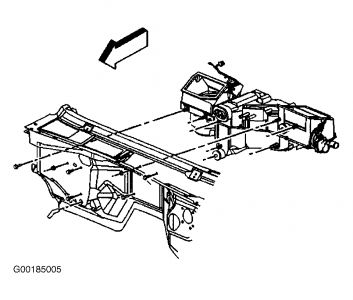
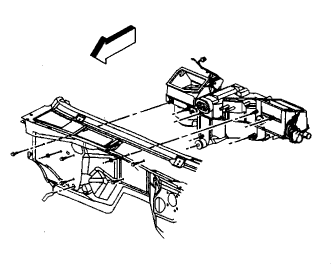
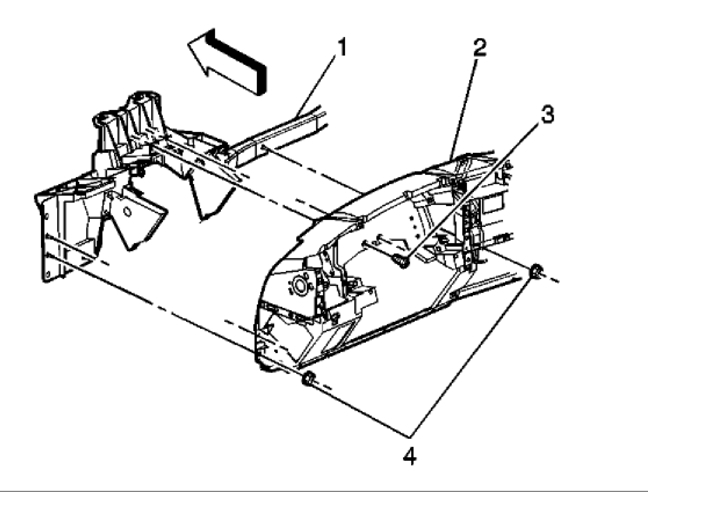
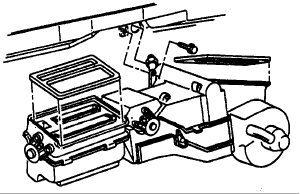
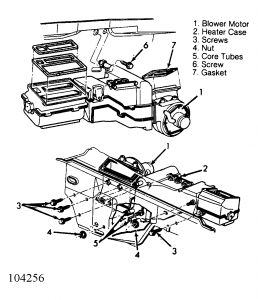
In the engine compartment, remove the 4 heater assembly-to-chassis screws and the 2 heater assembly-to-chassis nuts.
NOTE
Removal of the heater assembly may require the help of an assistant.

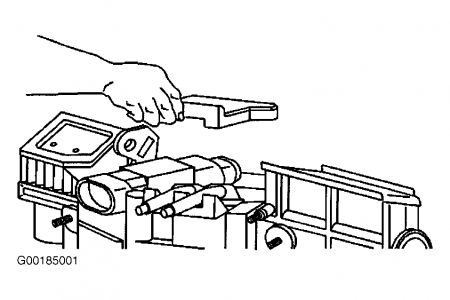
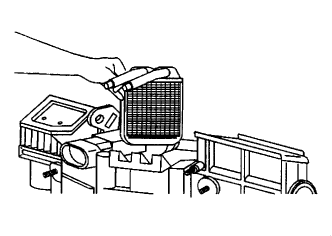
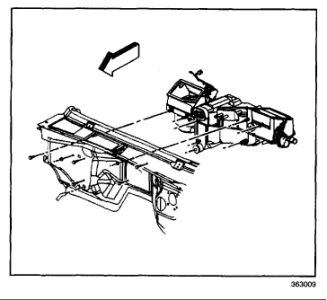
Remove the 7 heater cover-to-heater assembly screws and the cover.
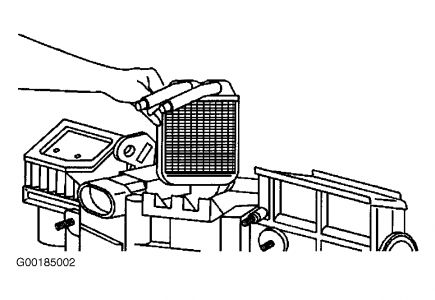
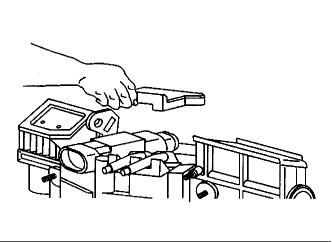
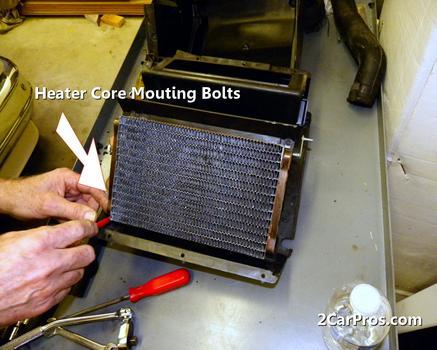
Remove the heater core from the heater assembly.

To install:

Install the heater core to the heater assembly.
Install the heater cover and the 7 heater cover-to-heater assembly screws.
NOTE
Installation of the heater assembly may require the help of an assistant.

In the engine compartment, install the 4 heater assembly-to-chassis screws and the 2 heater assembly-to-chassis nuts. Torque the screws to 17 inch lbs. (1.9 Nm) and the nuts to 25 inch lbs. (2.8 Nm).
While holding the heater assembly against the firewall, install the screw located on the interior side near the evaporator pipe, if equipped. Torque the screw to 97 inch lbs. (11 Nm).
Install the instrument panel and the instrument panel fasteners.
Install the steering column (standard & tilt) and the steering wheel.
Install the blower motor and the blower motor screws.
Install the blower motor the cover and the cover screws.
Install the hinge pillar trim kick panels.
Install the center floor air distribution duct.
Connect the electrical connectors that were disconnected.
Install the instrument panel storage compartment.
Disconnect the heater hoses to the heater core.
Refill the engine cooling system.
Connect the negative battery cable.
Run the engine to normal operating temperatures; then, check the climate control operation and check for leaks.
Was this
answer
helpful?
Yes
No
Tuesday, May 25th, 2021 AT 11:39 AM (Merged)
Tiny
LEO72
  • MEMBER
  • 1 POST
  • 1995 CHEVROLET SILVERADO
  • V8
  • 2WD
  • AUTOMATIC
  • 150,000 MILES
What steps do I need to follow in order to replace the heater core
Was this
answer
helpful?
Yes
No
Tuesday, May 25th, 2021 AT 11:39 AM (Merged)
Tiny
RASMATAZ
  • MECHANIC
  • 75,992 POSTS
Remove or Disconnect

Engine coolant.
Instrument panel storage compartment.
Electrical connectors, as necessary.
Center floor air distribution duct.
Hinge pillar trim panels.
Blower motor cover.
Blower motor.
Steering column.
Roll instrument panel back.
Coolant recovery reservoir.
Heater hoses. Refer to "Heater Hoses" in this section.
Screw on interior side of cowl, near the evaporator pipe (if equipped) while holding heater case to the cowl.
Four screws on the engine side of the cowl holding the heater case to the cowl.
Two nuts on the engine side of the cowl holding the heater case to the cowl.
Heater case.
It may be necessary to have an assistant when removing heater case.
Heater cover.
Remove seven screws that hold cover to the heater case.

Heater core from retainer.
Was this
answer
helpful?
Yes
No
Tuesday, May 25th, 2021 AT 11:39 AM (Merged)
Tiny
SKINNTA
  • MEMBER
  • 1 POST
  • 1988 CHEVROLET SILVERADO
How do you repair a heater core
Was this
answer
helpful?
Yes
No
Tuesday, May 25th, 2021 AT 11:40 AM (Merged)
Tiny
MERLIN2021
  • MECHANIC
  • 17,250 POSTS
Removal & Installation

1.Disconnect negative battery cable. Drain cooling system. Remove coolant recovery tank. Disconnect heater hoses at core. Disconnect cable from antenna mast. Remove glove box.

2.Disconnect wiring harness from ECM. Remove ECM and bracket. Remove right kick pad. Remove right lower dash panel bolt and nut.

3.Remove heater case mounting bolts. Remove heater case from vehicle, raising instrument panel for additional room. Remove heater core from heater case. To install, reverse removal procedure. See Fig. 2 .
Fig. 2:
Heater System Components


https://www.2carpros.com/forum/automotive_pictures/62217_heat_1.jpg

Was this
answer
helpful?
Yes
No
Tuesday, May 25th, 2021 AT 11:40 AM (Merged)

Please login or register to post a reply.

Sponsored links