Poor acceleration

Tiny
PATRICIA SUTTON
  • MEMBER
  • 2004 SATURN VUE
  • 4 CYL
  • 2WD
  • MANUAL
  • 350,000 MILES
After idling in neutral the other day, my mom shifted into first, but the car wouldn't accelerate. She stalled out. She restarted the car without a problem, but when she gave it gas, it wouldn't go. We switched seats and the car started without a problem and moved along without incident.

Two days later, she experienced the same problem - not able to accelerate from first. She turned off the car, restarted it, and the problem was solved.

Today, I experienced for myself poor acceleration into third. Then the reduced engine power light. And on the freeway the car would not accelerate at all at one point - turned the car off and restarted and the problem went away.

I'm handy and am thinking this might be a sensor issue or filter issue, but I'm not overly familiar with cars. If it's a sensor or easy part change out, I'm confident I can do it myself.
Thursday, May 16th, 2019 AT 7:34 AM

24 Replies

Tiny
JACOBANDNICKOLAS
  • MECHANIC
  • 108,269 POSTS
Welcome to 2CarPros.

Honestly, there could be a few different things causing this, so I have to start at the beginning. First, is the check engine light staying on when the engine is running? If it is, you need to scan the computer for diagnostic trouble codes. Here is a quick video that shows how it is done:

https://youtu.be/YV3TRZwer8k

I realize most people don't own a scanner, but often times, nationally recognized parts stores will scan it for you or lend or rent you the scanner. I need to know what codes are stored, otherwise, it becomes a guessing game. Things such as a weak fuel pump, bad crankshaft position sensor, plugged catalytic converter and so on can all cause power loss.

Since it seems to fix itself after being turned off, like you, I suspect a sensor, but we need to know the codes before we starting replacing parts.

Let me know if you can get that for me, or if you have other questions.

Take care,
Joe
Was this
answer
helpful?
Yes
No
+1
Thursday, May 16th, 2019 AT 6:38 PM
Tiny
PATRICIA SUTTON
  • MEMBER
  • 14 POSTS
I will get that done while I'm out tomorrow! Thanks!
Was this
answer
helpful?
Yes
No
Thursday, May 16th, 2019 AT 9:47 PM
Tiny
PATRICIA SUTTON
  • MEMBER
  • 14 POSTS
Good morning! The test concluded that I need a fuel tank pressure sensor.
Was this
answer
helpful?
Yes
No
Friday, May 17th, 2019 AT 5:50 AM
Tiny
JACOBANDNICKOLAS
  • MECHANIC
  • 108,269 POSTS
Welcome back:

I'm glad you found the problem. That is good news. Now for the not so good news. You need to remove the fuel tank to access the sensor. I will provide directions for removal and replacement of the tank. Then, I will add the directions for replacement of the sensor. The attached pictures will correlate with the directions. Note, the directions for tank removal indicate tank replacement. However, the same directions apply. You just don't need to replace the tank.

__________________________________

FUEL TANK REPLACEMENT

REMOVAL PROCEDURE
1. Ensure that the fuel level in the tank is less than 1/4 full. If necessary, drain the fuel tank to at least this level. Refer to Fuel Tank Draining Procedure.

CAUTION: Do not allow smoking or the use of open flames in the area where work on the fuel or EVAP system is taking place. Anytime work is being done on the fuel system, disconnect the negative battery cable, except for those tests where battery voltage is required.

2. Relieve the fuel system pressure. Refer to Fuel Pressure Relief Procedure.

CAUTION: Fuel supply lines will remain pressurized for long periods of time after the engine is shutdown. This pressure must be relieved before servicing the fuel system.

3. Disconnect the negative battery cable.
4. Raise and support the vehicle. Refer to Vehicle Lifting.

Pic 1

5. Remove the rubber exhaust hangers on order to allow the exhaust system to drop slightly.
6. Remove the propeller shaft, if equipped.

Pic 2

7. Disconnect the EVAP canister vent and fresh air hoses:

NOTE: Clean all fuel pipe connections and surrounding areas before disconnecting the fuel pipes to avoid contamination of the fuel system.

1. Grasping both sides of the quick-connect fitting, twist the female connector 1/4 turn in each direction in order to loosen dirt within the quick-connect fitting.
2. Blow any dirt out of the quick-connect fitting using compressed air.
3. Squeeze the plastic retainer release tabs.
4. Pull the connection apart.
5. Inspect both ends of the quick-connect fitting for dirt and burrs.

Pic 3

8. Remove the fuel filler pipe, EVAP vent hose, and fresh air hose from the fuel tank.

9. Disconnect the chassis fuel supply line from the tank.

CAUTION: Whenever fuel lines are removed, catch fuel in an approved container. Container opening must be a minimum of 300 mm (12 in) diameter to adequately catch the fluid.

10. Disconnect the electrical connectors:
1. Fuel tank electrical connectors
2. EVAP solenoid electrical connector

pic 4

11. Support the fuel tank.

NOTE: Do not bend the fuel tank straps. Bending the fuel tank straps may cause damage to the straps.

IMPORTANT: Do not disassemble the RDM. It is not necessary to touch the RDM for fuel tank removal.

12. Remove the fuel tank strap bolts and fuel tank straps.
13. Lower the fuel tank from the underbody of the vehicle.
14. Remove the fuel tank module assemblies.

INSTALLATION PROCEDURE
1. Install the fuel tank module assemblies.

Pic 5

2. Install the fuel tank heat shield and fuel tank assembly into the vehicle.
3. Install the fuel tank straps and tighten the bolts.

NOTE: Refer to Fastener Notice in Service Precautions.

Tighten the fuel tank strap-to-body bolts to 25 N.M (18 lb ft).

Pic 6

4. Install the fuel filler pipe, EVAP vent, and fresh air hoses to the fuel tank.
5. Connect the electrical connectors:
1. Fuel tank electrical connector
2. EVAP solenoid electrical connectors
6. Tighten the hose clamp on the filler pipe-to-fuel tank connecting hose.

Tighten the fuel fill neck-to-fuel tank clamp to 5 N.M (44 lb in).

Pic 7

7. Connect the EVAP canister vent and fresh air hoses to the fuel tank hoses.
8. If equipped, install the propeller shaft.

Pic 8

9. Install the rubber exhaust hangers.
10. Lower the vehicle.
11. Fill the fuel tank with gasoline.
12. Connect the negative battery cable.
13. Prime the fuel system:
1. Cycle the ignition ON for 5 seconds and then OFF for 10 seconds.
2. Repeat the previous step twice.
3. Crank the engine until it starts. The maximum starter motor cranking time is 20 seconds.
4. If the engine does not start, repeat steps 13.1-13.3.

_____________________________________________

Sensor replacement.

FUEL TANK PRESSURE SENSOR REPLACEMENT

REMOVAL PROCEDURE
1. Remove the fuel tank.

Pic 9

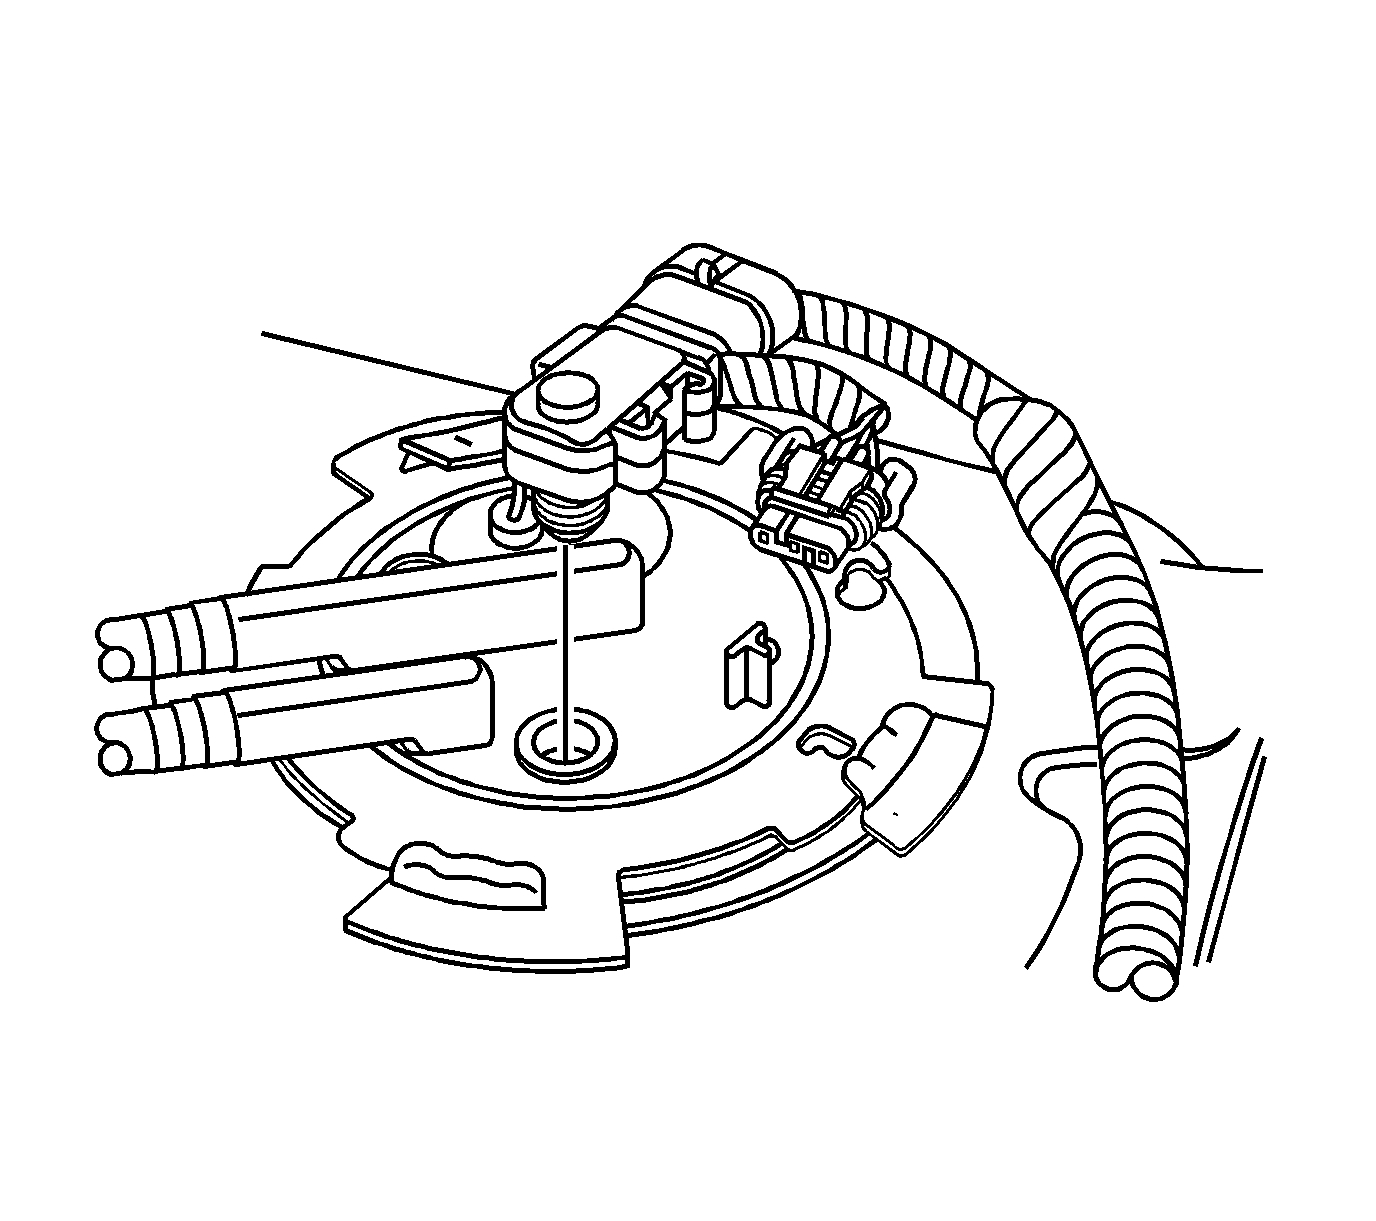
2. Disconnect the fuel pump module harness electrical connector from the fuel tank pressure sensor.

Pic 10

3. Position 2 flat-bladed screwdrivers, one on each side of the sensor, near the vacuum port.
4. Carefully use the screwdrivers to lift and release the sensor from the fuel pump module.

INSTALLATION PROCEDURE

pic 11

1. Install the fuel tank pressure sensor to the fuel pump module assembly. Ensure that the sensor grommet is fully seated to the pump module.

Pic 12

2. Connect the pump module electrical connector to the fuel tank pressure sensor.
3. Install the fuel tank.

_______________________________________________

I hope this helps. Let me know if you have questions and if you get it going.

Take care,
Joe
Was this
answer
helpful?
Yes
No
+1
Friday, May 17th, 2019 AT 7:32 PM
Tiny
PATRICIA SUTTON
  • MEMBER
  • 14 POSTS
Hi! So, since we last talked, I've changed out the fuel tank pressure sensor, the accelerator pedal sensor, the accelerator pedal sensor connector, the throttle body unit (and gasket) and gas cap. The code that remains: P2122 Throttle/Pedal Position Sensor/Switch "D" Circuit Low Input. Any thoughts?
Was this
answer
helpful?
Yes
No
Saturday, July 27th, 2019 AT 4:22 PM
Tiny
JACOBANDNICKOLAS
  • MECHANIC
  • 108,269 POSTS
Welcome back:

Okay, you should have a 5 volt reference in pin A and F of the connector. Pin A is the suspect for the issue, but check both. For the code to set, the ECM detects that the APP sensor 1 voltage is less than 0.13 volts. What I need you to do is check the connector pin to confirm there is 5 volts. If there isn't, either you have a broken or damaged wire, or there could even be corrosion causing a poor connection at the ECM.

If you look at pictures 1 and 2, they show the connector and what each pin is for. Focus on pin F for voltage.

Check that and let me know what you find. Also, if you find 5 volts, then confirm that pins C and D for continuity to ground.

Let me know what you find.

Joe
Was this
answer
helpful?
Yes
No
Saturday, July 27th, 2019 AT 6:08 PM
Tiny
PATRICIA SUTTON
  • MEMBER
  • 14 POSTS
Oh! Duh. I forgot to tell the remaining symptoms: so, I get up and go in first and second, it still struggles in third. I struggle to get up to 4 RPM'S in fourth. Fifth rests at 3 RPM'S. And without admitting to anything, it won't go past 80 mph and that's with the help of gravity (hills). It's a real struggle to get up to speed!

Note: 2004 Saturn Vue 2WD 2.2 Liter 4 cylinder manual has 353,000 miles, 140,000 on the engine, and the spark plugs are about 40,000 miles old.
Was this
answer
helpful?
Yes
No
Saturday, July 27th, 2019 AT 6:08 PM
Tiny
JACOBANDNICKOLAS
  • MECHANIC
  • 108,269 POSTS
Welcome back:

I just replied to the other post. Take a look through what I listed. It is specific to the code you provided.

Let me know.

Joe
Was this
answer
helpful?
Yes
No
Saturday, July 27th, 2019 AT 6:11 PM
Tiny
PATRICIA SUTTON
  • MEMBER
  • 14 POSTS
Uh, yeah. How do I check that? Is it a visual inspection? Do I use a tool? (And can it be rented?)
Was this
answer
helpful?
Yes
No
Saturday, July 27th, 2019 AT 6:23 PM
Tiny
PATRICIA SUTTON
  • MEMBER
  • 14 POSTS
And thank you!
Was this
answer
helpful?
Yes
No
Saturday, July 27th, 2019 AT 6:24 PM
Tiny
JACOBANDNICKOLAS
  • MECHANIC
  • 108,269 POSTS
Welcome back:

You need either a multi meter or volt meter. Here are links explaining how to use one and how to check wiring:

https://www.2carpros.com/articles/how-to-use-a-voltmeter

https://www.2carpros.com/articles/how-to-check-wiring

Let me know if that helps or if you have other questions.

And, you are very welcome. LOL

Take care of yourself.

Joe
Was this
answer
helpful?
Yes
No
Saturday, July 27th, 2019 AT 8:44 PM
Tiny
PATRICIA SUTTON
  • MEMBER
  • 14 POSTS
Okay, thanks!
Was this
answer
helpful?
Yes
No
Sunday, July 28th, 2019 AT 6:46 AM
Tiny
JACOBANDNICKOLAS
  • MECHANIC
  • 108,269 POSTS
You are very welcome. Let me know what you find or if you need help.

Take care,
Joe
Was this
answer
helpful?
Yes
No
Monday, July 29th, 2019 AT 6:33 PM
Tiny
PATRICIA SUTTON
  • MEMBER
  • 14 POSTS
I will!
Was this
answer
helpful?
Yes
No
Monday, July 29th, 2019 AT 6:55 PM
Tiny
PATRICIA SUTTON
  • MEMBER
  • 14 POSTS
Does it mean anything that my vehicle has a very noticeable difference in power with the AC/fan off?
Was this
answer
helpful?
Yes
No
Tuesday, August 6th, 2019 AT 6:07 PM
Tiny
JACOBANDNICKOLAS
  • MECHANIC
  • 108,269 POSTS
Welcome back:

I'm sorry that I didn't get back sooner. Yes, if the power loss is all the time, that is my first suspect.

Let me know if I can help.

Joe
Was this
answer
helpful?
Yes
No
Thursday, August 8th, 2019 AT 7:43 PM
Tiny
PATRICIA SUTTON
  • MEMBER
  • 14 POSTS
Interesting, because I do have way better acceleration with the fan off. And if on, no A/C. (Took notice while driving on a cool day with the window down.)

I also recall a couple weeks ago my serpentine belt? Squealing on start up (does not happen and hasn't happened sense.)

Your thoughts? You suspect what?

And no worries about the late response! Thanks for responding!
Was this
answer
helpful?
Yes
No
Thursday, August 8th, 2019 AT 8:05 PM
Tiny
JACOBANDNICKOLAS
  • MECHANIC
  • 108,269 POSTS
Welcome back:

Interesting. If you have a lot more power with the AC off and the belt was making noise, I question if the AC compressor is starting to lock up. That would cause a power loss and a belt squeal.

In my last post, I was questioning if the catalytic converter was plugging, but now based on what you said, I don't. It sounds like the compressor is going bad and adding a very heavy load on the engine.

Let me know if that makes sense.

Joe
Was this
answer
helpful?
Yes
No
Thursday, August 8th, 2019 AT 8:21 PM
Tiny
PATRICIA SUTTON
  • MEMBER
  • 14 POSTS
That does make sense. Would it explain the P2122 code? Low circuirt. And why changing the pedal, pedal connector, throttle body unit hasn't fixed anything.
Was this
answer
helpful?
Yes
No
Thursday, August 8th, 2019 AT 9:29 PM
Tiny
JACOBANDNICKOLAS
  • MECHANIC
  • 108,269 POSTS
Welcome back:

It doesn't explain that code. Have you deleted the code and seen if it has come back?

Joe
Was this
answer
helpful?
Yes
No
Thursday, August 8th, 2019 AT 10:19 PM

Please login or register to post a reply.

Sponsored links