Welcome to 2CarPros.
Based on your description, my first suspect is a bad crankshaft position sensor. When they start going bad, heat can cause them to fail. Take a look through these two links. The first describes the function of the sensor and the second common symptoms.
https://www.2carpros.com/articles/how-a-crank-shaft-angle-sensor-works
https://www.2carpros.com/articles/symptoms-of-a-bad-crankshaft-sensor
Now, when I question one, the easiest thing to do is see if ignition spark is lost when the vehicle won't start. Or, if you have a live data scanner, you can check to see if there is an RPM signal or not. No signal indicates the sensor is most likely bad.
Here is a link that shows how to check for spark:
https://www.2carpros.com/articles/how-to-test-an-ignition-system
Here are a few links that you may find helpful when checking for spark:
https://www.2carpros.com/articles/how-to-use-a-test-light-circuit-tester
https://www.2carpros.com/articles/how-to-use-a-voltmeter
https://www.2carpros.com/articles/how-to-check-wiring
_______________________________________________
Now, if you find there is no spark, the first thing to try is the sensor. Here is a link that shows in general how one is replaced:
https://www.2carpros.com/articles/crankshaft-angle-sensor-replacement
Now, the crankshaft sensor on your vehicle is different than most. It is located in the distributor. I attached a pic of the component and circled it. Here are the directions specific to your vehicle for replacement. The remaining pictures correlate with the directions.
______________________________________________
REMOVAL AND INSTALLATION
REMOVAL
CAUTION: Do not attempt to replace distributor stator without an arbor press or damage to distributor drive gear and distributor may occur.
NOTE: The distributor drive gear cannot be replaced separately. If the distributor drive gear is worn or damaged, replace the complete distributor.
1. Remove distributor cap and position the distributor cap and ignition wires away from the work area.
2. Disconnect distributor from engine control sensor wiring.
3. Remove distributor rotor.
4. Remove distributor from engine.
5. Remove two screws holding Ignition Control Module (ICM) to the distributor housing.
6. Remove ignition control module, clean distributor housing and ignition control module, keeping surfaces free of dirt.
NOTE: Hold distributor drive gear to loosen armature retaining screws, do not hold armature.
7. Remove two screws holding armature and remove armature.
8. To ease assembly, mark distributor shaft collar and distributor drive gear with a felt tip pen.
9. Remove and discard pin in distributor drive gear and in distributor shaft collar.
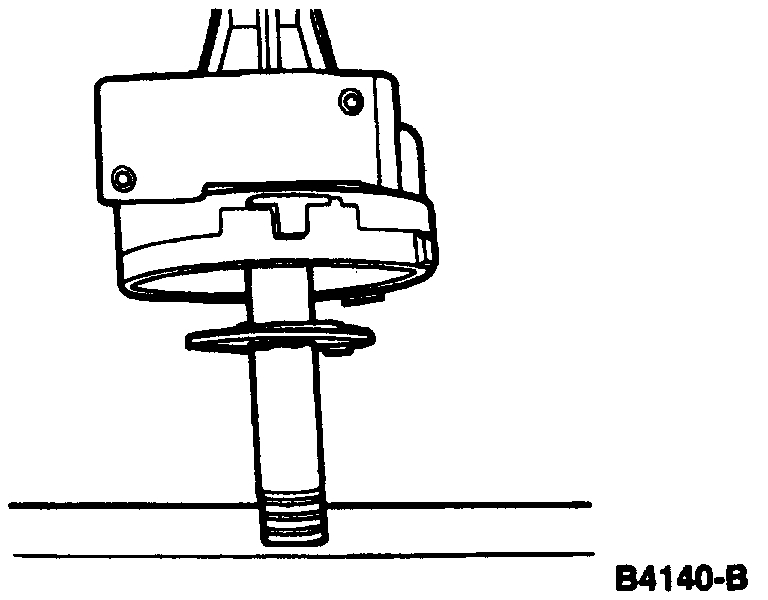
Pressing Distributor Gear Off Shaft
pic 2
10. Invert distributor and support in Axle Bearing/Seal Plate T75L-1165-B. Press distributor drive gear off using Bearing Puller Attachment D79L-4621-A or equivalent.
11. Remove the distributor shaft collar.
12. Deburr and polish distributor shaft with emery paper. The distributor shaft should slide freely on the distributor housing.
13. Remove distributor shaft from distributor housing.
14. Remove screw retaining octane rod and remove octane rod.
15. Remove stator retaining screw or screws (depending upon application).
16. Remove distributor stator from top of distributor housing.
17. Inspect distributor housing bushing for wear or signs of excess heat concentration. Replace complete distributor if damaged.
18. Inspect distributor housing for cracks and wear. Replace complete distributor if damaged.
19. Inspect distributor housing O-ring for cuts or damage and replace O-ring if necessary.
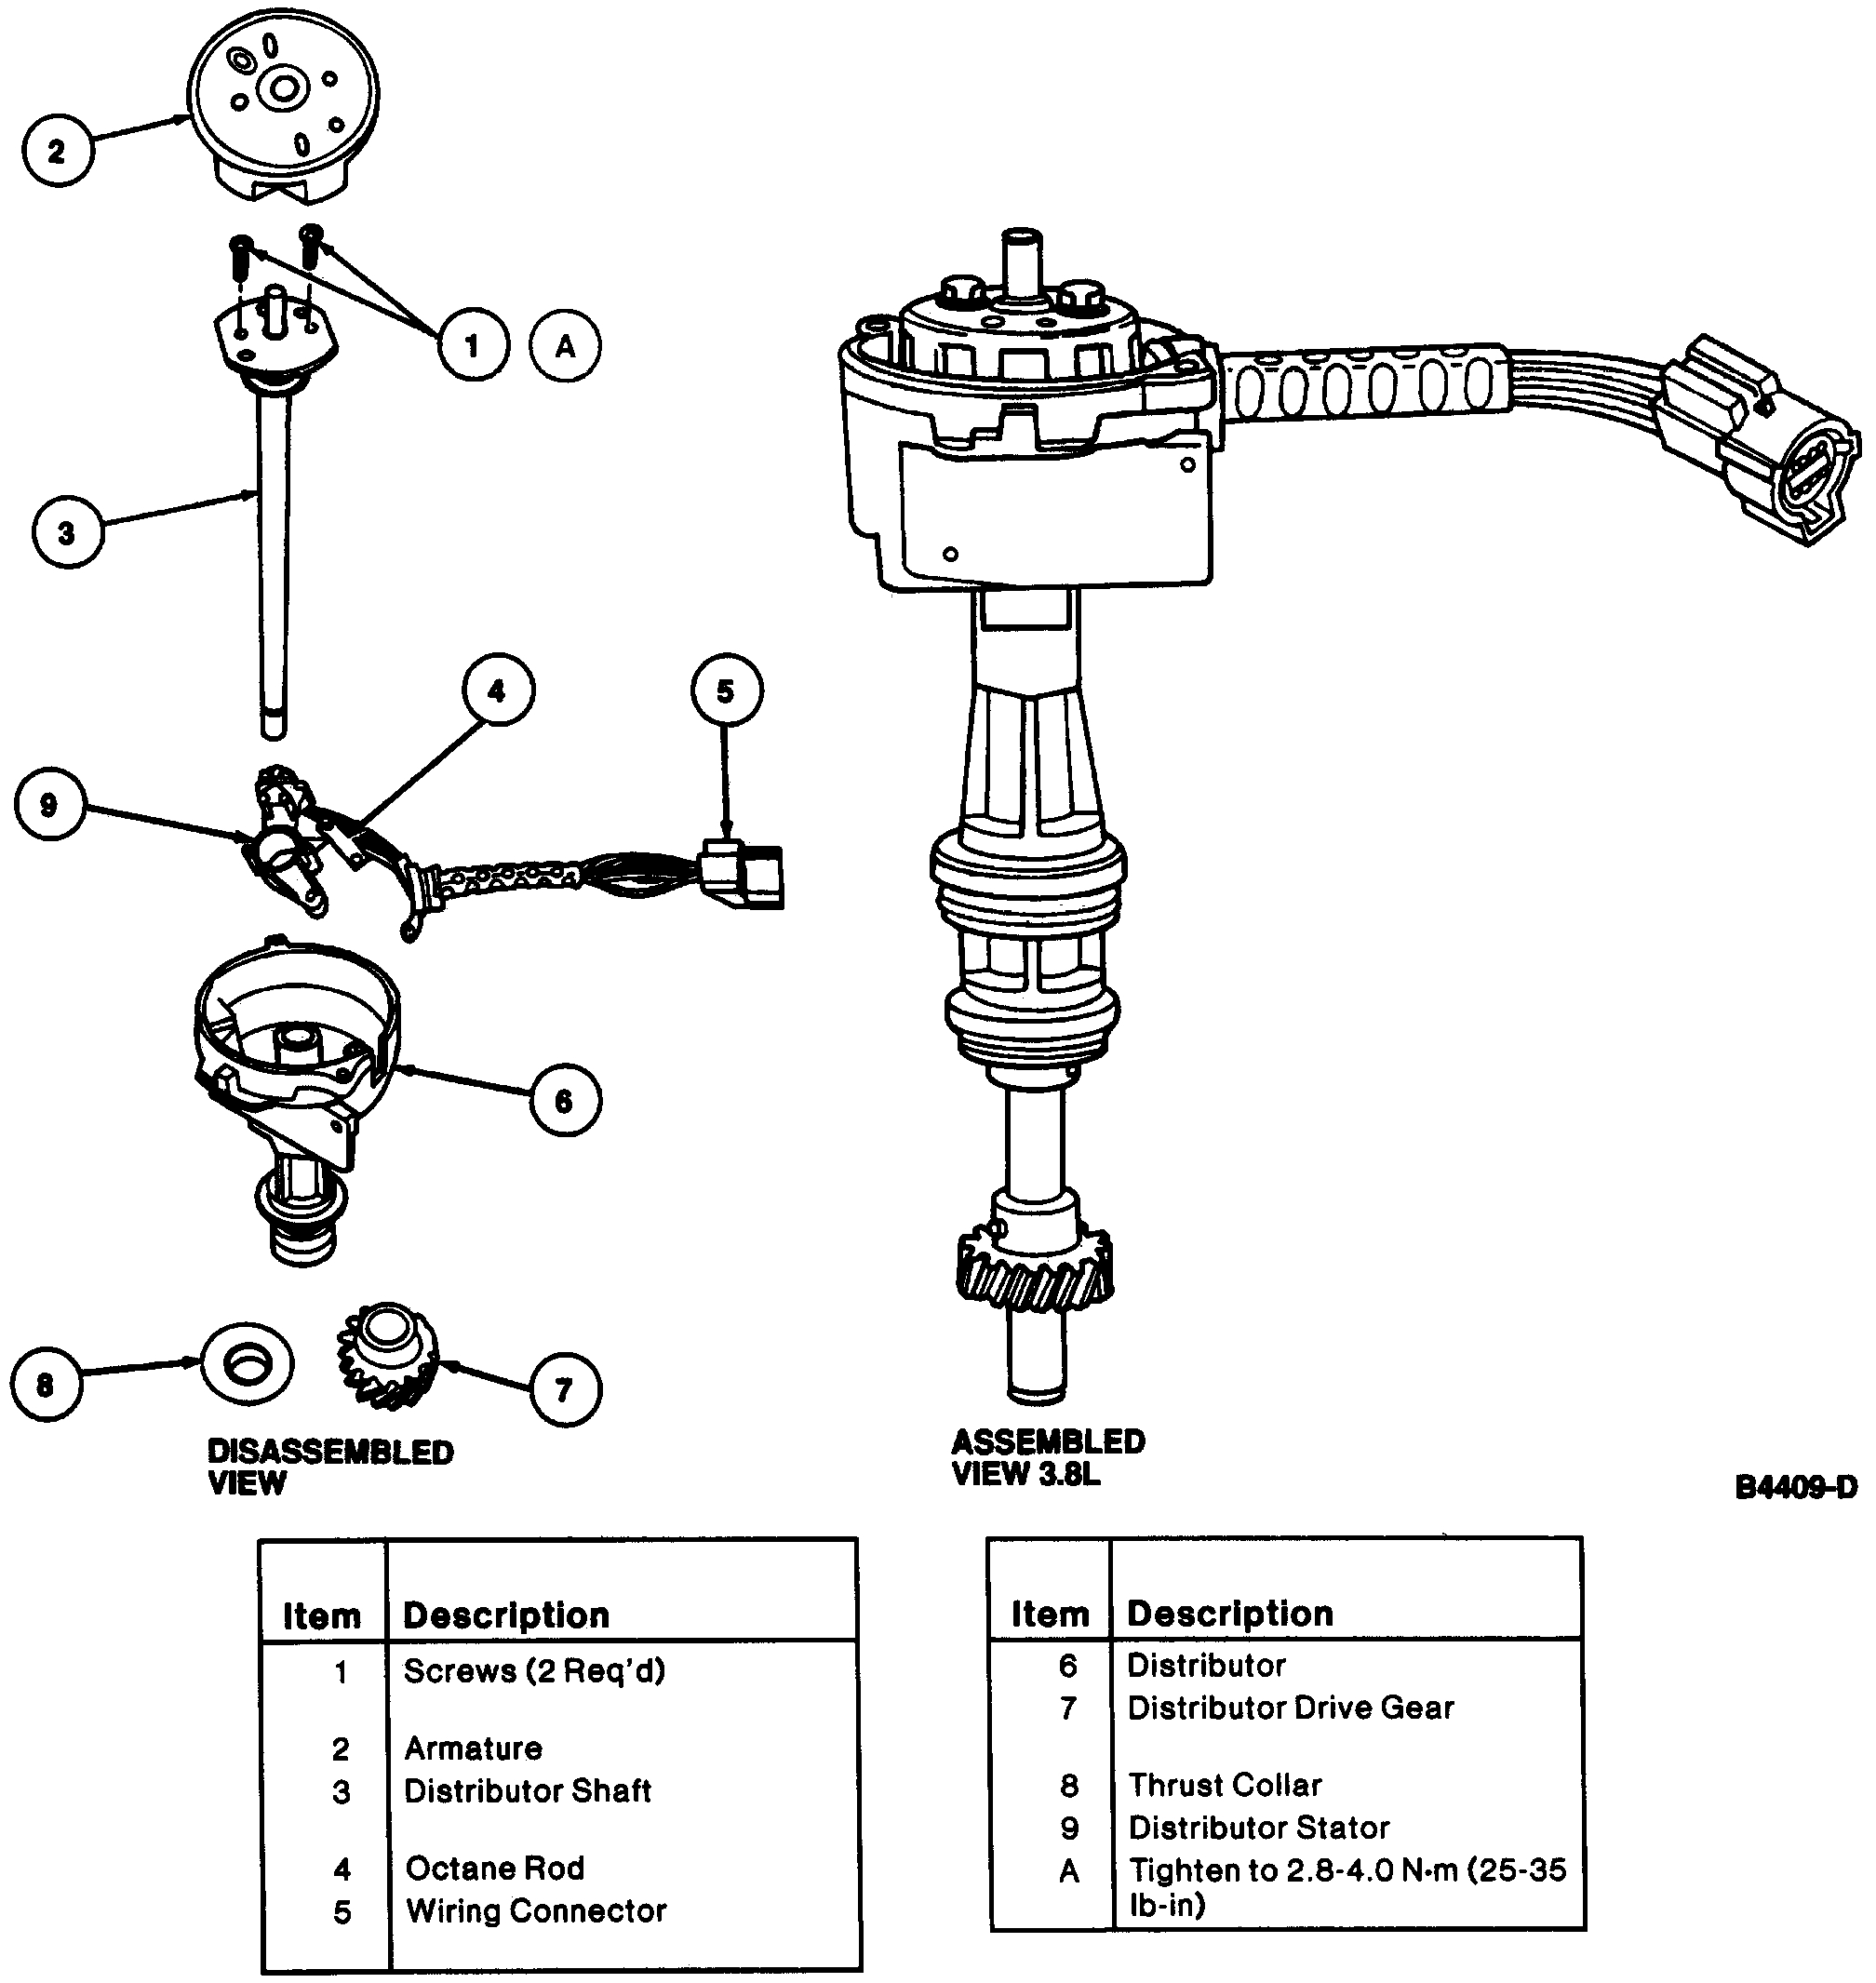
Distributor Assembly, (3.8L Shown, 3.0L Similar)
pic 3
INSTALLATION
1. Place distributor stator over bushing and install into seat.
2. Place stator connector in position. Tab in notch on distributor housing and fastening eyelets aligned with screw holes.
3. Position stator wires away from moving parts.
4. Install two stator retaining screw or screws (depending upon application) and tighten to 1.7-4.0 Nm (15-35 in lb).
5. Install octane rod and retaining screw. Tighten to 1.7-4.0 Nm (15-35 in lb).
6. Apply a light coat of Motor Oil XO-10W30-QSP or -DSP or equivalent meeting Ford specification ESE-M2C153-E to distributor shaft below armature.
7. Insert distributor shaft through distributor housing bushing.
8. Install distributor shaft collar and roll pin.
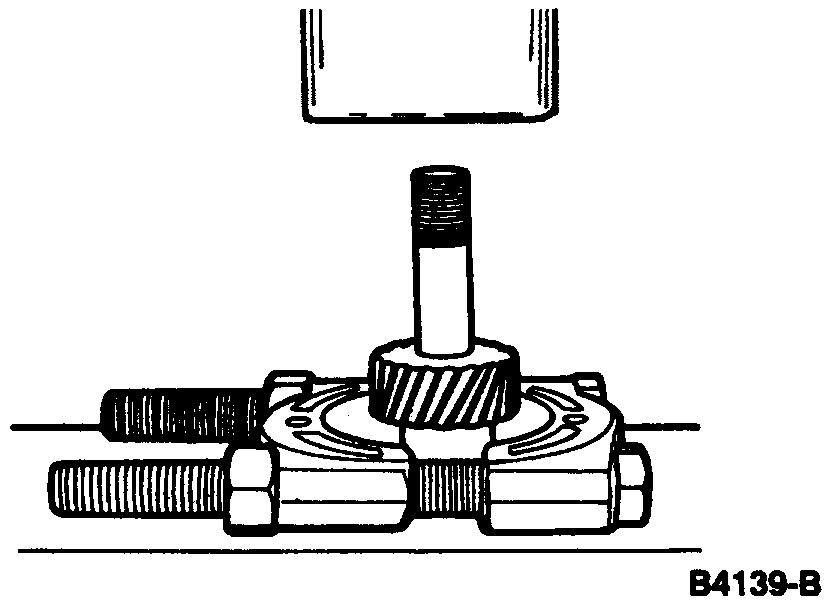
1/2 Inch Socket Over Distributor Shaft
pic 4
9. Place a 1/2 inch deep-well socket over distributor shaft on armature end of distributor shaft. Invert and place on arbor press plate.
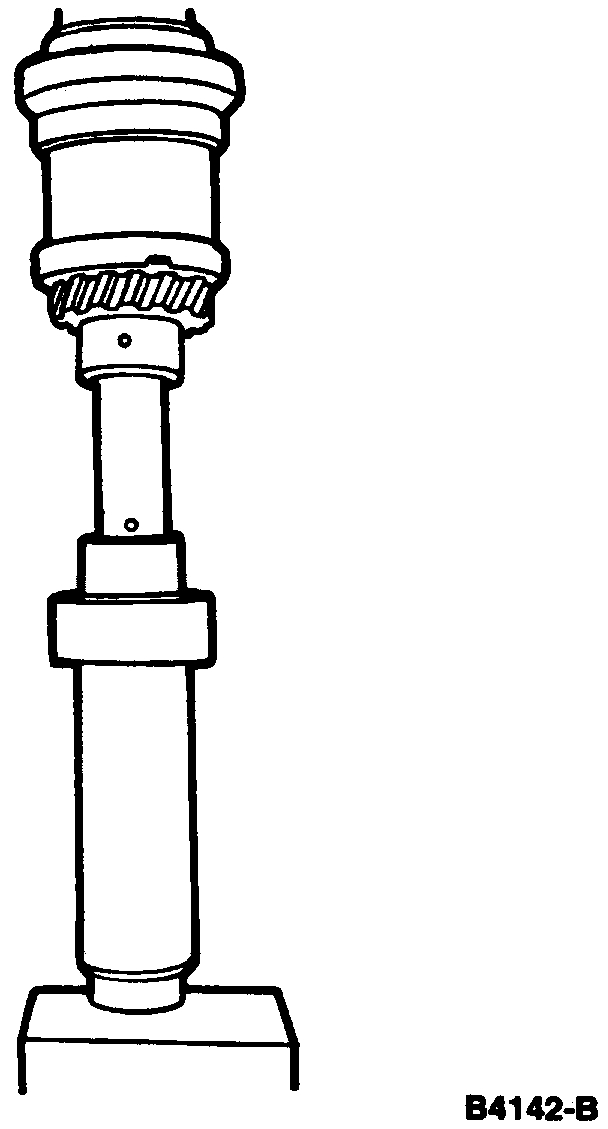
Line Up Mark On Collar And Drive Gear
pic 5
10. Place the distributor drive gear on distributor shaft end. Line up the mark on collar and distributor drive gear.
CAUTION: If distributor drive gear is damaged, serious engine damage may result. Replace complete distributor.
NOTE: The hole in the distributor shaft and distributor drive gear must be lined up as accurately as possible to ensure ease of roll pin insertion.
11. Place a 5/8 inch deep well socket over the distributor shaft and distributor drive gear and press distributor drive gear to align with original retainer pin hole.
NOTE: If the distributor drive gear hole does not align, the distributor drive gear must be removed and repressed on. A drift punch will not align the holes.
12. Insert new roll pin through distributor drive gear and distributor shaft. Pin should have proper extrusion.
13. Replace armature on distributor shaft and tighten screws to 2.8-4.0 Nm (25-35 in lb).
NOTE: If the armature contacts the distributor stator, replace the entire distributor.
14. Check distributor for free movement over full rotation of distributor shaft.
15. Clean back of ignition control module and distributor mounting face free of all dirt.
16. Apply Silicone Dielectric Compound D7AZ-19A331-A, (Motorcraft WA-10) or equivalent meeting Ford specification ESE-M1C171-A to the back of the ignition control module and spread thinly and evenly.
17. Turn distributor housing upside down so that the stator connector is in full view. Insert ignition control module and align the three ignition control module pins into the stator connector. Fully seat the ignition control module into the connector and against distributor housing.
18. Install two ignition control module retaining screws and tighten to 1.7-4.0 Nm (15-35 in lb).
19. Install the distributor into engine.
20. Connect distributor to engine control sensor wiring.
21. Replace distributor rotor.
22. Replace distributor cap and tighten screws to 2.0-2.6 Nm (18-25 in lb).
23. Set initial engine ignition timing.
__________________________________
I hope this helps. Let me know if you have other questions.
Take care,
Joe
Images (Click to make bigger)
SPONSORED LINKS
Monday, June 10th, 2019 AT 10:05 PM