Cannot change air from floor to vent or defrost why?

Tiny
PATRICK CALLAGHAN JR.
  • MEMBER
  • 9 POSTS
My original post. I attached a diagram. It shows the actuator.
Was this
answer
helpful?
Yes
No
Monday, March 22nd, 2021 AT 2:21 PM (Merged)
Tiny
ASEMASTER6371
  • MECHANIC
  • 52,797 POSTS
You need to check for voltage to the actuator. Did you do that?

Roy
Was this
answer
helpful?
Yes
No
Monday, March 22nd, 2021 AT 2:21 PM (Merged)
Tiny
PATRICK CALLAGHAN JR.
  • MEMBER
  • 9 POSTS
Yes. This is what I did:

There are 5 wires to the mode actuator:
Term 5 is Brown, that's battery.
Term 6 is Yellow, that's your control. You are looking for varying voltage with DVM when you change modes(bi, vent, heater, etc.).
Term 7 is Yellow, that's your ground.
Term 9 is Yellow/blk tracer, that is your position data.
Term 10 is Grey, that is a 5 volts ref signal for the position sensor.
Basically test 7 for ground, 5 for BAT voltage, and 6 for varying voltage.
Was this
answer
helpful?
Yes
No
+1
Monday, March 22nd, 2021 AT 2:21 PM (Merged)
Tiny
ASEMASTER6371
  • MECHANIC
  • 52,797 POSTS
Okay, does the motor work out of the car and hooked to the car harness?

Roy
Was this
answer
helpful?
Yes
No
Monday, March 22nd, 2021 AT 2:21 PM (Merged)
Tiny
PATRICK CALLAGHAN JR.
  • MEMBER
  • 9 POSTS
Yes.
Was this
answer
helpful?
Yes
No
Monday, March 22nd, 2021 AT 2:21 PM (Merged)
Tiny
ASEMASTER6371
  • MECHANIC
  • 52,797 POSTS
Okay, then the issue is in the case. The door is not moving.

Can you move the door manually without the actuator hooked up?

Roy
Was this
answer
helpful?
Yes
No
Monday, March 22nd, 2021 AT 2:21 PM (Merged)
Tiny
PATRICK CALLAGHAN JR.
  • MEMBER
  • 9 POSTS
I could not using just my finger tips. I slid the actuator on and used it as leverage and the doors moved.
Was this
answer
helpful?
Yes
No
Monday, March 22nd, 2021 AT 2:22 PM (Merged)
Tiny
ASEMASTER6371
  • MECHANIC
  • 52,797 POSTS
Then replace the actuator. It may be failing under load.

Roy
Was this
answer
helpful?
Yes
No
Monday, March 22nd, 2021 AT 2:22 PM (Merged)
Tiny
PATRICK CALLAGHAN JR.
  • MEMBER
  • 9 POSTS
Will do. I want to thank you for sticking with me. This has been frustrating. I will update when I get the part.
Was this
answer
helpful?
Yes
No
Monday, March 22nd, 2021 AT 2:22 PM (Merged)
Tiny
ASEMASTER6371
  • MECHANIC
  • 52,797 POSTS
You are welcome.

Always glad to help.

Roy
Was this
answer
helpful?
Yes
No
Monday, March 22nd, 2021 AT 2:22 PM (Merged)
Tiny
DAMEIDASH34
  • MEMBER
  • 1 POST
  • 2001 BUICK LESABRE
  • 200,000 MILES
I need to know how to locate and fix my mode door actuator.
Was this
answer
helpful?
Yes
No
Monday, March 22nd, 2021 AT 2:22 PM (Merged)
Tiny
JACOBANDNICKOLAS
  • MECHANIC
  • 108,200 POSTS
Welcome to 2CarPros.

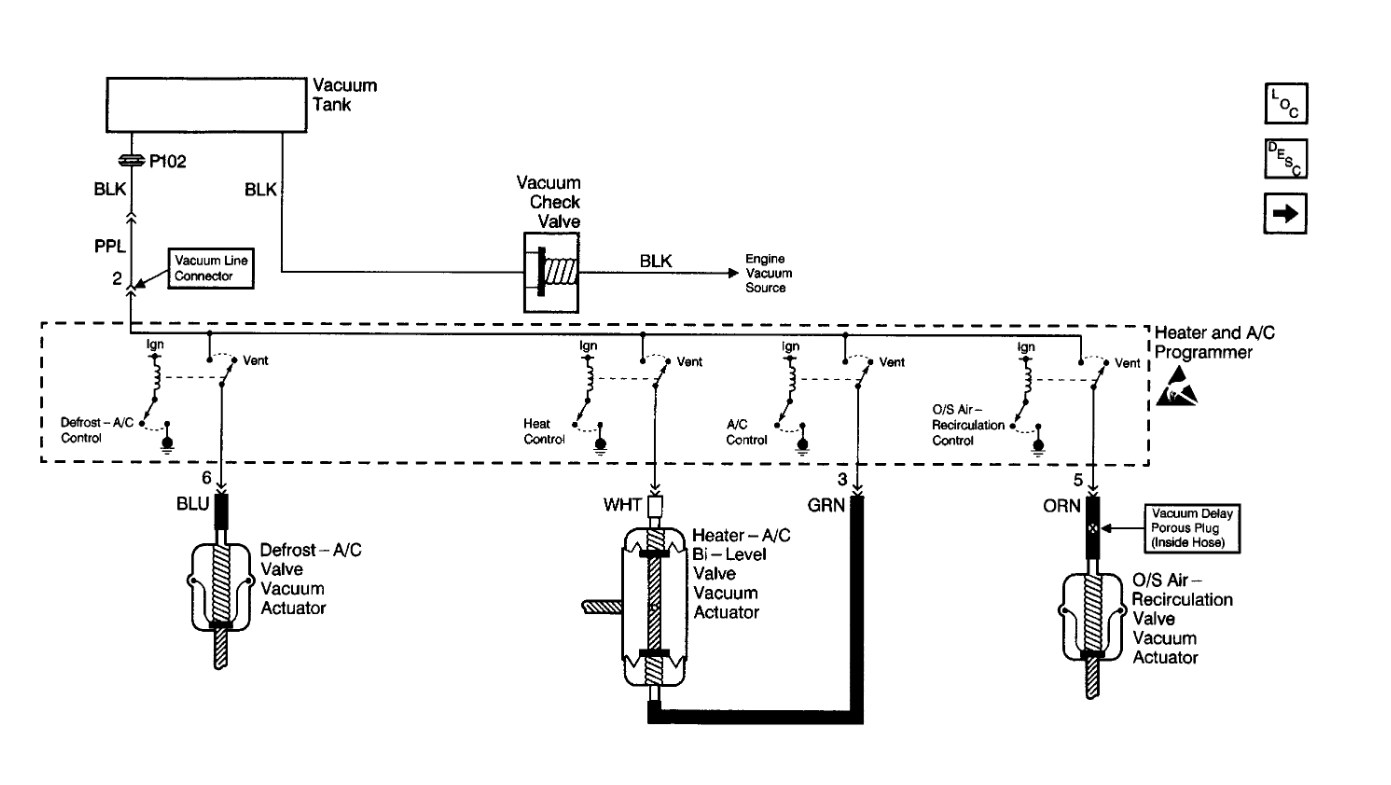
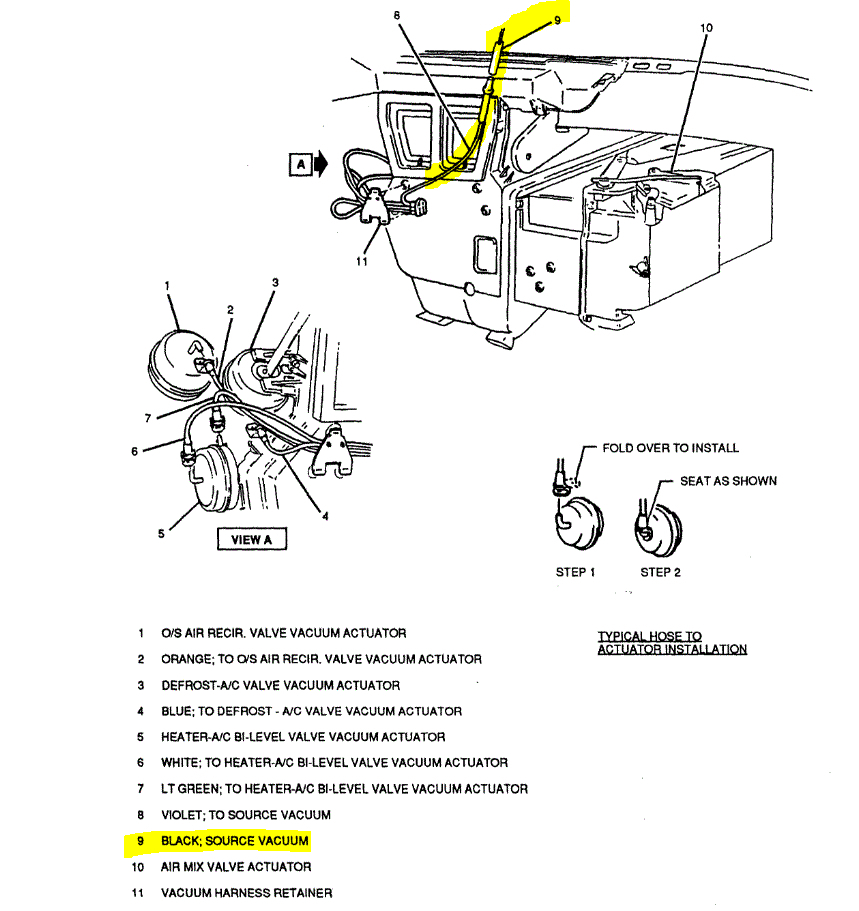
Here are the directions for replacement. It is located under the dash on the HVAC box. See the pictures for location.

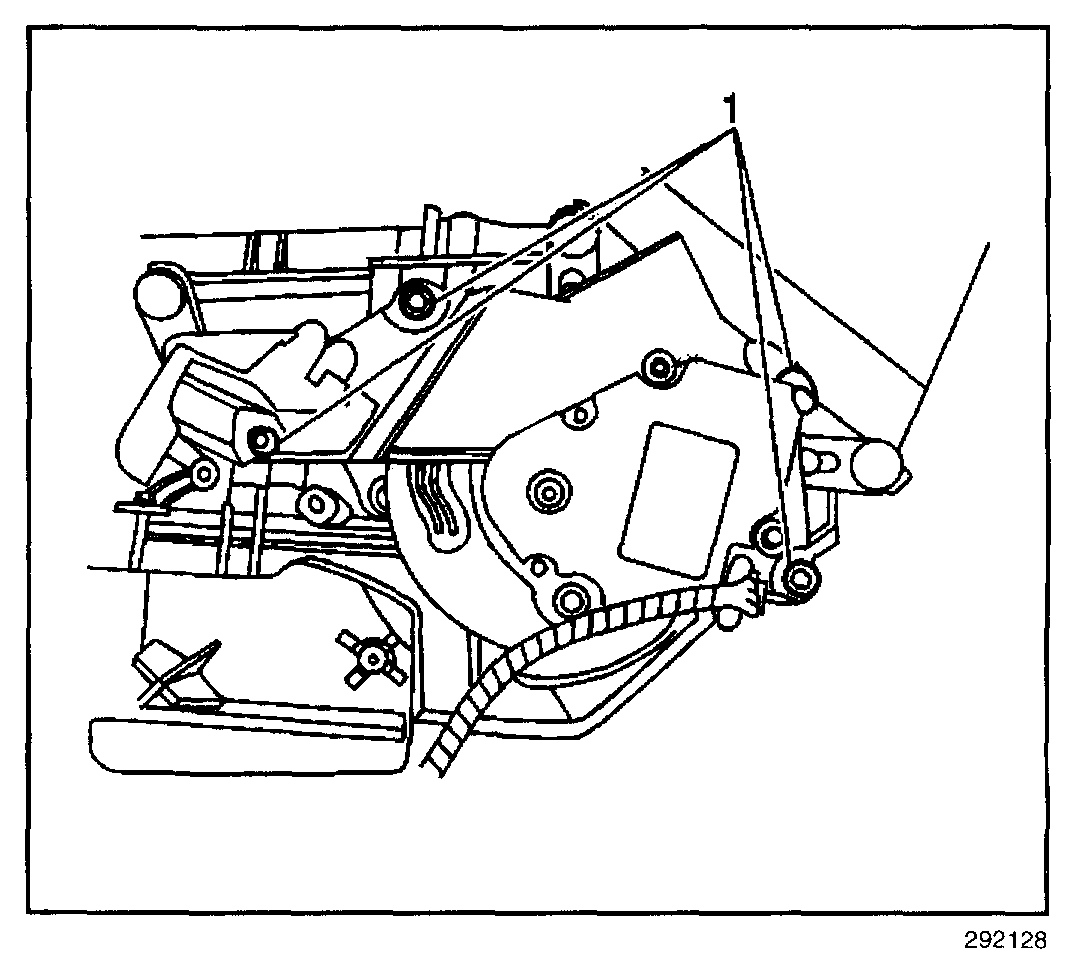
MODE ACTUATOR REPLACEMENT
REMOVAL PROCEDURE

1. Remove the air temperature actuator.
2. Disconnect the electrical connector from the mode actuator.
3. Remove the mode actuator retaining screws (1).
4. Remove the mode actuator.

INSTALLATION PROCEDURE

1. Align the mode valve levers with the cam slots.
2. Install the mode actuator.

NOTE: Refer to Fastener Notice in Service Precautions.

3. Install the mode actuator retaining screws (1).

Tighten
Tighten the fasteners to 1.4 N.M (12 lb in).

4. Connect the electrical connector to the mode actuator.
5. Install the air temperature actuator.
6. Recalibrate the actuator. Refer to Re-Calibrating Actuators.

Here are the re-calibration directions.

RE-Calibrating Actuators - HVAC System - Manual
Vehicle Heating and Air Conditioning Testing and Inspection Programming and Relearning RE-Calibrating Actuators - HVAC System - Manual
RE-CALIBRATING ACTUATORS - HVAC SYSTEM - MANUAL
CALIBRATION PROCEDURE
Use the following steps to perform the calibration update.
1. Turn OFF the ignition.
2. Remove the battery positive voltage circuit fuse of the HVAC Control Module.

IMPORTANT: The module memory will not clear if the battery positive voltage circuit fuse is installed in less than 60 seconds.

3. Wait 60 seconds.
4. Install the fuse.

Check out the diagrams (Below). Please let us know what happens.
Was this
answer
helpful?
Yes
No
Monday, March 22nd, 2021 AT 2:22 PM (Merged)
Tiny
BUICK CAT
  • MEMBER
  • 1 POST
  • 1999 BUICK LESABRE
  • 6 CYL
  • FWD
  • AUTOMATIC
  • 185,000 MILES
The A/C no longer blows out of the dash vents, but will blow out of the defrost and floor vents. It just recently began this, but prior to this, it would blow out of the defrost and floor vents, then you could hear a "flap" close and the air would then blow out of the vents. Do you have any DIY suggestions?
Was this
answer
helpful?
Yes
No
Monday, March 22nd, 2021 AT 2:22 PM (Merged)
Tiny
WRENCHTECH
  • MECHANIC
  • 20,757 POSTS
The mode selection is done through a series of air doors that are operated by vacuum. When there is either a partial or total loss of vacuum, the system will default to either defrost or on some vehicles, heat. Acceleration can also have an effect on the doors for the same reason.

This guide will help

https://www.2carpros.com/articles/air-vents-stay-in-the-defrost-position

Look under the hood for a small black plastic hose coming through the firewall. Follow it to the vacuum source looking for any breaks, cracks or leaks. Also follow any other lines that branch off because they may go to a vacuum reservoir (storage tank) and a leak there will cause the same problem. Using a vacuum gauge to determine if you have full vacuum at any given point is the best way to find it. You can cut into the line anywhere and splice it back together with a piece of vacuum hose. Find the broken line, you found your problem.

Check out the diagrams (Below). Please let us know what happens.
Was this
answer
helpful?
Yes
No
+12
Monday, March 22nd, 2021 AT 2:22 PM (Merged)
Tiny
CAJONES
  • MEMBER
  • 1 POST
  • 1996 BUICK LESABRE
Air won't vent from dash(only floor or defrost now). Replaced the controll unit in dash and guessing its a vacuum issue as can manually force the door to vent from dash. Question is where does the vacuum line originate. Want to check that end to see if still connected or worn. Any other ideas to check? Thanks CJ
Was this
answer
helpful?
Yes
No
Monday, March 22nd, 2021 AT 2:22 PM (Merged)
Tiny
SEANLABROWN
  • MEMBER
  • 1 POST
My future wife has a 1995 Buick LeSabre that had the same problem. There are two parts to our solution. The majority of vacume lines were all rotted so I replaced them. In addition there is a three way check valve that had a hole melted in it. This check valve is connected directly to a vacume line leading into the fire wall from the engine compartment to the inside of the vehicle. Once all the vacume leaks were fixed everything else worked great. Also there is a vacume can on the drivers side all the way to the front near the head lamp of the vehicle. Be sure to check those hoses as well. The entire job cost less than $10 and I was able to find all the necessary parts at Napa. :D Good luck!
Was this
answer
helpful?
Yes
No
+2
Monday, March 22nd, 2021 AT 2:22 PM (Merged)
Tiny
LIPS81
  • MEMBER
  • 2 POSTS
  • 1995 BUICK LESABRE
  • 3.8L
  • V6
  • 2WD
  • AUTOMATIC
  • 125,000 MILES
The heater/air conditioning is stuck on defrost and floor and will not change to any of the other vents.
Was this
answer
helpful?
Yes
No
Monday, March 22nd, 2021 AT 2:22 PM (Merged)
Tiny
JACOBANDNICKOLAS
  • MECHANIC
  • 108,200 POSTS
Hi,

The air flow direction is controlled by what is called a mode door actuator. On this vehicle, all actuators are controlled via engine vacuum which is supplied from the engine intake manifold via a black vacuum hose. That hose connects to the rear of the controller in the vehicle where you select air flow directions. Then, based on your selection, engine vacuum is routed to the different mode actuators which open and close different doors allowing the air to flow in different directions.

_________________________________________

Since you are getting air at both the defroster and the floor, I suspect the vacuum supply from the engine has failed. In most cases, the plastic hoses crack and break off. So what I need you to do is simply craw under the dash and locate the vacuum hoses to the rear of the controller. Locate the black supply hose and remove it from the controller. Start the engine and place your finger over the end of that black hose to see if there is a vacuum (suction) available from the engine. If there isn't, we will need to locate where the break has happened.

__________________________________________

I attached a pic below that shows the different actuators and vacuum lines. Note that I highlighted the supply. That is the black one you need to check.

Let me know what you find or if you have other questions.

Take care,
Joe
Was this
answer
helpful?
Yes
No
Monday, March 22nd, 2021 AT 2:22 PM (Merged)
Tiny
LIPS81
  • MEMBER
  • 2 POSTS
Would it have anything to do with the plastic cover over the blower motor?
Was this
answer
helpful?
Yes
No
Monday, March 22nd, 2021 AT 2:22 PM (Merged)
Tiny
JACOBANDNICKOLAS
  • MECHANIC
  • 108,200 POSTS
I'm not sure what you are referring to. Are there vacuum hoses going to something at that point? If it is just a cover, I don't see how that would cause this.

Joe
Was this
answer
helpful?
Yes
No
Monday, March 22nd, 2021 AT 2:22 PM (Merged)

Please login or register to post a reply.

Sponsored links